Some users, when working on a computer, are faced with the need to increase the size of the “C” drive in order to add additional space to the system partition. By default, the Windows operating system, various system components, third-party programs are installed on the “C:” drive, and user data is stored here.
In other cases, on the contrary, you need to shrink the “C:” drive if it is large in order to attach more space to the “D:” drive (or a drive under another letter) used to store data.
There are several ways to solve this problem. In this guide, we will look at instructions on how to change the disk size in the Windows operating system, redistributing space between partitions using the system's built-in tool, increasing or decreasing the size of the system disk.
First, let's look at some reasons why this operation may be needed.
How to change the disk size in Windows when installing the operating system
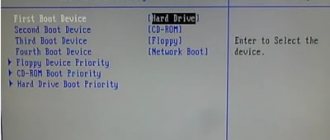
Boot your computer from bootable media: flash drive or DVD. In Windows Setup, go to the window that asks where you want to install the operating system.
The user may have several options for further actions:
- If you are reinstalling Windows and there is another disk or several disks with data on the computer, you need to first remember or write down on paper the size of the disk (disk partition) in order not to delete this partition when selecting or creating a disk for installing the system.
- If your PC has one disk, remove all partitions remaining from the previous operating system: select the partition, and then click the “Delete” button. Unallocated space will appear in place of the deleted partitions.
- If your computer has not yet installed an operating system, all available space on your hard drive is unallocated space.
Using the example in this article, there are no other data disks on the PC; all partitions have been deleted. If your computer has a data partition, don't touch that drive.
First you need to create a system partition to install the Windows operating system:
- Highlight "Unallocated space on disk 0".
- Click on the “Create” button.
- In the "Size" field, select the appropriate space size for the system disk. Leave some space to create another partition that will serve as data storage.
- Click on the "Apply" button.
- A warning window will inform you that additional partitions will be created for system files. Click on the "OK" button.
- In the next window, new partitions will appear on your hard drive: “Primary”, on which you can install Windows, and the “System Reserved” partition. This option is displayed when using the old BIOS.
On modern computers with UEFI there will be not one, but several small system partitions that do not need to be touched after they are created.
- Select the unallocated space, click on the “Create” button and then “Apply” to create a new partition.
- Select the newly created partition, click on the “Format” button to format the partition into the NTFS file system. This operation can be performed after installing the system from the Disk Management snap-in.
- The necessary partitions on the hard disk have been created. Select the partition selected for installing Windows (in the image - “Disk 0 Partition 2”), click on the “Next” button to continue installing the operating system on the computer.
Free up space on Windows 10
The newest version of "windows", unlike the old ones, can itself free up space on the system partition. So, if the unallocated space on the disk is 0 MB, the system will issue a warning and offer a deep cleaning of unnecessary files.
Unlike the "seven", on Win10 you no longer need to think about how to increase the size of the C drive, because after installation and deployment the system takes up to 8 GB on the 32-bit version and 12 GB on the 64-bit version. Naturally, after installing updates, disk space gradually disappears, but not as quickly and aggressively as on Win7. In addition, automatic cleaning effectively removes old versions of the OS and simply unnecessary temporary files.
If you are interested in the question of how to increase space on the C drive under the Windows 10 operating system, then in this version you can expand the volume in a similar way to older OSes. In the system search menu, enter “panel”, the system will find “Control Panel”, then the algorithm is similar to that described above.
You can manually find space on drive C by following the path: “Start” - “Settings” - “System” - “Storage” - “Disk C” - “Temporary files”. Here you can delete the Temporary Files folder, as well as the Trash and Downloads.
How to increase the size of the C drive using Windows
The Windows operating system has a built-in disk management tool that allows you to create, expand, shrink, or delete a volume (disk).
We need to increase the system partition using the “D:” drive.
Keep in mind that you will not be able to enlarge the “C:” partition by borrowing additional space from the drive under the letter “D” without deleting information from the “D:” drive. After compressing the disk, there will be unallocated space located after the “D” drive, which cannot be attached to the “C” drive due to the fact that the volume expansion function will not work. This feature works if the space you are attaching is immediately behind the drive (“to the right”) to which you want to add additional disk space.
Follow these steps:
- Press the "Win" + "R" keys.
- In the “Run” window, enter the command: “diskmgmt.msc” (without quotes), click on the “OK” button.
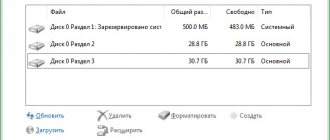
- The Disk Management window will open, displaying all the disks connected to the computer.
On this computer, the hard drive has two hidden system partitions (they do not have letters) and two logical drives: “C:” and “D:”.
In order to increase space on drive “C”, we need to perform the following steps:
- Remove drive "D".
- Attach a certain amount of unallocated space to drive “C”.
- Create drive "D" from unallocated space.
Before deleting the partition, copy the necessary data from the “D:” drive to a flash drive or external hard drive.
- Right-click on the “D:” drive, select “Delete Volume...” in the context menu, agree to delete the partition.
- An area with unallocated space will appear on your computer's hard drive.
- Right-click on the “C:” drive, and in the menu that opens, select “Extend Volume...”.
- In the "Extend Volume Wizard" window, click the "Next" button.
- In the "Select Disks" window, select the required size of the attached space, displayed in MB (megabytes).
- In the “Completing the Extend Volume Wizard” window, click the “Finish” button.
In Disk Management, you will see that the size of the C: drive has increased. There is unallocated space left on the hard drive, from which we will create a new logical drive.
Now we need to re-create the “D:” drive:
- Right-click on the area of the hard drive that says “Unallocated” and select “Create a simple volume...”.
- In the “Create a Simple Volume Wizard” window, click the “Next” button.
- In the “Specify volume size” window, click on the “Next” button. By default, the system tool will select all available unallocated space.
- In the “Format Partition” window, agree to the selected settings. You can set the volume label (the name under which the disk will be displayed in Explorer): “New Volume” (default), “Local Disk” or any other name. In this example, I chose the label "vellisa".
- In the Completing the New Volume Wizard window, click Finish.
As a result, a new drive “D:” appeared on the computer.
Programs to expand C drive
AOMEI Partition Assistant
The first program to expand C drive is called AOMEI Partition Assistant. There are several reasons why it is in this place. The most important thing is that this software is free for non-commercial use, which means that after installation you will not experience any difficulties and will be able to interact with all functions. The second reason is a wide range of tools that will help the user perform almost any action with hard drive partitions. AOMEI Partition Assistant has even more operations available to perform than the standard operating system disk management tool, so it will become a full replacement for it.
As for directly expanding hard drive partitions, including system C, in AOMEI Partition Assistant this can be done in just a few simple steps. You separate a certain number of gigabytes from another partition if needed, then specify the required volume and expand it with free space. All that remains is to apply the changes so that the program automatically completes all tasks in one processing. We recommend that you familiarize yourself with the rest of the functionality of AOMEI Partition Assistant in a separate review on our website using the link below.
MiniTool Partition Wizard
MiniTool Partition Wizard is slightly similar in functionality and appearance to its previous representative, but it also has its own features that distinguish this software from other similar solutions. To begin with, this tool is also free for non-commercial use, and in this version you will not find any restrictions related to options. It implements everything that an ordinary person might need when working with partitions of a built-in or external drive; accordingly, expanding or shrinking a volume can also be done here without any particular difficulties.
Among the features present in MiniTool Partition Wizard, I would like to note a module that tests the disk surface for errors. This will help you determine if there are any problems reading the content. It is located in the section with other operations, where you will find tools for partition recovery, bootloader and MBR to GPT conversion.
On our website there are separate instructions for expanding a hard drive partition, where the process is discussed using the MiniTool Partition Wizard as an example. If you are interested in this procedure, but you do not know how to manually expand disk space, we recommend that you read this detailed guide by clicking on the link below.
Read more: Extending a volume using MiniTool Partition Wizard
Acronis Disk Director
Acronis Disk Director is one of the most famous programs for managing hard drives, with a huge range of different options. With this solution you can create logical partitions, copy them, move them, delete them and, of course, expand disk space. “View Files” allows you to familiarize yourself with the structure of your hard drive using the built-in browser. Through Acronis Disk Director you can defragment the HDD, optimizing its operation, and also check for various errors.
The main disadvantage of this representative is paid distribution, although it is quite logical that developers ask for money for software of this level. A fully Russified trial version of Acronis Disk Director is available for download on the official website for review. In it you can interact with all the functions present, but with one limitation - the size of the hard drive partitions for which changes will be made should not exceed 10 gigabytes. However, there is nothing stopping you from allocating space by creating a volume through the system tool to test the program and decide whether it is worth purchasing for permanent use.
We have an article dedicated to analyzing the rules for using Acronis Disk Director. This material will be extremely useful for novice users who have just begun to get acquainted with third-party solutions of this level. You can read the article by following the link below.
Read more: How to use Acronis Disk Director
EaseUS Partition Master
The next topical program is called EaseUS Partition Master. In it, the user will find everything that we have already talked about above, in the usual implementation. If you pay attention to the screenshot below, you will notice that even the interface of this solution is as similar as possible to its previous analogues. One of the advantages of EaseUS Partition Master is the presence of Wizards that allow you to cope with various tasks faster and easier. However, we note that, unfortunately, there is no Wizard that simplifies the expansion of HDD partitions here yet. If you need to increase the size of Logical Volume C, you can shrink other partitions or use free space by selecting the appropriate option in the left pane.
Additionally, the partition itself is available for moving to another area, for example, if dead pixels were noticed in its current location or some problems arise with reading or writing files. Another unique feature available in EaseUS Partition Master allows you to create a bootable USB flash drive or disk by setting basic parameters for this. This will save the user from the need to use additional software, especially in cases where this tool has already been purchased and wants to use all its capabilities. Below you will find a link to download the trial version of EaseUS Partition Master and detailed descriptions of all its points.
Eassos PartitionGuru
The original purpose of Eassos PartitionGuru was to display detailed information about the status of connected media, but later the developers added other features, making this solution multifunctional. Among these same functions there is also a tool for resizing the selected logical volume. When you open the Expansion Wizard, you see how much space is available for use and manually set the additional amount. In this case, the screen immediately displays the first and last sector assigned to this partition, which will allow you to independently bypass broken fragments and other non-working areas of the hard drive.
Sometimes the expansion process takes quite a long time, especially if the location of the volume changes along with it. Then a useful additional option present in the Eassos PartitionGuru Wizard will come to the rescue. It allows you to select an action that will be automatically performed when the operation is completed. This way you can end your session in the operating system, restart your computer, or put it to sleep. Unfortunately, Eassos PartitionGuru does not have the Russian language, but this will not prevent even a novice user from quickly understanding the intuitive implementation of the application’s appearance.
Macrorit Disk Partition Expert
Macrorit Partition Expert Free Edition is a powerful free program for managing hard drive partitions that allows you to expand, create and format them, fix the problem of low disk space, and also interact correctly with both MBR and GPT types. This software is free for home use, and the options present in this assembly are quite enough to satisfy the needs of any user. If you have previously encountered software of a similar type, understanding the interface and management of this tool will not be difficult, because the developers have made it template-based.
The already familiar “Resize/Move Volume” option is responsible for managing the size of a logical volume. It is simultaneously capable of performing the task of expansion, compression and movement by a certain number of sectors. If necessary, you can first shrink another volume to expand the system drive C. Additionally, the free version includes a tool for checking the media for errors. Run it if you doubt the functionality of the device you are using. Macrorit Disk Partition Expert cannot be called a unique or unusual program, because it only contains those functions that are already implemented in standard Windows functionality, but are simply wrapped in a different graphical shell. However, it is possible that this software will be of interest to a group of users who will even be ready to purchase the full version by paying the required amount.
Partition Magic
Partition Magic is the penultimate software in our review, which, despite its slightly outdated interface, has all the necessary options useful when using a hard drive or solid state drive. In this tool you will find all the functions that we have already talked about more than once above, and you will implement any task related to editing logical volumes, including expanding any of them by using free or allocated space.
If you are just starting your acquaintance with software of this level, in Partition Magic you should definitely turn to the built-in Wizards for help. They will allow you to format the drive, create a new partition, or edit an existing one in a step-by-step format. However, the lack of Russian localization may make this process a little more difficult. This solution also contains auxiliary capabilities designed for testing a physical disk, quickly converting file systems, erasing sectors, and working with hidden volumes.
Paragon Partition Manager
Paragon Partition Manager is a standard software for managing hard drives and SSDs, differing from others only in its interface. Otherwise, there are exactly the same tools that can be used both in other third-party programs and through the built-in functionality of the operating system. The Free Space Redistribution Wizard is responsible for expanding or shrinking a partition in Paragon Partition Manager. In it you perform all the steps step by step, following the instructions displayed on the screen.
Thanks to Paragon Partition Manager, you can create a bootable USB flash drive or disk, for example, for further installation of an operating system via an ISO image. Such auxiliary tools include the ability to connect a virtual drive. This will come in handy when transferring data while using VirtualBox or any other virtual machine. The main disadvantage of Paragon Partition Manager is the paid distribution, because you even get a basic set of options for free for evaluation purposes only.
We are glad that we were able to help you solve the problem. Add the Lumpics.ru website to your bookmarks and we will be useful to you. Thank the author and share the article on social networks.
Describe what didn't work for you. Our specialists will try to answer as quickly as possible.
Did this article help you?
NO
How to reduce disk size using Windows
Now consider the reverse situation, where you need to shrink the C: drive by attaching some space to the drive letter D: (or to the drive with another drive letter).
Follow these steps:
- Right-click on the “C” drive and select “Shrink Volume...” from the context menu.
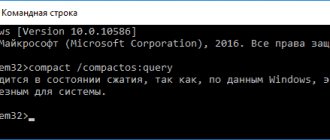
- The Query Compact Space window polls the volume to estimate available space.
- The window that opens shows the amount of disk space available for compression. If the available size is large enough, you can select a smaller size for compression. Click on the "Compress" button.
In Disk Management, unallocated space appears between the “C:” and “D:” drives.
You won't be able to attach this space to the "D" drive because it is located "to the left" of the "D" drive. If this location was "to the right" of the "D:" drive, we could expand this partition without removing the "D:" drive.
Remove the “D:” drive, and then create a new partition under the letter “D:” in place of the unallocated space. This process is described in detail above in the article.
How to Enlarge C Drive Using Aomei Partition Assistant
Unfortunately, even strict implementation of all the given instructions sometimes does not lead to the desired result; in this case, all that remains is to use applications from third-party developers. The first of the recommended products allows you to quickly and easily expand any partition on all generations of the OS. The advantages of the utility are not only “omnivorous”, but also the presence of a Russian interface. Of course, during the operation of the utility, no unnecessary or malicious software is installed - you will only get what you really need.
Before you start using the program, save all your important data on a separate drive, and in addition, try to ensure uninterrupted power supply. If the power is turned off during operation, the data in the partitions may be lost once and for all.
How to delete a volume
You can only add an unallocated partition to a disk, which appears after deleting a volume.
Deleting a volume in Windows 7
To delete a volume:
- Open the Disk Management utility.
- Call the context menu of the volume you want to delete and click on the “Delete volume” command.
Click on “Delete Volume” in the context menu of the selected partition
- Confirm the deletion request.
Answer yes
You will be left with free space the size of this volume, which can now be attached to another partition.
Why can't I delete a partition or volume?
In some cases, removal may be difficult.
The reasons are as follows:
- The swap file is in the way. Remove it from the partition or volume;
- It is impossible to delete a partition because there are two or more volumes in it. Delete all volumes and the partition will also be deleted;
- Windows environment variables have been moved to this partition or volume. There are dozens of them - some create and maintain temporary Windows user and system folders, for example, C:\Users\<username>\AppData\, C:\ProgramData\, etc. They cannot be easily deleted. Windows environment variables need to be configured. You can open the settings window by going to “My Computer” - right-click - “Properties” - “Advanced system settings” - “Advanced” - “Environment variables”.
Click the "Environment Variables" button to enter their configuration
How to remove the swap file
To make volume deletion available, do the following to eliminate the Windows page file:
- From the Start menu, go to Control Panel.
From the Start menu, go to Control Panel
- Go to the “System” section.
Go to the "System" section
- Go to "Advanced system settings".
Click on "Advanced system settings"
- In the "System Properties" window, go to the "Advanced" tab and click on the "Options" button in the performance settings.
Click this button
- In the performance settings window, select the “Advanced” section and click on “Change”.
Select the “Advanced” section and click on “Change”
- In the virtual memory settings window, uncheck the option to automatically select the paging file size and check the box next to “Without paging file.” Click on the "Set" button.
Uncheck the option to automatically select the paging file size and check the box next to “No paging file”
- Click "Yes" when prompted to clear the page file.
Answer yes to the request to clear the page file
- Close all windows by clicking "OK" and restart your computer.
Go back to Disk Management and try to delete the volume again. Check to see if this volume is connected to a neighboring volume on the same partition.
How to change the hard drive on a laptop without losing data?
A common reason for replacing the HDD on laptops is that a more capacious drive is needed or it fails due to overheating. There is always only one disk in a laptop; it is impossible to connect another hard disk there. Therefore, you need to disassemble the laptop. This is the main difficulty, because the models are different. Sometimes to replace memory modules and w. disk on the bottom cover there is a special cover, it is on separate screws...
... and often there is no such cover. More and more modern devices require complete removal of the bottom cover. This requires certain skills; There is no need to rush and it is better to stock up on instructions for disassembling your model in advance (youtube):
The further replacement process without loss of information will take place in a similar way as described above. You need to hang the new and old laptop drives into the computer system unit:
And start the procedure. It has been noticed that after transferring the laptop, the operating system is often restored to start if it was damaged. This is a good way! Good luck everyone!
Author of the publication
offline for 5 days
How to change hard drive on the command line if you have more than one?
It all depends on what you are going to do. For operations with disk partitions, use the diskpart
To view connected disks and partitions, use the List disk
To select the desired disk, use the select disk command and the disk number:
Now, using the list partition , you can get a list of partitions of the selected disk and perform various operations with them. Another case is if the drive partition letters are already known, then you can use commands to work with files and folders on these partitions (view, copy, delete, etc.). Simply enter the Latin letter of the desired partition with a colon, for example D: Below is an example of switching from drive C: to drive D: and then viewing the disk folders using the DIR command:
So, nothing complicated, and you can work with disks on the command line if necessary. You need to know the list of commands and enter them manually. This is how people worked in the days of MS-DOS. Many commands from it still work in the modern command line.