It’s a sad situation when your printing machine ends up without a driver disk or if there is no disk drive in your PC. In this article we will tell you how to install a printer in this case. It is more difficult to do this without an installation disk, but it is possible even for an ordinary user.
There is not much difference - you want to connect it to a laptop or install it on a computer, all steps to connect the printer will be identical. In fact, the solution to the problem depends on the ability to install the driver. We will look at how to do this procedure using Windows 7 and models from HP, Canon and others as an example.
Manual installation
The easiest way to add a local printer to your computer is to manually install its drivers.
Before starting all actions, you must break the physical connection between the printing device and the PC created by the USB cable.
If you have a Windows operating system installed, then the procedure should be as follows:
1. Go to the “Devices and Printers” section. To do this, click the "Start" button and select "Devices and Printers" on the right.
If you have Win10 installed, then the procedure for logging into the “Control Panel” is described in this subsection of this article.
2. In the window that opens, look for the button to add a new printer. Depending on the version of your Windows, its name may differ slightly.
3. Click on the “Install a printer” button at the top left. In the next window, select “Add a local printer.”
4. We do not make any changes in the port selection window. Leave the LPT port and click “Next”.
5. In the window that opens on the left, select the manufacturer of your device. After which, a selection of models will be available on the right. Among them you should find the desired model.
If your device model is not in the list on the left, then click the “Windows Update” button to download the missing devices.
Installation from disk
- Disconnect the printer from the computer and turn it off if it is wireless. You will need to enable it when the installation wizard asks you to do so.
- Insert the disc into the drive and wait: Autorun may work if it is configured on your PC.
- If no windows open and the drive stops making noise, open Explorer: Right-click on the icon
and click Open.
- In the next window, find
.
. But there is another option: clicking on the Open line will allow you to see the contents of the disk.
. You need to select a file with the EXE extension, run it and follow the prompts.
Downloading drivers
If the option described above cannot be implemented, then you should try downloading directly through the official website of the product manufacturer.
Do not download drivers from third-party resources, no matter how reliable they may be. There is always a threat of infecting your laptop with viruses or malware.
Depending on the manufacturer of your printing device, use the links below:
- HP
- Canon
- Dell
- Epson
- Lexmark
- Samsung
- Xerox
- Brother
But it will be more convenient and faster to do this using our driver selection service.
We will look at downloading drivers directly using Canon devices as an example.
1. Follow the link https://software.canon-europe.com/.
2. Next, you need to find your device by the exact name of its model. Enter its name in the search bar.
3. The manufacturer’s official website suggests choosing different software versions for the Windows system.
As a rule, your OS version will be detected automatically, of which you will be notified with the message “Operating system detected”. You should not change these default selections. All that remains is to select the driver language you need from the list to the left.
4. Click on the “DOWNLOAD” button.
You can find the downloaded file in the “Downloads” section of your browser. To enter this section, press the key combination CTRL+J.
Download the driver from this site (ILovePrinting.ru)
- Find the article for your model:
- Move the cursor to
in the top menu of the site and select the desired category in the drop-down list. Click on the line with
.
- Or
and press the button with a magnifying glass. Click
or Read more.
- Select the driver taking into account the system bit depth and click Link (for example,
).
- Select
.
Windows Update
Windows updates can also help install drivers on the printer when there is no disk for it. Modern operating systems of the Windows family, such as Windows 7,8,10, have a built-in base with drivers not only for printing devices, but also for other equipment.
If your device model is new or not very popular, then there may not be drivers in the Windows base. In this case, it is necessary to perform a forced update through the Windows Update service. See the instructions below for how to quickly and easily do this.
Procedure for Win10. Click to view.
1. Open the control panel of your personal computer. Regardless of the device, everything is the same for both if Windows 10 is installed. Right-click on the “Start” button and select “Run” from the drop-down menu.
2. In the window that opens, type “Control”.
3. In Control Panel, open the "Devices and Printers" section.
4. Find your PC among devices.
5. Open the menu by right-clicking and select “Windows Update.”
6. Click on “Check for updates”. If the system finds any update packages, install them.
Instructions for Win7. Click to see.
Actions to update through the “Update” service for the seven.
1. Click “Start” and enter “update” in the search bar. Select "Check for updates".
2. Check for updates and install those found.
After rebooting the PC, Windows should “see” the new device and install the newly downloaded drivers. If this does not happen, then perhaps the driver is not in the Microsoft database. We recommend using other connection methods. They can be found below on the page.
First way
If you decide to complete the task related to how to connect a printer to a laptop without a disk using Windows Update, then first you will need to connect the printing device to a PC on which Windows 8/Windows 10 or some other version is installed given OS and wait a few minutes. During this time, the system will identify and determine the connected equipment, after which it will try to automatically install the appropriate software. If this does not happen, then run the update in Windows 8/Windows 10 on your computer manually by following these steps:
- Open Control Panel, then go to the section called Hardware and Sound.
- Find among several titles a category with a list of devices and printers connected to the PC.
- In the new window that opens, you will need to click on the button that starts checking for updates on your Windows 8/Windows 10 system.
- After this, a search for software for the connected office equipment will be performed. If the system can find something, the driver will be downloaded and installed automatically. The system may ask you to give permission for this action.
- Be sure to reboot your computer to make sure that the printing device is actually installed. After this, you can start setting up your device for further actions.
If you want your Windows 8/Windows 10 OS to constantly load drivers and images for office equipment connected to the computer automatically, then you should perform the following manipulations:
- To begin, open the “My Computer” context menu by right-clicking on its icon and select “Device installation options.” In a new window you will be asked to decide on the setting, in this case, select the first option, which implies permission to automatically install drivers.
- Click on the button that will save the change you made. Thanks to these simple steps, when you connect new equipment, the system installed on your PC will automatically search for a suitable driver in its database.
To manually install the appropriate driver from the update center, first disconnect your device from your PC (if you have previously connected the printer to your computer). After this, carefully read the following instructions:
- Open the section with the list of devices and printers through the Start menu.
- Find “Add a printer” on the top panel and click on it.
- Then, among the two proposed options, select the first one, i.e. "Add a local printer."
- In the next window, where you will be asked to decide on the printer port, you should not change anything, so feel free to click on “Next”.
- The wizard will now prompt you to select a driver installation method. In this case, click on “Windows Update” and wait until the list of available software loads.
- When the list appears on the screen, select the manufacturer, and then the specific model of the device.
- Enter the printer name (you don’t have to change anything) and click “Next” and wait for the installation results.
- In the new "Use Shared Printers" window, select "No sharing of this printer" and "Next". Thus, the configured device has been successfully installed.
- But that’s not all, now you should remove the installed device by right-clicking on its icon in the section with printers and faxes. The fact is that we need software that is installed with the printer, and not the device itself.
- Now you can connect your office equipment to your PC and wait until the device “grabs” the previously installed driver.
Automatic installation
For the Windows operating system family, it is possible to automatically download drivers for any device connected to a personal computer. When you make certain settings, all the necessary files will be downloaded to your computer themselves.
To do this, you need to do a few simple steps:
1. Go to the “Devices and Printers” section (how to do this is described in the same article above). Among the devices, select your PC or laptop. Right-click on it. Find "Device Installation Options".
2. Oh and save.
How to install the printer driver automatically
Solving the problem manually will be postponed until the following sections. First you need to enable the automatic update process - this integrated function searches, installs and configures drivers.
- Go to “Control Panel” from Start;
- Select the "Devices and Printers" tile;
- Now on the icon where the computer is shown, right-click and see Windows Update;
- Next, run the update in a new window and wait for it to finish.
The convenience of using the method lies in the automation of the process of searching and installing devices. No manual manipulation is required, so try this option first.
In theory, immediately after connecting the printer, the computer tries to find the necessary drivers, but since you are still reading the article, apparently Windows could not detect the device. We will help you resolve this issue.
How to find out the printer ID
Another working way to download drivers is to use a unique hardware identifier. Each model has its own unique ID. Using this code, you can try to search for suitable software.
Instructions for determining ID:
1. Click "Start" and find the "My Computer" icon. Right-click and select “Management” from the menu. See the picture below.
2. Open the device manager, and on the right, expand the “Other devices” item. If the PC or laptop sees the printer, it will be in the list. Right-click on it and select “Properties” from the list.
3. In the window that opens, go to the “Information” tab. In the properties from the drop-down list, click on “Hardware ID”.
4. Afterwards you will see the necessary information. Using the received identifier, you can easily find drivers through an online search or on the manufacturer’s website.
Determining the Printer ID
Each device that connects to a computer has a unique identification code. If you know the hardware ID, then you can download the driver you need without any problems. If the instructions described above did not help you, and you have not figured out how to install a printer without a disk , you need to find out its identification code. I recommend using this option in the most extreme cases, and if you downloaded the drivers from the official website, you can skip this option.
So, to find out the ID:
1. Right-click on the computer and select “Properties”, then on the left click “Device Manager”;
2. In the window that opens, find your printer. Right-click on the desired line and in the menu that appears, click on “Properties”;
3. A dialog box will open where you need to go to the “Details” tab. Next, in the “Property” line, select “Equipment ID”.
4. A value will appear in the window below, which will be the printer identification code (if there are several values, you must select the first one);
5. Copy the ID. Go to the official website of your printer manufacturer and enter the copied identification number into the search. You can also use search engines to find the driver you need using the hardware ID. But don’t forget that our website has all the drivers for existing printers. All that remains is to download the found driver.
Remember that you need to download drivers only from official resources. It's absolutely free and as safe as possible.
Installing a driver from another printer
This option can safely be classified as “exotic”. It would seem how a driver from another model might fit. But if the firmware and software versions of both printers are identical or these devices are representatives of the same series, then this method can also help you.
The next steps are:
- Find out the exact model of the printer connected to your PC or laptop.
- Open the manufacturer’s website, enter the model in the search and in the model description you can find information about the series to which it belongs.
- Find out what other models belong to this series.
- Install drivers for any printer in the series on your computer using any of the methods described above.
- Try printing any document.
How to install a Canon printer on a computer without an installation disk
One of the most difficult situations is when we get our hands on a Canon printer, without the necessary installation disk. This can happen if we bought a printer inexpensively from our friend, or at some kind of sale of things, or somehow we got our hands on someone’s old printer, or it is possible that we received a gift to our office because they bought a newer model there.
The disk can also be lost after formatting the computer if we have been using this computer for a long time and this disk has never been useful before.
But in any case, such a problem can be solved; it is only recommended to follow all the instructions that we will now discuss in this article.
For the printer to work properly in any operating system, it is very important that we have drivers, and also have knowledge of how to install drivers on a Canon printer. Drivers are an intermediary for the connection between the printer and the computer, or between our other devices. Without them, nothing will work, the same thing will happen if the drivers are broken or outdated - full-fledged work will not be possible. The question is how to install a printer on a computer without a disk that you didn’t have at hand. There is a way out of this situation and today we will tell you about it. When many users do not have an installation disk for a Canon printer, it confuses them because they have no idea what can be done about it. In fact, the situation is not hopeless, there are other sources for obtaining essential drivers and how to install a printer without a Canon installation disk.
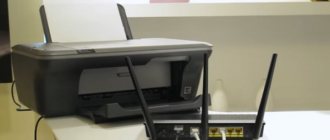
How to connect a Canon printer to a laptop without a disk Step 1. Connect the printer to the computer via a USB cable. Through this cable, the printer receives data for the printing process. It looks something like the image below:
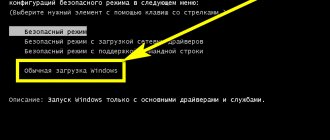
If you do not have this wire, there is no reason to worry, since its cost is not high and you can purchase it at any computer store. » Step No. 2 First of all, turn on the computer and after it completes the boot process, turn on the printer. This must be done in such a way that the computer is already in normal functioning when the new hardware is connected, so that the PC can detect the new device. Step #3 Now on your computer, click on the “Start” button, then select “Settings”. Step #4 Then select “Printers and Faxes” or “Printing Devices”. Step #5 Now after clicking on the button as shown in the previous image, all that remains is to click on the “Add Printer” option. Note: Add Printer in Windows7 is located in the top left corner as shown in the image below. In WindowsXP, this option is also in the upper left corner, but in the "
Step #6 The Add Printer Wizard will begin.
Click Next to allow your computer to discover your new printer through Plug and Play Note: Plug and Play in Windows 7 is automated. Once we click on the “Add Printer” option, it will detect the printer automatically. Below we leave you with an image of how the printer will appear when you try to install it on Windows 7. This system will automatically detect printers that are connected and available for installation. In this case, the computer will automatically begin installing the printer. If this does not happen, you will have to select a printer from the list. You can use the Help or Help app in Windows if your device is not recognized. Step No. 7 If the printer is not recognized by the computer, you will have to select the port through which the printer is connected. As mentioned earlier, the printer is connected to the computer via a USB cable. We select the same type of connection. All that remains is to choose a printer. If the printer is not new, then this will most likely happen when installing it on Windows7 or WindowsXP. First, in the window that appears, select the printer brand, then the model with the corresponding series. Step No. 8 If the procedure carried out in step 7 does not work, then you should download the driver from the manufacturer’s website. Once the driver is downloaded, install by unpacking the driver file. How to install drivers for my printer normally if I have installation problems » Please be aware that even if you use this information, the driver installation process without the installation CD or without the driver present may not proceed as expected. Therefore, we are always ready to help. Just leave a comment on this article and we will respond as quickly as possible." We also carry out: refilling and repair How to refill an HP cartridge?
Update centre
You can try installing the printer through Windows Update. There is nothing complicated here:
- Disconnect the printer from your computer.
- Open the "Devices and Printers" section.
- Click on the "Install" button.
- Select "Add Local".
- Leave the port unchanged.
- Click on the "Update Center" button.
- Wait until the available drivers are downloaded and select the software for your model (or at least series).
- Leave the printer name unchanged and wait until it installs. You do not need to allow public access.
After installation, an icon for the added equipment will appear in the “Devices and Printers” section. Right-click on it and select "Delete". Then connect the printer and wait until it “grabs” the previously installed software.
You can repair or update your printer in Simferopol at the service center on the street. Starozenitnaya, 9 (entrance from the fence). Please contact us during business hours from 9.00-18.00 at
Don't forget to rate the post and share it with your friends on social networks by clicking the special buttons below. Don't forget to leave a comment and subscribe to our youtube channel
Save
Save
Rate this article:
(
9 ratings, average: 5.00 out of 5)
Share with friends:
Related posts:
Description of Canon MP series MFP errors
Instructions for installing CISS on Canon Pixma MG2440, MG2540, MG2940 and Ink Efficie…
Waste ink drain outlet for Epson L210, L222, L350, L355, XP-406, XP-313, ...
How to make a drain for Epson Stylus Photo PX720WD, PX820FWD, TX700W, TX710W, TX800…
How to upgrade CISS in Canon and Epson printers. How to remove air from CISS. Rules…
Recommended products:
- 29 in stock
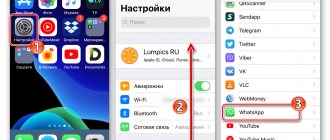
Installing HP Printer Software | Wireless Print Center
It is recommended that you download the latest software for your printer and computer. Make sure the software you select is suitable for your computer operating system and printer model. The computer on which you are installing the printer software must be connected to the same network that you are connecting the printer to.
- Follow the onscreen instructions until you are prompted to select a Connection Type.
- Select Over Network, Network, or Wireless.
- The exact name of the parameter depends on the version of software you are installing.
- In some cases, the program may automatically search for wireless network settings.
- Follow the onscreen instructions to complete the printer software installation.
If the printer is already connected to the network and you are now installing the software, the printer should be detected automatically during installation. Please note that the computer on which you are installing the software must be connected to the same network as the printer.
Sometimes the software may have problems detecting the printer on the network. In this case, perform an advanced search for the printer using the IP address assigned to the printer. To determine the IP address, print a wireless network test report or network configuration page. For touchscreen printers, the IP address should be displayed on the screen when you touch the wireless icon or button.
If this is your first non-touch screen printer setup and you are using a wireless network setup using a USB connection, the software will not be able to detect the printer on the network and will provide instructions on how to create a wireless printer connection. During installation, temporarily connect the USB cable to the printer and computer. Do not connect the USB cable until the installer prompts you to do so. The computer on which you are installing the printer software must be connected to the same network that you are connecting the printer to.
www8.hp.com