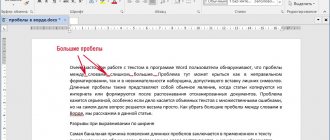
In my practice, quite often I had to change the line spacing in Word when editing various documents. Microsoft Word already has several convenient templates for this, but you can deviate a little from the standards and customize everything as you wish.
Changing the line spacing parameters is a functionality that is not used very often... I would even say rarely. When encountering a document with double line spacing, some users become discouraged from not knowing how to return everything to normal!
When creating serious documents a little more complex than a school essay, the use of different spacing between lines or paragraphs can be used to focus the reader’s attention on a certain part of the document
How to change line spacing in Word
14.08.2017
Line spacing in the Microsoft Word office program is a value that determines the distance between lines on a document page. Most users don't change it? since the default one satisfies almost all needs. However, changing this parameter will help make the text more readable, and if you enlarge it greatly, you can write signatures on the printed sheet. Moreover, many teachers require a strictly established distance, which differs from the standard one, but it can be difficult to independently find the right tab to change it.
Let's adjust the distance between lines
If you need a document in Word format to have one and a half spacing only on specific lines, then select only these specific lines and use the following commands:
- If you have version 2007 or 2010 , then in the “Paragraph” section, click the arrow icon at the bottom right. As soon as the dialog box opens, select the “line spacing” option from the drop-down list, then the value 1.5 lines.
- Another option for this action is to select the “multiplier” option, adjust the value to 1.5. In this case, one and a half distance will be established between the highlighted lines and the one immediately following them.
- In the 2003 version, the sequence of actions is similar, except that the dialog box is called up from the regular “Standard” menu.
- Any version of the editor allows you to open the settings window from the context menu, you need to do this by right-clicking on the selected lines, the paragraph menu will appear and you can easily call up the “paragraph” section.
These methods are suitable for setting one and a half spacing between certain lines. Next, we'll look at how to set this spacing for paragraphs.
Setting the interval before starting work
There are several ways to set line spacing for a blank document.
Method 1: button in the “Home” tab
In a blank document, you can set a single value that differs from the default.
- To perform this operation, the program provides a special button located in the “Home” tab. It is this that will allow you to set the spacing that will be applied to all future written text.
- In the drop-down menu you can select the suggested values. If for some reason you are not satisfied with them, then you can set your own by clicking on the “Other line spacing options” field.
- In the window that opens, in the “Indents and Spacing” field, you need to find the “Spacing” section. In this part, you can select one of the existing values, depending on the style, or set it yourself. This can be done using special buttons located on the panel or from the keyboard. There is no limit on the length of decimal places.
Method 2: Change Styles menu
There is another way to quickly change the distance between lines. For some, it will seem more convenient than the previous one.
- On the top panel, find and click on the “Change Styles” item. A menu will open in which you can configure the basic font parameters in the text and restore their default settings if they are lost.
- Click "Paragraph Spacing" and then click "Custom Paragraph Spacing."
- A window will open in front of you in which you can make the necessary settings. In addition, in this section you can create your own template and configure the distance between paragraphs, font, its size and other important parameters, and simply refer to it in the future. This saves a lot of time.
Method 3: in the “Page Layout” tab
Another interesting way.
- Click on the item at the top of the “Page Layout” screen.
- In the “Interval” field, you can change the values using special buttons or enter the values manually using the keyboard.
Changing letter spacing
Each character, regardless of the type of writing, has a specific space allocated. Moreover, depending on the spelling, the characters themselves can fill it in different ways. In order to precisely adjust the space occupied, kerning is used. In Word there are three types. In addition to the standard one, there is rarefied and compacted.
You can adjust it in 0.1 point increments. This parameter can be found in 2 options:
- using the context menu called by right-clicking the mouse;
- through the “Font” command group in the “Home” tab.
Changing the spacing of an already completed document
Most often, a situation occurs when you need to change the line spacing in a ready-made document. If you simply try to do this using the button in the “Home” tab, then you will not succeed: the parameter will only change in the paragraph on which the cursor is positioned. To change the spacing between lines in the entire document, you need to select all the written text with the left mouse button and only then can you use method number 1.
Tip: In order to quickly select absolutely all the text in a document, you need to hold down the “Ctrl” key combination and the English letter “A” or Russian “F”. All text will be highlighted. This is much more convenient than performing the same operation with the mouse.
Select an interval in a couple of mouse clicks
Everything here is generally simple, but this method is applicable only locally, so initially select the area of the text in which you need to change the spacing. Having selected it, find the “Interval” button in the already known “Paragraph” column. Click on it and select the value you need from the drop-down list. If these settings are not enough for you, then you can select “Other options...” and the same window will open as last time. You know what to do in it.
By the way, if you are wondering how to change the spacing between lines in Word in a table, then all the above methods work in this case, just select the desired area of the table before starting.
Setting Defaults
If you often write texts that require line spacing other than the standard ones, then it would be much more convenient to change the default settings and not return to this issue.
- Open the “Home” tab and click on the button for changing the distance between lines. In the dialog box, click “Other line spacing options.”
- In the familiar window you can configure all the parameters you are interested in.
- It is important to remember to click the “Default” button. A window will pop up in which you need to select “For all documents” and click “OK”.
Line spacing is an important parameter that exists in the Microsoft Word text editor. As we were able to see, it is not difficult to change it both for the entire document and for part of it. However, some users find this operation difficult. We hope that after reading this article, all your questions on the topic have disappeared and you can easily change the interval in Word; if not, then write the points that interest you in the comments.
Set default settings (first method)
We will, of course, talk about how to change the spacing between lines in Word, but, in addition, we will initially figure out how to change it, setting it to default, so that next time you do not have to make all the settings again.
So, how to change the spacing between lines in Word? The first method will be universal for all versions of the program. But, unlike the next one, it will be more complex. So we advise you to read the article to the end to choose the method for yourself.
So, initially you should create a new document in Word. Once you do this, go to the Home tab on the top toolbar. In it you need to find the “Styles” column, which is located on the right side. There you need to click on the small arrow, which is located in the lower right corner. A menu of styles will open in front of you, but we are only interested in the icons at the very bottom. Click on the third one.
Once you do this, the settings window will appear - go to the “Default” tab. In it, pay attention to the “Spacing” item; on the right side you can set the line spacing. You can use the templates in the drop-down list or enter them manually in the field to the right. This is the first way to change the spacing between lines in Word. When finished, be sure to select “In new documents that use this template” and click OK.
How to make spacing in Word manually
To change line spacing, you must adhere to the following algorithm. We highlight
part of the text necessary for processing. In the “Home” tab, in the “Paragraph” group, click on the small window to the right of the “Paragraph” inscription. In it we find the inscription “Interline”, click on the arrow and select the necessary indicators in the pop-up list. How quickly and correctly you prepare your document depends on their correct assessment.
- Single. It is used most often, is optimal for most cases and is used as a reference point for other intervals.
- 1.5 lines. This is the so-called one and a half, which is 1.5 single.
- Double. It defines the distance between lines in two singles.
- "Minimum". This is the minimum space between the lines at which it is possible to place them so that they do not merge.
- "Exactly." Using it, you can set a fixed interval in points. It is installed in the window on the right using the arrows.
- "Factor". Designed to establish large spaces between lines. It got its name because when you set the line spacing with arrows, its size increases significantly.
The choice of the desired option also depends on the font size and the availability of graphic material. If the text contains individual fragments or large characters, the spacing is automatically increased. Often, at a predetermined interval, some of the graphic material, characters or text may not be visible. To prevent this from happening, you need to take into account the features of the document and set an adequate interval.
Program parameters
First of all, each person using the Word editor needs to configure the interval parameters that are used automatically. This can be done in two ways:
First way:
- Run “WORD” (without any file, i.e. “empty”).
- In new versions of the editor (2007, 2010 and 2013), “click” on the icon with a small arrow located in the lower right corner of the “Styles” section. After that, open the style management window (the third button at the bottom of the panel that opens), and go to the “Default” tab.
- In the old version, click the Styles and Formatting icon in the Formatting toolbar. Right-click on the name “Normal” and select the “Edit” command. Then - “Paragraph” from the “Format” list (bottom left).
- Now you need to change the values in the “Interval” area. This includes the space before and after the paragraph, as well as the space between lines. The parameters of the latter can be adjusted either by rounded values or by exact values. If you need to make the spacing double, single or one and a half, select the desired line in the list. For finer correction, you need to select “Exactly” or “Multiplier”. If the “Exactly” option is selected, then the “Value” box displays the gap in points. For the “Multiplier” parameter you need to set the number by which the single distance between the lines will be multiplied. So, with a value greater than one, the distance lengthens, with a coefficient less than 1, it shortens.
Second method, only for new versions
- Open a blank “WORD” editor.
- Open the control window from the “Paragraph” section (arrow icon, bottom right). Change the parameters, similar to option 1.
- Click the “Default” button at the bottom of the window, and confirm these options for all new documents using the “NORMAL” template.
- You can also undo adding extra spacing between paragraphs with the same style.