This article will talk about converting video (conversion) from the DVD format (for example, from a DVD disc) into a single file that would be convenient to play on a computer, TV or other devices using the Free DVD Video Converter program.
In one of the articles, I already touched on one of the methods for converting a DVD disc, and then we were talking about the MakeMKV program. That program does its job well, but it converts DVD video exclusively to the MKV format (called “sailor”), and not to some popular MP4 or AVI, for example. For some this will not be significant, but for others it will be significant. For example, not all devices can play MKV files, and not all video editors can work with them, because someone may want to edit the final file, perhaps cut something. Of course, there is always the option to once again convert a ready-made MKV file, for example, to MP4, but the 2nd conversion is unlikely to do without loss of video quality.
Therefore, I offer another option for converting DVD video - using the free program Free DVD Video Converter.
Pros and cons of DVD converter program Free DVD Video Converter
I will highlight the advantages of the program:
- The program is completely free.
The program is truly free to use without any payment. The program itself has a “Premium Subscription” item, but according to information from the official website of the program, it is needed in order to disable advertising in the program, to be able to receive prompt support (including remote access to a computer) and to conveniently manage updates (this The point is generally unclear to me).
Based on this, we do not lose anything significant from the program by using it without a premium subscription.
- Conversion without loss of quality;
- Conversion is performed with slight compression, i.e. the resulting video file will be smaller in size than the original DVD disc;
- It's ridiculously easy to use the program. The entire process of setting up the conversion will take a minute or two at most.
drawback of the program : the program may not cope with some DVD films, most likely due to their not entirely correct structure. For example, I tried to convert three DVD movies using Free DVD Video Converter. Two of them were successfully converted to the MP4 format I needed, but the program could not open one movie; it simply froze at the stage of reading the structure of the DVD disc. By the way, this was noticed not only for this program, but also for some others, which I will talk about in other articles.
And I will attribute one more point to both the pros and cons of Free DVD Video Converter at the same time. This is the lack of a large number of different conversion settings. For beginners, this is even good, since you don’t need to understand the settings and just select the final file format and one of the ready-made settings profiles to select the optimal quality of the final video. You don’t need to “tighten” anything yourself. But for experienced users, this may, on the contrary, serve as a disadvantage, since someone will want, for example, to set a certain bitrate for the video, enable or disable deinterlacing (removing the “comb” effect from the video), set other compression parameters and, probably, something else.
How to Convert DVD or VOB to AVI
- After downloading the converter and installing it on your PC, launch it on your computer and get to work.
- Adding video to the program. This can be done by clicking on the “Add” button in the left tab panel.
- Click “Add video”. Here you can select several files or an entire folder at once. Or upload one video to the program by checking the box.
- Open the “Convert for” menu and select AVI.
- Select the recording option. To do this, you need to open the “Options” tab, where you can select the bitrate, size, codec and frame rate.
- Select the folder where we will place the converted file and start the conversion.
- If movies are stored on DVD, then by clicking on the “Add” button, you must select “Add DVD”. In this tab, select all the films or episodes you need to convert. Then select the audio track, image quality and format.
- Press the “Convert” button and wait a few minutes.
- You can view the modified file directly in this program. To do this, you need to select the folder in which it was saved.
Once the conversion is complete, the video content can be played on DVD. This can be viewed in the storage folder. Approximately the same actions are performed in other converters, paid or free.
IMPORTANT. In order not to lose picture quality in videos, you need to set the maximum values in the settings. It is important to remember that high quality movies take up more space on your computer.
After all these procedures, enjoy watching in a new format. And you don’t have to worry about a damaged disc or a hard drive full of movies. A large number of people have been using converters for a long time when they download media content to their phone or tablet. It’s also convenient to send captured videos in this format, and use simple programs to reformat one into another.
Download and Install Free DVD Video Converter
You can download the program to your computer from the official website of the developer using the link:
Go to download the program
On the program page, click the “Download” button and after a few seconds the program installer will begin downloading to your computer.
Size of the program installation file: 40.8 MB.
After downloading the program, run the installation file and complete the installation. The installation is extremely simple, click “Next” everywhere until the process is completed. There is no need to configure anything.
You can find out more about the various nuances of installing programs for Windows here »
Four steps to rip and convert DVD to MP4 video format
As we know, MP4 (MPEG-4, encode in h.264/AVC format) is often used for portable media devices, video sharing websites and supports compression to a smaller file size while maintaining high video quality. Converting DVD to MP4 file type sounds a little difficult, but with the help of VideoSolo DVD Ripper, the process becomes very easy. So let's take the next steps.
Note: Windows Version VideoSolo BD-DVD Ripper has released a new version which has big changes compared to the old version. But a new version for Mac is still under development. This means that the interface and operation of Windows and Mac will be different.
To find out more about the new version, you can read the article: New version of BD-DVD Ripper (Windows) has been released! Look what's changing
Step 1. Download and Install VideoSolo DVD Ripper
You may have downloaded a trial version of the program and installed it on your Mac or Windows computer. If you have already purchased the full MP4 version of this DVD, you will receive a confirmation email containing a registration code. Then you can register to enjoy all the benefits.
Step 2. Add DVD to the program
After inserting the DVD into your computer's drive, click the Load DVD button to open the DVD. What's more, you can add and convert the entire DVD folder to MP4 by clicking the "Load DVD Folder" button first.
Step 3. Select MP4 Format as Output Format
In the "Rip All to" field, you can select MP4 format according to your target device and edit advanced settings using the "Settings" button. For example, if you want to convert DVD to MP4 and play it on iPhone, you can search for "Apple iPhone" and select your phone model. If you want to download H.264/H.265 MP4 to YouTube, you can search for "Streaming Video - YouTube".
Step 4. Click "Rip All" to start converting DVD to MP4
After making sure that all MP4 output settings are selected correctly, you can now click the "Rip All" button to start converting DVD to MP4. The conversion will complete automatically after a few seconds.
The easiest way to convert DVD to MP4 is listed in detail. In just four steps, you can complete DVD to MP4 conversion. You no longer need to spend a lot of time worrying about the incompatibility between DVD and other devices, you can enjoy your favorite DVD movie on your devices with VideoSolo DVD Ripper. It really helps solve this problem.
How to use Free DVD Video Converter
When you launch the program, you will see the following window:
First of all, you need to select the DVD video you will convert. To do this, click the “Browse” button under “Original DVD” at the top and point to the VIDEO_TS folder of your DVD movie (or a shared folder that contains the VIDEO_TS and AUDIO_TS folders), then click “OK.”
You can insert the DVD directly into your computer (if you have a drive, of course) and select a folder from the disk, but I recommend that it is better to transfer all the contents from the DVD to your computer and convert the files already transferred to the computer. This is more reliable, because the disk may fail during the conversion process.
Now you need to specify the folder where the final file will be placed after conversion. To do this, click “Browse” under “Output Folder” and select the desired folder on your computer, then click “OK”.
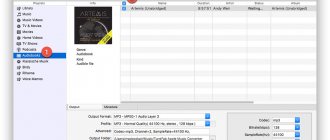
The last step is to select the final file format [1], the profile for converting DVD to this format [2] and click “Convert” [3].
To begin, select the desired format from the 4 available: MP4, MKV, AVI, MP3.
I think you will immediately exclude the MP3 format, since this format only supports audio, that is, after conversion you will only get audio, no video!
I recommend choosing MP4 or AVI, since they are the most popular, and MKV is very specific and may not play in some places.
After selecting the format, you need to select a conversion profile, which will determine the quality of the final video. Pay attention to the video bitrate (the width or speed of the video stream), for example, 5Mbit/s. The higher this value, the higher the quality of the video and the larger the final file size. But, one way or another, the size of the output file will not exceed the size of the original DVD video and the bitrate above 5Mbit/s cannot be selected in the program anyway.
If the bitrate is selected to be the maximum possible in the program, then you don’t have to look at the other values, they will also correspond.
By clicking “Convert”, the program will begin converting your DVD movie to the selected format with the selected settings.
Among the optional program settings, there is also the ability to select which sections from the DVD will be converted. Most often, the option is useless, because there is usually no point in converting videos in chunks. But if necessary, click “Select” in the center of the window and mark the required sections, if any, because DVDs are not always divided into sections.
The time that the conversion process will take may vary, because DVD videos can be of different sizes.
If the program slows down your computer a lot during the conversion process, then you can lower its priority:
Then the program will not load the computer so much, but the conversion time will also increase. Or, conversely, if your computer is powerful, set the priority to maximum so that the video is converted faster.
After the conversion is completed, all you have to do is check the result by going to the folder where the video was converted and opening it.
Top 4. Free online converter Apowersoft
Apowersoft Free Online Converter is a powerful DVD to MP4 converter. It supports converting DVD contents such as movies and TV shows to MP4, AVI, WMV, MOV, VOB, MKV, etc. The program can run at super-fast speed. The converted video can maintain its original quality. The great thing about Apowersoft Free Online Video Converter is that the program is reliable and safe as it is free of annoying ads and viruses. In addition, the program is free.
How to Convert DVD to MP4 Using Apowersoft Free Online Converter
Step 1: Place the DVD into your computer.
Step 2: Open the DVD folder and watch the video file. Then select one DVD item to convert.
Step 3: Configure output settings such as output format, video bitrate, sample rate and output folder.
Step 4. Click the "Convert" button. After some time, the conversion will be completed.