Downloading the Android image
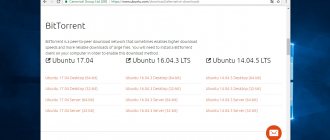
It is impossible to install Android on a virtual machine in its original format, and the developers themselves do not provide a ported version for PC. You can download from a site that provides various versions of Android for installation on your computer, using this link.
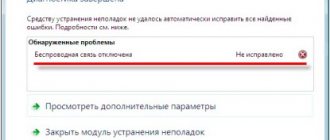
On the download page you will need to select the OS version and its bitness. In the screenshot below, Android versions are highlighted with a yellow marker, and files with bit depth are highlighted in green. To download, select ISO images.
Depending on the version you choose, you will be taken to a page with direct downloads or trusted download mirrors.
Android-x86
As you know, Android sources are open - this is Google's policy. Therefore, anyone, in principle, has the opportunity to take the original version of the mobile OS as a basis and start developing their own branch. Many enthusiasts are actively releasing patches that implement additional functionality that is not present in the original Android.
This is how the “patch hosting for android x86 support” project appeared. The developer planned to release patches to support the x86 platform. But after several months of work, they realized that they were capable of more than just delivering patches. This is how the Android-x86 project appeared - a special version of the mobile OS for running on the most ordinary computer. Android-x86, like Android, has different branches. The cult netbook Eee PC was chosen as the test platform, but it actually doesn’t matter where you install the project. This can be either a computer, a tablet or a laptop (tested devices include ASUS Eee, Viewsonic Viewpad 10, Dell Inspiron Mini Duo, Samsung Q1U, Viliv S5, Lenovo ThinkPad x61 Tablet). The latest build even has Wi-Fi support.
The vga=ask parameter allows you to manually select the desired video mode
Other articles in the issue:
Hacker #157. Money from bugs in Chrome
- Contents of the issue
- Subscription to "Hacker"
However, if installing Android on a laptop is more like pampering, then installing it on a virtual machine can bring quite tangible benefits, especially for those who want to try their hand at Android development, since after installation it will be much more convenient for them to test applications (though , you will have to put up with some limitations, such as the lack of accelerometer emulation). I suggest moving on to practice.
Creating a virtual machine
While the image is downloading, create a virtual machine on which the installation will be performed.
- In VirtualBox Manager, click on the “Create” button.
- Fill in the fields as follows:
- Name: Android
Type: Linux
- Version: Other Linux (32-bit) or (64-bit).
- For stable and comfortable work with the OS, allocate 512 MB or 1024 MB of RAM.
- Leave the option to create a virtual disk enabled.
- Leave the disk type as VDI.
- Do not change the storage format either.
- Set the virtual hard disk size to 8 GB or more. If you plan to install applications on Android, then allocate more free space.
Setting up a virtual machine
Before starting, configure Android:
- Click on the “Configure” button.
- Go to System > Processor, install 2 processor cores and enable PAE/NX.
- Go to "Display", set the video memory to your liking (the more the better), and enable 3D acceleration.
The rest of the settings are at your discretion.
Android installation
Start the virtual machine and install Android:
- In VirtualBox Manager, click on the “Run” button.
- As the boot disk, specify the Android image that you downloaded. To select a file, click on the folder icon and find it through system Explorer.
- The boot menu will open. Among the available methods, select “Installation - Install Android-x86 to harddisk”.
- The installer will begin to launch.
- You will be asked to select a partition to install the operating system. Click on "Create/Modify partitions".
- When prompted to use GPT, answer “No”.
- The cfdisk utility will load, in which you will need to create a partition and set some parameters for it. Select "New" to create a partition.
- Set the partition as primary by selecting “Primary”.
- At the stage of selecting the volume of the partition, use the entire available one. By default, the installer has already entered all the disk space, so just press Enter.
- Make the partition bootable by giving it the “Bootable” parameter.
This will appear in the Flags column.
- Apply all selected options by selecting the “Write” button.
- To confirm, type the word “yes” and press Enter.
This word is not displayed in its entirety, but is written in full.
- The settings will begin to apply.
- To exit the cfdisk utility, select the Quit button.
- You will be taken to the installer window again. Select the created partition - Android will be installed on it.
- Format the partition to the "ext4" file system.
- In the formatting confirmation window, select “Yes”.
- When prompted to install the GRUB boot loader, answer “Yes.”
- The Android installation will begin, please wait.
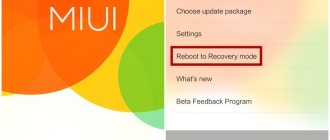
- When the installation is complete, you will be prompted to start the system or reboot the virtual machine. Select the desired item.
- When you launch Android, you will see the company logo.
- Next, the system needs to be configured. Select your desired language.
Controls in this interface can be inconvenient - the left mouse button must be held down to move the cursor.
- Choose whether you want to copy Android settings from your device (smartphone or cloud storage), or whether you want to get a new, clean OS. It is preferable to choose option 2.
- The update check will begin.
- Sign in to your Google Account or skip this step.
- Adjust the date and time if necessary.
- Please enter your username.
- Customize the settings and disable those you don't need.
- Configure additional settings if you wish. When you're ready to finish setting up Android for the first time, click on the "Done" button.
- Please wait while the system processes your settings and creates your account.
From here onwards, perform the installation using the Enter key and the arrow keys on your keyboard.
After successful installation and setup, you will be taken to the Android desktop.
How to install Android 8.1 Oreo on VirtualBox
Historically, Android . However, there is nothing to be surprised here. Android is free, customizable, and has many apps written for it. But, despite all its advantages, this operating system is practically not suitable for installation on ordinary desktop computers, although this does not mean that such an installation is impossible in principle.
There are modified x86 versions of the system; after all, you can install Android on a VMware Workstation or VirtualBox .
For what purpose? There may be plenty of reasons, for example, the developers have released a new version of the system shell and you want to get acquainted with it, so to speak, live, which we, in fact, will demonstrate using the example of installing the Android 8.1 Oreo the VirtualBox virtual machine . The installation procedure of this OS is very similar to the installation procedure of Windows and Linux, but there are some differences in it that should be taken into account, otherwise the installation will not work.
So, let's begin.
Let's assume that you already have VirtualBox, all that remains is to download the distribution kit with Android 8.1 Oreo. Go to the official page www.android-x86.org/download and download the ISO of the required bit depth.
Launch VirtualBox, create a new machine with a suitable name, select operating system type Linux , version - “Other Linux” .
Set the amount of memory to at least 1 GB, or even more, Android is not optimized for a virtual platform, the system lags even with a sufficient amount of allocated RAM, if you allocate little, you simply will not be able to control the interface.
We do not change the remaining parameters and click “Create” .
In the next window, VirtualBox will offer to allocate the amount of physical memory to the operating system; here, too, you don’t have to change anything; the default 8 GB of Android Oreo is enough.
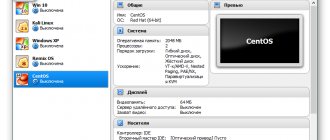
Now the most important thing is to configure the virtual machine settings.
Go to VM settings.
Switch to the “Media” and perform the following steps.
By default, the connected VDI has the attributes “Primary IDE Master” , you assign these attributes to the virtual CD-ROM , and assign the attribute “Secondary IDE Master” VDI .
Next, in the optical drive settings, click on the CD-ROM and select the installation image with the operating system, and at the same time check the box for the live CD/DVD .
We’ve sorted out the media settings, now switch to the “Display” , allocate 128 MB of video memory to the machine and enable 3D acceleration.
Leave the rest of the settings unchanged, click “OK” and start the virtual machine.
When the installation wizard window appears on the screen, use the arrow keys to select “Advanced options” .
And press enter, in the next window select the option “Auto_Installation - Auto Install to specified harddisk” .
And press Enter again.
Confirm the installation by selecting “Yes” .
The wizard will format the virtual disk and install Android .
The installation procedure takes a few minutes, during which time you will see an animated company logo on a black screen.
Once the installation is complete, a welcome window will appear in which you will be asked to perform basic settings - select a language, time, connect to the Internet and create a user.
Launch Android after installation
Before subsequent launches of the virtual machine with Android, you must remove from the settings the image that was used to install the operating system. Otherwise, instead of starting the OS, the boot manager will load each time.
- Go to the virtual machine settings.
- Go to the "Media" tab, highlight the installer ISO image and click on the delete icon.
- VirtualBox will ask you to confirm your actions, click on the “Delete” button.
The process of installing Android on VirtualBox is not very complicated, but the process of working with this OS may not be clear to all users. It's worth noting that there are dedicated Android emulators that may be more convenient for you. The most famous one is BlueStacks, which runs smoother. If it doesn't suit you, check out its Android-emulating counterparts.
We are glad that we were able to help you solve the problem. Add the Lumpics.ru website to your bookmarks and we will be useful to you. Thank the author and share the article on social networks.
Describe what didn't work for you. Our specialists will try to answer as quickly as possible.
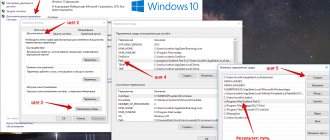
Setting up audio and video
Sound. After installing Android-x86, the sound very often stops working. I also discovered this problem when I went to Youtube to watch videos. Fortunately, everything turned out to be not so bad, and replacing the sound card in the virtual machine settings with “Intel HD Audio” eliminated the problem. If a simple solution does not help, there is a FAQ on the official website that describes how to get ICH AC97 to work under VirtualBox.
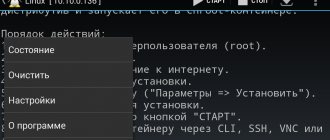
Video. The Android operating system is aimed at a wide range of devices, from smartphones to watches. Obviously, devices have different sizes and therefore different screen sizes, so it would be great to test the application you are developing at different resolutions. This is not difficult to do. When starting the virtual machine, you need to wait until GRUB offers options for loading the OS, and select “Android-x86 2.2 (HDPI)” from the menu. Next, press “e” to edit the entry. Another menu will appear in which you should select an entry like “kernel /android-2.2/kernel /quiet root ....”. Press “e” again and at the end of the line add “vga=ask” separated by a space. Press Enter to save and “b” to load. After this, all available video modes will be displayed on the screen; all you have to do is select the one you need and enter its number. For example, the 1152x864x32 VESA mode is designated as 34C.
List of available video modes