Linux can be useful to you for many reasons. For example, your old computer can't be upgraded to new versions of Windows or macOS, or you need Linux-specific applications, or you're just curious to try something new. Or maybe you just bought a new computer without an operating system and want to save money by choosing free Linux.
Installing Linux is easy. Of course, there are distributions like Arch, which are quite difficult to install for a beginner. But most modern distributions are very easy to install. Perhaps even simpler and faster than Windows.
Before installing Linux on your main computer, make a copy of your important data. When working with partitions on your hard drive, you may accidentally erase something important. Of course, if you follow the instructions and carefully read what you are doing, then nothing unexpected will happen. But backup is a good thing in any case.
You can install Linux on computers running Windows and macOS or on an empty hard drive. You can choose Linux as your main system or use it in parallel with your old system.
Download Linux distribution
First of all, you need to choose a Linux distribution. The DistroWatch.com rating will help you decide.
Then you need to download the selected distribution. This is easy to do: open the website of the desired distribution, find the downloads section and select the one that suits the bit capacity of your processor.
As a rule, Linux distributions on official websites are offered for download in two ways. The first method is a normal download. The second is via P2P using a torrent client. The second method is naturally faster. So choose it if you want to save time.
Write the distribution to media
When the distribution kit in ISO format is downloaded, you need to burn it to a CD or a regular USB flash drive.
Burning to a CD can be done using standard system tools: “Burn a disk image” in Windows or “Disk Utility” in macOS. Just right-click on the downloaded image and select the appropriate item in the menu.
To burn ISO to a flash drive, you will need special utilities. For Windows it is better to choose Rufus, and for macOS - UNetbootin. These programs have a very simple interface, it is quite difficult to get confused in them.
Prepare the disk partition
This step should be followed if you want to keep the system installed on you and use Linux at the same time as it. If you decide to switch your computer completely to Linux or are installing the OS on an empty hard drive, skip this paragraph.
Windows
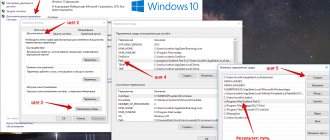
Open Windows Disk Management. Select the drive or partition from which you plan to carve out some space to install Linux. For most distributions, 10 GB is more than enough. But if you plan to install a lot of apps, get more. Right-click on the partition and select Shrink Volume. Enter the size and click OK.
The process can take quite a long time, so be patient.
When Disk Management finishes resizing the partitions, there will be empty unallocated space on the disk, marked in black. We will install Linux there.
Later, if you don’t need Linux, you can delete partitions with it and give the free space back to Windows using the same Disk Management Tool.
macOS
You can allocate space for installing Linux through macOS Disk Utility. Select your drive and click on the “+” icon to create a partition for Linux. Creating a new partition may take some time.
Solution.
Please note that the entire algorithm is built for Linux Mint OS. On other Linux systems (not based on Ubuntu or Debian), the directory names and commands may be slightly different.
- Install Linux next to Windows, using the appropriate option in one of the first installation steps or (if this option does not appear) by partitioning the hard drive properly (deserves a separate article, this is also already written about on the Ubuntu wiki).
- DO NOT reboot your computer after installation. If you rebooted, it’s okay, you’ll just have to boot from live-cd\usb\dvd again (after all, Linux won’t start for you?).
- Just in case, run the command sudo update-grub (entering a blank password when prompted).
- Open a console\terminal or by other means (for example, using the program manager in Ubuntu\Linux Mint) install mc. In the console (for systems with apt) this is done as follows: sudo apt-get install mc (after which you will need to enter a password, let me remind you that there is no password in live mode, just press Enter and agree to the installation).
- Run mc as root: sudo mc (and again an empty password if asked).
- Find the following directory in the file system: /boot/efi/EFI .
- Rename the directory (combination ctrl+F6 in mc) Microsoft to something else, for example Microsoft2.
- Create a new directory named Microsoft (F7 key).
- We go to the newly created Microsoft directory and partially (see below) create a folder hierarchy within it similar to the old Microsoft (the one that was renamed). In my case, it had this folder structure: /boot/ , then a bunch of folders and a bootmgfw.efi next to them. You need to recreate the folder structure exactly up to this file. Those. everything that lies next to it is not needed, and everything that goes before it (i.e. parent folders, those adjacent to them are also not needed) is recreated in our new Microsoft folder. In my case, I only needed to create the boot folder, the final path to the new directory was: /boot/efi/EFI/Microsoft/boot .
- We find in the directory from step 6 a folder with the name of our Linux distribution, in our case it is ubuntu . We copy (we leave the original files and the ubuntu folder just in case, it won’t hurt) all the files from this folder to the final directory created in the previous step (in /boot/efi/EFI/Microsoft/boot ).
- In the resulting file system (in the directory created in step 9 and the files moved to it in step 10) we find the file grubx.efi or grubx64.efi (there will be only one of them: depending on the bitness of the installed Linux). Rename it to bootmgfw.efi .
- Find the file /boot/grub/grub.cfg . Open it for editing (F4 key). Inside it we find (the F7 key opens a text search form) the word “Microsoft” in the context of the line starting with “chainloader” and replace this word (there should be only one occurrence and it is in the line with “chainloader”, so you can’t go wrong) with the name of the directory to which we renamed Microsoft in step 7 (i.e. Microsoft2 in our example). Save the changes to the file (F2 key - save).
That's all. It looks very complicated, but if you follow everything exactly according to the steps (which are described in as much detail as possible!), then everything will work out without any problems. And, after a reboot and subsequent boot from the hard drive (and not from the live media), we will see the coveted screen with the OS selection menu. Hurray, comrades!
Prepare the bootloader
Windows
This point only applies to new computers running Windows 10, 8.1 or 8 pre-installed. These computers use a UEFI boot loader, which will not allow you to boot into anything other than Windows.
To fix this, go into your computer's BIOS settings and disable the Secure Boot option. Then reboot. Done, you can now download and install other systems next to your Windows.
macOS
Unlike most computers, a Mac requires a couple of additional steps to install Linux on dual boot with macOS.
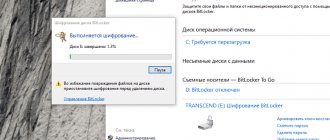
First of all, disable SIP. Restart your Mac and press Cmd + R. The Recovery menu will appear. Select “Terminal” in it and enter csrutil disable.
Restart your Mac again. SIP is disabled.
Download and install rEFInd. The built-in Boot Camp utility can help you install Windows only. rEFInd can boot macOS, Windows, and Linux. So you can choose which system will boot at startup.
Unpack rEFInd. Then open Terminal and type diskutil list. Find the name of your EFI boot loader in the list that appears. Most often this is /dev/disk0s1.
Type mount /dev/disk0s1 and start the rEFInd installation by dragging install.sh from the unpacked folder into the Terminal window.
Uninstall Linux and revert to Windows boot loader
After playing around with the new operating system, many users decide to return to the familiar Windows environment. Is it possible to remove Linux if it was installed on a partition along with Windows?
No problem - you just need to delete this partition, but in a Windows environment. And this will require restoring the native bootloader. When you turn on the computer, select to boot Windows, and then run the Dism++ utility.
Select the “Recovery” item in the top menu, and the “Restore” item in the submenu. loading”, confirm.
Then we launch the standard Windows Disk Management tool and delete all Linux partitions, and attach the free space to the disk partition in which we created new partitions.
So we looked at installing Linux next to Windows, trying to cover the process in as much detail as possible. We hope that if you encounter an unexpected situation during installation, you will be able to resolve it yourself.
Start installing Linux
We are greeted by the Linux installer. For example, we will take the Ubuntu distribution. But the installation processes for Mint, openSUSE, Fedora, Debian, Manjaro and most other distributions are almost identical.
The exception is distributions that use a pseudo-graphical installer. The only serious difference with this installer is that you will have to select options using keys. Otherwise everything is the same.
Select the language you want to use on the system and click Install. Then about making Linux able to use proprietary drivers and codecs. The "Download updates during installation" option can be turned on or left off if your Internet connection is not very fast.
Installing Linux on UEFI boards
I will look at installation using Ubuntu as an example, but all steps are similar for other distributions. First you need to burn the disk image to a flash drive. Most distributions already support UEFI booting.
Step 1: Burn Linux to UEFI Flash Drive in Linux
To write an image to a flash drive in Linux, it is better to use the Etcher utility. The program will write media that can be booted into both UEFI and a regular system. After starting the program, you need to select the system image:
Then the memory card and wait for the recording to complete:
You can also write the image to a flash drive manually. This is easier than for a regular BIOS, although it will require more steps. First, format your media to FAT32. This can be done in the standard Gnome Disk Management utility:
Then unzip the contents of the installation image to the root of the flash drive:
sudo mount /path/to/image.iso /mnt sudo mount /dev/sdb1 /media/flash/ sudo cp -r /mnt/* /media/flash
Here /dev/sdb1 is the name of the partition of your flash drive. You can do all these steps in the file manager. It is not necessary to use commands. Next, you need to set two flags on the partition of the flash drive where you unpacked your files - boot and lba. This can be done using Gparted. Just run the program, select your flash drive in the list of disks:
Right-click on the partition, select Manage Flags and check the boxes next to the boot and lba flags.
Whatever method you use, your flash drive is ready and you can boot from it. Most Linux images already contain an EFI boot loader and the computer's firmware will find it the next time it reboots.
Step 1 (alternative). Burning Linux to a UEFI flash drive in Windows
If you decide to burn Linux on Windows, then it is better to use the Rufus utility. It is necessary to set the following parameters:
- Partition layout and system interface type: GPT for computers with UEFI;
- File system: FAT32.
All other parameters are default. Once recording is complete, your flash drive is ready for use.
Step 2: Select Boot Order
In order for your system to boot from the flash drive you just recorded, you need to disable UEFI Secure Boot. This mode allows only signed operating systems to boot, and only Microsoft operating systems are signed. Therefore, for Linux this mode must be disabled. I also have this setting on the Boot tab:
In addition, you need to install the flash drive in the first place:
After this, you can restart your computer and begin installation. If you see a window like this, then everything is fine. Here you need to select “Try Ubuntu without installing”, this is a prerequisite:
I will not describe all the installation steps that need to be completed, they are no different from installing a regular OS, the only difference is installing the bootloader and disk partitioning. We will dwell on it further.
Step 3. Disk partitioning for UEFI
UEFI has several differences from BIOS in this regard. The first is the use of a GPT disk partition table. This is a new technology that has many advantages over MBR, including a very large number of primary partitions (MBR has only four), recovery from damage, and much more. Read more about how GPT differs from MBR in a separate article. The second difference is that the operating system boot loader files are no longer stored in the first 512 bytes of the hard drive. All of them are stored on a separate partition called ESP.
Before clicking “Install Ubuntu” , it is advisable to prepare the disk using Gparted. Open the utility from the main menu of the image. Then select Device -> Create Partition Table:
Select GPT partition table from the list:
Next we move on to creating sections.
Step 4: Create an ESP partition
In Gparted we only need to create an ESP partition for UEFI. To do this, select “Unnoticed”, and then right-click on it and select “New”:
You must select FAT32 as the file system for the partition, size - 100 megabytes. Next, click the “Apply” to apply the changes.
Then click "Manage Flags" and check the boxes next to the "boot" and "efi" .
Next, move on to the Ubuntu installer.
Step 5. Disk partitioning option
When the system prompts you to select a markup method, you can let the system mark everything up automatically. But this is only if you do not already have any operating system installed. Otherwise, select “Custom option” :
Step 6. Assigning partitions
If you chose a different layout option, a menu will open in front of you with a list of all sections. Find the “Bootloader installation device” and select the partition for EFI from the list.
Then click on the EFI partition in the list and select “EFI System Partition” :
You can then continue the installation as usual. You need to create a root partition, and you can optionally create a bootloader, swap, and home partition. You can read more about installing Ubuntu 18.04 at the link.
Step 7: Complete installation
Once all the files are unpacked and the bootloader is installed, the Linux installation on UEFI is complete, you can reboot your computer and use your system as usual.
But let's also look at managing menu items and EFI boot loaders.
Partition the disk
This is a critical stage at which you must be very careful.
The next steps vary depending on whether you want to install Linux alongside your system or replace your system. Don't accidentally erase the disk if you want to keep your system.
How to install Linux instead of your current system
So, you've decided to install Linux instead of your current system (or on an empty hard drive). There are two options.
Auto
The installer will erase all data from your disk, create new partitions and install the system without bothering you with unnecessary questions. To do this, select “Erase disk and install Linux.” Before performing a clean install, save your files to another hard drive or cloud storage.
Manual
Suitable if you want to set the sizes for your partitions yourself or, for example, create a separate partition for your files. To do this, select “Other option” and click “Continue”.
Linux will display what partitions you have on your computer. You can delete them, format them, or, conversely, leave the sections with the information you want to save intact.
To install Linux instead of your system, select the partition with the installed system and delete it with the “–” button. Then create new partitions in the free space.
- Root partition for Linux system files. Select Ext4 file system and mount point /.
- A swap partition, or swap partition, is useful if you do not have enough RAM, but have a fast SSD drive. In the list of file systems, select "Swap Partition".
- Home partition where your files will be stored. Select the Ext4 file system and the /home mount point.
Click Continue and confirm the changes. The installer will erase the partitions you selected and create new ones in the free space.
How to install Linux next to your current system
There are two ways to install Linux next to your system.
Auto
Most Linux installers will immediately detect the systems you have installed. If you haven't created a separate disk space for Linux, you can try selecting the "Install next to Windows" option. The installer will automatically create the necessary partitions, and you will not have to do anything manually.
Manual
If you want to determine for yourself how much space to allocate to the system, and followed the instructions in step 3, click “Other option” and click “Continue”. You will see your disk partitions and empty space that we have prepared for Linux. Create a root partition there (mount point /) as described above. A home partition is not necessary in this case: you will be able to copy and modify files on your main system.
Click Continue. The installer will leave your files in place. It will simply create new partitions on the free space. You will be able to choose which system you want to boot at startup.
How to install Ubuntu along with Windows 7
Installing Linux on the same computer with Windows 7 is the easiest task of all possible OS combinations. The simplicity lies in using a regular bootloader, since the UEFI interface is not familiar to Windows 7.
Preparing a hard drive using Windows
Windows OS uses the entire disk. At this stage, it is necessary to allocate a certain amount of space for the new system without disrupting the current performance.
To solve the problem, you can resort to the Linux installation image, but under Windows this is easier and safer.
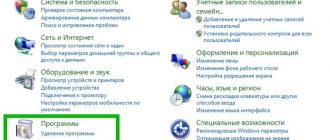
First you need to go to the “Disk Management” section, which can be accessed by clicking on the “Manage” item in the context menu of the “My Computer” shortcut.
Windows often has two partitions: C is where the system is installed, D stores game files, documents and other data. When dividing, it is better to touch the D drive. If it is not there, then on the only drive you can cut off memory only from the end. So, to reduce the partition, mark the desired volume and right-click to bring up the menu. Here you need to select the “Shrink volume” option.
Now you need to enter the volume of the volume to be created in the “Size of compressed space” field. In this case, you can set the value to no more than the free space of the partition.
Attention! It is advisable to allocate a total volume of at least 100 GB if you plan to use Linux as the main system. The indicated 22 GB in the picture is taken as an example.
The main events in Windows have been completed. Now you can proceed to installing Ubuntu using Linux itself.
Creating a bootable USB flash drive
The next step is to download the current version of the OS from the official Ubuntu website and write it to removable media, for example, a flash drive. On Windows, the simplest tool is the Rufus utility.
In the program, you need to specify the drive for recording and, opposite the “Create bootable disk” option, select “ISO image”. An explorer window will appear to search for the downloaded image. The recording will start after clicking on the “Start” button. When finished, you need to restart your computer.
Installation process of Ubuntu next to Windows 7
After the reboot, at the device checking stage, you must enter the BIOS and select the flash drive on which the Ubuntu installation image is stored to boot.
When Ubuntu starts, you need to immediately press any key to select the language. The next step is “Run Ubuntu without installation.” Now you can run the installer, and then step by step (after each step, click the “Continue” button):
- Select language.
- Check all the boxes to be able to update and install additional software.
- Work with the disk begins. If you are unsure, you can run a silent installation of Ubuntu next to Windows. When you select “Other option,” a window will open where you can independently distribute disk space to suit your needs. In the example, 22 GB was selected, but it is recommended to set at least 50. To create a swap partition, you need to make the “Free space” line active and click “+”, in the window that opens, set the size approximately equal to the amount of RAM, and the file system – “swap partition” " The system partition is created next. Its size should not be less than 8 GB. If you plan to install many programs, then it is better to set a larger amount of memory. Select ext4 file system. The mount point is “/”. The home section will take up all the remaining space. The file system is ext4, the mount point is “/home”.
- Now everything is ready for installation, you can start it by clicking the “Install Now” button. Subsequent windows will prompt you to create a user, which does not require any special knowledge.
After installation, every time you turn on the computer, you can change the system from Windows to Linux, and vice versa.
Complete the Linux installation
Then everything is simple. The installer may ask you where you are to determine your time zone and prompt you to select your preferred input language.
You will then be asked to introduce yourself. Enter your name and create a password. Don't forget your password, as you will constantly need it to perform tasks on behalf of everyone. If you wish, you can encrypt your home folder.
Then just wait. When the installation is complete, you will be prompted to remove the installation disc and reboot. Don't forget to disable booting from external drives in the BIOS if you enabled it.
Linux installation process - step by step instructions
Step 1 - Greetings. After launching the Ubuntu image, you will see a “Welcome” tab. Here you should select the language “Russian” and click on the button install Ubuntu.
Notice the first link "Run Ubuntu". It will allow you to boot from a disk without installation (LiveCD). This feature allows you to see what Ubuntu looks like, whether you should install it, etc. All changes made after such a start will not be saved, so this option is unlikely to be suitable for practical use.
Step 2 - Automatic download of updates. The second step is that Ubuntu will ask for permission to automatically install and update all drivers. To do this you will need access to the Internet.
I think that it would be logical to allow this so that your drivers have the most current version after installing Linux.
Step 3 - Select installation type. At this step, you need to choose the location where to install Ubuntu, as well as the disk partition. Since in our example we install Linux on VirtualBox, we can select the first option “Erase disk and install Ubuntu”:
If you are installing Ubuntu together with another system, then you need to select the “other option” and partition the disk yourself. To do this, you will need to specify the main partition, home folder, disk size, page file size and select file system types (ext4 main and swap for the page file).
Step 4 - Keyboard Layout. Select "English (US)" as the default to avoid problems with the layout in the future. After installation, you can add the Russian layout.
Step 5 - Setting a name. You are required to provide a username and password. This name will be used as the name for the Linux home directory. I also selected the “log in automatically” option:
Step 6 - Installation. Next comes the installation process. Now you just need to wait for the end.
Upon completion, the installer will tell you to restart your computer:
Then you will need to press Enter:
After rebooting, Ubuntu will start. You will see the following picture:
Actually, this completes the installation of Ubuntu. Now you can start using it.
I recommend taking a “snapshot” of the new system in VirtualBox so that you can always roll back to its original state.