Update center
Very often in the comments I am asked a question related specifically to Windows 10: how to disable system updates? Friends, in my opinion, the easiest way to do this is to deactivate the Update center. Let me briefly and concisely tell you how to do this:
- Start => Run / Win+R => type in an empty line services.msc => OK / Enter.
- Services window => two clicks on Update Center.
- “Properties” window => “General” tab => “Startup type” section => select the “Disabled” option => click “Stop” => OK.
Deactivating Windows 10 update
Windows 10 OS, by default, automatically checks for updates without user intervention, downloads and installs them on its own. Unlike previous versions of this operating system, Windows 10 differs in that it has become a little more difficult for the user to disable the update, but it is still possible to do this both using third-party programs and using the built-in tools of the OS itself.
Next, we’ll look step by step at how you can cancel automatic updates in Windows 10, but first, let’s look at how to pause it, or rather, postpone it for a while.
Restricting Internet access
There is an interesting option to prevent automatic upgrades - installing a limited Internet connection. Limited availability on select Spring 2020 releases (for designers). This is done like this:
- “Settings” => “Network and Internet” => Wi-Fi => “Manage networks” => “Advanced settings”.
- “Parameters” window => command “Set as metered connection” => switch the slider to the “Enabled” position.
Microsoft Show or Hide Updates utility
Friends, sometimes some Windows 10 users ask me: how to disable driver updates for a specific product, and not for the entire operating system. The easiest method is to use a special utility from Microsoft. It's called Microsoft Show or Hide Updates. Here's how to use it:
- Pre-download => install => run the utility.
- “Next” button => Hide Updates item.
- Check the box next to the desired option => click “Next”.
Temporarily suspending the update
By default, the Windows 10 operating system has a feature that allows you to defer the download and installation of updates for up to 30-35 days (depending on the OS build). To enable it you need to follow a few simple steps:
- Click the "Start" button on the desktop and go from the menu that opens to "Settings" of the system. As an alternative, you can use the key combination “Windows + I”.
- Through the “Windows Settings” window that opens, you need to go to the “Update and Security” section. Just click on its name once with the left mouse button.
- Next, you need to go down just below the “Windows Update” block, find the “Advanced options” line and click on it.
- After that, look for the “Pause updates” section on the page that appears. Slide the switch below to the “On” position.
You can now close all previously open windows. Please note that once you click the "Check for Updates" button, the suspend feature will be automatically turned off and you will have to repeat all the steps again. Next, let's move on to more radical, although not recommended, measures - completely disabling the OS update.
Method 1: Win Updates Disabler
Win Updates Disabler is a utility with a minimalist interface that allows any user to quickly figure out what’s what. In just a couple of clicks, this handy program allows you to disable or enable system updates without having to understand the OS system settings. Another advantage of this method is the ability to download from the official website both the regular version of the product and its portable version.
So, to disable Windows 10 updates using the Win Updates Disabler utility, simply follow these steps.
- Open the program after downloading it from the official website.
- In the main window, check the box next to “Disable Windows Update” and click on the “Apply Now” button.
- Restart your PC.
Method 2: Show or hide updates
Show or hide updates is a utility from Microsoft that allows you to prevent certain updates from being installed automatically. This application has a more complex interface and allows you to quickly search for all currently available Windows 10 updates (if the Internet is available) and will offer to either cancel their installation or install previously canceled updates.
You can download this tool from the official Microsoft website. To do this, follow the link below and scroll down a little to the location indicated in the screenshot.
The procedure for canceling updates using Show or hide updates looks like this.
- Open the utility.
- In the first window, click "Next".
- Select "Hide updates".
- Check the boxes next to the updates that you do not want to install and click “Next”.
- Wait for the process to complete.
It is worth noting that using the Show or hide updates you can prevent the installation of only new updates. If you want to get rid of old ones, you must first remove them using the wusa.exe with the .uninstall .
Method 3: Standard Windows 10 tools
Windows 10 Update Center
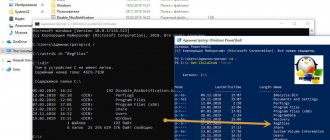
The easiest way to disable system updates using built-in tools is to simply disable the Update Center service. To do this, follow these steps:
- Open Services. To do this, you need to enter the command services.msc in the “Run” window, which, in turn, can be called by pressing the key combination “Win + R”, click the “OK” button.
- Next, in the list of services, find “Windows Update” and double-click on this entry.
- In the Properties window, click the Stop button.
- Next, in the same window, set the “Startup Type” field to “Disabled” and click the “Apply” button.
Local Group Policy Editor
It is worth immediately noting that this method is only available to owners of Pro and Enterprise versions of Windows 10.
- Go to the Local Group Policy Editor.
To do this, in the “Run” window (“Win + R”) enter the command: gpedit.msc - In the “Computer Configuration” section, click on the “Administrative Templates” element.
- Next, “Windows Components”.
- Find "Windows Update" and in the "Status" section, double-click on "Set up automatic updates."
- Click "Disabled" and the "Apply" button.
Registry
Also, owners of Windows 10 Pro and EnterPrise versions can turn to the system registry to disable automatic updates. This can be done by following these steps:
- Press “Win+R”, enter the command regedit.exe and click on the “OK” button.
- Expand "HKEY_LOCAL_MACHINE" and select the "SOFTWARE" section.
- Navigate to the branches “Policies” - “Microsoft” - “Windows”
- Next “Windows Update” - “AU”.
- Create your own DWORD value. Give it the name “NoAutoUpdate” and enter the value 1.
Local Group Policy Editor
For Pro and Enterprise editions (except Home), it is recommended to stop automatic upgrades using the Local Group Policy Editor. This method is somewhat more complicated than those presented above, but it is quite doable:
- Win+R / Start + Run => in an empty line type gpedit.msc => Enter / OK.
- Section “Computer Configuration” => subsection “Administrative Templates” => directory “Windows Components” => directory “Update center” => two clicks on the item “Setting up automatic updates”.
- Mark the “Disabled” option with a dot => “Apply” => OK.
- Go to Update center=> click “Check for updates” (for the settings to take effect).
To stop automatic downloads and installations of new versions of the system in the tenth version of Windows, a bunch of special programs were invented, for example, Win Updates Disabler. You can use them, but it requires some practice. In today’s article, I tried to break down the most basic and simple methods. I hope everything is clear. If not, write in the comments. I will answer everyone. See you soon.
How to Show Hidden Windows Updates in Windows 10
This option allows you to display a hidden Windows update using the option described above.
- Download the wushowhide.diagcab file from the KB3073930 web page at Microsoft and run it.
- Click "Advanced".
- Check the "Apply repairs automatically" checkbox and click Next.
- When problems are found, click on the Show hidden updates option.
- Check the box for any hidden updates (if any) that you want Windows Update to show again and click Next.
- Selected hidden updates are no longer hidden. Click Close when finished.
- You can now check for updates in Windows Update to download and install them.
- Related materials