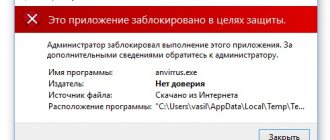
During the installation and connection of new devices in Windows 10, the error “ third-party inf does not contain signature information ” may appear. This means that the driver that is trying to install with this device has not been tested for compatibility with this version of Windows 10. According to the operating system developers, such a driver should not be installed.
Error window “third-party inf does not contain win 10 signature information”
But what can we do? After all, a device without a driver will not work. There is an exit! This is a temporary disabling of driver signature verification in Windows 10. You will learn how to do this in this article.
Disabling Windows 10 Driver Signature Verification One Time
This method allows you to disable driver signature verification one-time, until the next computer restart. That is, we disabled the verification, installed the driver, rebooted Windows and that’s it, the signature verification service works again.
Click on the Start menu and go to Windows Settings (gear icon).
Go to the "Update and Security" section.
Go to the “Recovery” tab and in the “Special boot options” section, click “Restart now”.
The computer will reboot and launch a special bootloader. Go to "Diagnostics".
Next, click on “Advanced options”.
Next, go to the “Download Options” item.
A menu will open with a choice of boot options for Windows 10. Click on the “Disable mandatory driver signature verification” item.
You can either click on this item or simply press the F7 key on your keyboard. After this, Windows 10 will boot without checking driver signatures, and you can safely install it. The next time you boot your computer, signature verification will work again.
Risks of disabling digital signature of drivers
Such an action involves many risks. The most common problems with shutdowns are malware infections. Such cases are not frequent, but no one is immune from this. Some users, after installing a certain driver that has absolutely no signature, try to re-enable the protection. This may keep the computer safe, but if there was a virus, it will be extremely difficult to detect the malware. Some antiviruses are not able to find virus files, so you should be extremely careful when performing this action.
Disable Windows 10 Driver Signature Verification Permanently
If there are three solutions, how can you disable driver signature verification forever.
Disable via Group Policy.
Disabling signature verification through the Group Policy Editor is only possible in Windows 10 Professional. If you have a home version, then the method described in the next chapter of this article will suit you.
Launch the Windows 10 Local Group Policy Editor. To do this, right-click on the Start menu and left-click on “Run”. Or just press the Win+R key combination.
Write gpedit.msc in the window that opens and press OK or Enter.
In the Group Policy editor that opens, go to the following registry branches: “User Configuration” - “Administrative Templates” - “System” - “Driver Installation”. Double-click on the line on the right “Digital signature of device drivers”.
In this setting, you can choose two options in which you will solve your problem with driver signature verification. By default, the setting is “not configured”. If you enable the setting, then select the “skip” subsetting. In this case, if Windows detects a driver file without a digital signature, it will still allow you to install it. You can also explicitly select “disabled” and in this state the check will be disabled in principle.
Once you have changed the settings click “Apply” and “OK”. After restarting the computer, driver signature verification will not be performed. If you need to return driver signature verification again, you will have to return to this menu and select the setting status “enabled” and “block”.
Disabling via command line
Disabling driver signature verification via the command line has a limitation. This feature is only available if your computer is running BIOS. If you have UEFI, then you must first disable Secure Boot.
The procedure is as follows. Right-click on the Start menu and open Command Prompt with administrator rights.
In the command prompt that opens, type the following command and press Enter.
bcdedit.exe -set loadoptions DISABLE_INTEGRITY_CHECKS
Now enter the second command and also press Enter. bcdedit.exe -set TESTSIGNING ON
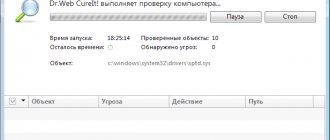
After the commands work (as in the screenshot above), restart your computer. Checking driver signatures will be disabled, but a sign indicating the test mode of Windows 10 will always be displayed in the lower right corner of the screen.
To remove it, you will need to open a command prompt with administrator rights and enter the following line there:
bcdedit.exe -set TESTSIGNING OFF
Disable via Safe Mode and bcedit
This proven method is, in my opinion, the most convenient. Start your computer in safe mode.
Right-click on the Start menu and launch Command Prompt with administrator rights.
At the command prompt, type the following line: bcdedit.exe /set nointegritychecks on and press Enter. Reboot your computer, after which signature verification will be disabled.
To re-enable the check, perform the same operations, but enter the line bcdedit.exe /set nointegritychecks off .
Why is the driver not digitally signed?
Most often, this situation occurs with computer devices (flash drives, web cameras, etc.). purchased in China. There, manufacturers do not care much about compatibility and obtaining a digital signature from Microsoft.
Also, driver signature errors can occur with older devices that have not been tested for compatibility with Windows 10 simply because they were created long before it was introduced.
But if the driver does not have a digital signature, this does not mean that it will not work correctly or harm the operating system.
You can try to install it by disabling this very check, and in case of problems, remove the faulty driver through safe mode.
Option 2: Using the Advanced Boot Menu
You can switch to test mode with driver signature verification disabled using the Windows 10 extended boot menu. Changing the OS startup configuration is not permanent, and the next system boot will take place as usual.
To access the advanced options menu, you must press and hold the Shift key while pressing the Restart button in Windows.
On the “Advanced Options” screen that appears, select the “Boot Options” option. Configuring Windows boot options." On the next screen, click the "Reboot" button.
After a few seconds, the “Boot Options” screen will appear, on which, using the “F7” key, you need to select the option to disable mandatory driver signature verification.
The computer will restart using test mode, and driver signature verification will be disabled. Now you can install any drivers that have not been officially signed by Microsoft. To exit test mode, you just need to restart your PC in the usual way.
Option 1: Enable test signature mode using the command line
Windows 10 includes "Test Mode" or "Test Signature Mode". Once enabled, the Enforced Driver Signature Verification feature will be disabled until you exit this mode. You will see a “Test Mode” watermark and the current operating system build number appear in the lower right corner of your desktop next to the clock, indicating that Test Mode is enabled.
To launch Command Prompt with administrator rights, enter the name “Command Prompt” in the Windows search field, right-click and select the appropriate item from the drop-down menu. Enter the command “bcdedit /set testsigning on” (without quotes), which will enable test mode.
If you see the "Protected by Secure Boot Policy" message, your PC's UEFI firmware has Secure Boot enabled. It must first be disabled to enable the test signature mode.
To enter test mode, restart your computer. Now you can install any unsigned drivers without any problems.
To exit test signing mode, run the command prompt again with administrative rights and run the command “bcdedit /set testsigning off” (without the quotes).
Method 2
Attention! This option is only suitable for PCs with Basic Input/Output System (BIOS).
If your computer is equipped with a Unified Extensible Firmware Interface (UEFI), you must first disable the Secure Boot option.
- Place the cursor on “ Start ” and press the right mouse button. Select " Command Prompt (Admin) ".
- Type bcdedit.exe -set loadoptions DISABLE_INTEGRITY_CHECKS, then bcdedit.exe -set TESTSIGNING ON Press Enter.
- After some time, information about the successful completion of operations will appear in the window. Close the command prompt.
- Reboot the device. Now the OS will function in test mode.
- Install the necessary drivers with a missing digital signature.
To return to previous settings, enter bcdedit.exe -set TESTSIGNING OFF into the command line and confirm (Enter). When the specified operation is completed, restart the PC.
Windows 8
This version of the operating system has more diverse shutdown options. One of the options helps to disable the signature once, before installing the driver, and the second disables it completely. Let's look at both options.
Briefly disabling driver signature
The first method solves our problem using the Charms panel.
- You need to select “PC Settings”.
- Then “change computer settings.”
- Next, select “Update and Recovery”.
- In the “Recovery” sub-item, click on special download options.
- After this, you need to restart your PC.
- After the system restarts, select “Diagnostics”.
- In the boot options, disable digital signature verification.
- When the system boots, installing a third-party driver will become available. But, after rebooting the system in normal mode, it will not be possible to install third-party drivers.
Using the Local Group Policy Editor
- This method involves completely disabling the scan, so be careful. Use the Win+R key combination to call up the “Run” line, in which you must enter and execute the command gpedit.msc.
- The Local Group Policy Editor will open. In it you need to select “User Configuration”.
- In administrative templates, go to the system and select “Driver Installation”. At this stage, you need to double-click on “Digital signature of device drivers” to go to this sub-item.
- Now click on “Skip” in the “Enabled” item.
The method itself is quite simple, so its implementation should not take much time. When using it, you should understand that disabling the scan occurs forever and nothing will change when you reboot.
Windows 10
Win 10 is a more optimized system, so this process is implemented here in three ways. One of them helps to temporarily solve the problem, and the other two completely disable the scan. This procedure is done both on the home version 10x64 and on the pro version.
Via boot options
This method allows you to temporarily solve the problem, so we recommend using this method if you need to install third-party drivers.
Procedure:
- Go to settings, select “All settings”.
- In the “Update and Security” item, select the “Recovery” sub-item. For special download options, click on the “Restart Now” button.
After the reboot process, you should perform the following steps:
- Select the item “Diagnostics”.
- After it “Advanced options”.
- Then "Boot Options".
- Let's reboot.
After this, an options menu appears in which you can select the necessary third-party drivers to install. After rebooting to normal mode, you will have to repeat all the steps to install the drivers. This method is convenient because it allows you to install third-party unsigned drivers only once. After the reboot, the system will again begin checking the developer for loyalty.
Local Group Policy Editor
The second method is no different from the actions in Windows 8. You can familiarize yourself with this method in this article a little higher.
Command line
This method is similar to the option to disable scanning in Windows 7. It differs only in the commands.
You need to open a command line (necessarily as an administrator, otherwise it will not work). After that, enter the following commands one by one:
- exe -set loadoptions DISABLE_INTEGRITY_CHECKS;
- exe -set TESTING ON.
After performing this procedure, you should pay attention to the operation performed. If everything went well, you should restart your PC.
The disadvantage of this method is that in the lower right corner an inscription will appear that the Windows 10 system is running in test mode. To enable the verification function, you must replace the value “ON” with “OFF” at the end of the second command.