Solving sound problems
Detailed description Get rid of sound slowdown, various extraneous clicks, wheezing or jamming when playing music or video.
Quite often, users of laptops and computers are faced with the fact that when playing music or video, the sound jams, extraneous clicks or wheezing are heard. This article describes in detail how you can get rid of these problems.
First of all, it is worth determining what causes the sound reproduction defects. They can be caused by both hardware and software. The best way to test this is to run a LiveCD from Ubuntu. The entire process is described in this guide: Quickly diagnose laptop problems. I won’t dwell on this.
If the same problems with sound or video playback appear in Ubuntu Linux, then most likely they are of a hardware nature. In other words, to solve them you will have to take the laptop to a service center or try to fix it yourself. Since this is a very broad topic, I will not dwell on it.
But if everything is fine in Ubuntu, then this means that the problem is in Windows and its drivers. Let's consider this case in more detail.
First of all, you should check whether caching and DMA are enabled. What it is and how to enable it is described in this guide: Optimizing Windows. Even if enabling those options does not help solve the sound problem, it will still improve system performance.
So. If enabling caching and DMA did not help you or you did not find such options, then the next step is to update the drivers for sound and other devices. Often, sound drivers, network cards, and Wi-Fi adapters are to blame for clicks and sound slowdowns. You can find the driver data using these forum topics: Solving problems with drivers for a sound card and Solving problems with drivers for a network card and Wi-Fi.
In some cases, Dolby audio enhancement technologies are to blame for sound problems. They are not present on all laptops. If updating your sound and network card drivers did not help you, you can try disabling these technologies. They are available through the Speaker properties:
If the measures outlined above did not help, then we try to update the set of codecs. I recommend these: download/download.
On laptops with nVidia video cards, you can try disabling nVidia PowerMizer technology. This can be done using the PowerMizer Switch utility. You can download it using these links: download / download.
It is also worth checking if your laptop or computer is overheating using this guide: ways to cool a laptop.
Sometimes sound problems are caused by flaws in the BIOS. Try updating it. The update procedure differs from one laptop model to another. Often detailed instructions for updating the BIOS are contained in the archive with the BIOS itself and the flashing program.
If all the above tips did not help you, then there is a more complex method that allows you to more accurately determine the “hero of the occasion.”
Solving audio problems using DPC Latency Checker
First, we need to download the DPC Latency Checker utility (download/download). This utility measures the execution latency of deferred procedures at a certain time interval. In other words, how quickly the data will be processed. If the delay is large, then when playing music or video, the necessary data is simply not processed in time. This is what causes jamming and wheezing.
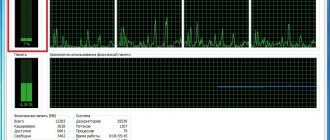
And so, we launched the program and we see something like this:
If you turn on music or video, you will notice that jamming, clicking and wheezing occurs when the bars are red. Red bars indicate high processing latency. This means that some sounds or video frames simply do not have time to be processed by the processor in time. This results in various audio and video playback errors. Our task is to get rid of the red bars.
In most cases, large delays in deferred procedure calls are caused by incorrect drivers. First of all, these are drivers for network cards, Wi-Fi adapters and, in fact, sound drivers. Next come drivers for Intel Turbo Memory (if such an adapter is available), drivers for the video card and chipset.
Important note: the delay value itself (the height of the bar) directly depends on the power and load of the processor. The presence of a large number of red bars can be quite normal when the processor is heavily loaded.
How can you determine which driver is not working correctly? It's simple: open Device Manager and disconnect devices one by one:
The principle is simple: turn off the device and see if there are red bars in the DPC Latency Checker utility. If there is, then turn the device back on and turn off the next one. You can turn on the device in the same way through the menu:
Here, for example, is what the main window of the DPC Latency Checker utility looks like after disabling the Wi-Fi adapter (in the picture above):
The difference is obvious. Obviously, the large delays (red bars) were caused by the driver for the Wi-Fi adapter. To get rid of the red bars and, as a result, sound problems, in my case it’s worth updating the drivers for the Wi-Fi adapter. In your case, another driver may be to blame. You must determine it using the method above.
So. The driver that is causing the problem has been found. For help in finding and updating the required driver, please contact one of these forum topics: Solving problems with finding and installing drivers, Solving problems with drivers for a video card, Solving problems with drivers for a network card and Wi-Fi, and Solving problems with drivers for sound cards.
Please post all questions related to sound problems in this forum topic: Solving problems with sound card drivers.
You can make all comments and suggestions regarding the article itself through this contact form: send an e-mail to the author. Please note that if something doesn’t work out for you, then you should only ask on the forum. These types of emails will be ignored.
Sincerely, the author of the material is Andrey Tonievich. Publication of this material on other resources is permitted only with reference to the source and indicating the author
Page 2
If your laptop just turns off, freezes, or just sometimes lags in games, then this article is for you. This article describes how to determine whether a laptop is overheating, as well as how to deal with overheating.
This guide will talk about overheating. In fact, this is one of the most common problems encountered in laptops. The topic of overheating was partially raised in the article: How to properly operate a laptop. In this article I will try to reveal it more fully.
Let's first look at why the laptop overheats. There may be several reasons for this:
- The cooling system is poorly designed. I think it’s no secret to anyone that laptops are all different. Therefore, they have different cooling systems. For some, it is thought out very well and with a reserve, while others do not have laptops. As a result, some laptops heat up weakly, while others heat up more;
- Accumulation of dust and other debris in the cooling system. This happens very often. Dust gets clogged in front of the radiator on the fan side. In particularly advanced cases, the thickness of the layer of dust, wool and other debris reaches 5-10 mm. Naturally, the efficiency of the cooling system in this case tends to zero. So the laptop overheats;
- Loss of contact between the chip surface and the heat sink plate. This also happens. Since then, the thermal paste, which is located between the chip and the plate, has hardened. This can lead not only to a deterioration of its properties, but also to the fact that due to impact or strong vibration, the heat sink plate will simply move away from the layer of hardened thermal paste and an air gap will form. This greatly complicates heat transfer and, as a result, the chip overheats;
- Incorrect operation of the laptop. Many laptops are designed in such a way that air is drawn in to cool the internal components through holes in the bottom and/or from the keyboard side. If you place the laptop on a soft surface, the holes on the bottom will block. As a result, the laptop will simply overheat. The same applies to working with the lid closed. Some of the holes are blocked, less air enters the cooling system and the laptop overheats.
Let us now consider how overheating usually manifests itself.
Typical symptoms of an overheating laptop:
This happens because the overheating protection is triggered. The fact is that modern processors, video cards and chipsets have thermal sensors that constantly monitor the temperature. If the temperature exceeds a certain threshold, the processor and video card reduce their frequency and supply voltage. As a result, the temperature and performance drop and the laptop begins to slow down. Also, if the laptop overheats, it may freeze or turn off. When the video card overheats, extra lines, squares and other defects may appear on the screen. When the processor overheats, the laptop freezes and turns off with a characteristic sound jam.
It is quite logical that in order to determine whether a laptop is overheating or not, you simply need to measure the maximum temperature of the processor, video card and other components. This is what we will do now.
Temperature measurement
The HWMonitor utility is great for measuring laptop temperatures. You can download it using these links: download / download.
Important note: as an alternative to the HWMonitor utility, you can use Open Hardware Monitor. The key advantage of this utility is the ability to build temperature graphs, display maximum frequencies and load levels of various components, and also display information about frequencies, temperatures and load in the system tray near the clock and on the Desktop. You can find out more about this utility here: Diagnostics of a laptop using Open Hardware Monitor.
Unpack the archive downloaded from the links above and run the utility:
This utility shows the current, minimum and maximum temperatures since startup. We are only interested in maximum temperature values.
Now we launch a game or other application that heavily loads the laptop. We work or play for 15 minutes and see what the HWMonitor utility shows:
Important note: the HWMonitor utility must be minimized while playing or working with an application. If you start it after you have worked or played, or while you have closed the game, then you will not receive accurate data on the maximum temperature. This is due to the fact that if you remove the load, the processor and video card drop their temperature very quickly.
Now I’ll explain what is what:
- THRM is a chipset. During the game he was able to warm up to 74 degrees (right column);
- Core #0 and Core #1 are the processor cores. They warmed up to 71 and 72 degrees;
- GPU Core is a video card chip. He was able to warm up to 87 degrees;
- HDD is a hard drive. It heated up to 47 degrees.
Note: if you can’t figure out what the HWMonitor utility is showing you and how bad it is, then don’t be shy and ask in the appropriate forum topic: Discussion of ways to cool laptops. Be sure to add an image of the HWMonitor window to your message.
What temperatures are normal:
- For a processor, the normal temperature can be considered 75-80 degrees under load. If it’s above 90, it’s definitely overheating;
- For a video card, the normal temperature is 70-90 degrees;
- For a hard drive, the normal temperature is up to 50-55. If it is above 60, then it is worth copying important data from the hard drive. There is a risk of losing them;
- For the chipset, the normal temperature is up to 90 degrees.
Important note: Maximum temperatures may vary from model to model. For example, for an nVidia GeForce 8600M GT video card, the normal temperature is 90-95 degrees. For nVidia GeForce 9500M GS - 80-85.
If your laptop does not overheat and the temperatures are significantly lower than those described above, then the cause of freezes, slowdowns and shutdowns should be sought in the operating system and drivers. First of all, you need to try updating the laptop BIOS. It is available on your laptop manufacturer's website. If this does not help, then you should reinstall the system, try other drivers, update programs and look at the recommendations from the guide: How to get rid of periodic stuttering in games and other applications. If this does not help, then you should contact a service center, since the cause of freezes and shutdowns of the laptop may be partial failures of the motherboard (power stabilization circuits and other things). It is very difficult to fix this at home.
If the laptop still overheats, then you need to take measures to cool it.
There are the following basic ways to lower the temperature of a laptop:
- Place something under the rear end;
- Use a cooling pad;
- Clean the cooling system from dust;
- Replacing thermal paste.
Let's look at each of these methods.
Lifting the back of the laptop
In most cases, the air that cools the laptop components is drawn through holes and slots in the bottom of the laptop. Some air is also sucked in from the keyboard. By lifting the back end of the laptop, we increase the gap between the bottom and the table. As a result, air circulation improves. In other words, the air that is forced through the radiator of the cooling system becomes colder. Also, by reducing the resistance of this air, more air is sucked in. As a result, the maximum temperature may drop by 5-10 degrees.
You can put anything under the back end, from books to rubber bands. This is what it looks like:
There is nothing complicated. Everything is simple and clear.
Using a Cooling Pad
This method is also quite simple and effective. The bottom line is that the laptop is placed on a stand with fans. These fans force air onto the bottom of the laptop. Air enters through slits and holes in the bottom. As a result, the air flow increases, which blows over the internal components of the laptop and the radiator. In practice, the temperature drops by 5-15 degrees.
This is what the cooling pads look like:
They usually cost from 20-30 to 50-60 $. You can also do this yourself. The stands are usually powered from the laptop's USB port.
Cleaning the laptop cooling system from dust
Cleaning the cooling system from dust makes sense if 2-3 months have passed since the purchase. This period depends on the operating conditions of the laptop. After cleaning, the laptop will heat up the same way as after purchase.
This is a service operation and is often not covered by warranty. If possible, entrust this operation to a service center. For a small fee they will clean everything for you.
If you don’t want to give the laptop to a service center, then you can completely clean it yourself. To do this, you need to partially disassemble the laptop. Cleaning with a vacuum cleaner often does not have a serious effect.
So. Let's begin. First you need to turn off the laptop, unplug it and turn it over:
Before disassembling your laptop, you should remove the battery. This must be done! When the battery is removed, it is worth analyzing how to get to the fan. On the Acer Aspire 5920, for example, to do this you need to remove the large bottom cover. It is held on by the following bolts:
When all the bolts that hold the cover are unscrewed, we begin to remove it a little at a time:
Important note: often, in addition to bolts, the lid is held in place by the following latches:
They must be handled very carefully so as not to break. They usually serve to more securely fix the lid.
And here is the fan and radiator that need to be cleaned:
Removing the fan:
Now you can clean both the blades and the radiator itself:
Since I clean it regularly, there is not a lot of dust and other debris there. In practice, there are cases when a thick layer of debris accumulates in front of the radiator. It is not surprising that the cooling system does not cope with its task and the laptop overheats.
You need to clean it with a dry cloth, napkin or brush.
When we're done cleaning, we put everything back together.
That's all. Read more about cleaning your laptop from dust here: Laptop. Cleaning from dust.
Replacing thermal paste in a laptop
This is the most difficult way to cool a laptop. Replacing thermal paste requires experience and knowledge. In this case the warranty is void. If possible, entrust this operation to a service center.
The essence of this method is that laptop manufacturers usually use thick layers of thermal paste, which does not have the best characteristics. This is necessary to ensure an acceptable defect rate. If you replace that thermal paste with a more efficient one, you can lower the temperature of the processor and video card by 5-15 degrees.
More information about replacing thermal paste in a laptop is described in this material: Replacing thermal paste in a laptop.
That's all.
If you have any questions about this material, you should first read the answers to frequently asked questions and then ask on the forum.
Please post all questions about laptop cooling in this forum topic: Discussion of methods for cooling laptops.
You can make all comments and suggestions regarding the article itself through this contact form: send an e-mail to the author. Please note that if something doesn’t work out for you, then you should only ask on the forum. These types of emails will be ignored.
Sincerely, the author of the material is Andrey Tonievich. Publication of this material on other resources is permitted only with reference to the source and indicating the author
NotebookClub.org
Updating audio device drivers
In order for Windows to recognize your sound card or sound processor, you must find and install a compatible driver .
Most sound cards and sound processors require drivers to operate. Outdated, incompatible, or corrupt sound card drivers can disrupt communication between your computer and your sound card.
If you recently updated your version of Windows, your current sound card driver may be for a previous version of Windows. Recent power outages, viruses, or other problems may have damaged your drivers. Downloading and installing the latest sound card drivers can resolve most of these issues.
Below are three ways to find and install drivers
- Using Windows Update. You may need to set Windows Update to automatically download and install recommended updates. Installing important, recommended, and optional updates may make certain changes to system functionality and other software that may help resolve audio problems.
- Installing software from the device manufacturer. For example, if your device came with a disc, it may contain software to install the device driver.
- Download and install the driver yourself. You can find the driver on the manufacturer's website. Try this method if Windows Update can't find a driver for a device that came with no software to install the driver.
Updating the driver using Windows Update
- To open the Windows Update service, click the Start button; In the search box, type Update, and then select Windows Update from the list of results.
- In the left pane, select Check for updates. If there are updates, click the Learn more about each one link. Windows Update indicates the type of update: Important, Recommended, or Required. Each type of update may contain drivers. For more information, see Understanding Windows Automatic Updates.
- On the Select updates to install page, find the update for your sound card, select the checkbox next to the drivers you want to install, and then click OK. Driver updates may not be available.
- On the Windows Update page, click Install updates.
The Windows Update service will notify you that the updates have been installed successfully.
Note: Some updates require you to restart your computer.
Why does the sound stutter and freeze on a computer in Windows 10?
A very common problem with sound, after its absence, is distortion: hissing, whistling, crackling, etc. It arises, naturally, as a result of updating the operating system or drivers for the sound card. Less commonly, the culprit is a virtual audio device. Today we’ll look at what to do if the sound on your computer stutters in Windows 10.
Checking the health of the audio playback device is the first step towards finding the cause of the problem. If the sound reproduction is unusual, speakers, headphones or an audio system should be disconnected from the computer/laptop and then reconnected. It is also strongly recommended to check the functionality of the device on another computer or phone. If crackling and other distortions occur in this case, the problem lies in the hardware. Otherwise, the proposed article will become a reliable assistant in correcting the situation.
Turn off sound effects
Audio effects may cause noticeable distortion in audio playback and should be disabled. Most likely, the audio stream passing through these filters turns out distorted.
1. Open the context menu of the “Speakers” icon located in the tray (through which we adjust the volume).
2. Select “Playback devices”.
3. Select speakers or an audio system, during playback on which the sound is interrupted or otherwise distorted.
4. Open the properties window by clicking on the button of the same name at the bottom of the window.
5. Go to the “Advanced” tab.
6. Uncheck the box next to the “Enable additional audio” option.
7. Go to “Advanced Features” and check the “Disable all effects” option.
The same is done through the “Realtek HD Manager” if you are using a Realtek sound card and this utility is installed.
1. Open the context menu of the effects manager through its icon in the taskbar.
2. Click on the “Sound Manager” item.
3. In the “Sound Effect” tab, be sure to remove the checkboxes next to the “Loudness” and “Voice Suppression” options.
This will help if the sound on Windows 10 wheezes and hisses, or the quality of human voice reproduction has decreased significantly.
4. In the last tab “Standard format”, select “DVD format”, corresponding to studio quality: 24-bit audio with a sampling frequency of 48,000 Hz.
If there is no Realtek Manager or a different sound card is used, the audio format can be changed in the properties of the device used as a device for audio playback. In the “Advanced” tab, select studio recording with the parameters 24 bit and 48 kHz.
If the sound continues to be interrupted, hissing and distorted, try selecting other parameters.
Deactivating exclusive mode
At times, even with the latest drivers downloaded from the official resource, sound on a PC can be interrupted at any time for a split second when exclusive mode is enabled.
Check to see if the checkbox next to “Allow programs to use the device exclusively...” is unchecked.
Other settings that may affect audio playback
There is a function in Windows 10 that mutes all sounds when making audio and video calls through a browser or instant messengers. If the function is active, the volume will be reduced during conversations, and as a result, poor-quality sound may be heard.
In the speaker properties, go to the “Communication” tab and move the trigger to the “No action required” position.
Configuring playback devices
In the list of devices detected on the computer for playing sound, select the default one and click “Configure”. After this, a wizard will open with the parameters of the selected audio device.
Select your equipment type and test the sound for each speaker.
Reinstalling sound card drivers
If none of the above methods help resolve the cause of the problem, there are still several methods to do so. One of them is reinstalling the drivers for the sound card.
If you don’t know it, get this information in the “Sound, gaming, video devices” branch.
1. Go to the driver developer’s resource and download its latest version (for Realtek, follow the link https://www.realtek.com/downloads/).
2. Launch the installer and follow all instructions.
3. Once the installation is complete, reboot the computer.
Driver and hardware developers recommend using the above software update method. Microsoft insists on its own.
1. Call Device Manager via Win→X.
2. We expand the branch with sound and other gaming devices.
3. Using the device’s context menu, call the command to update its driver.
4. Specify the automatic type of search for the latest software versions on the Internet.
5. Upon completion of downloading, copying files and registering them, be sure to restart the computer
The second method, despite Microsoft's strong recommendation, is not recommended. Windows 10 loads drivers from the software giant's resources, and often such software is, if not outdated, then less suitable for the device than created by its developer. And using such software can bring a lot of problems.
additional information
Let's look at a couple of important aspects regarding sound problems in Windows 10.
- An installed program for capturing streaming audio or applying effects to sound can cause problems. If they appear after installing such applications, remove them from startup, or better yet, remove them altogether.
- Along with incorrect sound playback and slowdown, is Windows 10 itself buggy? Check the system for viruses, and through the Task Manager, make sure that no process is loading the CPU at 70 percent or more, and that the processor has free resources for normal audio decoding and OS operation.
- If the audio is distorted on a virtual machine or emulator, it is unlikely that the problem will be corrected. Like all software, emulators and virtualization tools are imperfect.
windows10i.ru
Wrong playback format in Windows 10
Sometimes laptop problems occur as a result of using outdated sound cards. If the speakers wheeze, you need to go to the playback settings and perform certain actions:
- On the control panel, find the “Sound” icon and click on it;
- Go to the properties of the audio device you are using (it is important to select the correct device);
- Select default settings;
- Set the required CD (16 bit);
- Save all adjustments.
This method is universal and is suitable for almost any laptop model that has old sound cards installed. This is due to the fact that they have the same support installed. The software can be easily adjusted. The main thing is to choose the right commands correctly. And do not forget that all changes must be saved. Otherwise, all the work done will be in vain.
Sound stutters on Windows 10 computer
Windows 10 never ceases to amaze: only one problem is solved by its developers, and at least one new problem takes the place of a fixed problem. This applies, for example, to playing audio on a computer. So, users encountered a problem: after reinstalling Windows 10, the sound on the PC was significantly deteriorated. For some it simply stutters, for others the high frequencies are cut off, for others there is a crackling or sound, like the equalizer settings are off. Moreover, this applies to all audio output devices: speakers, acoustic systems and cheap headphones. What to do in this case and how to find a solution to the problem?
Updating drivers
If sound plays on your PC, but its quality is far from what it was before installing Windows 10, it means that the sound device drivers are installed. The problem may lie in the fact that one of the first versions of the software is used, which, as a rule, are crude and do not have many flaws. Therefore, the first thing you need to do if the sound starts to act up is updating the audio card driver.
This is done automatically or manually.
Manual update
- Launch "Device Manager".
- We are expanding the category of audio, gaming and video devices.
- We select our sound device and call up its context menu, where in the drop-down list we select “Update drivers...”.
- Select the drivers located on this PC.
- Select an application from the list of already installed ones if the problem appeared as a result of updating the sound driver.
- In the case of devices from Realtek, select the option shown in the screenshot and click “Next”.
If the problem is not solved, go to the sound device support site and download the latest version of the software in the form of an installer corresponding to the Windows 10 bit installed on your computer.
See also: How Windows 10 spies on users
Next, run the downloaded file and follow the installer’s recommendations.
After restarting the PC, check if the sound stutters.
Automatic installation of new drivers
There is an easier way to fix the problem with audio playback on your computer after installing “ten”. To do this, you need to download an application, the purpose of which is to search, download and install the latest software versions for Windows hardware components. One of them is Driver Booster. Despite the paid distribution, the trial version will be enough to solve the problem.
- We launch the utility and wait for the program to complete the scan.
- If there are new versions of software for the sound card, check this box and click “Next”.
- We wait a couple of minutes until all the necessary files downloaded from the Iobit server are unpacked, copied to the required system directories and registered.
- Be sure to restart Windows 10.
The problem is not with the drivers
If the software update does not lead to success, then the problem does not lie in crookedly written drivers, and it is worth looking for it in the sound configuration parameters, Windows 10 itself, or BIOS settings.
Problem with system settings
There are practically no articles on the Internet on the topic of sound problems in the “top ten”, and only a few forums provide solutions to the problem if its source is incorrect settings.
- We reboot the system and go into the BIOS (in Windows 10 this is done using many methods).
- Disable options C1E and EIST.
- We find the HPET parameter and set its value to “Enabled”, select the bit depth, as in the Windows 10 we are using.
Note. This option may not be available in all motherboard BIOSes, so you shouldn’t get hung up on searching for the option.
- We launch the command interpreter with the privileges of the administrator account through the program’s context menu in Start.
- Enter the command: “bcdedit /set {default} disabledynamictick yes” and execute it by pressing “Enter”.
See also: What do Windows 10 update codes mean?
- Then insert “bcdedit /set {default} useplatformclock true” into the command line and press “Enter”.
- Reboot the computer.
Sound should work fine in Windows 10.
Additional audio tools
It happens that the sound begins to play with jerks, stutters and noise due to the activated “Additional audio tools” option. To disable it, perform the following steps.
- Call the context menu of the speaker icon in the tray.
- Click “Open mixer...”.
- Click on the icon of the device that reproduces sound in the system.
- Activate the “Advanced” tab and uncheck the box next to the “Enable additional tools...” option.
The last thing we can recommend if artifacts occur when playing audio in Windows 7 is to check the load on the CPU. Perhaps, due to the load, the processor simply cannot cope with audio decoding. To do this, launch the “Task Manager” and look for the most gluttonous processes in the tab of the same name.
(Visited 29,361 times, 27 visits today)
windowsprofi.ru
Sound distortion in Monopoly mode
Even installing the correct drivers on MSI laptops may not fix the problem. In such cases, it is recommended to carefully study the monopoly regime. It may be turned on by mistake, which explains the sound problem on the laptop.
To check if Monopoly Mode is not working, you need to do the following:
- In the Windows 10 taskbar, select “Sound”;
- In the window that opens, select playback devices;
- Use the mouse to display the tool and go to properties;
- Go to the “Advanced” tab and check the status of the corresponding mode;
- Uncheck all checkboxes, if any.
Confirm all changes and check the sound status. If the sound on the laptop is further distorted, then the actions could be carried out incorrectly. Everything must be done in accordance with the instructions provided.
Sound stutters on Windows 10 computer
After updating the operating system to the latest version, many PC and laptop users wondered why the sound stutters on a Windows 10 computer.
Often this problem occurs when installing drivers that are incompatible with Windows 10 or when specifying incorrect settings. The BIOS, or rather active settings that affect the operation of the sound card, can also be the culprit of the problem. Therefore, to solve the problem when, when playing tracks, the sound stutters for 1-3 seconds with varying frequency, you should use the following recommendations.
Content:
Update your driver
There are two ways to update your audio driver. Many prebuilt PCs from Dell, HP, and others install a "command center" application that scans your device and installs updated drivers.
For example, Alienware PCs come with SupportAssist, which scans for outdated drivers, hardware issues, and so on. Run these applications to check for driver updates.
The second approach is to update the driver manually through Device Manager. To begin, right-click the Start button and select Device Manager from the pop-up menu.
Select and expand the "Sound, Video, and Game Controllers" entry to get a list of all available audio devices. Click once on your primary device—this example uses Realtek Audio—then right-click to open a pop-up menu. Select the "Update Driver" option.
Select "Automatically search for updated driver software" in the next window.
Alternatively, you can find new drivers on the sound card manufacturer's website and download them to your PC. If you choose this route, select the "Browse my computer for driver software" option. Just point Windows 10 to the download location.
Another option to Browse my computer for drivers is to install compatible drivers from the list. So, instead of entering a download location, click "Allow me to choose from a list of available drivers on my computer."
Make sure the "Show compatible hardware" checkbox is checked and select one of the listed drivers in the next window. Click the "Next" button to finish.
Interference when playing sound in the “seven”
Windows 7 is considered one of the most stable operating systems ever produced by Microsoft. For this reason it enjoys well-deserved popularity among users. According to statistics, the “seven” ranks first in the ranking of desktop and laptop users.
Nevertheless, it is not free from various kinds of “glitches”. There are some problems with sound. Sometimes hissing and wheezing begins to be heard from the speakers, and the sound itself is constantly interrupted (it begins to stutter). Listening to music or watching movies in such an environment becomes almost impossible. This article is dedicated to the fight against such stuttering.
There are several reasons for this behavior of the sound subsystem. The first group of reasons includes hardware problems. The second is software failures. We list some of the reasons for failures:
- Failure of the computer sound card.
- Problems with non-native drivers.
- Incorrect connection to speaker or headphone adapter.
- Incorrect choice of playback mode in the operating system settings.
Next we will consider all these problems and offer adequate options for solving them.
How to restore normal sound?
First of all, check how tightly the speaker or headphone plug is inserted into the sound card socket, and whether the connector is used. The speaker pin connector is usually green.
To test your sound card, you can use the RightMark Audio Analyzer program or something similar. Using the Everest utility, you can scan all your computer hardware and accurately determine the adapter model - perhaps the drivers you installed do not quite fit the computer card.
In the settings of the “seven”, delete the secondary IDE channel. You can do this by opening the device manager (“Control Panel” => “System and Security” => “System” => “Device Manager”). The secondary channel is located in the “IDE ATA/ATAPI” section. Right-click on its name and select “Delete” from the menu that opens. Sometimes it works only the second time. To fine-tune the sound, download and install the “SRS Audio Sandbox” program - with its help it’s easy to fix the problem.
Sound still stutters on your Windows 7 computer? Then there is nothing to do, take the computer for repair.
WindowsTune.ru
Checking audio effects, additional audio tools
If you go to Playback devices in the sound settings of Windows 10 and select Properties of the device you need, in the window that opens, on the “Advanced” (“Additional features”) - depending on the settings of the sound card manufacturer, you can find two options “Enable additional sound tools” and "Disable all effects." If you uncheck the first option and check the second one, you can try playing any sound to see if disabling additional effects helped the audio work properly.
Updating drivers
If sound plays on your PC, but its quality is far from what it was before installing Windows 10, it means that the sound device drivers are installed. The problem may lie in the fact that one of the first versions of the software is used, which, as a rule, are crude and do not have many flaws. Therefore, the first thing you need to do if the sound starts to act up is updating the audio card driver.
This is done automatically or manually.
Manual update
- Launch "Device Manager".
- We are expanding the category of audio, gaming and video devices.
- We select our sound device and call up its context menu, where in the drop-down list we select “Update drivers...”.
- Select the drivers located on this PC.
- Select an application from the list of already installed ones if the problem appeared as a result of updating the sound driver.
- In the case of devices from Realtek, select the option shown in the screenshot and click “Next”.
- Reboot the computer.
If the problem is not solved, go to the sound device support site and download the latest version of the software in the form of an installer corresponding to the Windows 10 bit installed on your computer.
After restarting the PC, check if the sound stutters.
Automatic installation of new drivers
There is an easier way to fix the problem with audio playback on your computer after installing “ten”. To do this, you need to download an application, the purpose of which is to search, download and install the latest software versions for Windows hardware components. One of them is Driver Booster. Despite the paid distribution, the trial version will be enough to solve the problem.
- We launch the utility and wait for the program to complete the scan.
- If there are new versions of software for the sound card, check this box and click “Next”.
- We wait a couple of minutes until all the necessary files downloaded from the Iobit server are unpacked, copied to the required system directories and registered.
- Be sure to restart Windows 10.
System diagnostics using standard Windows 10 tools
To use the built-in capabilities of the “tens” to identify the cause, you need to do the following:
- Find the speaker icon in the system tray. Right-click on it.
- From the context menu, select Troubleshoot Audio.
The disadvantage of this method is that standard tools are not the most effective for solving various problems. They can only help with minor mistakes. For example, if the required software is missing.
Another way:
- Open the Start menu.
- Go to the "Options" tab. You can also use the key combination “Win + I”.
- Go to the "Update and Security" section.
- Next is “Troubleshooting”.
- Select the option with sound.
It happens that the system offers solutions. In other cases, it automatically corrects immediately. Often this requires exiting all programs that require sound or disabling all enhancements from the Control Panel.
If the guides above did not help, move on to the next, more complex methods.