07/28/2016 windows
This instruction tells you how to disable automatic updating of device drivers in Windows 10 in three ways - a simple setting in system properties, using the registry editor, and also using the local group policy editor (the latter option is only for Windows 10 Pro and Enterprise). You will also find a video tutorial at the end.
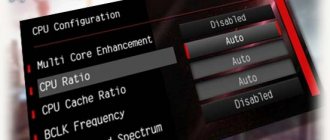
According to observations, many problems with the operation of Windows 10, especially on laptops, are currently associated precisely with the fact that the OS automatically loads the “best” driver, which in its opinion can ultimately lead to unpleasant consequences, such as a black screen , incorrect operation of sleep and hibernation mode and the like.
Disable automatic driver updates in Windows 10 using a utility from Microsoft
After the initial publication of this article, Microsoft released its own Show or Hide Updates utility, which allows you to disable driver updates for specific devices in Windows 10, i.e. only those for which updated drivers cause problems.
After launching the utility, click “Next”, wait until the necessary information is collected, and then click on the “Hide Updates” item.
In the list of devices and drivers for which you can disable updates that appears (not all appear, but only those for which, as far as I understand, problems and errors are possible during automatic updating), select those for which you would like to do this and click Next .
Upon completion of the utility, the selected drivers will not be updated automatically by the system. Address for downloading Microsoft Show or Hide Updates: support.microsoft.com/ru-ru/kb/3073930
Using a program from Microsoft
Let's start with the official program provided by Microsoft. It's called "Show or hide updates". The utility scans your computer and then provides a list of what can be installed, including drivers. You need to mark the item with which you are having problems, and after that the selected drivers will not be installed.
Go to the official Microsoft page using the link: https://support.microsoft.com/ru-ru/help/3073930/how-to-temporarily-prevent-a-driver-update-from-reinstalling-in-window
In the article that opens, you need to find the phrase “troubleshooter.” Click on it and the program will begin downloading.
On your computer you will find it in the folder where all files downloaded from the Internet go. In the example, this is “Downloads”. To launch the utility, click on its name: “wushowhide”.
To start scanning your computer, click on the “Next” button in the first window.
After scanning is complete, select “Hide updates”.
The list will show everything that can be installed. In it you need to find the phrase “driver update” and the name of the component for which downloading should be prohibited. Check this box (if there are several devices, check them too) and click “Next”. When the program finishes working, drivers for the selected components will not be installed along with updates.
Disable automatic installation of device drivers in gpedit and Windows 10 Registry Editor
You can disable automatic installation of drivers for individual devices in Windows 10 manually - using the Local Group Policy Editor (for Professional and Enterprise editions) or using the Registry Editor. This section shows the prohibition for a specific device by hardware ID.
To do this using the Local Group Policy Editor, you will need the following simple steps:
- Go to the device manager (right-click menu on the “Start” button), open the properties of the device for which driver updates should be prohibited, on the “Information” tab, open the “Hardware ID” item. These values will be useful to us, they can be copied entirely and pasted into a text file (this will make it more convenient to work with them later), or you can simply leave the window open.
- Press Win+R keys and enter gpedit.msc
- In the Local Group Policy Editor, go to “Computer Configuration” - “Administrative Templates” - “System” - “Device Installation” - “Device Installation Restrictions”.
- Double-click on “Prevent installation of devices with specified device codes.”
- Set it to Enabled and then click Show.
- In the window that opens, enter the equipment IDs that you defined in the first step and apply the settings.
After these steps, the installation of new drivers for the selected device will be prohibited, either automatically by Windows 10 itself or manually by the user, until the changes are canceled in the local group policy editor.
If gpedit is not available in your edition of Windows 10, you can do the same using the Registry Editor. To begin, follow the first step from the previous method (find out and copy all equipment IDs).
Go to the registry editor (Win+R, enter regedit) and go to the HKEY_LOCAL_MACHINE\SOFTWARE\Policies\Microsoft\Windows\DeviceInstall\Restrictions\DenyDeviceIDs section (if there is no such section, create it).
After this, create string values, the name of which is numbers in order, starting from 1, and the value is the ID of the equipment for which you want to prohibit driver updates (see screenshot).
Disable auto update using Group Policy Editor
This method is not suitable for the home version of Windows 10.
- Open Device Manager.
- We look for the required device, and then right-click on it.
- Click “Properties”.
- Open “Information”.
- Select “Equipment ID” in the list that opens.
- Copy the ID.
- Open the “Run” window. Next you need to type “gpedit.msc”
- Click “Computer Configuration”.
- Next we need the “System” section.
- Click on “Device Installation”.
- After which you need to complete steps 1-5 from the previous guide.
- Next, you need to open the Registry Editor by searching for “Regedit” in the search bar.
- Open HKEY_LOCAL_MACHINE
- We find the SOFWTWARE subsection, in it we find Policies.
- Opening the registry
- Next we go to Microsoft. Open Windows. Next DeviceInstall
- We need DenyDeviceIDs, which is located in Restrictions. If suddenly it is missing, we create it ourselves.
- We make entries in the line, assigning a name starting from 1. The value identifies the device with which problems occurred.
Disabling automatic driver downloads in system settings
The first way to disable driver updates is to use the Windows 10 device installation settings settings. There are two ways to get into these settings (both options require you to be an administrator on the computer).
- Right-click on “Start”, select the “System” context menu item, then in the “Computer name, domain name and workgroup settings” section, click “Change settings”. On the Hardware tab, click Device Installation Options.
- By right-clicking on Start, go to “Control Panel” - “Devices and Printers” and right-click on your computer in the list of devices. Select Device Installation Options.
In the installation options, you will see a single request: “Automatically download manufacturer apps and custom icons available for your devices?”
Select "No" and save the settings. In the future, you will not receive new drivers automatically from Windows 10 Update.
Via control panel
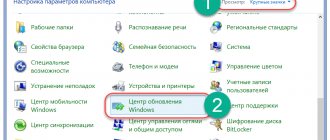
To do this, right-click on the “Start” button and select “Control Panel” from the drop-down menu:
Set “View: Large icons” and go to the “System” section
In the next window, click on the link “Advanced system settings”
In the window that opens, go to the “Hardware” tab and click on the “Device installation parameters” button:
A window opens in which we set the switch to the “No, allow choice” position, and you can also put the switch to the “Never install drivers from the update center” position if you do not want to install them from there.
Save the changes made
Using Registry Editor
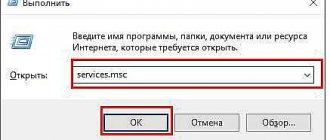
The same can be done using the Windows 10 Registry Editor. To launch it, press the Windows + R keys on your computer keyboard and enter regedit in the Run window, then click OK.
In the Registry Editor, go to the HKEY_LOCAL_MACHINE\Software\Microsoft\Windows\CurrentVersion\DriverSearching section (if the DriverSearching section is not in the specified location, then right-click on the CurrentVersion section, and select New - Key, then specify its name).
In the DriverSearching section, change (on the right side of the Registry Editor) the value of the SearchOrderConfig variable to 0 (zero) by double-clicking on it and entering the new value. If such a variable is missing, then in the right part of the registry editor, right-click - New - 32-bit DWORD Value. Name it SearchOrderConfig and then set the value to zero.
After this, close the Registry Editor and restart your computer. If in the future you need to re-enable automatic driver updates, change the value of the same variable to 1.
Disable auto update in Windows 10 settings
It is necessary to implement the combination Win->X. In the window that opens, click “System”, and then in the “Computer name” select “Change settings”. Click “Device Installation Settings”.
Another way, somewhat simpler. Launch the “Control Panel”. Open "Devices and Printers". Call the context menu and go to “Device installation parameters”.
A window will open, then switch to “No”. Save by pressing the button. As a result of all these actions, auto-updates will be disabled.
Preventing Windows 10 and 7 driver updates via Control Panel
How to disable automatic reboot in Windows 10
The control panel is a tool built into the operating system designed to change its settings. The application window has several sections, each of which is responsible for activating a particular function and contains a corresponding description.
Disabling automatic driver installation via Control Panel
The algorithm for disabling driver auto-installation is the same for both tens and sevens:
- Enter the Start menu by tapping the logo in the lower left corner of the screen.
- Enter the phrase “Control Panel” in the search bar.
- The search result will be the application icon. You need to click on it with the left key of the manipulator once.
- It is recommended to set the “Display” field to “Small icons” to make it easier and faster to find the desired parameter.
- Click on the “Hardware and Sound” section.
- In the next window, click on the line “Devices and Printers”.
- In the presented list of devices, you need to find the computer monitor icon and right-click on it.
- In the context menu, click on the “Device installation options” item.
- Place the toggle switch in the “No” line. After this, the operating system will not automatically download, install and update drivers for components connected to the PC.
Important! If problems arise with the operation of components on Windows, the user will have to independently download the necessary drivers from the Internet when the auto-installation function is disabled, and update them for system components.
The process of downloading such software will not take much time if you use specialized driver selection software.
Administrative Templates section in the Windows 10 Group Policy Editor
Windows 10: how to disable automatic driver installation using the standard method
This method works on all builds of Windows 10 and involves performing simple steps according to the algorithm:
- Find the This PC application on your desktop.
- Click on the program icon with the right mouse button.
- In the context type window, click LMB on the “Properties” line. After this, a window with the technical characteristics of the PC will open.
- In the left column, click on the line “Advanced system settings”.
- In the window that opens, switch to the “Equipment” section at the top.
- Click on “Installation Options”.
- Now in the next window the user will need to put a toggle switch in the line “No (the device may not work correctly).”
- Save everything and restart your PC.
Menu "Advanced system settings" on Windows 10
Note! The considered algorithm allows you to quickly get rid of automatic driver loading. However, it may not always be enough to complete the task.
In addition to this method, others are used, which are described below.
Method 2: How to disable automatic driver installation using Group Policy Editor
- Open the Group Policy Editor by pressing Win+R and executing the command gpedit.msc.
- Let's go along the path: Computer Configuration => Administrative Templates => System => Device Installation => Device Installation Restrictions.
- In the same section, we find the policy Prohibit installation of devices not described by other policy settings and change its value to Enabled .