12/03/2018 Category: ParametersAuthor: Leonid Levin
To maintain stable computer performance (speed), it is recommended not only to regularly clean hard drives from unnecessary accumulated files and download the latest update packages for Windows, but also to periodically update drivers for all built-in PC components. According to statistics, most often users have to update the software for their video cards, and the process of upgrading a graphics adapter itself is not limited to one method.
- Ways to update video drivers to the latest version in Windows 10
How to find out the video driver model nameVideo: how to find out all the necessary information about a video card using the TechPowerUp GPU-Z program
- Video: How to automatically update your video driver using the Windows 10 Update Wizard
- Nvidia GeForce
- Display Driver Uninstaller
- Error "The video driver has stopped responding"
Viewing drivers through Device Manager
All data about the computer's hardware configuration, along with management tools, are collected in the device manager.
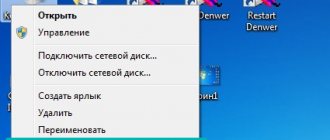
Call the additional “Start” menu using the keyboard shortcut “Win+X”. Open the item highlighted in the screenshot.
In the manager window, we find the group of interest and expand it to see the devices included in it. For each you can call the context menu. Let’s take the keyboard as an example and open the “Properties” item.
Switch to the “Driver” tab. At the top of the window, under the device name, general information about the manufacturer, development date, software version and digital signature is provided. By clicking the “Details” button, we can obtain information about the location of driver components.
The window that opens contains a general list of them, indicating their name and location in the operating system. By selecting a specific file, we look at its characteristics.
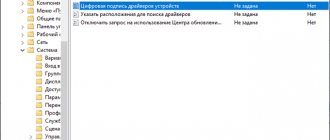
By going to the “Information” tab in the properties window, you can collect even more information about the driver. Expanding the drop-down menu indicated by the arrow, we get a long list of parameters, starting with a general description.
Msinfo32 - system information
The msinfo32 utility has been part of Microsoft operating systems since Windows 98, but is used extremely rarely. With its help, you can obtain almost complete data about your computer, including a list of installed drivers.
Use the keyboard shortcut “Win+R” to open the “Run” window. Type “msinfo32” in the text field. We start executing the entered command by pressing “OK” or the enter key.
The “Components” section contains information about the hardware configuration and is similar in structure to the device manager. By expanding the “Input” group as an example, you can see the characteristics of the keyboard. The driver displays the path where it is located on the system, software version, file size and installation date.
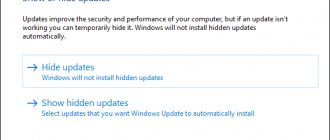
The “Software Environment” section provides the main characteristics of the operating system. The item indicated in the screenshot contains information about the standard drivers included with Windows.
By opening the “File” menu in the control command line, you can see two items shown with arrows. “Save” involves creating a complete copy of the collected information. The data is transferred to a file with the NFO extension, which is opened in the msinfo32 program. “Export” allows you to record the characteristics of a specific device into a plain text document.
DriverPack
What is the easiest way to update network card drivers? There is a site that contains all known drivers. But I recommend contacting him only when absolutely necessary. If previous methods did not produce any results, then you can resort to this “Plan B”. The fact is that this service is free, but in addition to drivers, it installs a lot of garbage and additional programs on the “computer” that later need to be removed.
- We go to the website – drp.su.
- In the top menu, go to the “Sysadmins” tab;
- Scroll down a little and download the pack, which is located in the middle of “DriverPack Offline Network”.
- Launch, install and reboot.
- Now a very important point - go to “Programs and Features” and remove all unnecessary software that was installed along with “Firewood”.
View drivers on Windows 10 via the command line
The entire list of drivers installed in Windows can be obtained using the command line.
In the additional menu of the Start button, use the marked item to launch the console with administrative privileges.
Type the command “driverquery”. The window displays a complete list of all drivers, sorted in alphabetical order.
For ease of study, you can copy it using hot keys. Select the entire contents of the command line window using the combination “Ctrl + A”. Copy the information by pressing “Ctrl+C” and paste it into Notepad using the combination “Ctrl+V”.
The use of additional keys allows you to display detailed information. The command “driverquery /si” is shown as an example. It opens a list of only signed drivers. A complete list of additional parameters can be obtained by typing “driverquery /?”.
View drivers on Windows 10 using PowerShell
PowerShell is developed by Microsoft and promoted as a modern alternative to the CMD console. In addition to supporting old commands, it uses object-oriented scripts.
Open the additional menu of the Start button. Launch PowerShell in elevated privilege mode.
Enter the command “Get-WindowsDriver -online -all”. The “all” key is intended to display information about all drivers installed on the local computer. If it is not used, only third-party software is included in the list.
Processing the entered command takes a few seconds, after which it is presented in the form shown in the screenshot. The array of received data does not fit into the default 3000 rows. To study it from the screen, the output size must be increased in advance in the Powershell settings.
Let's make a small improvement to the command by providing output of the collected information to a text file. Type “Get-WindowsDriver -online -all | Out-File driver.txt". The resulting document driver.txt is saved in the system directory.
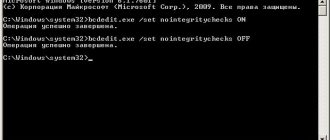
In the search window, enter the full file name, including the extension. The number “2” marks the field with available action options. You can open the document for study or go to the system32 directory and move it to a more convenient location on your hard drive.
If you copy the path highlighted in the screenshot from Notepad to the address bar of Explorer, you can directly open the configuration file of the selected driver.
Mouse acceleration
The mouse acceleration problem is incredibly frustrating, especially for the gamers among us. You line up at the head and BAM! Your mouse moves to the opposite side of the screen and you look at the spawn screen.
Windows 10 users are reporting acceleration issues in several scenarios. There is no single solution to mouse acceleration problems. Try some of the mouse acceleration problem fixes below and see which one works for you.
Turn off and on
First, try turning mouse acceleration on and off in system settings.
- Go to Control Panel → Hardware and Sound → Mouse.
- Select the Pointer Options tab.
- Uncheck "Improve pointer precision" to turn off acceleration.
- Select Apply and OK. Check how your mouse responds.
MarkC Mouse Fix
If the good old "turn off and on" doesn't work, you can try using MarkC Mouse Fix to fix your mouse acceleration problem on Windows. MarkC Mouse Fix is a registry file that fixes mouse pointer acceleration in Windows 10, retuning the feature to the expected level of accuracy.
Download the compressed MarkC Mouse Fix file and extract it to a memorable location. Next, find out which DPI (access point) you're currently using by typing "Display" in the Start menu search bar and selecting "Display options" from the options menu.
- If the slider is all the way to the left, your display DPI is 100%. If it is in the middle or to the right, it indicates a different scale. Click the slider to open a tooltip displaying the current DPI. Write down your DPI.
- If the slider is all the way to the left, your display DPI is 100%. If it is in the middle or to the right, it indicates a different scale. Click the slider to open a tooltip displaying the current DPI. Write down your DPI.
Go back to the extracted MarkC Mouse Fix folder, find your version of Windows and open the folder. Select the registry file that matches your display DPI. Answer Yes or OK to the prompts that appear. Now reboot your system to complete the fix.
You should now enjoy precise 1-to-1 mouse control, with no acceleration or pause between movements.
Download: MarkC Mouse Fix for Windows (Free)
View drivers for Windows 10 Third-party programs
Third-party programs allow you to receive information in a graphical representation that is more familiar to the user.
AIDA64
AIDA is designed to collect and display detailed information about your computer. The program is paid, but with a 30-day trial period.
The section indicated by the arrow is similar to the Windows Device Manager. The top right half of the window displays a tree structure of the hardware configuration. Information about the device selected in it is displayed at the bottom. For the driver, you can view a general description, release date, vendor, and version.
The “Operating System” section contains all the characteristics of Windows installed on your computer. The item indicated by the arrow in the screenshot contains information similar to that displayed in the Msinfo32 program. Here is a complete list of system drivers.
The built-in report creation wizard allows you to save data into a TXT or HTML file for subsequent detailed study.
InstalledDriversList
A free utility from a large collection developed by Israeli programmer Nir Sofer. You can download it from the official website of the developer. InstalledDriverList is distributed as a ZIP archive, the Russian language pack is downloaded as a separate file.
After launch, the utility displays a list of drivers in the window. Opposite the name of each, arrows indicate colored marks. A green indicator indicates that the driver is being used by the system. Elements that are installed but not currently active are marked in yellow. Detailed information can be viewed by calling the context menu. The “Properties” item opens a separate window with the characteristics of the selected driver. The group of elements indicated by the number “3” allows you to create reports in TXT or HTML formats.
The screenshot shows the characteristics that open when you click on the “Properties” button in the dialog menu.”
DriverView
Another utility from the same developer that collects information with greater detail. You can download it from the official NirSoft page as a ZIP archive. The Russian language is also downloaded as a separate file.
After launch, DriverView analyzes the system state and displays a list of drivers currently in use. To obtain detailed information, select the element of interest and call the context menu with the right mouse button.
Let's take a closer look at the actions performed when using the items marked with numbers.
“Select Column” opens a menu in which you can check the items of interest. The buttons located on the right side of the selection area are designed to sort the order in which columns of information are displayed. Having configured the appearance of the main program window in this way, click “OK”.
The “Properties” item contains data collected by the utility about the selected driver. To view information, DriverView can save information to local report files. Like the applications discussed before, TXT and HTML formats are available.
Ways to update video drivers to the latest version in Windows 10
The user can complete the update process in three ways:
- automatically thanks to the “Update Wizard” built into Windows 10;
- in semi-automatic mode using third-party utilities;
- manually (to do this you will need to download a special installer from the official website of the video card developer).
Any of the listed options will not require the user to have any specialized knowledge in programming or other information sciences . But before you start updating drivers, you need to find out the model name of the installed video card, in particular for manual updating.
How to find out the video driver model name
To find out the full name of the video adapter:
- Right-click on the Start icon and launch the Device Manager application.
You can also find “Device Manager” through the search function by entering the appropriate query (the search bar is located next to the “Start” button)
- Find the "Video Adapters" category and expand it. Find the name of your video card.
To ensure the accuracy of the video card model name, you can double-click on the card name with the left mouse button (in the window that appears, accurate information about the hardware will also be available)
Video: how to find out all the necessary information about a video card using the TechPowerUp GPU-Z program
Automatic video driver update
Automatic updating of the video card driver is carried out thanks to the “Update Wizard” built into Windows 10. To run it, you need:
- In “Device Manager”, find the video adapter connected to the PC, right-click on its name and select “Update Driver”.
The update process can also be started through the "Properties" menu
- In the “Update Wizard” window that appears, select the “Automatically search for updated drivers” option.
An Internet connection is required to automatically search for updates.
- Wait for the automatic process of searching, downloading and installing the current driver version to complete, and then click the “Close” button.
After updating the video driver, it is advisable to restart the PC
Video: How to automatically update your video driver using the Windows 10 Update Wizard
Manually updating the video driver
To update the software for the video adapter manually, you need to download the update package from the official website of the video card developer.
Nvidia GeForce
If you have an Nvidia GeForce video card, then you should:
- Go to www.nvidia.ru and select the “Drivers” section. On the loaded page, fill out the information form with the data and click “Search”.
Don’t forget to also select the current version of the Windows operating system before searching.
- Wait until the Nvidia service finds the appropriate (current) version of the driver, and then click on the “Download Now” button.
In the “Additional Information” tab you can find information of interest about the downloaded driver (for example, its release date)
- After downloading the exe file of the update package, run it, specify the installer unpacking folder and click “OK”.
The unpacking path can be absolutely anything (user-friendly)
- Once the unpacking process is complete, the Nvidia Installation Wizard will automatically launch. You need to wait for the OS preliminary scan to finish.
The check usually lasts a few seconds
- After successful verification, select the driver installation option and click “I Accept.” Continue".
GeForce Experience is a special utility from Nvidia for working with video card settings
- Select the desired installation options and click Next.
The Custom Install option will allow you to select individual components to install
- Wait for the installation process to complete.
During the driver installation process, your monitor screen may go dark for a few seconds (this is normal)
- Close the video driver Installation Wizard window.
After installing the driver, it is not necessary to restart the PC
AMD Radeon
If you have a Radeon video card installed, then in this case you need to:
- Go to the AMD website, open the “Drivers and Support” tab, select the model of your video adapter (Search for your product line) and click “Submit”.
You can also find your video card in the hardware table provided just below the search bar
- Select the version of the driver package suitable for your Windows OS and download it.
The most current driver versions are always at the top of the list
- After downloading, run the installer and unpack the package to any folder on your PC.
To fully see the process of unpacking files, you need to click on the Show Details button
- Once the unpacking process is complete, the Radeon Driver Installation Wizard will automatically launch. You need to accept the “License Agreement” and wait while the utility scans the system.
The scanning process depends on the processor load
- Then choose one of the video driver installation methods.
By default, it is better to select the “Express Install” mode
- Wait for the installation process to complete, then click “Reboot now”.
If you want your driver to always be updated automatically, then before restarting your PC, check the box next to “Update the system in a timely manner”
- Done, after restarting the PC, the driver for the video adapter will be finally updated.
Update/install video driver in semi-automatic mode
Such an update involves the use of third-party utilities designed to simplify the search and installation of drivers for all PC components, including the video adapter. To make the search for such specialized software easier, let’s look at the most popular ones.
Display Driver Uninstaller
The utility is designed to completely remove all versions of previously installed video drivers. You can download it on the official website of the developer. It is recommended to use it if you need (for example, when updating the current driver version an error appears) to reinstall the latest “clean” driver for the video adapter . All you need to do is download/run the program, indicate the model of the installed video card in the start window and select one of three uninstallation modes.
In the “Log” field you can also see all the information about the video card and the installed driver
After uninstallation, you can proceed to reinstall the driver.
SlimDrivers
You can find and download the program on the developer’s website. SlimDrivers is not only capable of automatically searching, downloading and installing the latest versions of drivers for components, but also creating “rollback points” (useful if problems arise during the update) . To update the video driver, you need to:
- Download and run the program. Click the Start Scan button.
The utility does not support Russian language
- Wait for the scanning process to finish, find the name of the video card in the list of results and click Download Update.
Updating the driver will only be possible if a newer version is available on the network
Radeon Software Crimson Edition
It is a specialized comprehensive program for owners of AMD Radeon video cards, which can not only update the video driver, but also improve (increase) the performance of the card itself. To update the driver:
- Install and run the program. Click on the “Updates” tab and select “Check for updates.”
The program installation file weighs ~500 MB
- At the end of the check, mark with a marker the components that need updating and click “Install”.
To update the graphics card software, you must select “AMD Display Driver”
- Done, after installation you should reboot the system.
DriverPack Solution
An excellent driver update manager from Russian developers. The utility does not require installation on your hard drive and runs in standalone mode . Capable of automatically searching and installing drivers for all PC components:
- Launch the manager and click the “System Scan” button.
The manager works correctly on all operating systems and with any models of components
- After that, find your video card in the list of devices, place a marker next to it and click “Install all”. Next, the program will perform an automatic update.
If you want to update the driver only for the video card, then uncheck all other checkboxes
Having personally tested the work of the above utilities, I can say that the most convenient, easy to use and effective were SlimDrivers and DriverPack Solution, which fully cope with updating the video adapter driver. The Display Driver Uninstaller utility does not always correctly remove old versions of video drivers (to minimize technical failures, it is recommended to run the program and carry out the uninstallation process in Windows Safe Mode). If you have a Radeon video card (from AMD), then instead of Radeon Software Crimson Edition I would advise using Radeon Software Adrenalin Edition, since this utility is a kind of improved version of Crimson Edition.