When installing a driver, the Windows operating system checks the authenticity of the digital signature, and if the signature is missing or changed, the system prevents the driver from being installed on the computer. The driver's digital signature is verified for security purposes.
In some situations, the user needs to install a driver that does not have a digital signature on the computer. To do this, you need to disable digital signature verification. It is not recommended to disable driver digital signature verification because it may compromise system security.
Drivers are designed to enable interaction between various computer hardware. Without installing drivers, the hardware installed on the PC cannot operate normally.
A large number of drivers are included in the Windows operating system; the necessary drivers are installed when installing the operating system. In another situation, the user independently installs drivers for new equipment on a PC, downloading them from the official website, or installing them from the supplied disk.
The digital signature of drivers informs about the manufacturer of this software, that this driver has been tested, verified and certified. The user can be confident that installing a driver with a valid digital signature is secure.
Installation of unsigned drivers is disabled in 64-bit versions of Windows.
What should I do if I need to disable Digital Driver Verification? For example, a driver for some equipment does not have a verified digital signature. Without installing the driver, the user will not be able to use this equipment on the computer.
The Windows operating system has options to disable driver digital signature verification. In the article you will find instructions on how to disable digital signature verification of Windows drivers for the operating systems Windows 10, Windows 8.1, Windows 8, Windows 7. Some methods disable digital signature authentication completely, other methods only work during the current session on the PC.
How to disable digital signature verification in Windows
First, let's look at a universal method that works in all modern versions of Windows operating systems. The Local Group Policy Editor will help us.
Only users who have older versions of the operating system on their computers, starting with Windows Pro and higher, will be able to use the Local Group Policy Editor. This system component is not present in home versions of Windows. In this case, you must use other methods described in this article.
- Press the “Win” + “R” keys on your keyboard at the same time.
- In the Run dialog box, enter the command "gpedit.msc" (without the quotes).
- In the Local Group Policy Editor window, go to User Configuration → Administrative Templates → System → Driver Installation.
- Double-click on the “Device driver digital signature” option.
- In the “Device driver digital signature” window, activate the “Enabled” option, and in the “If Windows detects a driver file without a digital signature” option, select “Skip”.
- Apply the settings, and then restart your computer.
In the Local Group Policy Editor, you can use another method: in the “Digital signing of drivers” window, select the “Disabled” mode, apply the settings, and restart the PC.
Signature
Let's first understand what a digital signature is. This is a mark on software and any files that allows you to identify its creator, as well as ensure that the software has not been changed after it was signed.
In the case of drivers, the operating system checks their authenticity, as well as compatibility with the OS. In addition, the driver is checked for absence of modifications by third-party users.
If a file or driver contains an incorrect signature or no signature at all, this could mean either that it was created by an untrusted developer, or that the file has been modified (for example, infected with a virus). However, the absence of a signature does not guarantee that the drivers are malicious, and its presence does not necessarily guarantee security.
How to disable digital signature verification in Windows 10
The Windows 10 operating system has a feature for custom boot options that you can use to change your boot options. Among other parameters, there is an option to disable mandatory verification of driver digital signatures.
You may also be interested in:
- Windows Command Line Commands: List
- Windows Run Commands: Complete List
This method will allow you to disable digital signature verification during the current session. After completing the session on the PC, after starting the computer again, the digital driver check will be turned on again.
- Go to the Start menu and launch the Settings app.
- Select "Update and Security", open the "Recovery" section.
- In the “Special boot options” option, click on the “Restart now” button.
- After the reboot, in the “Select Action” window, click on “Troubleshooting”.
- In the Diagnostics window, click on Advanced Options.
- In the "Advanced options" window, at the bottom of the window, click on the "View other recovery options" link.
- In the window that opens, click on the “Download Options” button.
- In the "Boot Options" window, click on the "Restart" button.
- After the reboot, in the “Boot Options” window, using the “F7” key, select the “Disable mandatory driver signature verification” option.
Install an unsigned driver on your computer.
Removing system files
Now that the update is turned off, you need to delete files from system32. Before doing this, you need to stop the Windows “software protection” service.
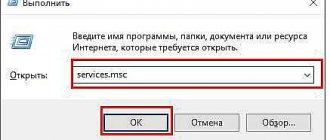
- Press the Win button and go to the control panel.
- Open the “Administration” menu category.
- Go to the “Services” subcategory.
- Find in the list the service called “Software Protection”, right-click on it and disable it.
Now you can start deleting system files:
- Open “My Computer” and go to the system drive (usually it has the letter C).
- Open the Windows directory and its subfolder System32.
- If showing hidden files is disabled on your machine, you should enable it. To do this, in the top menu of Explorer, select “Arrange”, then “Folder Options”, then “View”. In the list of additional parameters, you need to find the “show hidden” item and select it.
- In the System32 directory, delete two files with unwieldy names starting with the characters "7B296FB0".
- Enable back the service that was disabled in the previous step of the guide.
Disable driver signature verification in Windows 8.1 and Windows 8
In Windows 8.1 and Windows 8 operating systems, use the same method as in Windows 10, which is practically no different in its application.
- Move your mouse cursor to the right edge of the screen.
- Click on the "Change PC settings" option.
- In the PC Settings section, click on Update & Recovery.
- Under Update & Recovery, select Recovery.
- In the “Special boot options” option, click on the “Restart now” button.
- After the reboot, in the “Select Action” window, click on “Diagnostics”.
- In the next window, click on “Advanced options”.
- In the Advanced Options window, click on Boot Options.
- Click on the "Reboot" button.
- After restarting the PC, use the “F7” key to apply the option to disable mandatory driver signature verification.
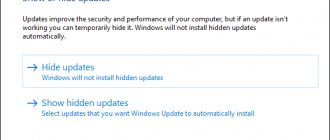
What to do if the driver does not install
Finally, we will name several reasons why the installation of a correct and supported driver may fail:
- your account does not have the required permissions;
- driver installation is blocked by security programs;
- the system is infected with viruses;
- the file with the .inf extension, which specifies the conditions for installing the driver, does not contain information about the equipment;
- during the installation process a conflict arises with already installed drivers;
- The system files responsible for installing drivers are missing or damaged.
How to disable digital signature verification in Windows 7
In the Windows 7 operating system, you can use the advanced boot options option, similar in use to that used in older versions of Windows, the command line, or change registry settings.
Let's see an example of disabling digital signature verification using the Windows Registry Editor.
- Open Registry Editor.
- In the Registry Editor window, follow the path:
HKEY_CURRENT_USER\Software\Policies\Microsoft
- Right-click on “Microsoft”, select “New” from the context menu, and then “Partition”.
- Give the section a name: “Driver Signing” (without quotes).
- Select the “Driver Signing” section, right-click on an empty space in the section, first select “New”, then “DWORD Value (32-bit)”.
- Name the parameter "BehaviorOnFailedVerify" (without quotes).
- Right-click on the “BehaviorOnFailedVerify” parameter and select “Edit...” from the context menu.
- Check the parameter settings: value is “0”, number system is “Hexadecimal”.
- Close Registry Editor and restart your computer.
To enable driver digital signature verification in Windows, delete the previously created “Driver Signing” section from the Registry Editor.
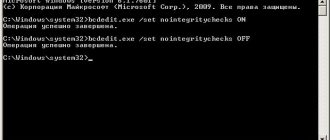
Turn off digital driver verification using the command line - method 1
There are several options for disabling driver signature verification in Windows 7, Windows 8, Windows 8.1, Windows 10 by running commands from the command line.
The first option to use the Windows command line is:
- Run Command Prompt as Administrator.
- In the command line interpreter window, type the command and then press Enter:
bcdedit.exe /set nointegritychecks ON
- Restart your PC.
To enable signature authentication, do the following:
- Open Command Prompt as Administrator.
- Run the command:
bcdedit.exe /set nointegritychecks OFF
- Restart your computer.
Driver digital signature verification in Windows will be enabled again.
Disabling digital signature verification in Windows PowerShell or the command line - method 2
Another method for disabling verification, which works the same in Windows PowerShell or on the command line. We will need to execute two consecutive commands to apply the settings in the Windows operating system and enable test mode.
- Run Windows PowerShell or Command Prompt as an administrator.
- Enter the command, and then press the “Enter” key:
bcdedit.exe -set loadoptions DISABLE_INTEGRITY_CHECKS
- Then run the second command:
bcdedit.exe -set TESTSIGNING ON
- Restart your computer.
To enable digital signature verification on your computer, run the following commands in sequence:
bcdedit -set loadoptions ENABLE_INTEGRITY_CHECKS bcdedit -set TESTSIGNING OFF
For security purposes, it is recommended to use methods that disable driver digital signature verification once, while the computer is running. In this case, after restarting the computer, the Windows operating system will again begin mandatory digital verification of drivers for authenticity.
A few final recommendations
Here, in fact, are all the main solutions, which are completely equivalent to each other, unless you take into account the actions to disable the Defender tools in Windows 10. However, as already mentioned, if the installed antivirus is active, such actions are not required.
Yes, and here's another thing. If for some reason all the described actions do not give the desired result or their implementation turns out to be impossible due to too strong restrictions on the part of the so-called super administrator, try lowering the level of control of UAC “accounts” (you can access this section by entering the desired abbreviation in the field search) or try to do it all using Safe Mode boot. In some cases, this approach may be the only correct solution. But in most cases, even with the default options installed, such actions are not required (they are only needed when the security settings have changed dramatically).
However, finally, it is worth reminding all users without exception that it is recommended to disable checks only in cases where it is known for sure that the software was downloaded from a trustworthy resource and does not contain explicit or implicit threats to the performance of the operating system (for example, when downloaded from website of the device manufacturer or driver developer).
As a last resort, to ensure security after downloading, files should be checked for viruses with any available scanner (preferably a portable type that does not depend on the installed standard protection tool). Utilities like KVRT or Dr.Web CureIt! are perfect for these purposes, as they can detect almost all known threats and malicious codes without requiring installation on the hard drive, which can provoke conflicts with the standard antivirus at the software level.