How to completely remove drivers from the system using Driver Sweeper
As you already understood from the title, and the subtitle, the story will be about a small utility called Driver Sweeper, which is engaged in the fact that it can remove drivers from the system, the remains of driver files, as well as all sorts of junk keys in the Windows system registry from them .
There are quite a large number of possibilities that can be useful to literally everyone. These include removing drivers from major manufacturers, backups, cleaning the registry, a multilingual interface (including, importantly, Russian), simultaneous deletion of several profiles and other miscellaneous things.
In addition to the above, the program, of course, is completely free (like almost all the software we write about on the pages of this resource), and is also simple and pleasant to use. You can download, for example, .
The installation process is simple and straightforward. During the installation, do not forget to uncheck anything that is offered to you as an add-on (especially if you already have it).
It is possible that you will need to install the .NET Framework separately. I already wrote more about what it is, how and why in the material “What is the Microsoft .NET Framework and why install it.”
As for use, when you launch the program, you first need to set the language to Russian. To do this, follow the “Language” link and select the “Russian” item from the drop-down list, and then click on the “Apply” button:
After this process, the program language becomes Russian, and therefore we simply go to the “Analysis and Cleaning” tab, check off those items with drivers that we want to remove and the garbage from which we do not need in the system.
Next, we resolutely press the “Cleaning” button (if you suddenly doubt that it will sweep away something unnecessary, then it is better to start by clicking “Analysis” and look at the list of files and registry keys that the program wants to remove).
Oh, and yes, of course, there is the possibility of restoring deleted data, for which there is a corresponding “Recovery” tab.
With this, the whole process actually ends, and therefore we can move on to the afterword.
Driver Sweeper is a reliable driver removal program
As already mentioned, the manufacturer does not support this utility and you cannot download it from the official website. The installer weighs 5.2 MB. I suggest downloading it quickly from the link below.
Download and install the program. Installation is simple. You only need to refuse to install Instagrille in the window below and click Next >
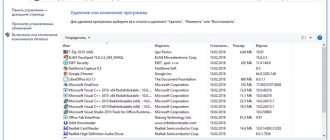
The program has been installed. Now you need to use standard Windows tools to remove software, such as a driver for a video card. (You can read how to choose a graphics adapter here.) This is done in the “Uninstall programs” section of the control panel.
After the drivers are removed, we proceed to cleaning.
In this mode, programs from the startup folder and many drivers are not loaded, therefore, the possibility of completely removing drivers is increased. To boot into safe mode, after pressing the computer's power button, you must press the F8
. A window will appear with a selection of download options. You must select the highest safe mode and press Enter.
Launch the driver removal program Driver Sweeper.
The default program is in English. Let's switch to Russian. To do this, in the Options
select the
Language
.
Next on the right, select the required language from the drop-down list. To change the settings, click the Apply
Then, on the left, select Analysis and Cleaning
.
On the right, select the checkboxes for the drivers that need to be removed, and click the Analysis
. In my case, I will remove old AMD video card drivers
The program will search for the remaining information and show it to us. We are required to click on the Cleanup
Driver Sweeper will issue a warning. Click OK
You need to wait a little. The program will then prompt you to restart your computer. Click OK and reboot.
This completes the driver removal procedure.
A program to remove a device driver from a computer.
Complete removal of the problematic driver in many cases solves problems with the computer crashing into the “blue screen of death”, system slowdowns, and other conflicts. Sometimes the presence of an old driver on the system makes it impossible to install a device driver. We wrote about the reasons why the driver is not installed in the previous article.
Driver Sweeper
Driver Sweeper is a free program for correctly removing a device driver from your computer. This program removes the device driver completely without leaving any tails, which can later lead to the system crashing into a “blue screen of death” (BSOD) and other related problems. The program has Russian language support. The interface is intuitive and convenient. It is possible to change the color scheme by installing themes. The undoubted advantage of the program is that before removing the driver, it creates a complete backup copy of it. If something goes wrong after removal, you can always restore the deleted driver from a backup copy.
Driver Genius
Driver Genius is a program that helps keep your drivers always up to date. This utility allows you to update, install, copy and transfer installed drivers to other computers. In addition to the above mentioned skills, the program can boast of completely removing installed drivers. This program will help get rid of drivers for unused devices, drivers that negatively affect the system. But this program has a significant disadvantage. The program is paid and does not support the Russian language. There is also a free version, but it strips away most of the useful features.
Afterword:
You will learn about how to use these programs and more from the following article. In it I will provide detailed instructions on how to properly remove a device driver from a computer.
Over time, Windows stores many backups in the system, temporary files, old drivers, which will gradually take up space on your hard drive. Of course, you can clear drive “C” of unnecessary files to free up space on your hard drive, but what to do if old drivers for a device interfere with the installation of new versions? Particularly problematic are wireless mice, keyboards and other USB devices that sometimes do not want to work until we remove the old drivers and install new ones.
Drivers are small necessary applications to connect any device and make it work. The Windows system has a very large database of drivers for different types of devices: printers, mice, sound cards, boards, etc. Some manufacturers release their own versions of drivers that are necessary for operation, and drivers in the Windows database may not always work with a particular device. To do this, we need to remove old unnecessary driver versions and install new ones from the manufacturer.
Complete removal of drivers in Driver Sweeper
When installing new devices on a computer, the system most often determines all the necessary drivers. But it often happens that it is necessary to remove all drivers so that no traces are left either in the registry or in the form of files. In this case, a small free utility, Driver Sweeper, will come in handy, allowing you to remove or restore drivers. Another function of the program is to save the location of icons on the Desktop.
Once launched, Driver Sweeper automatically analyzes the system and displays a list of drivers that can be removed. If for some reason this does not happen, press the button.
Check the boxes on the drivers and click on the button. After uninstallation, the program will prompt you to reboot the system for the changes to take effect.
The Management – Backup section lists drivers removed using Driver Sweeper. They can be restored at any time by pressing the button.
By the way, the Russian interface is switched to the Options – Language – Russian menu.
Another useful feature of the program is located in the Home menu - Desktop Icons. Here we can save the position of icons on the Desktop (button). This will be useful in case some program confuses the arrangement of icons on the Desktop (and this sometimes happens). To restore the position of the icons, select saving in the list and click on the button.
Driver Sweeper currently supports removing the following driver types: NVIDIA (display and chipset), ATI (display), Creative (sound), Ageia (PhysX), MMouse and Realtek (sound).
Characteristics: Interface language: Russian, English, etc. OS: Windows 2000, XP, Vista, 7 (32- and 64-bit) File size: 4.7 MB License: free
Driver Fusion - remove drivers quickly and efficiently
Phyxion, the developer of Driver Sweeper, has, as has been repeated many times, discontinued support for this product. You can verify this by looking at her website. When hit we see the following
Driver Sweeper has been replaced by the new and improved Driver Fusion. Which will be supported by Treexy. After 30 seconds, you will be redirected to the site https://treexy.com/ from which we will download it.
Downloaded file Driver_Fusion_1.4.0
has a weight of 6.2 MB. The program supports the Windows 8 operating system and requires Microsoft installation. NET Framework 4.0 or higher.
Installation is simple and does not involve installing third party programs.
For greater efficiency, launch Driver Fusion in safe mode. The program interface is completely different. The program launched immediately in Russian.
You find yourself in the Maintenance section on the Drivers tab. Select the required drivers (you can select several at once) and click on the button below Analyze
The program will find driver remnants that need to be removed. Click on the only Delete
Driver Fusion will ask you to confirm the selected actions to delete entries. Confirm
You may need to reboot after removing the drivers. Reboot and continue working without failures.
Removing driver applications
Drivers are service files of the “.sys”, “.dll”, “.vxd”, “.drv” formats, stored in special Windows directories. Most of them are installed using “.inf” files and do not have their own interface for user control. But there are third-party drivers that come bundled with their proprietary applications. These exist for video, audio cards, printers and other peripherals. And they are installed into the system like third-party programs. It is not always possible to get rid of such drivers through regular uninstallation; their hidden components may remain in the system. And at best, it takes up disk space as a dead weight, at worst, it conflicts with new drivers. In this case, special cleaning programs will help.
Uninstall Tool
One of the best advanced uninstaller programs is the Uninstall Tool. Firstly, it will help to correctly uninstall the driver applications themselves, i.e. remove them by clearing any residues in the registry and on the disk.
Secondly, the program displays not only the main directory with third-party software, it also has two separate directories with hidden and system components. Remaining components of third-party drivers may be hiding there, and the Uninstall Tool can forcefully remove them.
Display Driver Uninstaller
The Display Driver Uninstaller program is designed specifically for correctly removing video drivers. It is narrow-profile, intended only for cleaning Windows from Nvidia, AMD and Intel video card drivers along with all their installed proprietary applications. It is recommended for use before replacing the video card, so that the next time you start Windows you can install a new video driver without any problems. In its window on the right you need to select the desired brand of video card - Nvidia, AMD and Intel. And on the left, indicate the desired action - remove the video driver, and then either do nothing, or reboot the system, or turn it off.
Removing regular drivers
Problems with hardware and peripherals can sometimes be caused by information about old devices of this type left in the system. Such devices may no longer exist, but Windows stores their drivers. Plus, they also take up disk space. How to remove drivers for old, no longer existing hardware and peripherals?
For externally connected equipment, you can try to use the device manager. It needs to be configured to show hidden devices.
And remove those that are no longer used. They will be marked with faded icons.
As for the internal filling of the computer, everything is not so simple. To correct the conflict situation, you can unlink component drivers using the standard Sysprep utility, designed for deploying Windows on corporate and OEM devices.
It returns the system to the state of the first launch, and the entire hardware of the computer is defined in a new way.
But it is preferable, of course, to use this utility before replacing important components.
The drivers themselves (their service files) do not disappear anywhere in either the first or second case. Unless the installation files “.inf” of some of them can be deleted in order to clear space on drive C. This is done using a standard disk cleanup tool or special third-party programs.
Standard way to remove drivers
Important! Before making any changes, create a system restore point!
This method is not original; everything is the same as when deleting any program. For example, I will remove drivers from an NVidia video card. Go to “Control Panel -> Add or Remove Programs” or find it through a search in the “Start” menu
and delete everything related to NVidia (in my case) by double-clicking on the positions.
Follow the wizard's instructions and reboot. If your device is not found in the control panel, then you need to remove the driver manually:
- Go to Device Manager (press “Win + Pause” and select “Device Manager” on the left)
- Finding the right device
- Go to the “Driver” tab
- Click “Delete”.
Removing drivers from the Windows system directory
Completely removing regular drivers from the Windows environment - with the destruction of their service files and installation files - can only be done in a barbaric way by interfering with the Windows system directory. It is advisable to hold such events if there is absolutely nothing else left. And then, with the obligatory creation of a backup of the drivers, as well as a backup of the entire system, if its contents are of value. Or when we talk about experimental purposes using virtual Windows, systems on other disks, etc. It is not recommended to perform the following steps without proper training on basic computers.
We go to the device manager. Double-click to open the properties of the device for which we are going to remove the driver. Go to the “Driver” tab, click “Details”.
Here in a new window we will see the path to the driver service file. For some devices there may be several such files. We remember all of them, their location in the system directory, or better yet, write it all down or take a screenshot.
Next, close the window and return to the device properties. Now open the adjacent “Details” tab. In the drop-down list, indicate “INF Name” and record its value somewhere. This is the driver installation ".inf" file.
Now we turn off the device in the manager.
We go to the Windows system directory, where its service file “.sys”, “.dll” or another is stored. And we delete it.
If there are several service files, then it is necessary to delete all of them in this way. We return to the manager and see that the device is displayed with an exclamation mark. And this means that the driver for it is not installed on the system. Let's try to update it.
In our case, the experiment was carried out with a network card, so there is no point in searching on the Internet. Immediately select local search for drivers.
Click on the selection from the list of available drivers.
We have found the one we need, click “Next” and install it.
Restoring the driver became possible because we deleted its service files in the system directory, but we have not yet touched the “.inf” installation file. To make it impossible to install the driver in the future, we follow the path:
C:\Windows\INF
And delete the previously recorded “.inf” file in this folder.
But the system will not want to delete it; it will request access with TrustInstaller rights. And, having received such rights, he will come up with a new reason for refusal. Moreover, the system will not want to delete not only the “.inf” file, but also the service files of some drivers. In the case described above, the “.sys” file was deleted due to the selection of a device that the system does not consider vital – the network card. It will not allow you to remove drivers for vital components. In such cases, you need to boot from any Live disk with a file manager on board. And delete all service files recorded inside the system and, if necessary, the “.inf” installation file.
After deleting the “.inf” installation file, a system without the Internet or the help of third-party software will not be able to install the device driver.
Next, we can try to install a new driver in any of the possible ways:
• From the installer downloaded from the official website; • Search on the Internet or in the Update Center;
• Use specialized third-party software; • Extract from previously made backups.
Removing drivers using standard Windows tools
In this case, you need to use the Control Panel menu, in which you select the “Device Manager” item. The name may change depending on the version of the installed operating system. Now just select the device you are interested in and call up the context menu, then use the “Properties” command. There will be a complete description of the driver version (the “Driver” tab, the “Properties” menu).
Now let's look at an example, say, how to remove an audio driver (or how to remove a printer driver). In principle, the formulation of the question does not matter, the scheme is the same. We carry out the procedures described above, but only instead of the “Properties” button we use the “Delete” button. The system will ask you to confirm the deletion, after which you can restart the computer.
If the printer drivers are standard and included in the Windows installation package, they will be installed automatically after a reboot. Otherwise, you will have to install them either from the original disk or download them from the manufacturer’s official website.
By the way, this method of viewing information about drivers is also convenient because here you can even find out the location of the files themselves. If for some reason the system cannot remove such programs, you can begin to resolve the issue of how to completely remove the driver manually. To do this, you just need to delete files from the location specified by the system, as well as the corresponding registry keys. However, this is highly discouraged for inexperienced users.
Removing a device driver installed on your computer
Method 1:
(removing a driver using special programs) There are not many simple free programs for removing drivers. A good option is Driver Sweeper. • Driver Sweeper:
⇒
The procedure for removing a driver using Driver Sweeper: • download the program (see link above), install and run it on your computer; • activate the Russian interface language (this is not necessary, but it will be more convenient). To activate the Russian language, on the left side of the program window you need to click on the “Language” item, then on the right side, in the drop-down list, select the “Russian” option. After that, click the “Apply” button; • when the program switches to Russian, in the left part of its window, click on the “Analysis and Cleaning” item. Then, on the right side, check the box next to the device whose driver you want to remove, and then click the “Analysis” button; • After some time, the program will display a list of driver files to be removed, as well as the system registry keys associated with them. If you want to keep some of them, you need to uncheck the boxes next to them. To delete flagged files, click the “Cleanup” button and confirm the deletion in the dialog box that appears.
Method 2:
(via Windows Device Manager) • kill all active processes that may be using the driver being removed (so that they do not interfere with its removal); Let me remind you that to end a process you need to open the Windows task manager, go to the “Processes” tab, select the corresponding process in the list and at the bottom of the window click the “End process” button. You can learn that a process can use a device driver from its description. For example, processes related to an NVIDIA GeForce video card will have the word NVIDIA in their description (see image). • open Windows Device Manager; • in the list, find the device whose driver you want to remove, right-click on it and select “Properties” in the menu that appears; • in the window that opens, go to the “Driver” tab, where click the “Delete” button; • in the next window, check the box next to “Remove driver programs for this device,” click “OK” and wait until the removal process is completed. In most cases, the above steps are sufficient. However, this method does not guarantee complete removal of the driver from the computer. Some files may remain on the system, as well as associated registry keys. Usually, this does not create any problems. However, if you need to completely remove the driver, it is better to use a special program (see the previous method).
How to use
Working with the program is quite simple: the user interface, all functions create ease of use due to their location. The utility is supported in Russian, and all you need is to find the “Language” tab on the toolbar, where you can find “Russian language” in the list and select it. Let's take a closer look at the three main functions and find out how they work.
- Analysis, cleaning. By going to the appropriate tab, select the drivers that we need to remove. The utility starts a scan and then displays all the keys and registry traces left by the software on the system. We select what we want to get rid of, click on the “Cleaning” button and wait a couple of minutes. After this, you need to restart your computer, and after starting, all traces will disappear.
- Icons. This feature only works with the desktop. In the control panel you can archive your desktop with the location of all icons and files. All information is saved, and at any time you can restore the desktop to its original position.
- Recovery. If you did something wrong, don't worry. All information regarding drivers can still be returned. During deletion, Driver Sweeper creates a return point, which means that all impact data must be returned without loss of information. Just click on the “Recover” button and select the files that you accidentally deleted. In a few minutes you will receive the data you need.
Removing drivers for unused devices
Some devices are constantly connected to the computer (flash drives, removable drives, card readers, phones, printers, etc.). For each of them, a driver is installed in the system. Once the device is turned off, these drivers remain on the system, take up space on your hard drive, and generally slow down your computer. It is advisable to remove them. The problem is that unused devices don't show up in Windows Device Manager by default, and the Driver Sweeper program mentioned above can only find some of them. Therefore, you cannot remove unused drivers using the methods described above. There are two ways to solve the problem: use the Driver Genius program or force the computer to display absolutely all drivers (including unused ones) and then remove them in the usual way through the device manager (see above). Now more details.
Removing unused drivers with Driver Genius
• Driver Genius:
⇒
Procedure: • download, install and run the Driver Genius program on your computer; • on the left side of the program window, click on the “Driver Cleanup” item. • the program will analyze your computer and display a list of unused drivers. In this list, you need to check the boxes of the devices whose drivers you want to remove, then click the “Next” button at the bottom of the window and confirm the removal in the dialog box that appears. The advantage of the Driver Genius program is that it makes it easy and simple to clean the system of unnecessary drivers. However, it does not remove all unused drivers, but only those that can negatively affect the operation of the computer. If you need to more thoroughly clean your computer from “driver junk”, you will have to do it “manually”.
Removing unused drivers through Device Manager
The procedure for removing drivers through the device manager is discussed in this article above (see Method 1 at the beginning of the article). However, by default, only devices connected to the computer are displayed in the manager. To make it display absolutely all devices for which drivers are installed on the computer, you must: • right-click on the “Computer” icon (on the desktop or in the “Start” menu) and select “Properties” in the context menu that appears; • in the left part of the window that opens, click on the item “Advanced system parameters”; • in the window that opens, go to the “Advanced” tab, where click the “Environment Variables...” button; • in the next window, under the “User environment variables...” list, click the “Create” button; • in the window that appears for creating a new variable, in the “Variable name” field, type devmgr_show_nonpresent_devices , enter 1 in the “Value” field, and then click OK. • then you need to open the device manager, click on the “View” item in its menu and activate “Show hidden devices” in the list of options that appears. Now the manager will display all devices whose drivers are installed on the system. For example, by opening the “Disk Devices” section, you will see a complete list of flash drives that have ever been connected to your computer. At the same time, those of them that are currently disconnected from the computer will be displayed in a paler color.
Installing and using Driver Sweeper
Let's start installing the utility and cleaning the system from driver remnants...
I recommend
If you haven’t checked the box by creating a shortcut on your desktop, go to the Start menu, find the program and run it...
The problem is a program in English. With a slight movement of the hand we switch the interface to your language...
...don't forget to click below...
Reward for several thousand nerve cells killed and kilocalories burned with three clicks.
You can customize the program for yourself - change the appearance by looking at “Miscellaneous” and “Theme”...
"Analysis and purification" ...
Here is a list of the main equipment manufacturers. Check the boxes next to the manufacturer whose driver you want to completely remove. I was surprised when Driver Sweeper found and removed Nvidia video card drivers with my integrated Intel. I have no idea where they came from.
Now “Analysis” is on the right, below and then “Cleaning”...
Clear day...
Reload and rejoice! Now you know how to completely remove the driver.
If necessary, you can restore deleted drivers...
Clean system and fast internet! To new useful computer programs and interesting applications for Android.