When launching the popular Android OS emulator “Bluestacks”, we may encounter the error message “The virtualization engine cannot be started.” The system suggests restarting our PC, but this does not solve the problem. Below we will look at why this dysfunction occurs and what to do if the engine does not start.
The virtualization engine does not start - the essence of the problem
As we remember, hardware virtualization technology was created by Intel to speed up the operation of its hardware components. Later, an analogue of this technology from AMD was released, and now the capabilities of this technology allow the Bluestacks emulator to work quickly and smoothly.
Virtualization technology allows you to speed up your PC
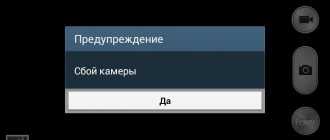
The error “The virtualization engine does not start” usually appears when you try to start the virtualization engine on the Bluestacks emulator.
An error appears when starting the virtualization engine
The appearance of this error may be caused by installing an incorrect update of the Bluestacks emulator or the Windows OS itself. In both cases, the cause of the error is an update bug, which is corrected by subsequent updates from the developers.
Dysfunction can also be caused by:
- Bluestacks emulator malfunctions;
- Lack of support for virtualization technology in the hardware of the user's PC (central processor);
- Disabling the virtualization function in the PC BIOS;
- The antivirus blocks the correct operation of the Bluestax emulator.
Let's figure out how to fix the virtualization engine startup error in Bluestacks.
Description
Bluestacks is one of the best Android emulators for PC in the market. This program has a wide range of capabilities, but, like any other software, it has its drawbacks. In particular, these shortcomings include errors that arise from time to time during the work process. One of them is the question that every second emulator user faces, namely: why does the Internet not work in Bluestacks? We will look at the reasons for this failure and, accordingly, rational ways to solve the problem.
Switch to DirectX and change RAM capacity
In the Bluestacks engine settings there is an option to select OpenGL or DirectX technology for stable operation of the emulator (by default the emulator uses OpenGL). Switching to DirectX and rebooting the emulator will help get rid of the “Virtualization engine does not start” error on Bluestacks.
Do the following:
- Open the Bluestacks emulator;
- Click on the emulator settings button in the upper right corner (down arrow);
- In the menu that appears, select “Settings”;
Select emulator settings
- Select the “Engine” section on the right;
- Activate the “DirectX” option;
Select the "DirectX" option
- Below, click on the “Reboot” button.
After restarting the emulator, check for the problem. If there is one left, then follow all the steps listed above, while on the DirectX or OpenGL selection screen, change the number of cores and the amount of memory. Try different options (for example, increase the number of cores and reduce the amount of memory). Then click on the “Reboot” button at the bottom. There have been cases where selecting the “DirectX” option and changing the RAM volume indicator helped fix the virtualization error in Bluestacks 3.
Advantages of Bluestacks
Bluestacks is a program that has many analogues in terms of operating principle, but none in terms of quality, practicality and efficiency.
This software has been duly appreciated by millions of users of Android devices from all over the world, who decided to get a pleasant experience from their favorite games and applications on the screens of desktop PCs and laptops. The first such advantage is the adaptability of settings. Each user can adjust the software directly to their fundamental wishes.
The size of the working screen, picture quality, input methods - you can easily configure all this and much more within the first minutes of using the software.
Another important advantage is the fact that the program is not demanding on resources. You are guaranteed to select a software version that will run your favorite Android applications and games on a weak PC. It should be noted that the program launches more than 95% of applications from Google Play.
Check if your system supports this technology
You also need to make sure that your PC supports virtualization technology. Special software tools will help us with this.
| For Intel based PC users | For AMD based PC users |
| Go to intel.com and download the “Intel Processor Identification Utility”; Install and run this program; Select the “CPU Technologies” tab; Find "Intel® Virtualization Technology" in the list. If “Yes” appears on the right, it means the technology is supported. If not, nothing can be done, and Bluestax will probably never launch. | Download the “AMD V Detection Utility” program from amd.com; Download and run the program; Make sure your system supports virtualization technology. The message should sound like “The system is compatible with Hyper-V”. |
Solving the problem with the Internet not working
When faced with the problem of the Internet not working, you will only need a few minutes to fix the error.
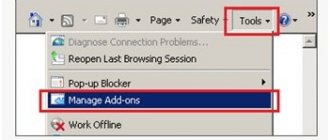
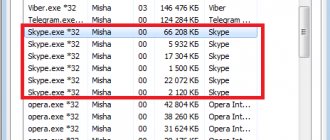
If the problem is with your antivirus and firewall, you should add a number of specific processes related to Bluestacks to the exception, namely: Agent, Apk Handler, App Runner, File System, Frontend, Log Rotator, Network and StartLauncher. These processes are responsible for the functionality of the emulator, and they are the ones that can conflict with your pre-installed protection. When the problem lies in the standards that your provider uses in the DNS server settings, then in this case you will need to download additional software. On the vastness of the global network, there is an impressive variety of programs that, with just one click of the mouse, allow you to change DNS addresses.
Reinstall the program
If none of the above methods helped you set up the Internet in the emulator, try downloading the latest version of the software and performing the correct installation.
It should be noted that incorrect installation of the program can lead not only to missing Internet, but also to more global errors that can affect the performance of games and even lead to the loss of important data.
Checking router settings
When faced with the question of what to do if the Internet does not work in Bluestacks, you can try dozens of settings and not achieve the desired result. The cause of the breakdown may be hidden in incorrect router settings.
To accurately determine the reason, try going to any page in your regular browser on your PC. If it doesn’t work, then there’s definitely an error in the hardware settings or you simply don’t have an Internet connection.
If there is Internet on your PC, but you cannot use the benefits of the global network through the emulator, then the problem is not with the router.
Enable hardware virtualization
A number of users were able to resolve the error “The virtualization engine does not start” in Bluestax simply by enabling virtualization in the PC BIOS.
To enable virtualization in BIOS, do the following:
- Restart your PC;
- Press F8, Esc, F12 or F10 when the manufacturer's logo appears;
- After going to the BIOS, in its menu, look for the option “Virtualization Technology” or “Intel Virtualization Technology” or “Intel VT for Direct I/O”;
- Enable (set to “Enable”) this option;
Activate the virtualization feature in BIOS
- Save the changes in the BIOS (usually by pressing F10), and then restart your PC.
This is relevant: error code 0xc0000225 in Windows 7/10
Applications won't launch: wrong graphics type
Many users do not even realize that the emulator may refuse to run the selected application due to an incorrectly selected engine. Its installation occurs automatically, immediately after installing and launching the program.
You can change the default parameters in the settings, in the “Engine” tab. There are several options to choose from: DirectX and OpelGL. Try changing them and running the selected game again.
What to do if nothing helps
If all else fails, try rolling back your PC to an earlier (and stable) restore point. Click on Win+R, and in the line that appears, type the command rstrui. From the menu, select an earlier and more stable restore point, and roll back your system to the selected stable state.
Restore the functionality of your system
After rebooting, try starting your Bluestax again.
Applications will not start: video driver is not updated
Let's assume that the system requirements are fully satisfied, the CPU supports the required technology, and the RAM is unloaded. But the emulator continues to refuse to launch games. Alternatively, all the problems may stem from the latest version of the video driver.
Some BlueStax assemblies were tailored to specific driver revisions, which is why their update “broke” all functionality. This is especially noticeable if there were no problems before installing the new driver version.
In this case, you will need to resort to a system rollback or reinstallation of auxiliary software for the video card in order to return to the preliminary assembly. This can be done using operating system tools or visiting the official website of the video chip supplier and searching for the previous version of the driver.
AMD official website
Official NVIDIA website
Installing BlueStacks and possible problems
Installation is, in principle, very simple. Even a novice user can install the program on his computer in a few clicks. Go to the official BlueStacks website and download the installation file on your PC. Launch it and wait until the installation window appears. Select the local disk for installation (usually the system partition) and click the "Continue" button.
Next, check the boxes “Access to the store”, “Application communications”. Wait until the system downloads and installs all additional components that ensure the program works correctly. When the installation is completed successfully, you will see a notification on your computer screen.
By the way, detailed instructions for installing the BlueStacks program have been published on the website mobimanual.ru. I recommend checking it out.
Applications won't launch: outdated version of Android
Emulation implies the reproduction of a specific platform. Regarding mobile Android, this most often applies to models with the 4.1 operating system. If you want to install a program for 5.0 on it, everything will end in failure, or to be more precise, the Play Market application store will block this opportunity.
It is still possible to try to install such an application using the original apk file, but there is no hope for a successful launch and continued operation. Don't miss updates.
Reasons why there is no internet connection in BlueStacks
Problems with Wifi on LG Smart TVs: finding the cause and solving the problem
The most common problem when BlueStacks does not see the Internet is that the computer picks up Wi-Fi, but BlueStacks does not connect to the network. But this problem can be solved. Why does it occur? The reasons why there is no Internet access may be:
- Incorrect installation of BlueStacks;
- Incorrect settings for working with BlueStacks;
- Firewall or antivirus is hostile to BlueStacks;
- Outdated version;
- The network is not stable.
If we look at the situation from the other side, the question arises of how to disable the Internet in BlueStacks. Then you need to block the Internet connection using a firewall or antivirus. It is their prohibition that is the most common cause of error.