OSFMount - a tool for mounting virtual images as USB
This is a small software for mounting virtual images in the form of USB drives or floppy disks. The program is absolutely free and extremely easy to manage.
The only drawback is that it is in English. In addition, it requires the image of a flash drive or floppy disk to work.
First, download the program from the official site (x86 or x64) and a floppy disk image from our file archive from here. Next, first of all, install the program (there will be no difficulties with this :)).
After launch, you will traditionally see the program interface (clickable):
In order to mount your media in OSFMount, click on the “Mount new” button. In order to unmount a media, select it from the list and click on the “Dismount” button, or click on the “Dismount all” button to unmount all media.
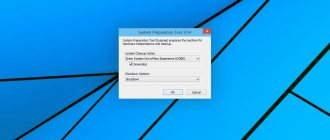
When you click on the "Mount new" button, mounting options appear.
Here we are interested in the following options:
- Source — source of the image. The source can be an image file (Image file), an image file loaded into RAM (Image file in RAM, not our case) or an empty disk from RAM (Empty RAM drive, also not our case, more details about disks from RAM were in this article). Here we point to our file;
- Volume options, — Various settings that are needed for the Image file in RAM or Empty RAM drive options are collected here. We leave them by default;
- Mount options - here are the mount settings that we need: Drive letter - set the drive letter that our image will use. For flop drives, it is recommended to use the letters A or B; the system perceives the rest as flash drives or HDDs.
- Drive type, — image type. You can select the following types: Auto - the program itself will try to determine the type of image;
- Floppy, — the image is a floppy disk;
- HDD, — the image is a USB storage device (flash drive or external hard drive);
- CD/DVD - the image is a CD/DVD media (like an ISO image).
After that, click on “OK” and that’s it.
In general, you can now work with the image in the same way as if you had a flash drive or other media inserted.
How to boot from USB in Linux in VirtualBox
To understand the principle, read the previous section about Windows. In Linux, to find out the name of the USB drive, run the command:
Sudo fdisk -l
In my case, the disk name is /dev/sdb
.
To create a virtual disk file pointing to a real disk, run a command like:
Sudo VBoxManage internalcommands createrawvmdk -filename /root/usb.vmdk -rawdisk /dev/sd#
Where instead #
Enter the letter of the corresponding drive. Example for my conditions:
Sudo VBoxManage internalcommands createrawvmdk -filename /root/usb.vmdk -rawdisk /dev/sdb
In this command, you can replace /root/usb.vmdk with another location of your choice.
To run VirtualBox with administrator rights, run the command:
Sudo VirtualBox
Everything else - creating a virtual machine and selecting an existing virtual disk as a hard disk - is exactly the same as in Windows.
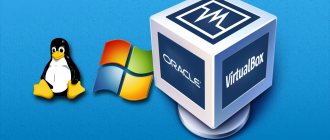
Being involved in system administration, I often have to use virtual machines like Oracle WM VirtualBox
and
WMWare Workstation
. I use VirtualBox more often due to the fact that it is simpler and lighter for single launches. There was a need to boot a virtual machine from a real USB flash drive, in this case, to test a freshly assembled bootable flash drive. But there is one nuisance - through the main interface of the VirtualBox program you cannot boot a virtual machine from a physical USB drive, however, there is a way to solve this problem. This is the method that will be discussed in the article.
To boot the VirtualBox virtual machine from an external USB drive, you need to create a clone of the USB drive as a *.vmdk file
, through which the VirtualBox host will communicate with a physical external USB drive. Such a file will occupy several kilobytes, because... contains only data for communication with a USB drive.
Creating a file that serves as a bridge between VirtualBox and a USB drive.
To create a *.vmdk file, there is a utility called vboxmanage.exe, which is included in the standard package of VirtualBox, so you do not need to download it separately.
So, to create such a file, you need to run the following command in the command prompt window, replacing the path to the VirtualBox directory with your own:
"C:\\Program Files\\Oracle\\VirtualBox\\VBoxManage.exe" internalcommands createrawvmdk -filename c:\\temp\\usb.vmdk -rawdisk \\\\.\\PhysicalDrive2 -register
There are two parameters to pay attention to here:
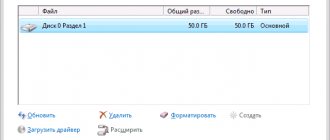
To find out the number of the external USB drive to which the file should be associated (usually an external USB HDD under the number 1
, if only one hard drive is installed), you can look at it in
“Control Panel → Administrative Tools → Computer Management → Disk Management”
.
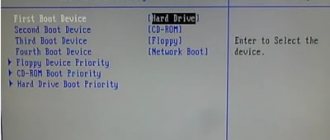
Now all that remains is to configure the VirtualBox host to boot from the newly created virtual disk.
Additional commands and other tails of OSFMount
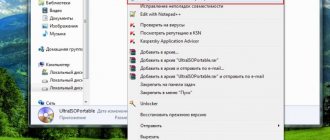
In order to use additional OSFMount commands, select the image file you are interested in and select “Drive actions” in the navigation panel, or right-click. The following commands are available here:
- Open - open the image (the same effect if you open it in My Computer -> drive A or E);
- Dismount — unmount the image;
- Save to image file — save the image to a new file. The same effect occurs if you simply copy the image file in Windows. But in the program you can also specify the image format (there is also an ISO);
- Extend size - you can increase the size of the image. In this case, you need to enter exactly how much you want to increase it, and not the full size of the image file (which, in my opinion, is somewhat strange). However, you will no longer be able to reduce it. And after increasing the volume, do not forget to reformat the image;
- Format—calls up the usual Windows image formatting menu;
- Set media read-only - prohibits writing to disk;
- Set media writable - allows you to write to disk;
- Set media removable - Windows will consider this device removable;
- Set media fixed—Windows will not consider this device removable.
That’s all, in general, and we can move on to the afterword.
OSFmount is a lifeline for those who do not have removable media at hand
OSFmount is a small program that will help you create a drive. This application can create both a ready-made image of the drive and RAM, which exists only in RAM. Floppy hard drive, artificial optical disk, and, most importantly, a virtual flash drive - the program can mount all these images. Windows 10, Windows 8, Windows 7 virtual flash drive will be created on any Windows operating system, both in a 64-bit environment and in a 32-bit environment. In mount you can even define a specific letter for an artificial disk and set the necessary attributes. At the same time, the size of the utility does not even reach 2 megabytes, its size is only 1.95 MB. The only downside is that the program does not support the Russian language.
Instructions for using OSFmount
It is easy to use and creating a flash drive does not require much time and effort. So, how to create a virtual flash drive on your computer using OSFmount:
- The first step is to download and install OSF.
- Now in the window that opens, click on “Mount new...” in order to add media.
- Now in a new window you can configure all mount options. The source parameter allows you to select a source. For example, screwed or RAM image virtual drive. But we need a USB virtual flash drive, and to make one, we need to specify a path with a certain format.
- You can skip the “Volume Options” settings, since they are absolutely not needed for artificial media. They are used only when loading an image into memory or to create a disk.
- With the "Mount Options" setting you can define a letter and assign an image format. There is a “Drive Liter” box for the letter, and a “Drive type” box for the type;
- At the bottom of the window there are two parameters “Read-only drive” and “Mount as remowable media”. To be able to record to an artificial hard drive, the first parameter should be unchecked. Opposite “Mount as remowable media” the checkbox must be checked so that the system opens virtual and does not realize that it was deceived.
- Click on OK! That's it, the virtual flash drive on the computer is done.
You may also need some options that open after clicking on “Drive Actions”. This option has the following:
- Dismount - for dismounting;
- Format—using this option you can perform formatting;
- Savetoimagefile - to save in the required format;
- Open - to open;
- Set media read-only - prohibits recording;
- Extendsize - used for expansion;
- Set media writable—allows recording.
This is how you can very easily make a virtual usb flash on your computer. You can choose any images for virtual flash. But in the case of a bootable image, the drive will have to be formatted and it will only open in this application.
An alternative version of this application is Virtual Flash Drive, which is also very simple and convenient for creating an artificial storage of information. Their difference is that OSTmount has more additional options and, in addition to usb flash, you can make other artificial drives.
Despite the fact that I increasingly use various online services to solve many problems, on a flash drive I always have a set of irreplaceable portable applications that run without installation on any computer. Developers themselves often publish portable versions of their products. But even if not, then enthusiasts often do it for them. After all, now everyone can download the wonderful Cameyo utility and make a portable version of almost any application. The goal is achieved through so-called virtualization: the application is placed in a special container in which the registry branches, files on the disk, etc. necessary for its operation are emulated. Wherever it is launched, such hothouse conditions will always be created for it.