Causes and types of errors
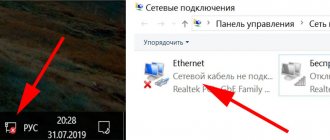
Making changes to the user-created environment sometimes results in inconsistencies between different versions of the software. The “Class not registered” error most often appears when performing the following operations:
- when you click the "Start" button;
- opening images;
- launching the browser;
- calling applications.
The reason for the message may be:
- system update;
- installing a new version of Windows;
- replacing or installing an antivirus;
- updating your web browser or its version;
- removal of graphics programs, antiviruses, applications;
- failure of Explorer or operating system settings;
- installing and launching applications that make changes to system settings;
- use of the Cyrillic alphabet in the Windows User name.
explorer.exe error "Class not registered" when clicking the Start button or calling Settings
Another common error is the Windows 10 Start menu or individual elements in it not working. At the same time, explorer.exe reports that the class is not registered, the error code is the same - 0x80040154.
Ways to fix the error in this case:
- Fix using PowerShell, as described in one of the methods in the article Windows 10 Start Menu Doesn't Work (it's better to use it last, sometimes it can cause even more harm).
- Strangely, the method that often works is to go to the control panel (press Win+R, type control and press Enter), go to “Programs and Features”, select “Turn Windows features on or off” on the left, uncheck Internet Explorer 11, click OK and after applying, restart the computer.
If this does not help, also try the method described in the Windows Component Service section.
Start doesn't work
To troubleshoot problems with the Start menu, there are several options:
- Restart Explorer.
- Update the system using the Media Creation Tool utility.
- Change the username to Latin, if necessary.
- Use the Image Servicing System (DISM.exe) and System File Checker (SFC.exe) utilities.
- Use Windows PowerShell.
Restarting Explorer
You can restart Explorer through the Task Manager.
- Press the Ctrl+Shift+Esc keys simultaneously.
- On the Manager screen, select Processes. All running applications and background processes are displayed here.
- Go to the "Explorer" line.
- Click Restart in the bottom right.
Advice! Remember the keyboard shortcuts: Ctrl+ALT+DEL - stops the entire system and displays the shutdown dialog box Ctrl+Shift+Esc - calls the “Task Manager”.
The task manager also allows you to remove frozen or malicious applications and monitor the operation of the system.
Update via "Media Creation Tool"
- Download the Media Creation Tool program onto your computer.
- Run MediaCreationTool1803.exe.
- Accept the license terms.
- Select "Upgrade this PC now."
- Click the "Install" button. If the version of Windows on your computer is supported by this utility, the update process will begin.
This is one of the most correct and reliable ways to get rid of errors, but sometimes the utility cannot update your computer.
Changing your username
If the username is written in Cyrillic, this may cause an error. In this case, you need to change it.
- Launch Computer Management. To do this, right-click on the “This PC” icon and select “Manage”.
- In Control Panel, select the Users folder and expand it.
- Go to the line with the username written in Cyrillic.
- Click RMB.
- Select Rename.
Using DISM.exe and SFC.exe
DISM.exe ("Image Servicing System") and SFC.exe ("System File Checker") repair damaged system files, remove, configure and update system components. They are launched through the Run application.
- Press the Win+R key combination.
- At the command prompt, enter "DISM.exe /Online/Cleanup-image/Restorehealth".
- After the first command completes, enter "Sfc /scannow".
Using Windows PowerShell
Before using PowerShell, you must close all browsers and applications. You can launch the program through the “Task Manager”.
- Press Ctrl+Shift+Esc.
- In the control menu, click “File” and “Run new task”.
- Set the “Create task with administrator rights” option.
- In the “Open” line, enter “PowerShell”.
- In the “PowerShell” window that appears, insert the line – Get-AppXPackage -AllUsers | Foreach {Add-AppxPackage -DisableDevelopmentMode -Register "$($_.InstallLocation)\AppXManifest.xml"}.
- After running the command, reboot the system.
Advice! The simplest and most correct solution is to reinstall Windows and reinstall all applications.
How to fix the error class not registered 0x80040154
When opening images
The most common error that occurs is class not registered when trying to open images of various formats. In such a situation, the user will only need to configure or completely reset file associations in Windows 10.
- Go to: Start > Settings > Apps > Default apps .
- Next, in the photo viewer, select a normally working application ( the Photos is recommended for Windows 10).
If necessary, you can return the standard photo viewer to Windows 10. If your trusted store application for viewing photos does not work, use the methods presented in the instructions: Photos do not open on Windows 10.
When launching browsers
If the class not registered error appears after trying to launch the Internet browser, we recommend changing the default browser to Windows 10. By setting the correct file associations and specifying the necessary default values for the application, you can solve the problem of the not registered class.
- Go to: Start > Settings > Applications > Default applications .
- Next, in the Web browser item, specify any working browser (the Microsoft Edge
is recommended for Windows 10). - Now go to the Set defaults by application , and after selecting the desired browser, set all browser values for file type and protocol mapping.
If an unregistered class error occurs when you try to launch Internet Explorer, you can disable Internet Explorer or register the required class on the command line. Just run the command line as an administrator and in the window that opens, run the command: regsvr32 ExplorerFrame.dll .
When opening Settings or the Start menu
Sometimes an error appears when you try to launch settings or simply open the start menu (this also applies to launching trusted applications from the store). We can talk about each trusted application from the store separately, but often in all cases the user only needs to re-register standard applications.
- Right-click on Start , and in the context menu that opens, select Windows PowerShell (Administrator) .
- In the shell window that opens, run the command: Get-AppXPackage -AllUsers -Name windows.immersivecontrolpanel | Foreach
Additionally, you can familiarize yourself with options for solving the problem when the Start button does not work in Windows 10. There we also used the ability to re-register standard applications.
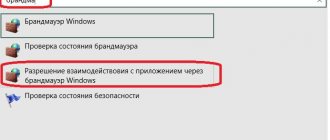
It also often helps users to register missing components in the Component Services window.
- Open the Component Services window by running the dcomcnfg in a Win+R .
- Then go to: Component Services > Computers > My Computer > DCOM Configuration .
- In the window that opens, confirm the agreement to request registration of missing components.
Once the process is complete, restart your computer. If such a window does not appear for you, the above option is not suitable for you. Along with the current method, we recommend that you additionally check and restore the integrity of Windows 10 system files.
As a result, we get one error of the unregistered class 0x80040154 and many solutions. It’s difficult to say which option is right for your version of the operating system and the computer as a whole. Depending on the environment in which the error occurs, we recommend choosing a method to solve the problem.
Error opening images
A crash when opening an image occurs when there is no program for working with an image of this type. Therefore, you need to establish a relationship between the file type and the application that opens it. This can be done in two ways:
- Set the default program through “Options”.
- Assign an application for this file type via “Open with”.
Setting the program as default
You can install the program through the “Options” panel.
- Click the Start menu.
- Select the Settings icon.
- In the Default Applications panel, find the application group you want.
- Assign a program from the list.
Selecting a program for file types
You can select a program for a specific file type through the “Open with” menu.
- Stand on the file you want to open.
- Click RMB.
- Next, the “Open with” menu.
- If the program you want is not in the list, click “Select another application.”
- Set the option to "Always use...".
- Select the desired option.
Error when launching Google Chrome, Mozilla Firefox, Internet Explorer browsers
If an error occurs in one of the Internet browsers, with the exception of Edge (for which you should try the methods from the first section of the instructions, only in the context of the default browser, plus re-registering applications), follow these steps:
- Go to Settings - Applications - Default Applications (or System - Default Applications for Windows 10 before version 1703).
- At the bottom, click “Set defaults by application.”
- Select the browser causing the "Class not registered" error and click "Set this program as default."
Additional steps to fix the error for Internet Explorer:
- Run Command Prompt as an administrator (start typing “Command Prompt” in the taskbar search, when the desired result appears, right-click on it and select “Run as administrator” in the context menu).
- Type the command regsvr32 ExplorerFrame.dll and press Enter.
After completing the steps, check if the problem has been fixed. In the case of Internet Explorer, restart your computer.
For third-party browsers, if the methods above do not work, deleting the browser, restarting the computer and then reinstalling the browser (or deleting the registry keys HKEY_CURRENT_USER\ SOFTWARE\ Classes\ ChromeHTML\, HKEY_LOCAL_MACHINE\ SOFTWARE\ Classes\ ChromeHTML\ and HKEY_CLASSES_ROOT\ ChromeHTML) may help (for the Google Chrome browser, for Chromium-based browsers, the section name can be Chromium, respectively).
Set Edge as your default program
If you still get the explorer.exe error when you launch Edge, try setting it as your default program. Sometimes the problem occurs when using another browser as default, in particular Chrome.
Press Win + R, in the dialog box, run the command ms-settings:defaultapps to enter the Default Applications tab.
On the right side, click on the “Browser” button and select Microsoft Edge.
You can also change the default program using the classic menu.
To do this, go to the Control Panel using the control command from the Win + R window.
Go to the "Default Programs" subdirectory. In the next window, select “Set default programs.” In the left navigation bar, select Edge and click on the “Set this program as default” option.
Save changes to “OK” and restart your computer.