The Windows 10 on-screen keyboard is used primarily for entering passwords when you suspect spyware is present on your system. You can configure the on-screen keyboard in Settings – Devices – Input.
How to turn on the keyboard on the screen on a laptop
In the right part of the open window, you can use the slider to enable:
- Automatically correct misspelled words.
- Highlight misspelled words.
- Show text suggestions as you type on the software keyboard.
- Add a space after selecting a text sentence.
- Add a period after double-clicking the spacebar.
Many people want to have an on-screen keyboard and don’t know how to turn it on on a laptop. There are different ways to display the keyboard on your computer screen.
Using the osk command
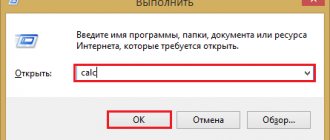
Launch one of the applications Command Prompt, Run Window, Windows PowerShell.
- The command line can be launched via the Start button - Windows System Tools - Command Prompt.
- The Run window can be launched using two WIN+R keys that must be pressed simultaneously.
- Windows PowerShell can be launched via search.
When the Command Prompt, Run, or Windows PowerShell window opens, type the osk command into it and press Enter.
Simple ways to connect an on-screen keyboard
The first option to enable it is through the taskbar. We need to add an on-screen keyboard icon. Right-click on the taskbar and select “Show touch keyboard button.”
On the taskbar, next to the volume, Wi-Fi and battery icons, a new icon will appear - a touch keyboard.
The second way is through parameters. Call up the “tens” parameters by holding down the Win+I key combination. Go to the “Accessibility” section, in the “Interaction” menu, select the “Keyboard” tab. Set the marker next to “Use on-screen keyboard”.
Here we see which key combination will turn off the touch keyboard the fastest. For quick access, press the key combination Win+Ctrl+O.
Or you can use the search. Press the Win+S key combination and start typing in the “Screen...” field. Windows identifies the touch capability as an application.
It is interesting that these methods call up keyboards with different interfaces. Compare:
- via the taskbar;
- through parameters, key combination and search;
In the latter case, the older version, known in earlier versions of Windows, is enabled.
And to complete the picture, let’s name two more ways to call the touch keyboard:
- key combination Win+R, in the “Run” line enter the command osk (this will call an older version of screen input);
- go to the Control Panel in the “Ease of Access Center.” To do this faster, press the Win+U key combination (in later updates the combination does not work, we go directly through the panel). Here we also see the “Enable on-screen keyboard” option.
We wrote more about the Control Panel, how to open it and how to work with it here.
Interesting life hack! Sometimes a classic computer or laptop keyboard breaks down at the wrong time. Often - when you need to enter a password or PIN code when logging into your Windows 10 account.
On the lock screen, you can also call up the touch keyboard to enter a password and get to the desktop. Left-click on the accessibility icon and select touch input.
Opening the keyboard on the Windows 7 screen
If you are using the Windows 7 operating system, then in order to open the keyboard on the screen you need to open the “Start” menu and go to the “All Programs - Accessories - Accessibility” section. Several standard programs will be available here, including an on-screen keyboard.
Also in Windows 7, you can open the keyboard through " ". To do this, open the “Start” menu, go to “Control Panel” and open the “Accessibility – Ease of Access Center” section there. There will be an on-screen keyboard available here, as well as other accessibility features and settings for people with disabilities.
If you can't open the on-screen keyboard, it may simply not be installed on your version of Windows. To fix this, open the Start menu and go to Control Panel. Here you need to open the “Programs – Programs and Features – Turn Windows features on or off” section.
As a result, a window should appear with a list of components that are installed on your computer. Here you need to enable the “Tablet PC components” option and click on the “OK” button.
Once the installation of this component is complete and the computer is restarted, the on-screen keyboard should appear.
Windows 10 virtual keyboard via Search
As in the method with the “Run” command, to enable the keyboard we need, you will need to enter certain characters. Therefore, if this cannot be done, then this method will not suit you. Well, if the keys work properly, follow these steps:
- In the lower left corner, find the search icon;
- In it you need to enter “ On-screen keyboard ” and open the found option;
- Ready. Just two simple steps and the Windows 10 on-screen keyboard .
The method is of course very simple to implement, but it is not always possible to use it.
Enable the on-screen keyboard using the Control Panel
Another way to enable the function we need without using mechanical keys is through the PC control panel. This method is ideal for those who only have a computer mouse. To enable the on-screen keyboard in Windows 10 , you need to follow a few simple steps:
- Left-click on “Start”;
- Find “Control Panel”;
- A window will open, in the upper right corner we switch the viewing mode “Category” to “Large icons”;
- Once you do this, the Ease of Access Center icon will open. Click LMB on it;
- Find the item “Enable on-screen keyboard” and click on it.
If you follow all the steps in the instructions correctly, the virtual keyboard will open . Compared to other methods, this method requires more steps.
Activating the Windows 10 on-screen keyboard through the quick taskbar
This operating system allows you to create a “hot key” to enable the virtual character input system. It will be located in the lower right corner, next to the time and other icons. To display it, you need to right-click on the clock and enable the “ Show touch keyboard ” function. When you do this, a new icon will appear on the quick taskbar that will be responsible for activating the on-screen keyboard . This method is one of the simplest, but at the same time very good. Since it allows the user to use the touch keyboard with just one click of the left mouse button.
Conclusion
This article discussed five different ways to enable the on-screen keyboard in Windows 10 . In my opinion, the last method would be the ideal option to achieve our goal. It is very simple and does not require the intervention of a mechanical keyboard. Other methods will also be able to cope with the task, but they are either more complex or require a real keyboard.
What is an on-screen keyboard?
The on-screen keyboard is the official Windows software that allows you to use the keyboard on your computer without connecting the main one.
Using it, you can type messages, just like on a regular keyboard. And then the question follows: “Why do I need a virtual keyboard if I have a regular one?” The main difference between the virtual keyboard is that it can change its size, and it also allows you not to interrupt your work if there is no main keyboard. Enlarging the keyboard will be convenient for people with poor vision. The second reason may be the breakdown of individual buttons on the main keyboard or its non-functionality at all; if your keyboard is damaged, we recommend contacting the Zeto service center. Next, we will figure out how to open the on-screen keyboard on Windows 10 with some tricks.
The virtual keyboard always launches itself on Windows 10
When the on-screen keyboard constantly launches on its own without a corresponding user command, this indicates incorrect settings in accessibility features in Windows 10. To stop this, you must do the following:
- Right-click on the “Start” button and launch “Control Panel”;
- Next, make sure that the display mode is set to “Large Icons” or “Small Icons” and go to “Ease of Access Center”;
- Here you will need to find the item “Use a computer without a mouse and keyboard”, go to it and uncheck the “Use on-screen keyboard” setting.
After completing the steps described above, the on-screen keyboard will no longer launch spontaneously on a computer running Windows 10.
( 450 votes, average: 4.62 out of 5)
How to disable automatic reboot in Windows 10
Built-in Administrator Account in Windows 10
Related Posts
Frequent malfunctions
The button does not appear in tablet mode
This malfunction is due to the fact that setting the display of this button in the taskbar functions separately for normal and tablet modes. Everything you need - in tablet mode
Right-click on the taskbar and activate the option. This will resolve the issue.
Startup problems
If a virtual input device on a PC does not start by any method, this means that the special service that is responsible for it is most likely deactivated. Restarting the corresponding service is quite easy:
- Right-click the "Start" button and click on " Run
". - In the window that appears, type services. msc
to access the corresponding services. - Find “ Touch Keyboard and Handwriting Panel Service
”, double-click on this button with the left mouse button. - A window will appear in which you need to click on the “ Run
” button. It's worth noting that if the Start button is greyed out, you'll need to select Stop and restart the service.
After starting the special service, you will only need to enable the virtual device using one of the above methods.
The on-screen keyboard launches itself
If the virtual input device continuously turns on by itself, without a special user command, it means that the settings in the accessibility features of Windows 10 are incorrect. To stop the on-screen keyboard from launching on its own, do the following:
- Right-click on “Start” and turn on the control panel.
- Make sure icon display mode is activated. After that, select the “ Ease of Access Center
” section. - Find the “ Use your computer without a mouse and keyboard
” menu. Go into it and uncheck the corresponding option.
Once you complete the steps above, the virtual input device will no longer turn on on its own on a PC running Windows 10.
The on-screen keyboard is one of the accessibility features of Windows 10. It is designed to help people with special needs when working on a computer. But this feature will be useful for any user when his physical keyboard is out of order. Virtual input will help replace it, since the panel contains all the keys necessary for comfortable operation of the PC.
Using the Windows 10 virtual keyboard may also be necessary to increase the security of personal data. The essence of this option is that the computer may be infected with a keylogger. This is a special type of virus that reads keyboard strokes. Accordingly, your password may end up in the hands of attackers. And it is believed that screen input will avoid this situation.
Removing the keyboard from the screen
There are several ways to disable the on-screen keyboard in Windows 10. We looked at one above - in the parameters, move the slider to the “Off” position. If this does not help, then go to the “Control Panel”. To do this, click on the magnifying glass on the taskbar, enter “control panel” in the search field and click on the result found.
Then, in the “Large Icons” mode, find the “Ease of Access Center” section and click on it.
Next, from the displayed options, click on “Use a computer without a mouse and keyboard.”
Uncheck the “Use on-screen keyboard” box and save your changes. After this, it should no longer appear on the screen on its own.
Now you know where to look for the on-screen keyboard in Windows 10. If you want it to appear automatically, then use a special program. If it appears after the system starts, then disable it in the settings or stop the service corresponding to it.
Rate this article:
( 1 ratings, average: 5.00 out of 5)
About the author: Anya Kaminskaya
- Related Posts
- How to restore Windows 10 bootloader via command line
- Enable or disable hibernation mode in Windows 10
- Activate and hide the built-in Administrator account on Windows 10
How to setup?
What to do if several keys on your computer keyboard are covered or stuck, and you urgently need to type text. What if it’s completely broken and you urgently need to send an email at this time?! The on-screen keyboard will come to the rescue. In Windows 10, it was inherited from the previous version - Windows 8. This convenient tool can become indispensable for people with disabilities. And the Windows on-screen keyboard will help you if you suspect that a spyware program, a keylogger, is installed on your computer, intercepting keystrokes. Well, if you have a tablet on an operating system from Microsoft, then without it you will not be able to operate the device normally.
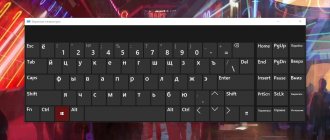
She looks like this:
There are no differences from the real one in the number of keys and their location. There are cursor arrows, language switching, page scrolling, etc. If necessary, you can activate the function keys F1...F12. This is done by pressing the "Fn" button.
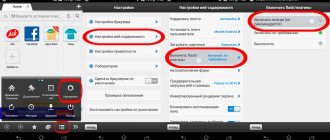
You can also enable the block of number keys on the Windows 10 on-screen keyboard, which is located on the right:
To do this, you need to click the “Options” button. The following window will open:
In it you need to check the “Enable numeric keypad” checkbox. As you can see, there are a lot of options here - there is a sound confirmation of keystrokes, customization of mouse controls, and even an analogue of the telephone T9 - “Text Prediction” prompts.
As you can see, the on-screen keyboard in Windows is located above all windows and can be moved across the entire window in any direction - left, right, up or down. It is also possible to place it across the entire width of the screen directly on the desktop under the taskbar. This is done by clicking the “Pin” button. You can also make it transparent when not in use by turning on the “Disappear” option.
How to enable the on-screen keyboard
There are two ways to launch the keyboard on the Windows 10 screen. The first and easiest is to click the Start button and find it in the “Special” section. capabilities" list of all programs.
Or simply by typing the word “Screen” - as a result of the search you will see its shortcut in the list of found ones. This is a one-time launch of the virtual keyboard. After rebooting the operating system, everything will have to be done again.
The second way to enable the on-screen keyboard in Windows is as follows. You need to go to the “Toolbox”, find the “Ease of Access Center” there and open the “Use your computer without a mouse or keyboard” section:
Check the box “Use on-screen keyboard” and click on the “Apply” button. After that, it will start every time on the computer screen when the OS boots.
Interesting on the topic:
- VPN error 809 in Windows 7,8,10
- Troubleshooting Windows 10
- Reset TCP/IP and DNS settings in Windows 10
- How to disable Windows 10 PIN when signing in
- Error 0x80240438 on Windows 10
- How to transfer Windows system from HDD to SSD
Calling the on-screen keyboard in Windows 10
A keyboard is not always at hand, or it is simply inconvenient to type text with it, so users are looking for alternative input options. The developers of the Windows 10 operating system have added a built-in on-screen keyboard, which can be controlled by clicking the mouse or pressing the touchpad. Today we would like to talk about all the available methods for calling this tool.