Viruses are dangerous objects that enter your computer via the Internet or through the use of removable devices, so any computer must be reliably protected. Only a proven antivirus, which is Dr.Web, can provide high-quality protection. Doctor Web is constantly improving the performance of its antivirus and has equipped it with a number of protective components that can cope with any type of threat. If you want to be sure of the security of your system, then Dr.Web anti-virus is today the best solution for both protecting your computer and mobile phone.
Where can I download Dr.Web
If you decide to install an antivirus program on your computer, you first need to download the installation file. Installation of such serious utilities should only be done from trusted sources. Therefore, we advise you to download the program from our website, where all installation packages presented are safe and original. In addition, we present the entire line of security products from Dr.Web for different operating systems. You can quickly, without registration and SMS, download Doctor Web antivirus to your computer.
Download order
Before installing any program, including antivirus, you must first download the installation file. If you want to install the Doctor Web anti-virus program on your computer, then to do this you need to select the product type and version of your operating system, and then click “Download”. Specify the folder to save the file and wait for the download to complete. Now you can proceed to installation.
Install Dr.Web on your smartphone
Program features
The name Doctor Web is generic. This is a generalized name for software whose main purpose is anti-virus protection, which can work on various platforms; it is also a line of software and hardware solutions and solutions aimed at ensuring the security of each node of the corporate network. The possibilities are amazing.
Doctor Web has the following protection options for 1 year:
- Reliable protection against viruses.
- Trojan, spyware and even adware.
- Worms, rootkits.
- Hacker utilities.
- Other unknown threats.
If reliable protection of information stored on your PC is important to you, you should definitely try downloading Doctor Web for 1 year. Having tried the capabilities provided by the manufacturer, you will certainly be able to appreciate them and in the future you will want to choose a product from this manufacturer to protect your PC from harmful electronic waste.
Are you interested in dr web trial version? We offer it to you on our resource. This version works fully and will allow you to scan your PC for viruses, after which you can quarantine or cure them.
Antivirus installation
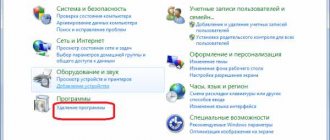
After the installation file has been downloaded, you can proceed with the installation. However, you should know that you cannot start installing Doctor Web if you have another antivirus on your device. If this rule is not followed, then first uninstall the existing antivirus program and do it correctly through the Add or Remove Programs Control Panel or using special cleaning utilities. Only after this condition is met, reboot the device and proceed with the installation of Dr.Web.
On computer
If you want to install Dr.Web on your computer, then after downloading the installation package, follow these steps in order:
- Double-click on the installation file.
- The installation wizard will appear on the screen where you first need to accept the terms of the license agreement to continue and click Next.
- Now you need to specify the location where the program will be installed. By default, the system folder will be registered there; if you are satisfied with this location, then click “Next”, and if not, then “Browse” and indicate the required address.
- The next step is the “Connection Parameters” window, where you enter the server provider data. Here experts advise not to change anything, so immediately click “Ok”.
- Next, a brief description of the Doctor Web cloud service will be displayed, and if you wish, you can connect to it by checking the box in the appropriate field, and then click “Next”.
- Now you need to do the same, only connect yourself a firewall component (there will be a brief description of the component on the page), which will be installed simultaneously with the antivirus. Check the box to agree and click “Next”.
- The last step is to notify you that it is ready for installation. If you are sure that there are no other anti-virus programs on your computer and you want to install Doctor Web, then confirm your consent and click “Install”.
The antivirus installation process will take only a couple of minutes, after which a notification about successful installation will appear on the screen and the need to restart the computer.
All you have to do is click on the “Restart computer” button. By default, all the important protective components of the antivirus will be installed, but if you want to perform a custom installation of the antivirus, then in the seventh step, before clicking “Install”, select the “Installation Options” item highlighted in blue. There are several tabs here where you can make your own installation settings, for example, select individual security modules and create a program shortcut. However, we do not advise ordinary users to do this, since the advanced functionality is provided only for specialists or for professional use of the utility.
On a smartphone
Dr.Web anti-virus is available not only for computers, but also for mobile devices. It can be easily installed on both smartphones and tablets running the Android operating system. To download Doctor Web to your phone, just use the Play Market application store:
- Go to the Play Market from your phone or tablet.
- In the search bar, write the product you are looking for – Dr.Web.
- In the search results, select an antivirus and click “Install”.
- The download will start automatically; there is no need to additionally install an antivirus on your phone; you can immediately launch the application.
If for some reason you are unable to download Doctor Web antivirus from the Play Market, then you can. To do this, select a product for mobile devices, download the apk file in a separate folder and launch it from there after the download is complete. However, in order to download the file you need to make changes in the device settings and in the “Security” section to allow installation of applications from unknown sources.
I want to try Dr Web antivirus. How to install it correctly?
Detailed instructions for installing Dr Web are as follows:
General installation settings:
1. Run the installer file. First, the installer will go to the official website and check for a new version of the antivirus there. You can either download it from the official website, or continue the installation without updating.
2. Depending on whether you decide to download the latest antivirus distribution or continue the installation, you will either download a new version of the antivirus from the site and start installing it again, or proceed to the next installation point.
At this stage, you need to agree to the terms of the license agreement.
3. In the next step of installing the Dr. antivirus. Web, you will be prompted to install its firewall. We recommend that you agree to install it, since it, together with the antivirus, will provide your PC with comprehensive protection.
4. In the fourth step, the program will offer you to connect to cloud services that would monitor the process of Doctor Web on your computer. This process will occupy certain resources of your system and take away part of the speed of your Internet connection. Therefore, if you have a weak computer, we recommend that you refuse these services.
5. At the fifth stage, the program will ask you for a key file. This is a file with a license that will allow you to use Dr Web for a certain time. If you have a key, specify the path to it; if you don’t have a key, select “Get file during installation.”
6. And now, finally, the system is ready for installation and all we have to do is click the coveted “Install” button. The process of automatic installation of the antivirus will begin, which will continue until the license key is received.
The process of obtaining a license key.
1. If you have a licensed disk with Doctor Web, then enter the serial number in the window that appears, and you will receive an activation key for the full version of Dr Web for a certain period.
If your version of the antivirus is without a license, then leave a dot next to “Demo key file”. You will be given it for a limited period (up to 30 days).
2. Fill out the information lines about yourself, indicating your name, country, city and email.
3. A message will appear that the license key file has been received, your antivirus will continue installation and update the anti-virus databases to the newest ones. And it will ask you to restart your computer.
Ready. After restarting your computer, you will be able to enjoy full antivirus protection from Dr Web.
Getting started
When you complete the installation, you can launch the antivirus and get to work. The first thing that will appear on your screen after launch is the choice of the working version of the program - licensed or demo. Despite the fact that Doctor Web is a paid antivirus, any user can choose a trial version. For desktop computers, a test version is available for 30 days (without registration) and 90 days (with registration).
Having chosen a trial version for 90 days, you need to register on the Dr.Web company server; after its completion, the full licensed version will become available to you with a 40% discount.
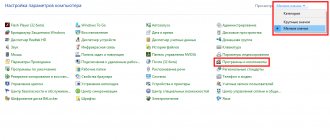
So, now to the interface and functions of the program. Launch the antivirus, and the following sections will be available to you in the menu:
- my Dr.Web. In the “My Dr.Web” item there is a “Security Center”, where you can familiarize yourself with the operation and individual functions of the antivirus, including setting up folders for scanning, adding exceptions and monitoring the safe operation of applications through the “Preventive Protection” module;
- license. The “License” section indicates the number of days until the license expires, and here you can extend it if necessary;
- tools. Here you can see license information, set up an anti-virus network and use a password manager;
- protection components. Here you can familiarize yourself with all the working antivirus protection modules and, if necessary, enable or disable them;
- update. By going to the “Update” item, you can monitor the frequency of program updates, adjust the frequency if necessary, and even perform a manual update if you are temporarily without internet;
- scanner. The “Scanner” menu has several scanning control modes - full, custom and quick. If you wish, you can set up a mode that is convenient for you.
In order to customize your antivirus, you first need to obtain full control rights. To do this, in the main menu of the program, click on the lock icon on the left to open it and confirm the permission. Then go to “Settings” using the gear icon in the right corner. In the “General” item, you can configure notifications, anti-virus network, anti-virus updates, enable/disable parental controls and more.