Microsoft's latest operating system, Windows 7, has gained many both fans and opponents. But she left almost no one indifferent. At the same time, almost everyone who dealt with it at first had to deal with various problems due to incompatibility of programs, and many had a desire to return to the “good old” XP. But not everyone is in a hurry to part with the new system. And therefore, many users feel the need to have two operating systems on one computer at once, so that they can use them in turn, switching between them as needed. But since Windows 7 is a new system, sometimes some difficulties arise when trying to create a multiboot configuration (and you still need to know how to do this correctly). And if you are one of those users who, after installing Windows 7 , still need XP, then this article is for you.
So, let's go.
ATTENTION. Let's start right away with a warning. If there is any data stored on your hard drive that needs to be saved, then minor adjustments will need to be made in further instructions, in the parts regarding partitioning the disk into partitions, since they are designed for a blank hard drive that does not contain any information, or that stores data that can be deleted. If the existing information needs to be saved, then we EXTREMELY recommend that you take care of repartitioning the hard drive BEFORE you start installing the operating systems. And use any advanced third-party programs for this purpose, for example, Acronis Disk Director Suite (paid program). Or use some Live-CD with Linux (for example, Ubuntu ) - almost all of them have the GParted (free, more powerful than the utility from Acronis, but often works more slowly). In any of these programs you need to create two empty MAIN partitions formatted in NTFS. These partitions should be at the beginning of the disk (on the left side of the graphics card in the specified programs), and the partition with the data that needs to be saved should be moved to the right - closer to the end of the disk. We will install operating systems into these 2 partitions - they will become, respectively, drives C and D. And then during installation you DO NOT need to touch them - neither repartition nor format - just install each of the operating systems in the partition prepared for it.
Well, now the installation itself.
Configuring the order of checking boot devices
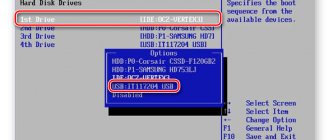
Go to the BIOS settings in the Advanced and look for the item Boot Device Priority . Here you need to set the first boot device (First Device) to the optical drive, and the second to the hard drive. This is necessary so that when you reboot you can start the computer from the boot disk and get into its menu. We save the configuration by clicking Save & Exit in the main BIOS menu (or by pressing the F10 and then answering the question with the Y ).
If your BIOS version is slightly different, you will have to look for the required section by analogy. Focus on the word “Boot”.
ATTENTION. BIOS is absolutely NOT intended for “crazy hands”. Therefore, you should not touch anything there without a clear understanding of what you are doing! This is exactly the case when it is better to think seven times and break once.
You can skip the first point if your computer, when rebooting, can itself read a disk that has long been forgotten in the drive. This can usually be determined if, when Windows starts, the disk in the drive begins to spin up on its own.
How to install two operating systems on one computer
In this article I would like to consider installing two OS (operating systems) on one computer, that is, without removing the Windows system that is already installed on our computer. This article describes installing Windows 7 on a computer with Windows 8.1 already installed.
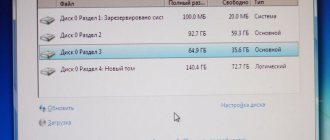
To begin with, we need an empty local disk on which we will install the Window 7 OS, in my case it is “New Volume (E:\)”, it is advisable to allocate at least 30 GB for installing the system. If you don't have an empty disk and don't want to delete anything from other local disks, you can simply split one of your local disks. How to do this, see the article Partitioning a local disk using Acronis Disk Director or How to partition a hard drive using Windows tools.
So, you have decided on the disk, now we insert the disk or flash drive with Windows and boot from it.
Next, the simple process of installing Windows 7 begins; for detailed instructions on how to install Windows, see the article How to properly install (reinstall) Windows 7?.
Click “Install”.
Check the box and click next.
Select full installation
Here we select the partition on which our system will be installed. Let me remind you that if you have problems with the installation, see the article How to properly install (reinstall) Windows 7?
And after the installation is completed, when the computer boots, we will be given a choice of operating system. But in most cases, at this stage, only Windows 7 loads without giving us a choice of which system it will boot from, because the installation overwrites the bootloader of the system that we had first, in our case it is Windows 8.1. To solve this problem, read the article to the end.
As we can see in the picture below, the local drive that had the letter (E:\) now has the letter (C:\). But this is only in Windows 7. And when we boot into Windows 8.1, the drive letter will again become (E:\).
To fix the boot problem we will need a program called EasyBSD. You can download it from the link https://www.softportal.com/get-41415-easybcd.html.
After downloading, run the Next program installer.
Leave the Next checkboxes.
Click Install.
The program is installed, run it (necessarily as an administrator) and select the language Russian.
So we see that there is only Windows 7 in the bootloader, our task is to add Windows 8.1
In the “edit boot menu” item, only Windows 7 is also visible. To add Windows 8.1 to the bootloader, click on the “Add entry” item.
In the drop-down list in the type item: select Windows Vista/7/8/10, write any name below, this name will be displayed when loading, then select the drive on which our system is located, in my case it is drive (D:\) and click add .
In the boot menu we see that a new entry has been added, which will be displayed on the initial system boot screen and we can select the one we need. You can also select the operating system that will boot (by default) at the end of the 30 second delay, simply by checking the box next to it. Click the save button.
Now, when loading the system, we can choose which one to boot from.
Leave your opinion about this article, and of course, ask your questions if something suddenly went wrong for you.
Thank you for your attention!
Articles recommended for reading:
- The built-in photography application does not work (buggy) in Windows 10 (29081)
- Creating a bootable USB flash drive Windows 7 UltraISO (8059)
- How to add an item to the Windows context menu (5072)
- How to remove the entry in the boot menu Windows 7 Loader XE (41111)
- How to remove a Microsoft account in Windows 10 (6251)
- (6602)
- (10336)
Would you like to thank the author? Share a link to the article!
We start the installation of Windows XP
Looking ahead, I will say that first we will install Windows XP . Not the other way around, but XP first! Therefore, we insert the installation disk with this operating system and reboot the computer. If suddenly, when loading, we see an inscription of white letters, something like “Press any key to boot from CD...”, then, without hesitation, we immediately press any key on the keyboard. This is how we will boot from this installation disc. While the inscription is on, you will have 5 seconds to press any key. If you don’t have time, the computer will start from the hard drive, and the XP installation will not start. You'll have to reboot again.
Media preparation
If you have a disk with Windows 7, go to.
If you have downloaded the image, read on.
Installation can be done:
Burning an image to a USB Flash drive or DVD
There are many recording methods, I offer several of them for you to choose from:
Unpacking the image to the hard drive (HDD)
To unpack the image, I suggest using a program or any other program of your choice.
Download the distribution, install, launch, click “Open”
, indicate the path to the image:
Select “Actions”
->
“Extract”
, specify the folder to extract:
Each system has its own personal section
As mentioned above, before installation, you need to select two partitions on your computer’s hard drive. While navigating through the installer dialog boxes, you will be asked to select a partition to install the operating system. Let's ignore this and create partitions ourselves, first deleting all old partitions by pressing the D , and then in their place we will create new ones by pressing the C and specifying the size of the first partition we need (in megabytes). This will be partition C. Next, we are left with an unallocated area of the disk - select it and press the C , and without delving into the details of the events, immediately press ENTER (since we don’t need to change the size of the second partition). This way we get partition D. Although, if the size of the hard drive is quite large, then it makes sense to allocate a certain volume for drive D, and leave all the remaining space unallocated - you will deal with it later, creating partitions on it according to your needs.
ATTENTION. The above procedures are intended for a blank hard drive with no data on it, since when partitions are deleted, all information will disappear. If there is data on the hard drive that needs to be saved, then these movements CANNOT be carried out. Return to the beginning of the article and create, as described there, two clean main partitions using special programs and only then proceed to install operating systems, without repartitioning or formatting anything, but simply install each OS in the partition prepared for it.
Why do you need multiple OS on one PC?
Often a user needs to simultaneously have two (sometimes more) independent operating systems on one PC. Due to the use of outdated, rare, or licensed software. Same thing when testing software. To master a new operating system, or simply, if you wish, to have two independent operating systems on one PC. There can be many reasons.
For example, a user constantly works on a PC in Windows 10, but wants to control a CNC machine from the same computer in the Turbo cnc program, which, as is known, works under MS DOS. It will not be possible to control such a machine through a virtual machine. It is necessary to have a full-fledged MS DOS operating system at hand. That is, we are now talking not only about installing two different Windows on one PC, but about installing two ANY operating systems on one PC . We also need the operating systems to be independent of each other (not have a common bootloader) and not interfere with each other’s work. In general, so that the failure of one operating system does not affect the performance of another.
Only the Hard Drive Switch .
Installing Windows XP on partition D
After all the manipulations with the hard drive partitions, we proceed to the installation itself, specifying partition D as the location for Windows XP . Exactly this way, and not otherwise, so that in the future there will be no problems with choosing and loading the desired operating system. After this, we complete the installation as usual.
Note. We installed Windows XP on drive D. It will be located there and will work from it, but its boot files, that is, the files that launch it, will still be located on drive C. And if drive C is formatted or in some way is damaged (along with these boot files), you will no longer be able to boot Windows XP . Although the system itself may be in perfect order, there will be nothing to start it with.
Windows XP boot files are:
- Ntldr
- Boot.ini
- NTDetect.com
They are located in the root directory of drive C (hidden files, service files - turn on their display). You can copy them to a safe place, and if you suddenly need them, it will be easy to restore them from a backup copy and manually return them to the C drive, thus restoring the boot of Windows XP again.
The essence of the proposed method of installing two operating systems on one PC:
Each operating system is installed on its own separate hard drive ( drives can be IDE OR SATA - it doesn’t matter).
That is, there are two hard drives, each of them has one partition and any one operating system is installed.
Both drives are connected to the motherboard via data cables (sata or ide).
The power cables of both drives are connected to a special device - hdd switch . Power from the switch (+5 volts and +12 volts) can only be supplied to one of the drives depending on the position of the switch switch.
The hdd switch is controlled manually using a switch located on the front panel of the PC.
The switch actually determines which disk will be used (which OS will boot).
And the most important thing:
— the main task of the hdd is to prevent hard drives from switching “on the fly” (switching is only possible when the PC starts for a second).
To switch from one OS to another, you need to do the following:
- turn off the PC;
- wait 1 minute;
- switch the switch to another position;
- turn on the PC.
Switching from one disk to another can only be done when the computer is turned on - this is especially important for ide disks. This is what the switch actually provides.
In other words, if within a second, when you press the “Power” button on the PC, the switch switch is not switched at the same time, then switching the disk will no longer happen. Further pressing/releasing the switch will be meaningless and will not switch disks. Those. The device has protection against untimely switching of disks in operation.
Switching disks can only be done when the PC is turned on (simultaneously with pressing the “Power” button), i.e. before loading the operating system (within a second).
Accordingly, to switch the disk, you must first turn off the computer and pause for 1 minute (until the capacitor in the circuit discharges - this is important!).
Thus, we have an independent operating system on each disk, which we select using the switch position when starting the computer. Reliable, purely hardware choice of operating system.
Installing a second OS
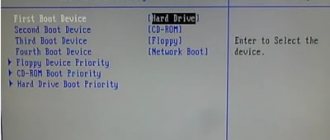
Before you begin installation, change the BIOS settings so that the device boots from a USB drive. To do this, restart the computer and as soon as the screen lights up, press the key on the keyboard to launch the BIOS menu.
As soon as you get into its interface, find the “Boot” menu in it, here you need to change the boot order “Boot Priority” and put USB in first place (if the installation will take place from a USB drive or CDROM if from a disk) and in second place - HDD (hard drive).
Save the changes, insert the USB flash drive into the computer and restart the computer. If you did everything correctly, a Windows welcome window will appear in front of you asking you to install the OS. If the computer boots normally, double-check the Boot Priority order.
All further steps are equally suitable for installing any version of Windows as a second OS. To do this: 1. configure basic OS settings (language, license agreement);
2. On the “installation type” screen, you must select “custom”;
3. the system will prompt you to select the disk on which the installation will be performed; 4. here you need to click on the partition we created, it will be designated as “unallocated disk space” (the disk with the OS will be listed as the main one);
5. After this, continue installation as normal. This completes the installation of Windows 7 with the second system. Now, after turning on the computer, you can select the OS to work with.
Fans of multiple operating systems (OS) are not embarrassed by the complexities before installation. The consumption of physical memory on boot files is also not a hindrance when you get additional confidence in the performance of the computer. Installing Windows 7 as a second system after G8 or XP is different and requires a certain skill and subtlety.
Hard drive partition before installing Windows 7
Installing the operating system allows you to format and partition the hard drive.
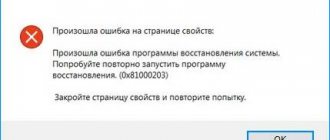
- Before loading the OS, select the SYSTEM RESTORE item in the dialog box;
- In the window that opens, leave the first item checked: USE RESTORATION TOOLS...;
- If necessary, select the OS;
- The open list of applications contains a command line selection item;
- At the command line enter: disk part;
- Then enter: select volume to select a disk for the partition;
- Enter the digital value of the disk (usually 1 or 2);
- Use the shrink query max command to determine the maximum size of the selected disk. Expressed in megabytes;
- Using the shrink desired = n command, set the required size of the required logical partition, where n is the size in megabytes;
- Quit the command prompt and restart your computer.
Thus, using the command line, you can create a logical partition for a new operating system.
Installing Windows 7 after Win XP
The standard build Win XP OS can only be installed on hard drives with MBR partitioning. Therefore, the installation of the “seven” by the second system will be successful. The main thing is to have an additional partition for the new OS. Installation in one partition is not recommended. There is a possibility that both operating systems will not work correctly.
Installing the seventh version after XP or Vista changes the boot loader window. In this case, the bootloader will be from the latest OS. There are no conflicts when configuring systems synchronously.