Few people know how to change a Google account on a smartphone and why it is needed
Instructions
Every Android smartphone is sold with Google services already installed. This happens due to the fact that an American corporation at one point became the owner of a popular operating system. In turn, the Google account combines all the company’s services, allowing smartphone owners not to have to worry about constantly entering account parameters.
Why do you need to change your Google account?
Creating a Google account occurs immediately after turning on your new smartphone for the first time. This is a mandatory item, without which it is impossible to imagine the further use of a mobile gadget. To register a UZ, you only need to provide a phone number and fill out fields with personal information. Next, the user is assigned an email address, which will be used for further login to the account.
As a rule, an account is created once and forever. Responsible users always write down their email addresses and passwords. Then, when you purchase a new smartphone, you only need to press a couple of buttons for authorization to occur. However, in some cases there is a need to change the account.
Thus, there may be several reasons for changing your account. Perhaps yours is not on this list. But this will not prevent you from replacing your account according to the instructions, which we suggest you read below.
By the way, also read:
What is a phone account and how to create one
How to change Google account on phone
There are two types of changing your Google account on your smartphone:
► Create a new account.
► Change account settings.
First, let's look at the first option, which involves creating a new user. It is used when a person purchases a used smartphone or loses access to an account. To continue using your applications, you will have to create a personal account. The operation will be performed using a simple algorithm:
1. Delete account.
2. Create a new one.
There is nothing difficult in performing these actions. However, not every owner of an Android smartphone knows through which menu item the operation is performed. Therefore, you should analyze in detail every aspect of deleting and creating a new account.
Moving information to a new Gmail email
As already mentioned, in order to change the Jimail address without major losses, you need to transfer important data and create a redirect to a fresh email account. There are several ways to do this.
Method 1: Import data directly
For this method, you will need to directly indicate the email from which you want to import data.
- Create a new email on Jimail.
Go to your new mail and click on the gear icon in the upper right corner, and then go to “Settings”.
In the window that opens, you will be asked to enter the email address from which you want to import contacts and letters. In our case, from old mail.
- Then click “Continue”.
- When the check passes, continue again.
- In another window you will be asked to log into your old account.
- Agree to access your account.
- Wait for the scan to complete.
- Check the boxes you need and confirm.
Method 2: Create a data file
This option involves exporting contacts and emails to a separate file, which you can import into any email account.
- Go to your old Jimail mailbox.
- Click on the Gmail icon and select Contacts from the drop-down menu.
Create a new account
As we found out earlier, without a Google account it is impossible to use a smartphone based on the Android operating system. So let's immediately move on to the process of creating a new account.
By default, the operation is performed the first time you turn on the smartphone. That is, if you purchased a new device or it has been reset to factory settings, you just need to turn it on and follow the instructions that appear on the screen.
If a reset has not been performed, creating a new account will be done through the Settings application. Once you open it, you should take several steps:
1. Open the “Accounts” section.
2. Press the button in the form of a plus sign.
3. Select Google from the available account types.
4. Provide your email address.
5. Enter the password.
6. Confirm entry using the one-time code from the response message.
The presented algorithm only works if you already have an email. If it doesn’t exist, it won’t be difficult to create a new one. We recommend using the Gmail app. It just invites users to create a Google mailbox. When the program opens, select “Add a mailbox” and follow the instructions.
When creating a new email, the system will require you to provide personal data, create a username and password, and also link a phone number to increase the level of security. When the email is done, you can proceed to adding a Google account. The operation is performed according to the instructions presented above.
How to restore my profile?
If you have access to your account, use the “Add…” option in the device settings and log in.
If you don't have a password, do this: 1. On your smartphone, tablet or computer in your browser, open the page - https://accounts.google.com/RecoverAccount.
2. Enter your profile login.
3. To confirm the owner’s rights, answer the service security questions (registration date, first name, last name, etc.).
4. If verification is successful, you will be given the opportunity to reset your password (replace the current one with a new one).
Enjoy your use of the Google Play online store!
Ever thought about this question: how to change the Google account on my device? After all, some accounts are linked by mistake, or the owner of the device loses control over the account. In this article, I will describe in detail the entire process of linking an existing account to an Android device.
All steps are suitable for version 4.0 and higher, but there are no fundamental differences in linking a Google account in earlier versions of this OS, so the instructions are applicable to all Android devices.
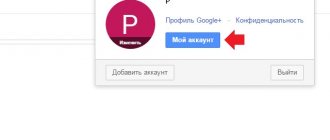
- So, first you need to get to the synchronization menu. To do this, go to “Menu” -> “Settings” -> “Accounts”. After this, you will see a list of all accounts that are synchronized with the device on your screen.
- After that, click the “Add account” button on the top panel:
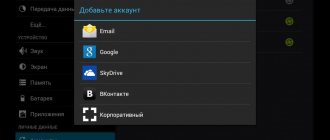
- Here you need to select the item "". I note that for each user the list of services in this menu will be different, it all depends on the number of installed applications.
- Then we will be offered a choice - add an already created account, or create a new one. We choose the first option:
- After this step, the Android system will ask you to turn on Wi-Fi if it has not already been done. Immediately after successful connection, you will be asked to enter your email address and password for your Google account. Do it:
- After you press the “Login” button, information will appear on the display of your device indicating that you need to wait a little for the connection to be successful. Usually everything is ready in a minute:
- After this procedure, you can link your bank card to your account. We'll skip this step:
- You can then choose which services you want to sync and which you don't. For example, you can unnecessarily disable Drive synchronization if you do not use this service.
- All! The new Google account is linked to your device. It now appears in the list of accounts available to you. At any time, you can turn off synchronization, or even delete your account from the device’s memory. Attention: all information associated with the account will be erased immediately after it is deleted! Be careful!
In fact, there is nothing complicated in the process of changing a Google account. You just need to strictly follow the step-by-step instructions and you will succeed. Good luck!
Often, when a user opens a new account in what he thinks is an unnecessary service, he does not think about the data he enters. So, over time, he discovers that he would like to change his name. This rule also applies to Google account holders. This article will tell you how to access your Google account without deleting it. We'll show you how to change it not only in your account, but also in your mail, so that when you send an email, the recipient receives it with the name you specified.
How to change personal information in your Google Account
In every person's life, something changes over time. It’s not surprising that at some point the owner of a smartphone will want to change his account name, photo or number to receive a one-time password. All this can be done without deleting and creating a new account.
The operation to change settings is carried out through the “Settings” application in the “Accounts” section, where Google is selected. Next, to change the parameters you need to:
1. Click on the “Personal information” button at the top of the screen.
2. If necessary, change the user name by clicking on the pen icon opposite the corresponding item.
The photo, password and phone number change in the same way. All that is required is to click on the pen icon, which is responsible for changing the parameters. After this, all that remains is to enter a new value and confirm the operation by clicking on “OK”.
Method 1: via the GMail website
It's very easy to change your name via email from Google; to do this you need:
- Go to the Google mail page.
- Enter registration details.
- If you have several accounts, then select the one you want.
- Go to Google settings. To do this, click on the gear-shaped button and select the appropriate item in the menu.
- On the new page that opens, go to the “Accounts and Import” section.
- Find among all the items “Send letters as” and click the “Change” button that is located opposite it.
- A dialog box will open. In it you need to enter the desired name and click the “Save changes” button.
Now you know the first way to change your Google account name. In the future, all emails will be sent under the name you specified. Well, in the meantime, we move directly to the second method.