Scaling
Scaling is used if the user needs to resize the entire picture , and not just some part of it. To apply the function, you need to find the “ editing ” tab on the top panel, go to “ transform ”, go from there and click on “ scaling ”. A frame should appear around the canvas, by pulling the corners of which the user will be able to change the proportions of the picture at their discretion. To ensure that the object does not stretch when enlarging or reducing the image in Photoshop, but maintains its proportions, you must hold down the SHIFT key .
If the user knows in advance what width and height parameters need to be given to the photo, he needs to enter these values in a special dialog box. This window is called by the key combination ALT+CTRL+I , or the “ Image size ” function in the “ Image ” tab on the top panel.
To maintain the proportions maintain proportions box .
Both options work almost the same, but when using the first, the picture quality deteriorates greatly when enlarged, while in the second case the quality does not suffer as much.
Maintaining proportions
In order for the inserted picture or individual figure to maintain its proportions when scaling, you must hold down the SHIFT key . Thus, the object increases (decreases) relative to the center of the layer, and when you hold down the ALT key, the image changes proportions relative to its center.
Free transformation
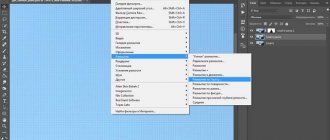
The key combination CTRL+T enables the “ Transform ” function. Free differs from the usual one in that with it the object can be rotated and reflected . If you can’t call the function with a key combination, then you can use the top menu, there you need to find the “ editing ” tab, go from it to “ transform ”, then click “ free transformation ”.
In the case of the English version of Photoshop, the path looks like this: “ Edit” - “Transform” - “Free Transform ”. You can perform various actions with the image by simply dragging the corners of the frame, and when you right-click on it, the user will see a context menu with advanced options.
Flattening layers
Let's now use another effective technique to reduce file size. Right-click on any layer and select Flatten Image from the menu.
Photoshop's method of flattening layers to reduce file size is very effective. As you can see, the file size is now only 6 MB!
The main downside is that now you don't have access to any of your layers and you can't edit them.
Although this is a very effective method, it is also quite destructive to the PSD structure as a whole.
Change layer size
This option is useful when you need to reduce or enlarge an entire layer, especially convenient when changing the size of a cut out object. Scaling can be done in the following ways:
- Change the content scale . To use this method, you must use the “ Free Transform ” function. Borders will appear around the entire image; by dragging it, you can enlarge or reduce it.
- Zoom out/zoom in on background . Background has a lot of restrictions, so its scaling is different from scaling a regular layer.
To change the background parameters , you need to go to the “ image size ” tab, then simply enter the desired Width and Height . Another option is to unlock Background , thereby making it a regular layer, after which the program will allow you to resize it in the usual way. To unlock, you need to double-click on the background layer icon and click OK without changing anything. Once unlocked, the user can change the proportions in the same way as with a regular one.
How to Resize Images as Required in Photoshop
You can always reduce the size of an image without losing quality, but you can't make an image much larger without noticing a drastic drop in quality.
In a digital image, the number of pixels is represented by DPI (or PPI) and the width and height dimensions. For example, a 2000 x 2000 pixel image at 72 DPI has a total pixel count of 4,000,000. To reduce an image to, say, 1000 x 1000 pixels, you can simply scale it down in size and it will retain the same level of detail, only in reduced image.
If you wanted this image to be larger than its original size, you would need to create additional pixels. This means the computer multiplies the number of pixels to fit the new dimensions, and the process of creating those pixels doesn't always happen correctly.
Resizing a selected image
When you need to resize only part of an image, the “ selection ” tool is suitable, it can be found in the side toolbar. You can select an object using an ellipse, a rectangle, a vertical and horizontal line, a lasso and a magic wand. right-click on the selected area of the picture , after which a context menu will appear in which you need to select “ free transformation ” or “ transform selected area ”.
Method two: Puppet Warp tool
This option is a little more difficult to set up, but faster. There is no need to separately select many areas; it is enough to place points in certain areas. Let's look at how to work with this technique.
In the top panel, click “Editing”, then “Puppet Transformation”.
The work grid will appear. In order to use it, the owner of the program needs to set the main points. Since we are talking about changing the figure, it is logical to place points along the contour of the body, as in the example below. Points are placed by clicking the left mouse button.
After creating the points, you can drag them, thereby changing the contours of the figure. The cursor must be placed over the point, click on the left mouse button and, without releasing, drag. When the desired shape is achieved, the button must be released. Thus, you need to drag several points.
Fact!
To create a slimmer figure, they need to be pulled inward of the body, and if you want to add fullness to the chest or hips, then outward.
Quality when resizing
Zooming in and out directly affects the quality of the edited photo. If you take any object, reduce it using Photoshop tools, and then increase it to its previous parameters, you will notice with the naked eye that the photo has become more blurry.
The deterioration in image quality is due to the fact that when a picture is reduced, the number of pixels in it also decreases , and when it is enlarged, the disappeared pixels do not return, so the photo becomes blurrier, less clear and of less quality. Therefore, if the user wants to change the scale of an edited cut out or selected object, then it is better for him to immediately decide on the proportions so as not to change them several times, thereby losing quality.
Selection Method No. 5: Quick Selection
An example of a quick selection is shown in the photo below.
Right-click on the Brush tool to make a panel appear (see photo below). You can reduce the brush size to select fine details. Hold down the Alt key to add to or subtract from the selection. Once you've made your selection, go to the Select menu, click Refine Edge.
This is a great example of how to select an object in Photoshop. You can also customize the sliders. You should end up with something similar to the picture below.
How to resize a picture in Photoshop
After studying this lesson you will learn in Photoshop:
- Reduce photo size
- Reduce the size of an individual object in the photo
- Transform photos and objects - twist, compress, flip and flip.
In this article I will tell you how to use Photoshop to reduce a picture, image, text, layer, individual object - everything that can be reduced in Photoshop. Photoshop allows you to quickly and easily reduce objects without losing image quality.
After all, it often happens that it is necessary to reduce a photograph or picture before sending it by mail or uploading it to any website in order to show it to people. The huge original sizes of photos are not suitable and therefore Photoshop comes to the rescue to make the photo smaller.
Selection Method #2: Pen Tool
Suitable for curved objects with hard edges. An example in the photo below.
Select the Pen tool, then click and drag towards the edge and release.
Continue dragging the tool along the edge of the object until the dots meet. Now you can change the line by clicking on the anchor points and moving them. You can also adjust the angle of these points.
Once you're done, right-click on it and select "Make Selection" as indicated in the photo below.
Now the object can be moved anywhere.
How to make a photo smaller
First, open the desired photo in Photoshop. Press CTRL+O or File - Open ( File - Open ) and select the desired photo on the disk.
The photo was opened in Photoshop:
The photo is a huge size 1600x1200 pixels. But for example, we need 600x450 or so.
There is a way to reduce the photo proportionally; to do this, go to the menu Image - Image size ( Image - Image Size ). In English Photoshop this window looks like this:
We see the Width and Height ( Width and Height ), make sure the values are shown in pixels, but if you need you can look and change in centimeters and other measurements.
Enter the width instead of 1600 to 600 and you will see how the height is automatically adjusted to 450 so that the photo resize is proportional.
Click OK and that's it! Our photo has been reduced in size:
Easy saving
- First, load the image into Photoshop.
- Now go to the main menu and select “Image”, and in the drop-down list that opens, “Image size”.
In the window that opens, you can see two cells (width and height) with the current size of the picture. This is where you have to change the size itself.
By default, width and height are linked in this way. This means the size is proportional. That is, if you change the value in any of these two cells, the size in the second cell will automatically change. Those. the image proportions will be preserved.
And if you click on this chain, the connection will be broken and changing any value will not lead to a change in another value. The picture will become disproportionate.
Just like when you create a new document in Photoshop, you can choose units of measurement, such as pixels, centimeters, inches, or even percentages of the current image.
After resizing, at the top of this window you will see the current size of the image in kilobytes (or other units), and the old size in brackets. This is not the final size, so don't pay too much attention to it.
Well, is the point clear? Let's look at a live example for greater clarity.
I need a photo for a website measuring 200*200 pixels. I take our photo size 1920*1200 and load it into Photoshop. And then point by point.
- Select the “Frame” tool, setting the proportion to square (1 to 1) and select part of the photo so that the entire face and a small part of the body up to the chest are included in the frame. And we frame it. We will get a square image, but the size is clearly not 200*200. Therefore, let's proceed directly to the reduction.
- We go to the “Size” of the image, as I described above, and set the width there to 200 , and the height will be set by itself, since there is a connection. I check that the unit of measurement is “pixels” and click OK . That's all. Now all that remains is to save the image, but you should already know that.
Select the desired area and zoom out
But what if we don’t need the whole photo, but part of it? And we need to reduce this part, but not proportionally and in our own opinion. The function we used before will not work for this.
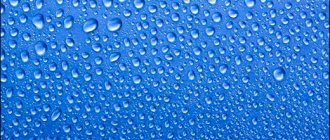
Let's say we have this picture with balloons and we opened it in Photoshop:
But we don’t need all the balls, we only need the blue one and we need to reduce it a little. To do this, select the Crop Tool (called Crop ) - with it we can select the area of the image we need and crop it. Namely the blue ball.
The tool itself on the panel looks like this:
Select the desired area:
Press Enter on the keyboard - we will cut out this ball and the rest of the image will be deleted.
Great. Now we need to make the ball smaller. You can use the function as in the previous step. Or you can do it differently, while maintaining the size of the image. First, let's get rid of the background and make it plain. To do this, we need to select the ball, cut it out and place it on a separate layer. And on another layer we will make the background.
Use the Polygonal Lasso Tool to select the ball.
Press CTRL+X to cut and copy it. After you click, it will disappear, and behind it there will be a transparent background. Press CTRL+V immediately to insert the ball. The ball is inserted a little to the side from the original place. And it will be immediately inserted automatically onto a new layer:
Now we'll quickly make a different background so that the ball doesn't seem cut out. But the old background is not suitable because there is a cut-out area due to the ball, and since we will make the ball even smaller, it will be even larger.
Create a new layer under the ball and fill it with any color:
Of course, the ball does not look neat, but the purpose of this article is to tell you how to reduce it in Photoshop, and not cut it out. Read about how to cut in Photoshop and in what ways in our other article.
Now let's make the ball smaller. Select the layer with the ball and press CTRL+T (or menu Edit – Transform – Scale ( Edit – Transform – Scale )) and you will see how a frame appears around the ball to reduce it:
Now drag the squares to scale the ball. You can make an image smaller as needed while maintaining the overall size of the document in Photoshop. You're scaling down an individual object that's on a separate layer, not the entire image document.
You can apply all these methods as you need, in any order. Knowing these techniques, you will cope with any task in which you need to reduce something in Photoshop.
At first
Usually, before posting an article on the blog, I load all the images into Photoshop and reduce them there. I do this through the “Save for Web” function, or with the hot keys Shift+Ctrl+Alt+S.
It looks like there are a lot of keys that need to be pressed, but in practice it turns out very convenient if you put your thumb on Alt, your little finger on Ctrl, your ring finger on Shift, and your index finger on S. Did it work? See how simple it is.
I recently posted an article about the most expensive motorcycles in the world, and this is what I did in Photoshop:
If you pay attention, this photo of the motorcycle itself weighs 2.15 MB.
It is clear that there is absolutely no need to post it on the site in this form. This is a huge weight for the Internet. We press our magic keys Shift+Ctrl+Alt+S, and this window opens.
Increasing and decreasing the size of an image or object in Photoshop
Resizing - reducing and enlarging an image using Adobe Photoshop is done in the following ways:
- zoom " function
- «transformation»;
- «free transformation»;
- scaling ;
- using selection tools .
All methods are different from each other and are used in certain situations.
Scaling
Scaling is used if the user needs to resize the entire picture , and not just some part of it. To apply the function, you need to find the “ editing ” tab on the top panel, go to “ transform ”, go from there and click on “ scaling ”. A frame should appear around the canvas, by pulling the corners of which the user will be able to change the proportions of the picture at their discretion. To ensure that the object does not stretch when enlarging or reducing the image in Photoshop, but maintains its proportions, you must hold down the SHIFT key .
If the user knows in advance what width and height parameters need to be given to the photo, he needs to enter these values in a special dialog box. This window is called by the key combination ALT+CTRL+I , or the “ Image size ” function in the “ Image ” tab on the top panel.
To maintain the proportions maintain proportions box .
Both options work almost the same, but when using the first, the picture quality deteriorates greatly when enlarged, while in the second case the quality does not suffer as much.
Maintaining proportions
In order for the inserted picture or individual figure to maintain its proportions when scaling, you must hold down the SHIFT key . Thus, the object increases (decreases) relative to the center of the layer, and when you hold down the ALT key, the image changes proportions relative to its center.
Entering specific zoom level values
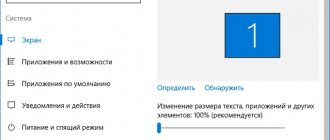
In the previous lesson, “The Basics of Scaling and Scrolling Images in Photoshop,” we learned that you can not only see the current zoom level in the lower left corner of the program window, but also change it by double-clicking on the current value and entering a new one:
Enter a new value for the current zoom level in the lower left corner
The only drawback we encounter with this is that as soon as we press the Enter (Win) / Return (Mac) key to confirm the new zoom value, the data entry window is no longer active. In other words, if we need to enter a new value for the zoom level, we will need to double-click on the current value again to select it, and only then enter the new value. However, if you press and hold the Shift key while you confirm the new value with the Enter (Win) / Return (Mac) key, the data entry window will remain active and the zoom amount you entered will be highlighted. This will allow you to change the scale values without having to click the mouse button each time to select the current value:
Hold down the Shift key while confirming a new value with the Enter (Win) / Return (Mac) key to keep the data entry window active
Another useful trick for working with the data entry window in the lower left corner is to change the image scale using a special slider. Hover your mouse over the data entry window, then press and hold Ctrl (Win) / Command (Mac), which causes the mouse cursor to change to the shape of a small hand with arrows pointing left and right. This is a dynamic slider icon. Click the mouse on the data input window and, while holding the mouse button pressed, drag the cursor left or right to increase or decrease the zoom value by 1% or more:
Press and hold Ctrl (Win) / Command (Mac) to make the slider appear, then drag the cursor left or right
To scroll an image, Photoshop uses the Hand Tool. To select this tool, there is no need to access the toolbar, just press the H key:
Press H to select the Hand tool
Change layer size
This option is useful when you need to reduce or enlarge an entire layer, especially convenient when changing the size of a cut out object. Scaling can be done in the following ways:
- Change the content scale . To use this method, you must use the “ Free Transform ” function. Borders will appear around the entire image; by dragging it, you can enlarge or reduce it.
- Zoom out/zoom in on background . Background has a lot of restrictions, so its scaling is different from scaling a regular layer.
To change the background parameters , you need to go to the “ image size ” tab, then simply enter the desired Width and Height . Another option is to unlock Background , thereby making it a regular layer, after which the program will allow you to resize it in the usual way. To unlock, you need to double-click on the background layer icon and click OK without changing anything. Once unlocked, the user can change the proportions in the same way as with a regular one.
How to make a cropped image smaller in Photoshop
To reduce the size of a cut-out object in Photoshop, you need to be able to: cut out objects, manipulate the cut-out area (including reducing it).
Read about how to cut out objects in other articles. Let's look at reduction in more detail.
In this situation, you will also need to know how to use the Free Transform
.
When the object is cut out, you need to form a shape around it. After that, apply a transformation and, according to the instructions above, drag the handles in the direction to make this object smaller.
In any case, when reducing the cut fragment in the free space, Photoshop will automatically add a background color. Therefore, if you have a simple case, then take care first and select the same background color that surrounds the object to be reduced. To do this, get a color sample using and .
If you notice an error in the text, select it and press Ctrl + Enter. Thank you!
Each photograph or picture has its own size, which depends on the quality of the image. The more a picture weighs, the better its quality. However, when uploading photos to a website or transferring them via e-mail, users often encounter restrictions regarding file size. Some crop the photo, others edit it in Photoshop. However, you can solve this problem in a simpler way - compress the photo.
Resizing a selected image
When you need to resize only part of an image, the “ selection ” tool is suitable, it can be found in the side toolbar. You can select an object using an ellipse, a rectangle, a vertical and horizontal line, a lasso and a magic wand. right-click on the selected area of the picture , after which a context menu will appear in which you need to select “ free transformation ” or “ transform selected area ”.
Method One: Liquify Tool
This is the simplest technique that even a beginner can master. You should select the work area (the entire layer), and then go to the filter panel. There is a "Liquid" filter here.
The program allows you to choose one of several options: swelling and wrinkling. To visually remove extra pounds, you will need wrinkling. The options are located in the left vertical brush panel, wrinkling is the third tool.
There is no need to perform any additional manipulations with the brush, except that you may need to adjust the brush size. You need to click on it with the left mouse button, after which the parameters will open on the right side of the menu. The size is adjusted using the slider.
Note!
It is better to use a brush that is not too large, otherwise it will eat up too much of the figure.
After selecting the size, just click “OK” on the pop-up panel.
Also read: How to change hair color in Photoshop
Next, simply move the cursor over the part of the body that requires correction and click. The image will be reduced in size.
The only difficulty with this method is that you need to separately click on different parts of the body - the stomach, chest, legs. If you forget some area, there will be a noticeable disharmony between the photoshopped areas and the original ones.
The result of simple manipulations:
Quality when resizing
Zooming in and out directly affects the quality of the edited photo. If you take any object, reduce it using Photoshop tools, and then increase it to its previous parameters, you will notice with the naked eye that the photo has become more blurry.
The deterioration in image quality is due to the fact that when a picture is reduced, the number of pixels in it also decreases , and when it is enlarged, the disappeared pixels do not return, so the photo becomes blurrier, less clear and of less quality. Therefore, if the user wants to change the scale of an edited cut out or selected object, then it is better for him to immediately decide on the proportions so as not to change them several times, thereby losing quality.
Adding and Subtracting from a Selection
Any tool that creates a selection in the options bar has a block of buttons that are responsible for changing the selected area. There are also Add and Subtract buttons, which will affect the size of the selected area.
These commands are described in great detail in this article.
To add to the selected area and thereby enlarge it, click on the corresponding button on the panel (as indicated above in the screenshot) and then create a new selected area.
The previous one will not disappear, and if they intersect, then the common boundaries will be summed up. During the Subtraction operation, everything happens exactly the opposite.
If you notice an error in the text, select it and press Ctrl + Enter. Thank you!
How to reduce or increase the size of an image in Photoshop
| The content of the article | |
| 1 | Method 1 – Image Size Dialog Box |
| 2 | Method 2 – Resizing using Transformation |
| 3 | How to reduce or increase the size of an entire image |
| 4 | How to reduce or enlarge an inserted image in Photoshop |
| 5 | Method 3 – Canvas Size |
| 6 | Method 4 – Cropping |
| 7 | How to reduce image size without losing quality |
| 8 | How to make a cropped image smaller in Photoshop |
Using Photoshop, you can easily reduce or increase the size of an image. Moreover, this can be done in different ways depending on what result you are striving for.
Before we start looking at the methods, first a little theory.
Firstly, what is reducing or increasing the size of an image? First of all, this concept should be understood as reducing/increasing the resolution of a picture, that is, its length and width and, accordingly, the number of pixels that make up any raster image. Learn more about resolution.
Secondly, what happens to the quality of the picture after resizing it?
- During the reduction process, pixels are lost, but the overall quality does not suffer, it remains quite clear.
- During the enlargement process, Photoshop stretches the pixels and draws them in accordance with its algorithm. Therefore, when enlarging, the picture quality always suffers. The higher the magnification, the more clearly the irreversible loss of quality is visible.
A similar issue was discussed in the lesson related to changing the layer size, I recommend you read it
A clear example of how image quality changes:
In this article, we’ll look at 4 ways to change the size of a picture in Photoshop and look at when and which method is best to use.
How to properly reduce image size
Author: NON. Date of publication: December 05, 2010. Category: Photo processing in Photoshop.
Let's imagine this situation. You took a series of beautiful photographs to order. Now you need to send these pictures by email for preview to the customer. The photographs, naturally, are taken with high resolution, but you need to reduce them to a certain size, which will significantly reduce the file size and, moreover, the customer will not be able to use such photographs for commercial purposes. If we immediately reduce the image size to the required size, then, as a result, we will significantly lose the sharpness of the photo, which our customer may not like. In this tutorial on working with Photoshop
A method will be shown that allows you to reduce the image size to the required size without losing the sharpness of the photo.
Similar publications:
- Photoshop
lesson : “How to transfer a file over the Internet” - lesson on working with Photoshop
: “Preparing a photograph for high-quality printing in a darkroom” - lesson on working with Photoshop
: “Preparing a photo for posting on the Web” - lesson on working with Photoshop
: “Print a photo with a resolution of 72 ppi” - lesson on working with Photoshop
: “Preparing a photo for printing and creating preset parameters for the Frame tool (C)” - lesson on working with Photoshop
: “Increasing the image size without losing quality” - lesson on working with Photoshop
: “Changing image sizes and resolution”
Let's open the original image.
Press the key combination Ctrl+Alt+I
.
Image Size
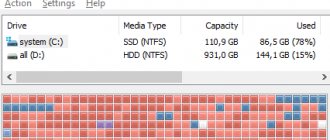
dialog box appears . We see that the photo weighs 14.4 MB, which is certainly too much to send by email.
Let's say we need to reduce the width of the image to 600 pixels. What are we doing. All work will be carried out in two stages. At the first stage, we reduce the width of the photo to 1200 pixels (double the size of the width we need: 600x2=1200), click “ Yes”
". The “weight” of the image dropped to 5.49 MB.
Create a duplicate layer by simply dragging it to the second icon from the right in the Layers
«.
Go to “ Filter – Sharpness – Sharpness”
«.
Since the filter has no settings, we will immediately see the result.
It is immediately noticeable that the image has become too sharp. Reduce the opacity of the top layer to about 70%, and the effect of the “ Sharpness”
«.
Let's merge layers - Ctrl+E
.
Image size” window again
" -
Ctrl+Alt+I
and set the image width required for the output - 600 pixels (the “weight” of the image dropped to 1.37 MB).
Click “ Yes
”.
Now we do exactly the same work as in the previous steps: create a duplicate layer, apply the “ Sharpness”
"and reduce the opacity of the top layer now to
50%
.
This is what we got as a result of our work. Now such a reduced image, but with good sharpness, can be sent to your customer.
If you don’t want to miss interesting lessons on photo processing, subscribe to the newsletter.
The subscription form is below.
Seal
- Back
- Forward
Comments
+1 Guest 02/14/2014 04:09 You can also reduce the size with the RIOT program - the Radical Image Optimization Tool works perfectly without loss of quality. I tried the above methods for reducing the weight of the image, but I didn’t get the result that I would like to have, but I learned something new for which is a big plus for the author
Reply | Reply with quote | Quote
0 Alexander 06/05/2013 03:45 When it comes to manipulating layers, understanding disappears
Reply | Reply with quote | Quote
+1 Ekaterina 02/12/2012 03:37 I see! Thank you very much for the links, I'll look into it 
Reply | Reply with quote | Quote
0 Ekaterina 02/11/2012 21:03 Thanks for the lesson! How to do a similar manipulation with text? Let's say I make a print screen from the screen - I get a picture with text, then I need to make it smaller, but so that the text does not “suffer”. I applied all the recommendations given in the lesson, but the text still turns out a little unclear. Sharp, yes, but not clear. I would be grateful if you duplicate the answer to the email. mail. Thank you!!
Reply | Reply with quote | Quote
0 Oleg 02/12/2012 03:32 Ekaterina! Your case is quite complicated, since the screenshot of the screen is usually initially not of very high quality, and you still reduce it. Under the first picture of this lesson, there are several links to other similar lessons, try using them to make the image smaller. In addition, after reducing the photo, since the text turned out to be fuzzy, you can select it, copy it to a new layer - Ctrl + J, and then use the rich arsenal of Photoshop to improve its clarity. Here at this link - after the first picture, you will find many links to increase clarity and sharpness.
Reply | Reply with quote | Quote
+1 Guest 12/07/2011 02:40 Help please, I can’t figure out how to make a photo size 10x15 in Photoshop cs5
Reply | Reply with quote | Quote
0 Oleg 12/07/2011 03:21 Look at the material at this link - Please note that under the first photo there are several more links that can help you.
Reply | Reply with quote | Quote
0 Timur 12/01/2011 12:28 Thank you, very good advice! They really helped.
Reply | Reply with quote | Quote
+2 Guest 09/23/2011 05:25 Thank you, you helped!!!! Otherwise I scaled it down and it turned out very bad
Reply | Reply with quote | Quote
Update list of comments
Liked? Share:
Add a comment
Enter your name, or register on the site, so that your name is inserted automatically in the answers: it will take 2 minutes! After registering, you will be able to edit your messages and will not have to enter confirmation
.
To display an Avatar
(your picture), you must have an account on Gravatar at the same email address, it’s free.
JComments
Method 1 - Image Size Dialog Box
This is the classic and most universal way. It is suitable in most cases, especially when you already know to what size you should reduce and enlarge the image size.
Open the image in Photoshop.
Open the Image - Image Size dialog box (or key combination - Alt+Ctrl+I). The following window will appear:
Pay attention immediately to the Width and Height fields. The values that will be indicated there are the current dimensions of the image. By default they are measured in pixels.
If you initially know to what size you need to resize the image, then enter these values in the above fields.
Proportions
If the Save proportions checkbox is not checked in the window settings, you can enter any values in the length and width fields. But you risk that the picture will be stretched vertically or horizontally. It is very easy to make a mistake and choose the wrong proportions.
Three main image parameters
- File size, which is measured in bytes (kilobytes, megabytes, etc.)
- Size, which is the width and height in any unit of measurement (pixels for screens, inches or centimeters for print)
- Resolution, which is measured in dots per inch for printing (DPI) or pixels per inch (PPI) for digital presentation or screens
Websites have different requirements and restrictions regarding these three image features. Ideally, you should make changes to your images to meet these requirements before uploading them. Although many websites resize images automatically, this automated process can degrade the quality of the image in both resolution and color, and this will certainly affect the appearance of the image. Exactly sized uploads ensure that your images are minimally or not altered and therefore not distorted. The best way to resize images is Adobe Photoshop.
Resizing in Photoshop can mean one of two things: reducing the file size of an image or resizing the image. They go hand in hand, but in this article we will discuss how to resize an image.
When you resize an image, you change the dimensions and pixel density, which determine its quality. There is a direct relationship between resolution and size. If you reduce the number of pixels per square inch (PPI) in an image, you effectively increase the dimensions. Dimensions determine the size of the image on the screen.
If this is confusing, just remember:
- More pixels per inch = better resolution
- Fewer pixels per inch = lower resolution
Method 2 - Resizing using Transformation
Transforming an image is a cool method that definitely needs to be added to your Photoshop knowledge base. This method is good in two cases:
- reduce or increase the size of the entire image;
- Reduce or enlarge the inserted image in Photoshop.
Size details for each case.
How to reduce or increase the size of an entire image
Open the picture. Select the command Edit - Free Transform or press the key combination Ctrl + T.
If this command is not active (grayed out), then your background layer is locked to change. This is indicated by a padlock icon directly on the layer.
To unlock the background layer, double-click on it. The New Layer window will appear, click OK.
A frame will appear around the image. There are markers in the corners and on each side that you need to pull to make the image smaller or larger.
After resizing, click on the checkmark at the top of the options bar. There is a bug in Photoshop CS6 and this checkbox is not visible. If you also don’t see it, then press the Enter button to accept the changes or Esc to cancel.
Step 3.1 Magnification case
If you enlarged the picture in this way, then, as you can see, part of it became hidden, it seemed to not fit into the size in which it was opened. On the one hand, this is also not bad and can also be used in some cases.
But if you insist on showing the entire image, select Image - Show All.
Step 3.2 Case when decreasing
When you zoom out, you'll see a checkerboard background. This is emptiness, transparency. It will disappear when you save the image. But it would be correct to cut off the void in order to ultimately see what the final size of the picture is.
To trim the void, select the Image - Trimming command.
In order not to disturb the proportions of the image in this method, when you drag the frame markers, simultaneously hold down the Shift .
How to reduce or enlarge an inserted image in Photoshop
In any case, take the case described above into account. Namely, the ability to use the Free Transform command (Ctrl+T). This technique will be needed to carry out such a common operation as reducing or enlarging an inserted picture, item, object (call it what you want).
So, a familiar situation: you inserted another picture into your main image in Photoshop, but it did not fit in size.
Select this image and use the transform command. Now, as described above, pull the markers in the desired direction.
Selection method No. 1: “Magic wand”
This is the easiest way. But it is effective only in 1 case: the selected background is plain, or the object is solid on an empty background.
Example: your photo is on a white background. It could be snowy peaks or just a white wall, something light, and so on. In this example, cutting out the object is very easy. To do this, you simply use a tool called the Magic Wand. An example of its use in the photo.
To do this, first make sure your image is on a layer - right-click on the Background layer.
Select From Background (as shown in the photo), then the Magic Wand Tool (from the Tools panel), click on the background.
Select "Add to Selection", change the Tolerance to 32 and make sure that the "Smooth", "Adjacent Pixels" and "Sample from All Layers" boxes are checked as shown in the photo.
A tolerance of 32 will select any pixels up to 32 shades darker or brighter. A higher tolerance value will increase the size of the selection, and a smaller one will reduce it accordingly.
And the result can be seen in the photo below.
The background has become transparent, and the object can be moved around it.
Method 3 - Canvas Size
Not the most popular method, but nevertheless we will also consider it - the Canvas Size command.
The peculiarity of this method is that we change the size of the image resolution, while the picture itself does not change in any way. Photoshop simply cuts off part of the image (if we are talking about reduction), or adds a background color (if we are talking about enlargement).
That is, let’s say your picture is 700x700 pixels. Through Image - Canvas Size you set the size to 500x500. As a result, Photoshop cuts off the extra 200 pixels in height and width. In the settings, you can specify where it cuts from: it is either evenly on all sides, or you can select a specific side.