Via the Layout tab
Place italics in any cell of the line above or below which you need to insert an additional one. Then go to the “Working with Tables” tab – “Layout” and in the “Rows and Columns” group, click on the appropriate button: either “Insert on top” or “Insert below”.
The line will be added.
If you need to add several lines, then in the finished table, highlight the number of new ones you need. Then click on the insert button at the top or bottom.
In the example, I highlighted three lines, respectively, and added the same number.
How to work with tables in Word
Greetings, dear reader! You've probably noticed that we receive a lot of information in tabular form. This could be a list of products with characteristics, a weather forecast for the week, a transport schedule, and so on. Tables improve the perception of information, and where necessary it makes sense to use them.
Today we will look at the creation and design of simple tables in the Word text editor.
How to create a table in Word
Before you create a table, you need to decide on the number of rows and columns. Before inserting, you must place the text cursor at the place in the document where the table will be placed.
If its dimensions do not exceed 10x8, then go to the Insert and in the Tables , use the mouse pointer to select the required number of cells and left-click to insert the table into the document.
We will get cells that are absolutely identical in width and height. Of course, we can change their parameters. But if the table is small, then you can draw it. In the same Tables there is a Draw table command .
By turning on this mode, you can draw rectangles and lines, just like in a graphics editor. The cursor will take the form of a pencil. If you need a table with a large number of rows or columns, then it is better to select the Insert table .
And just specify the required number of rows and columns.
Here you can additionally specify auto-fit parameters for the width of table columns:
- Constant : Auto aligns columns within the available table width; when specifying the exact size, the width of one column is set.
- By content : the original table has cells with a minimum width, their sizes will change as text is added to them.
- By window width : the same as constant in Auto mode
Using the context menu
Place the cursor on the line above or below which you want to insert a new one. Right-click on it and select “Paste” from the context menu. In the expanded list, click on the appropriate item: either above or below.
In order to insert several lines in this way, select them, and then choose from the context menu to insert new ones above or below the selected ones.
In the example, two new lines have been added above the highlighted ones.
How to add multiple rows to a word table
To add multiple lines, you can use copying by copying empty lines and pasting them into the desired location. This is what you need to do:
- Left-click and drag your cursor to select all the empty rows you want.
- Left-click on the selected rows. Hold down the left mouse button and drag the cursor to the point where you want to insert lines; then release
The second way is to place the cursor under the table, click “Insert” -> “Table” -> “Insert Table” in the ribbon and in the window that appears, enter as many rows as you need.
A quick way to add in Word 2013, 2020
In the latest versions of the text editor MS Word 2013 and 2016, you can cope with our task much faster, without opening the desired tab or context menu. Just hover the cursor over the line above or below which you want to add a new one, and click on the plus sign that appears at the left border.
After this, a line will be created in the specified location.
To quickly add in Word 2003, 2007 and 2010, you can use this method. Place the cursor outside the table in the line under which you want to create a new one. Then press "Enter".
An empty line will be added at the specified location.
Choose one of the methods and add the required number of items to the table you are working with in a Word document.
Rate this article:
About the author: Oleg Kaminsky
Webmaster. Higher education with a degree in Information Security. Creator of the portal comp-profi.com. Author of most articles and computer literacy lessons
- Related Posts
- How to check a box in Word
- How to make text in a circle or semicircle in Word
- How to combine pictures in Word
Creating lines in a Microsoft Word document
Quite often, when working with a MS Word document, the need arises to create lines (lineatures). The presence of lines may be required in official documents or, for example, in invitations and postcards. Subsequently, text will be added to these lines; most likely, it will be written there with a pen rather than typed.
Lesson: How to sign in Word
In this article, we'll look at some simple, easy-to-use ways you can make a line or lines in Word.
IMPORTANT: In most of the methods described below, the length of the line will depend on the values of the fields set in Word by default or previously changed by the user. To change the width of the fields, and along with them indicate the maximum possible length of the line for underlining, use our instructions.
Lesson: Setting and changing margins in MS Word
Underline
In the “Home” in the “Font” there is a tool for underlining text - the “Underline” . “CTRL+U” instead .
Lesson: How to underline text in Word
Using this tool, you can highlight not only text, but also empty space, including an entire line. All that is required is to first indicate the length and number of these same lines with spaces or tabs.
Lesson: Tabulation in Word
1. Place the cursor at the point in the document where you want the underlined line to begin.
2. Press “TAB” the required number of times to specify the length of the line to underline.
3. Repeat the same action for the remaining lines in the document, which also need to be underlined. You can also copy an empty line by selecting it with the mouse and pressing “CTRL+C” , and then pasting it at the beginning of the next line by pressing “CTRL+V” .
Lesson: Hotkeys in Word
4. Select an empty line or lines and click the “Underline” on the Quick Access Toolbar ( “Home” ), or use the “CTRL+U” .
5. Blank lines will be underlined, now you can print the document and write whatever is required on it by hand.
Note: You can always change the color, style, and thickness of the underline. To do this, simply click on the small arrow located to the right of the “Underlined” and select the necessary options.
If necessary, you can also change the color of the page on which you created the stitches. Use our instructions for this:
Lesson: How to change the page background in Word
Key combination
Another convenient way to create a fill line in Word is to use a special key combination. The advantage of this method over the previous one is that it can be used to create an underlined line of any length.
1. Place the cursor where you want the line to begin.
2. Click the “Underline” (or use “CTRL+U” ) to activate the underline mode.
3. Press the “CTRL+SHIFT+SPACEBAR” and hold until you have drawn a line of the required length or the required number of lines.
4. Release the keys, turn off the underline mode.
5. The required number of lines to fill the length you specified will be added to the document.
- Tip: If you need to create many underlined lines, it is easier and faster to create just one, then select it, copy it, and paste it into a new line. Repeat this step as many times as necessary until you have created the required number of rows.
Note: It is important to understand that the spacing between lines added by continuously pressing CTRL+SHIFT+SPACEBAR and lines added by copy/paste (as well as pressing ENTER at the end of each line) will be different. In the second case it will be greater. This parameter depends on the set spacing values; the same thing happens to text during typing, when the spacing between lines and paragraphs is different.
AutoCorrect
In the case when you need to put only one or two lines, you can use the standard autocorrect parameters. It will be faster and just more convenient. However, this method has a couple of disadvantages: firstly, text cannot be printed directly above such a line and, secondly, if there are three or more such lines, the distance between them will not be the same.
Lesson: AutoCorrect in Word
Therefore, if you only need one or two underlined lines, and you will fill them out not with printed text, but with a pen on an already printed sheet, then this method will suit you quite well.
1. Click in the place in the document where you want the beginning of the line to be.
2. Press the “SHIFT” and, without releasing it, press “-” , located in the upper number block on the keyboard.
Lesson: How to make an em dash in Word
3. Press “ENTER” , the hyphens you enter will be converted into underscores that span the entire line.
If necessary, repeat the action for another line.
hand drawn line
Word has drawing tools. In a large set of various shapes, you can also find a horizontal line, which will serve us as a designation of the line to fill.
1. Click where you want the beginning of the line to be.
2. Go to the “Insert” and click on the “Shapes” located in the “Illustrations” .
3. Select a regular straight line there and draw it.
“Format” tab that appears after adding a line, you can change its style, color, thickness and other parameters.
If necessary, repeat the above steps to add more lines to the document. You can read more about working with shapes in our article.
Lesson: How to draw a line in Word
Table
If you need to add a large number of rows, the most efficient solution in this case is to create a table of one column size, of course, with the number of rows you need.
1. Click where the first line should begin and go to the “Insert” .
2. Click on the “Tables” .
3. In the drop-down menu, select the “Insert table” .
4. In the dialog box that opens, specify the required number of rows and only one column. If necessary, select the appropriate option for the Auto-Fit Column Width .
5. Click “OK” , a table will appear in the document. By pulling the plus sign located in the upper left corner, you can move it anywhere on the page. By dragging the handle in the lower right corner, you can change its size.
6. Click on the plus sign in the upper left corner to select the entire table.
7. In the “Home” , in the “Paragraph” , click on the arrow located to the right of the “Borders” .
8. Select the “Left Border” and “Right Border” to hide them.
9. Now your document will display only the required number of lines of the size you specified.
10. If necessary, change the table style, and our instructions will help you with this.
Lesson: How to make a table in Word
A few final recommendations
Once you have created the required number of lines in the document using one of the methods described above, do not forget to save the file. Also, to avoid unpleasant consequences when working with documents, we recommend setting up the autosave function.
Lesson: Autosave in Word
You may need to change the spacing between lines to be larger or smaller. Our article on this topic will help you with this.
Lesson: Setting and changing intervals in Word
If the lines that you created in the document are necessary to be filled in manually in the future, using a regular pen, our instructions will help you print the document.
Lesson: How to print a document in Word
If you ever need to remove lines that represent rows, our article will help you do it.
Lesson: How to remove a horizontal line in Word
That's all, now you know about all the possible methods by which you can make lines in MS Word. Choose the one that suits you best and use it as needed. Good luck in your work and education.
We are glad that we were able to help you solve the problem. Add the Lumpics.ru website to your bookmarks and we will be useful to you. Thank the author and share the article on social networks.
Describe what didn't work for you. Our specialists will try to answer as quickly as possible.
Did this article help you?
NO
Editing a table in Word
Adding Rows to a Table
All operations with tables in all versions of the program are done the same way. Some methods are shown only for Word 2003.
Add a row to the end of the table
Place the cursor on the right side of the table near the last line and press Enter
on keyboard.
Place the cursor in the last cell of the table and press the key on the keyboard.
Add a row in the middle of the table
Place the cursor on the right next to the line after which you need to insert a new line and press Enter
.
Place the cursor in any cell of the row before or after which you want to insert a new row and select Table
–
Insert
–
Rows above
or
Rows below
.
Inserting multiple rows at once
To insert multiple rows into a table at the same time, do the following.
Select as many cells (precisely cells - you don’t have to select the entire row) as many rows you need to add (select three rows - you get three new rows) and select the command in the menu - Table
–
Insert
–
Rows
above or
Rows below
.
How to select a cell, row, column or entire table
The process of setting up its structure begins by selecting the necessary elements of the table. The selection is simple:
- To select the entire table , click on the icon in the upper left corner of the table. All cells will be filled with the highlight color
- To select a separate cell , move the mouse over its left border, the mouse arrow will change appearance - it will become black, directed diagonally. Click to highlight
- To select a row , select the first cell in the row and, without releasing the left mouse button, drag to the right, selecting the remaining cells of the row;
- To select a column - similar to rows, select the first (top) cell of the column and drag the selection down to the last row
Similarly, you can select an arbitrary group of cells within a table.
How to move a table to another location
Here I will offer you two ways:
- Drag the table using the icon in the upper left corner. Simply drag and drop it to place it in the desired location on the sheet.
- Select the entire table and press Ctrl+X to cut it from the sheet. Next, position the cursor at the insertion location and press Ctrl+V.
The first option is convenient to use when a new place for the table is nearby. If you have to pull it far, it’s better to cut and paste.
How to insert rows and columns into a Word table
Very often the table has to be modified as it goes along, so new rows and columns need to be inserted. I will also offer options for this:
- If you have Microsoft Office 2013 or later , place your mouse over the insertion point to the left or top of the table, an insertion pointer with a “+” sign will appear. Click on it, the row or column will be inserted;
- If you have an earlier version of the program , select the cell next to which you want to insert a row, column or other cell. Right-click on it and in Insert select one of the options:
- Insert Columns on the Left
- Insert Rows at Top
- Insert rows below
- Insert Cells
Insert columns on the right
Select Insert Cells to add individual cells. An additional menu will open where you can select the insertion method.
How to delete rows, columns, cells from a table in Word
Here the principle is the same as with insertion. Select the desired element, right-click on it and select “Delete...”
The same action can be done on the tape. On the ribbon, go to Layout – Rows and Columns – Delete. Select an action from the menu that opens.
Leta is a little more convenient to use, because there is no need to select an entire row or column.
How to change the size of a table or cell in Word
To resize a table, follow these steps:
- Hover your mouse over the icon in the lower right corner. The arrow will become diagonal bidirectional
- Pull this icon in the direction of the desired changes. The table will become “rubbery” and can be easily manipulated.
- When the desired size is found, release the icon
If you need to maintain proportions in size, hold Shift while stretching. The table will seem to change its scale.
To resize individual cells, do this
- Select the desired cell
- Drag the left or right borders with the mouse to achieve the appropriate size
To set exact dimensions, select a cell and indicate on the ribbon in the Layout – Cell Size block.
How to merge table cells in Word
Sometimes you need to merge several cells with each other. Often this has to be done in the table header when it is quite complex.
You can do this in two ways:
- On the ribbon in the Layout – Drawing block, find the Eraser tool . Click on unnecessary borders to remove them
- Select the cells you want to merge, and on the ribbon, go to Layout – Merge – Merge Cells.
Both methods are quite flexible and effective, although I prefer the Eraser.
How to enter data into a Word table
It looks like we've covered all the tools we need to create a table structure. Now let's fill it with data. To do this, simply click on the cell and enter text into it from the keyboard (or paste from the clipboard). To move between cells you can use the following methods:
- Click on the cell where you want to go
- Navigate using your keyboard arrows
- Press Tab, the cursor will move to the next cell from left to right, top to bottom.
So, moving from cell to cell, we will fill the entire table with data.
How to sort rows in a Word table
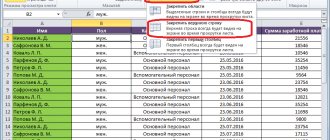
And finally, let's try to sort the entered data. It’s very good that the program can do this; we don’t have to do it ourselves. I've made a table as an example:
Let's sort it by employee last name.
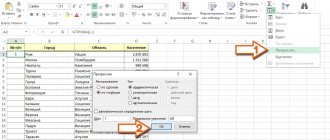
- Select the part of the table to sort and click on the ribbon Layout – Data – Sorting.
- In the window that opens, select the sorting options – by which columns and in what sequence to sort. Everything there is intuitive.
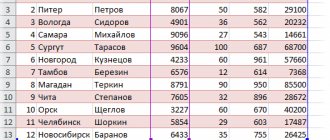
- Let's see what happened:
- As you can see, the sorting was successful.
- Well, we have considered the main issues in terms of working with tables, we only have 3 small topics left: Formatting tables, Express tables and formulas in Word tables.
- After that, let's start working with pictures.
vIn order not to miss these interesting topics, subscribe to blog updates and be among the first to know about everything! In the meantime, I say goodbye to you and wait again on the pages of officelegko.com.
Source: https://officelegko.com/2018/02/13/kak-v-word-sdelat-tablitsu-chast-2-rabota-so-strukturoy/
Working with Columns of Text in Word
From this instruction you will learn how to use columns in text documents, how to align text in columns and change the distance between them, how to add breaks between columns.
Why use speakers
Most often, the column element is used in newspapers, magazines, brochures and flyers. In particular, for a print publication, a format with columns looks more attractive and professional.
You can create one, two or three columns of the same size. Then, as you type, you will automatically move to the next column when the previous one ends, unless you manually insert a column end. You can set the width of the columns and use the usual formatting that is used in regular text documents.
Online course “Word from simple to complex” Online course “Word from simple to complex”
Master the work in the main text editor at a high level. It doesn’t matter if you are a beginner or already work with Word, with our course you will become a real document guru!Read more
Adding Columns
- Select the text you want to convert to columns.
- In the ribbon menu, select the “Layout” , “Page Setup” .
- Click on the "Columns" .
- From the drop-down list, select the desired number of columns (for example, three).
Note that unless you first select the specific area of text you want to turn into columns, all text following the cursor is converted into columns.
Formatting Columns
When columns are created, by default they have an alignment similar to that of the text. And often this is left aligned. This is not the best option for columns, so it is better to format it to fit the width.
- Let's highlight our columns.
- In the ribbon menu, select the “Home” , “Paragraph” .
- Click on the “Align to Width” icon (a similar action can be achieved by pressing the keyboard shortcut Ctrl + J).