Disabling the microphone on Windows OS
In the Windows operating system, as in all others, there are several ways to disable the built-in microphone on a laptop. Now we will look at the most popular of them. Both built-in microphones and external headsets will be exposed to publicity.
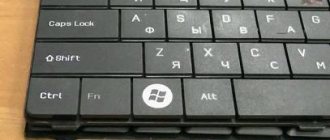
Initially, of course, it is worth saying that on more laptops there is a special button on the keyboard to mute the microphone. This key will have a microphone icon drawn on it, and it is often located in the upper area, where the keys starting with F are located. Note that this function is often activated when pressed in combination with the Fn key.
Now let's move on to the system settings themselves. The microphone (both internal and external) can be disabled in the audio settings. First, let's go there.
To do this, go to the “Control Panel”. To get there, click the “Start” menu, then click on “Control Panel”, which is located in the sidebar on the right. Find the “Hardware and Sound” category and go there. Now go to the Sound setting. A window will open in front of you; in it, immediately click on the “Record” tab. There you can see all currently connected microphones - both external and internal. To disable one, right-click on it and select the option of the same name in the menu.
Please note: if there are several microphones and you don’t know which one to turn off, you can tap on it, in this case in the “Sound” settings the green scale next to this microphone will fill. This way you will know which microphone the icon in the settings refers to.
Now you know how to disable the internal microphone on a laptop in the Windows operating system. But this is not the only way, so let's move on.
Mute the microphone on a laptop
The Windows operating system has one huge advantage: just hover the cursor over any of its elements, and you will receive its description, a kind of mini-tip.
The first and simplest option is suitable for all OS versions. Look in your tray. It's in the lower right corner. There are a number of icons, a clock and a date. We'll need a speaker icon.
Instructions for muting the microphone:
- Right-click on this icon and select “Recording devices” from the drop-down menu;
- A new window will appear on the screen with all microphones. If you first disconnect the headset from the laptop, then only the built-in recording device will remain. Right-click on it and click “Disable” in the drop-down menu;
- After which it will immediately disappear from the list and will no longer bother you.
Disable via Realtek utility
It’s worth saying right away that this method is only suitable for those users who have a microphone from Realtek installed. The fact is that this manufacturer, along with the product, also provides a utility that helps to interact with its device. Often this utility is installed automatically along with the driver, and later you can find it in the system tray.
Open the tray and click on the Realtek icon. “Realtek HD Manager” will open in front of you. Most likely, two tabs will be visible - these are “Speakers” and “Microphone”. Go to the second one. Now you have all the microphone settings in front of you. Here, in addition to turning off microphone recording, you can also enable the noise or echo suppression option, as well as much more. Now you know how to turn off the microphone on a laptop if you have one from Realtek.
The third option is for laptops with a built-in microphone from Realtek
Using the tray icon or Windows search, we get to the driver program called “Realtek HD Manager”; to disable the recording device you need to:
- Go to the “Microphone” tab;
- Click once on the icon shown in the screenshot;
- If a “cross” appears nearby, the microphone has been successfully muted.
These three methods are ideal for any laptop, and the first two are completely universal - they work on any version of the operating system and with recording devices from a variety of manufacturers. The third is relevant only for Realtek microphones - all more or less good laptops have it installed, which is why we additionally described this method.
Mute the microphone in Skype
Most often, people want to mute the microphone while using Skype. In this case, you don’t even have to bother searching for system configurations; everything is done much simpler.
There are also two options for how to turn off the microphone on a laptop. First, let's look at the simplest and most famous. To implement it, you just need to pay attention to the large round button with a microphone icon. Note that it only appears during actual conversation. If you click on it, your interlocutor will stop hearing you. To return everything to its original state, press the button again.
This was a simple method, but there is a more complex one. To do this, go to Skype settings. To do this, click “Tools” on the top panel and then go to “Settings...”. In the left panel, go to “Sound Settings” and in the “Microphone” column, move the slider to the far left position. Please note that after this your interlocutors will no longer hear you at all.
What other tools will be useful when packing/unpacking files?
- File manager . If you need to unpack a zip, you don't need to install a separate application. Use the built-in tools of the Total Commander file manager. It, for example, supports both RAR (unpacking only) and ZIP.
- The WinRAR desktop archiver - initially only he, as the creator of the compression algorithm - was used to work with RAR. Times are changing, dozens of new applications have appeared on the market, but WinRAR remains a solid program that processes its native format best.
- Zip archiver for phone. An important thing if you have downloaded important files to your phone. The archiver for Android will not take up much space, but it will help out when needed. Download!
A ZIP file is one of the most popular file archiving formats. Therefore, sooner or later all users encounter ZIP files. In this article we will look at two ways to unpack a ZIP file on a computer running the Windows operating system.
Method No. 1. Unpack the ZIP file using the built-in archiver.
The Windows operating system has a built-in ZIP archiver that can be used to unpack a ZIP file. This method of unpacking a ZIP file is convenient because you do not need to install any additional programs on your computer to use it.
So, in order to unpack a ZIP file using the built-in archiver, you just need to open the ZIP file by double-clicking the left mouse button (or using the right click and the “Open” command).
After this, the ZIP file will open as a regular folder. If you pay attention to the address bar, it will indicate that you are viewing the contents of your ZIP file.
Once the ZIP file has opened as a folder, its contents can be copied to any other folder on your computer. To do this, you can simply drag the files with the left mouse button or use copying via CTRL+C/CTRL+V.
If, when you try to open a ZIP file, it does not open as a folder, but instead some other program starts, then you can use the Open With menu and select Explorer.
After this, the ZIP file will open as a folder and you can unpack it as described above.
Method No. 2. Unpack the ZIP file using a free archiver.
Another way to extract a ZIP file on your computer is to use a free archiver. The most popular and well-known is the 7-zip program. Therefore, we will consider it further.
Download this program from the official website (link) and install it on your computer. After installation, the “7-Zip” section will appear in the files context menu. Using this section in the context menu, you can unpack ZIP files, as well as archives of other popular formats. If you select the “Extract here” menu item, the contents of the ZIP file will be unpacked in the same folder where the ZIP file itself is located. If you select “Extract to...”, a separate folder will be created and the contents of the ZIP file will be unpacked there.
You can also select the “Unpack” option. In this case, a small window will open in which you can select the folder into which you want to unpack the selected Zip file.
Another option is to open the Zip file in the 7-Zip program interface. In this case, you will be able to choose which files you want to unpack and which not. To do this, you need to select the required files and click on the “Extract” button.
After this, a window will open in which you need to select the folder into which you want to unpack the contents of the Zip file.
After selecting the folder, you need to click on the “Ok” button and the files will be unpacked.
An archive is simply one file into which other files have been stuffed to reduce the overall size. If you still sigh when you receive another file in a ZIP, RAR, 7-Zip or any other archive, then this article is for you.
Let's look at several possible options for unpacking the archive.
:
- How to extract a ZIP archive using Windows 7
- How to extract data from a RAR file using 7-Zip
- How to unpack a damaged or multi-volume archive
At the end of the article you can watch a short video on the topic.
Disabling the microphone in Ubuntu
We have already told you how to turn off the microphone on a laptop in Windows OS, but we have avoided the lesser-known Ubuntu OS. Although she also has many fans.
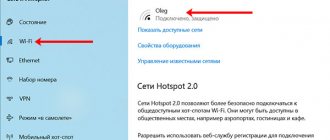
To turn off the microphone in it, you need to click on the volume indicator in the upper right corner. A small window will open in front of you, in which you can click on the microphone indicator, and it will immediately turn off. If you want to select the microphone you want to mute, then go to Sound Options. There, on the “Input” tab, all microphones will be displayed. Select the one you need and at the top of the window click on “Mute sound”. That's it, the microphone is turned off.
How to turn off the microphone in Skype on Windows 10
How to set up a microphone on Windows 7 - step-by-step instructions
To turn off a device that transmits audio in Skype, you need to:
- Open the program.
- Go to settings (usually indicated by a series of dots in the upper right corner.
- Stop the mouse pointer next to “Sounds and Video”;
- By moving the blue switch icon that appears in the field on the right, disable automatic microphone control.
- The slider showing the volume level must be moved to zero. In this position, no one will hear sounds near the computer when the program is running or simply downloaded.
Important! For laptops running Windows 7, the procedure for muting the microphone in Skype is similar.
Disable device in Skype
How to disable the webcam and microphone on a windows 10 laptop
comss.ru, 03/10/2017 (updated 07/01/2017)
Most modern laptops are equipped with a webcam. In many cases, the standard camera used for Skype and other video conferencing services is used, but some laptops come with infrared cameras, which are used for facial recognition in the Windows Hello service. The vast majority of laptops also have a built-in microphone that works in conjunction with the camera.
If you don't use your camera or microphone, you'll probably want to turn off these devices. You may ask why is this necessary? The fact is that some malware can gain control of hardware components and will carry out unauthorized access even when you are not using them. If you're concerned about protecting your personal data, these instructions will clearly show you how to disable the webcam and microphone on a laptop running Windows 10.
Scan your computer for threats
If you suspect that your computer may be infected with malware, the first step is to perform a full system scan. Even if the webcam and microphone are disabled, you cannot know for sure what kind of threat has taken up residence on your computer.
Windows Defender is already built into Windows 10, so it's a great option to start with. If you wish, you can use a third-party free antivirus or antivirus scanners.
Disabling the webcam and microphone in Device Manager
Disabling the camera and microphone in Device Manager is the fastest way, but not the safest - insidious malware can reactivate devices without the user's knowledge. However, it is useful to know how to disable your webcam and microphone using Task Manager.
How to disable your webcam
To disable your webcam you only need to follow a few simple steps.
- Right-click on the Start button.
- Select “Device Manager”.
- Expand the “Image Processing Devices” section.
- Right-click on the “Built-in Camera” entry (the name may differ on different devices).
- Select Disable.
- In the confirmation window, select Yes.
To turn the webcam back on, follow these steps again, but instead of the “Disable” option, select “Enable”.
How to mute the microphone
To disable the webcam, you need to follow the same steps as when disabling the camera.
- Right-click on the Start button.
- Select “Device Manager”.
- Expand the “Audio inputs and outputs” section.
- Right-click on the “Built-in microphone” entry (the name may differ on different devices).
- Select Disable.
- In the confirmation window, select Yes.
To turn the microphone back on, follow these steps again, but instead of the “Disable” option, select “Enable”.
Disable webcam and microphone in BIOS
Some laptops allow you to disable the camera and microphone at the hardware level from the BIOS. The following steps may differ on different devices, but the basic principle is to interrupt the system boot and enable the BIOS settings management interface and search for parameters responsible for the operation of the webcam and microphone.
In the case of the Lenovo ThinkPad, the built-in camera and microphone options were located in the “I/O Port Access” section of the “Security” tab. After disconnecting both devices, you need to save the settings and exit the BIOS, after which the computer will restart.
Keep in mind that the BIOS on your laptop may look different, but the end result will be the same. If you go to Device Manager after disabling devices in the BIOS, you will not be able to detect them.
To re-enable devices in the BIOS, repeat the steps, but instead of the “Disable” option, select “Enable”.
Close the camera
When it comes to the need to permanently unplug cameras, many users simply unplug their camera cables. This is a very drastic option and may void your laptop's warranty. A simpler solution would be to simply tape the camera.
Many users use sticky notes or tape to cover the camera, but some prefer a more professional approach. For these cases, inexpensive specialized accessories are available on the market that allow you to close the camera and unlock it if necessary using a slider.
See also:
— Is it worth sealing the laptop camera?
Privacy?
Keep in mind that the only guaranteed way to disable a camera or microphone is to physically disable the devices by removing them from the laptop or by unplugging cables and cables. Most likely, you won’t want to do this yourself, but at least remember it for the future.
Have you ever been a victim of malware that took control of your camera and microphone? Under what circumstances was this and how did you deal with the problem?
← Did you like the material? Read us on VKontakte
myfreesoft.ru
How to mute the microphone?
Sometimes a situation may arise that the turned on microphone interferes with work. In this situation, users are thinking about how to temporarily or completely turn off the microphone.
Our article describes the most common options for muting the microphone.
Microphone on computer/laptop
To mute the microphone on your computer, you can use one of the following options:
- disconnection from the system unit. If you have an external microphone, you can simply disconnect it from the system unit;
- mixer. If you want to use this method, you need to select “Speakers” – “Mixer” on the toolbar. In the window that opens, pull the lever down or press the speaker and the sound will turn off;
- sound - playback. You can also go to “Start” – “Control Panel” – “Sound”. Here select “Record” and highlight “Microphone”. Next, the “Properties” button will light up, and when selected, a tab will appear. Now you need to pay attention to the “Use of device”, where you can turn off the microphone by selecting “Do not use the device”. Or simply right-click on the device and select “Disable”. You can also call this window by right-clicking on the speaker sign on the tray and selecting “Recording devices”;
- driver. If you want to completely disable the microphone on your device, you need to go to the “Sounds” tab (described above). Then select the Recording app and highlight the microphone. Right-click on the microphone icon and select “Properties” – “General” – “Properties” from the drop-down menu. Here use the “Driver” tab – disable.
If you want to turn off the microphone on your laptop, you can use some additional methods:
- Fn button + microphone mute button. Many modern laptops are equipped with special buttons that allow you to turn off certain devices. The microphone is no exception. In order to use this method, you need to hold down the microphone mute button (depending on your model) and Fn;
- special application. If you installed a utility (special driver) when connecting the microphone, you can use it to disconnect the device. To do this, you need to launch the application and turn off the microphone on your laptop. In addition, you can also adjust the volume there;
- removing the microphone. This method is the most risky, since it will be necessary to disassemble part of the laptop and remove the microphone. This can only be done in rare cases and in specialized service centers.
Next, we'll look at how to mute the microphone in Skype.
Microphone in Skype
If you want to mute the microphone only in Skype, then you need to do the following.
- Go to “Settings” by selecting “Tools” in the panel or pressing Ctrl+.
- Drag the volume slider towards the minimum value and click “Save”.
If you need to turn on the microphone, then you should do the same steps, only drag the slider in the opposite direction.
By selecting one of the options, you can quickly and easily mute the microphone.
If during work the microphone stops working, then you need to find the reason. For information on how to check whether a microphone is working, read the article How to test a microphone.