Easy diagnosis of microphone problems in Skype
To get started, try the official sound test service “Echo / Sound Test Service”, which can be found in your contacts list. If it is not there, then simply open the Skype search engine and enter “Echo”, this service will appear as the first option.
To check your microphone, call this bot. First he will explain that after the beep you should start speaking into the microphone. After the second signal, it will play the recorded signal, if you hear yourself, then there is no problem with your microphone.
Enabling the microphone in the operating system
Any connected microphone is enabled by default in the operating system. But, there are times when it turns off after system failures, or someone turned it off manually. In this case, the desired microphone should be turned on.
To turn on the microphone, call the “Start” menu and go to “Control Panel”.
In the control panel, go to the “Hardware and Sound” section.
Next, in the new window, click on the inscription “Sound”.
In the window that opens, go to the “Record” tab.
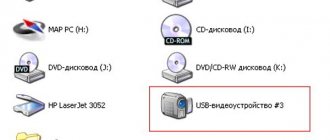
All microphones connected to the computer, or those that were previously connected to it, are presented here. We look for the disabled microphone we need, right-click on it, and select “Enable” in the context menu.
That's it, now the microphone is ready to work with all programs installed in the operating system.
Wrong microphone in Skype settings
If you do not hear yourself after the second beep, then your microphone may have been incorrectly identified in the settings. To check this, follow a few simple steps:
- To the right of your account there is an additional menu button, click on it;
- In the menu that opens, click on “Settings”;
- Among the items on the left, find “Sound and Video”;
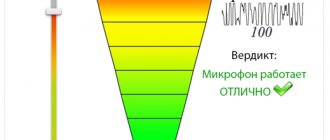
- Try to make some sound, and if the circles (see screenshot) begin to turn blue, you can understand that the microphone is working;
- If the circles are not colored, instead of “Default communication device”, select your microphone, and then make a sound again and look at the circles, then take the Echo test again.
Microphone check
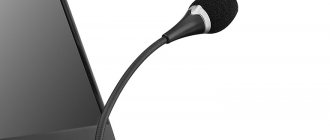
First, check if the recording device is connected to your computer. In laptops, the microphone is built into the case, but on desktop PCs it is connected to an external connector (either a separate device or together with a web camera).
Now check if your microphone is muted in Skype itself. Call Sound Test Service and look for the appropriate button. If the icon has a line through it, click on it.
Next, check the functionality of the device. To do this, connect the microphone to another device and try to use it for its intended purpose. If everything is fine, then the problem lies in the Skype or Windows settings.
Incorrect drivers
If you do not see your microphone among communication devices, then this may be a problem with the drivers.
Download the automatic driver installer or find the drivers for your microphone on the manufacturer's website by entering the full model name. You may also need drivers for the motherboard, in particular connector drivers; they can be installed if installing microphone drivers did not help.
Install the microphone drivers yourself and follow the setup steps again.
Enabling the microphone in Skype
Now let's figure out how to turn on the microphone directly in Skype if it is turned off.
Open the “Tools” menu section and go to the “Settings...” item.
Next, move to the “Sound Settings” subsection.
We will work with the “Microphone” settings block, which is located at the very top of the window.
First of all, click on the microphone selection form and select the microphone that we want to turn on if several microphones are connected to the computer.
Next, look at the “Volume” parameter. If the slider is in the extreme left position, then the microphone is actually turned off, since its volume is zero. If the “Allow automatic microphone setup” checkbox is checked, then uncheck it and move the slider to the right as far as we need.
As a result, it should be noted that by default, no additional actions need to be taken to turn on the microphone in Skype after connecting it to the computer. It should be ready to work immediately. Additional activation is required only if some kind of failure occurs or the microphone is forcibly turned off.
We are glad that we were able to help you solve the problem. Add the Lumpics.ru website to your bookmarks and we will be useful to you. Thank the author and share the article on social networks.
Describe what didn't work for you. Our specialists will try to answer as quickly as possible.
Wrong speakers/headphones in settings
Skype's automatic setup may not have selected your output device correctly. To check and resolve this issue, follow these steps:
- On the right side of the profile, find and click on the button to call the additional menu;
- In the additional menu that opens, select “Settings”;
- In the window that opens, find the “Sound and Video” item on the left;
- In it, at the bottom, look at the highlighted speaker volume slider, which should be at least at 1. If it is completely white, then this is the reason for the lack of sound - it is simply disabled in the settings. Set the slider to a value greater than 1;
- If everything is fine, instead of "Default communication device", select your headphones/speakers, and then test the sound in the call.
If your device is not there, then incorrect drivers may be to blame. Download the drivers for the motherboard connectors (or south bridge) and your headphones from the official website of the manufacturer, then install them and do the same steps with the settings.
Microphone not working on Skype
Microphone not working on Skype ? Then you need to configure it.
Don't know how? Now we will tell you.
There is absolutely nothing complicated about this. The main thing is to strictly follow our recommendations.
In order to set up a microphone in Skype , you will need:
- Skype installed. You can read about how to register for this program here;
- microphone of any brand and configuration that fits your PC or is built into your laptop.
All manipulations for setting up a microphone in Skype are performed in this program. No additional actions on the computer are needed.
First of all, you need to make sure that your device has the latest version of Skype (read more about how to install it here).
Before you start following our instructions, you need to make sure that the microphone is connected to your computer (and the one built into the laptop is working). If the microphone does not work on Skype , then our advice will definitely be useful to you.
So let's get down to business - it's quick and easy.
Along with recommendations on how to set up a microphone in Skype , we will give you tips on checking your speakers.
First stage - launch
In order to launch Skype, the most basic thing is to click on its icon on the desktop. You can press start and find it in programs.
The second stage is the search for tools
Go to the “Tools” section, then to “Settings”, as shown in the figure.
The third stage is setting up
In the “Sound Settings” section, adjust the microphone volume.
Stage four - checking the volume
To check the volume in the microphone, you need to say something into it. If during your response the “Volume” bar turns green, it means you did everything right. Then you can follow the recommendations for checking columns on Skype, described in the sixth step. If the strip was and remains gray, this indicates that the microphone is not working. How to turn it on, read on.
Stage six - fixing the problem
First you need to click as shown in the diagram. There will be a couple of lines for you to select. Click on each line one by one and repeat the steps described in the fourth step. If it doesn't work, you need to check all the lines until the expected result appears.
If you still can’t do anything, there are several options:
- the problem is in the microphone (maybe it is faulty or incorrectly connected); driver installation is required (in exceptional cases);
- it is not compatible with the device's operating system.
Then you will have to connect it to the computer on the control panel. Go to “Start”), select the “Sounds and audio devices” option, from where we go to the “Audio” tab.
Does the message “Record sound” appear? Yes - then you need to check the microphone volume, as shown in our diagram. If it’s different, try to correct it, and then “OK” in the volume and sound settings and check again.
If none of the above helps, you will have to work with the field (as in the bottom picture) and set other values. To do this, go to the control panel again (via the Start menu) and click “Sounds and Audio Devices,” then go to the “Audio” tab and check the microphone again.
Stage six - checking the speakers
Let's check if the speakers work on Skype. To do this, press as shown in the diagram. If you can hear something in your headphones or speakers, and the “Volume” bar turns green, everything is fine. You can safely proceed to the last eighth stage.
When you hear nothing and the bar is still gray, it may well be that the sound in Skype is not working. Then “Helpful Advice” will be useful to you, and if nothing works, follow the steps described in the seventh step.
Helpful advice. If there is no sound on Skype, then first of all you need to check the connection of the speakers to your computer. If they are connected, then you need to make sure that the sound is turned on on the computer itself. If yes, a blue ball should appear on the right side of the “Volume” bar. It is in a different place, you need to click on it and move it to the right without releasing the mouse. If these actions are unsuccessful, move on to the next stage.
Stage seven - sound settings
At this stage we will try to turn on the sound. To do this, click as shown in the figure. Compared to a drawing, you need to choose from several lines. Just click on them one by one, and then you need to repeat the steps of the sixth stage.
Eighth stage - control call
Basically, we did everything we could. All that remains is to click on “Make a follow-up call on Skype.” This way you can know for sure whether the microphone is configured.
What will happen?
A window will pop up. Next, you need to follow the instructions from the answering machine. There is no need to pay for this check, and it can be repeated any number of times. Still no sound? Most likely the sound is not working. Try the steps in step six and check the speakers again. If, despite everything, it is quiet, we return to the fourth stage and adjust the volume again. No response means the microphone, unfortunately, is faulty.
A common problem is mechanical damage.
If all the previous solutions did not help you, then you should prepare for the worst - possible mechanical damage to the devices.
Diagnosing mechanical damage to a device is simple - connect it to a known-good gadget or PC and test the device on it. If everything works, the device is working properly and the problem is in the computer; if not, take the microphone or speakers to a computer technician.
Diagnostics of computer connectors is just as simple, try connecting a working microphone and speakers to the connector, and then, if you connected devices to the case, then connect them to the motherboard connectors or vice versa. After this, try to test the working devices again; if the working connector works, but the one to which you previously connected does not, then you should take the computer to a specialist.
Setting up on Windows
Now let's look at the sound settings in Windows. Perhaps the problem lies with them. For this:
- Open “Control Panel” – “Hardware and Sound”.
- Find the “Sound” field and go to the “Manage sound devices” sub-item.
- In the window that appears, go to the “Record” tab. All microphones connected to the PC are displayed here.
- Right-click on the device with which you want to communicate via Skype and select “Enable”.
- To consolidate the result and prevent similar failures in the future, right-click on the microphone again and activate the “Use as default” option.
If sound appears, but you are hard to hear, follow these recommendations:
- Repeat steps 1-3 from the previous instructions.
- Right-click on the active device and select Properties.
- Go to the “Levels” tab and set the “Microphone” value to 100. If necessary, activate the microphone gain.
This is where all the recommendations come to an end. Now we know how to set up a microphone on Skype if the other person can’t hear you. If none of the methods helped you, update the sound card driver and repeat all the instructions described above in chronological order. Good luck!