Surely we all have photos where we turned out great, but the background ruins everything. You can have a great street style photo, but having a trash can in the background doesn't really add to the aesthetics of it. Or you took a photo of your masterpiece makeup with a selfie camera, but accidentally caught a pile of laundry in the frame. Wouldn't it be great to learn how to change a bad background to another?
Even if you don't post much on social media, this editing skill can come in handy at work. How many times have you received incredibly unsuccessful ID cards? Instead of dutifully submitting stupid passport photos from the nearest photo booth for the hundredth time, take a normal photo yourself. You can find it in the archives or take a neutral portrait at home, and then add a white background in the editor - the result will be no worse than a professional shot.
To figure out how to change the background of a photo, you don’t have to know how to process photos. This can be done easily and quickly – both on a computer and on a phone.
Replacing the background of a photo in Movavi Photo Editor
Even if you have little experience in photo processing, you can easily figure out Movavi Photo Editor.
To replace the background of a photo in our program, follow these steps:
Step 1. Download Movavi Photo Editor
Download the program to your computer and install it according to the instructions.
Step 2. Open the image in the program
Launch the photo editor and click the Open file
to find the desired picture. Or simply drag it from the folder into the program window.
Step 3: Select the background to replace
Open the Background Replacement tab.
To automatically select the area to highlight, click
Auto Select
.
To manually select the background, select the green brush
and apply a few strokes inside the main object (the one you want to save in the photo).
Then a red brush
to select the background that you will change.
You can adjust the selection using the Eraser
.
An alternative option is to use the Lasso tool.
To do this, set the starting point and move the cursor along the border of the object - the line will automatically be magnetized to it.
At this stage, it is not at all necessary to outline everything perfectly: just click the Next button -
you can correct it later.
Step 4: Adjust the Selection
Now swipe with Mask Brushes
along the contours to add the necessary areas or remove unnecessary ones.
Use the Hair Highlight
to select small details.
When finished, click Next
.
Step 5: Replace the background
Your main subject is now on a transparent background. To color it any color, click Replace background with color
and select the desired shade.
To place another photo in the background, click Add Image
.
Find the desired picture in the window that opens and click OK
.
Reset
to cancel your changes .
When you're finished working on the photo, click Apply
.
Step 6: Save the photo
Click Save in the lower right corner of the window. Select your desired image format and click Save again .
Watch this Movavi Vlog video to see the whole process:
Video tutorial:
Today we learned how to change the background in Photoshop
, worked with selection tools and adjustment layers. If you liked this lesson, do not be greedy, share it with your friends on social media. networks by clicking on any of the buttons below.
This lesson will tell you how to remove the background in a photograph and insert a new one in Photoshop . I will describe a fairly simple, correct and fast way to replace an image.
Often in a photo we are not satisfied with the background we are in and there is a temptation to insert something interesting. This can be done simply using Photoshop. The main thing is to replace the background efficiently and carefully so that the new background fits harmoniously into the photo. Therefore, you need to carefully select the background that you want to insert so that it fits into the composition as best as possible and is similar in color, so that you don’t have to do a lot of color correction later.
Lesson plan
- Open in Photoshop the photo on which the background will be replaced and open the photo of the new background
- Cut out the old background from the photo
- Copy new background and paste into photo
- Adjust colors, levels
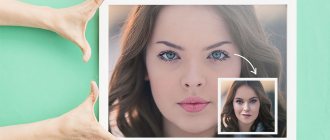
Look at the result of the work after replacing the background. Before and after photo.
How to Replace Background in Photoshop
If you already have experience with graphic editors, you can do the same in Adobe Photoshop. If you are used to the interface of Adobe Creative Suite programs, it will be easy for you to change the background on a photo as follows:
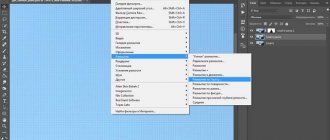
Launch Photoshop and open a photo
There are two ways to do this. First, you can find the image you want on your computer. Right-click on it, select the Open with
and click on the program name in the drop-down menu.
Secondly, you can first launch Adobe Photoshop, open the File menu,
click
Open
and find the pictures. Or simply drag them into the program window.
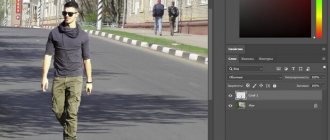
Select workspace
Use the Quick Selection Tool (W).
Drag the tool onto the image. If your main subject contrasts well with the background, the program will highlight it automatically.
Sometimes it is easier to select not the object itself, but the background - to do this, you can hold down the key combination Shift + Ctrl + I
on Windows or
Shift + Cmd + I
on Mac.
Edit the selection
To make the selection more precise, zoom in and continue working with the brush. You can add new areas to the selection by continuing to drag the cursor across the image - to do this, hold down Shift
.
To remove unnecessary fragments, do the same, but with the Alt button held down.
Selection and Mask
Find the Selection and Mask
in the top options bar.
A toolbar for working with the selected area will open. Now go to the Properties
, select
View Mode
and determine how you will see the selection.
Press Overlay
to see the contrast clearly, or press F to see your subject against different backgrounds - this will help you see any selection flaws.
Blend the borders
Select the Quick Selection
or
Lasso/Polygon Lasso
to continue working with large selection areas.
To adjust small details, work with brushes: a regular brush is suitable for pronounced edges and contrasts, and the Refine Edges
will help to organically highlight soft lines and transitions.
When to use the Refine Edges
, be sure to check the
Smart Radius
under
Edge Detection
in the right pane.
This option will help the program recognize hard and soft boundaries. Press P
to switch between “Before” and “After”.
Add your background
Select Clear Colors
in
Export Settings
to remove color errors.
Click Output To
and select
New Layer with Layer Mask
.
Make sure your new layer is in the background. Now select the background you want and drag it onto the layer you just created. Use the hand tool to adjust its position. Click Free Transform
to change the scale.
While doing this , hold down the Shift
so as not to disturb the proportions.
Adjust colors
Now adjust the colors so that your subject fits seamlessly into the new background. Select your front layer and click Image->Adjustments->Select Colors
.
A new window will open where you will need to click Image Options
and select the desired image.
Select the desired layer. Now check the box Neutralize
.
Now adjust the Luminosity
and
Intensity
until your layers look like one.
You can try Weakening
the colors to achieve optimal results.
Click Preview
to check what happened.
Ready!
Click OK
to save the result. Congratulations, you've just learned how to change the background of a photo in Photoshop!
Blur
If the question is how to blur the background in Photoshop, then this is how you need to proceed.
- Duplicate the image onto a new layer Ctrl+J.
- We go to the “Filters” - “Blur” tab, here we see many options. You can try different filters. It is convenient to use Gaussian blur. We'll show you how to further work with this filter.
- Set the radius you need and click OK.
You managed to blur the entire image. We fix this using a Mask.
- Click the Mask button, then there are two ways:
- Take a soft brush with black color, set it to a convenient size, and brush over the image of the object from which you want to erase the blur. This method is convenient when the background is large and the object itself is small.
- If, on the contrary, you have a large object that you need to keep unblurred, then it is more convenient to use another method. After applying the Gaussian Blur filter, press Ctrl+i. Create a mask and fill it with black. Then we take a soft brush, set it to white and brush it over the background, which becomes blurry.
You were able to change a simple background to a blurred one, you can further work with various effects to make the picture expressive.
Despite the impressive instructions, working with the background is not difficult; a novice user can easily blur or delete it on his own. And the photos will take on a new interesting look. Using various filters helps to enliven and diversify the picture. When creating collages, you will need the ability to remove excess background, making it transparent. If you are interested in the question of how to replace the background in Photoshop, then no special professionalism is required here either. With practice, you will learn how to quickly transfer objects from one image to another.
How to change the background of a photo on your phone
You can edit your photos in this way in a special application on your smartphone or tablet. For example, you can use PicsArt: this program is available for both iOS and Android. Use our instructions or try repeating a similar operation using other applications that you like (SnapSeed, Meitu, etc. are suitable).
In PicsArt, changing the background is done like this:
Launch the application
Download the program from the App Store or Google Play and open it.
Upload a picture
Click on the button +
at the bottom of the screen and open the picture you want to put in the background. Click on the red circle to continue.
Add a main object
Click the Add Photo
on the toolbar. Select the image on which you want to change the background. Stretch it to the desired size.
Select area to replace
Using the brush, select the object you want to leave in the top image. Use the eraser to erase any excess. Click on the arrow to continue.
Check if everything is correct
You will see your subject against a black background. Make sure everything is selected correctly and click on the check mark icon.
Adjust the location of the object
Move your main subject so that it is in the desired part of your background image. To finish the job, click on the checkmark again.
Example with a uniform background
- So, open the image in Photoshop in any way convenient for you.
- Now select the Magic Wand tool, which is most suitable in this case. And with this magic wand, left-click on the background. If the background is uniform, then it should stand out without affecting the girl herself.
- If the background is not completely uniform, then only a small part may stand out. In this case, you need to choose the maximum level of clearance that does not affect the girl herself. I took 42. Well, then click on the background areas while holding down the SHIFT until the entire background is framed by a dotted line. And don’t worry that there are unselected areas in your hair. More on this separately.
- If your layer is locked (there is a lock), then be sure to remove it by clicking the left mouse button. After everything is selected, press the DELETE and select “Content-Based”. And now your entire background will disappear into oblivion. Great. Now it's a matter of small things.
- Load the second second image as the second layer. But make sure it is under the main one. And what do we see? Now our girl is on a different background, which is what was required of us.
- But we see that there is a problem with hair. There are many spaces between them and it is very difficult and inconvenient to highlight them using conventional methods. Therefore, I have prepared a separate article on how to easily highlight hair in Photoshop.
Pen highlighting
Many Photoshoppers believe that using the Pen Tool produces the most accurate and “clean” selection, but this method, in addition to skill, requires great patience. Nevertheless, there are “masochists” who highlight hair with a pen (fortunately, the scale can be increased to 3200%).
In general, carefully outline the object with a pen, then, making sure to close the outline, right-click on it and select the “Make Selection” command. The program will execute the command immediately once you specify the Feather Radius and decide whether you need Smoothing.