2 years ago February 28, 2020 at 7:03 pm 101477
It's useful to run your local web server, if only out of curiosity. Understanding the structure of the web, making a simple website, getting involved and becoming a professional developer is easier than it seems. It’s very easy to install a ready-made WAMP package (Windows: Apache HTTPD, MySQL, PHP) with one click, or even better, figure it out yourself.
And in order to better understand web servers, let's install, configure and update all three components together: Apache HTTPD 2.4, MySQL 8.0 and PHP 7.3. And at the same time we’ll deal with phpMyAdmin 4.8.
To put it very simply, a run-of-the-mill web server needs only three things: a program to respond to browser requests, in our case this is Apache HTTPD, a program to manage databases (we'll look at MySQL), and libraries for processing code in some programming language , I'll talk about PHP. It is optional, but not at all necessary, to select software for manual manipulation of databases. Cheap internet hosting providers most often provide access to phpMyAdmin, which is why we use it too. All of these programs are completely free and their code is open source.
Of course, databases can be managed differently, for example, through PostgreSQL or SQLite, queries can be answered differently, say, through nginx or Microsoft IIS, and completely different languages can be used, say, Ruby or Python. But by 2020, for more than ten years, the Apache-MySQL-PHP combination is still the most popular.
Let's go through clear points with brief explanations for a deeper understanding. If you are only interested in the result, ignore the explanations.
Prepare to install the server
Visual Studio Code is ideal for both working with web server configuration files and writing
1.1 code. Create a web folder on drive D. Inside it, create 5 subfolders: apache, php, tmp, www and log.
It is better to install the server on a different logical drive from where Windows is installed: to avoid problems with file access rights and to avoid accidentally deleting the server when reinstalling the system. Let's take drive D as an example.
1.2. Install a text code editor. Good options: Visual Studio Code, Brackets, Atom, Sublime Text and Notepad++.
An editor is not required, but it is more convenient to work with: at a minimum, the editor numbers lines and automatically highlights code fragments in different colors. There are package managers for editors such as VS Code and Atom (and a separate one for Sublime). By installing additional packages, you will force the editor to “highlight” the code of even more languages, and also teach you to automatically indicate errors, complete expressions, and do much more. But in the end, you can also use the built-in Windows Notepad.
1.3. In the D:\web\www directory, create a file index.html with the text Hello world and a file index.php with the text .
An HTML file is needed to test the operation of the Apache HTTPD web server, which among developers is often called simply Apache or “Apache”, although this is not entirely true, because this is the name of a group of projects and the organization behind them, the Apache Software Foundation, and not just one program, but this is a forgivable mistake. If Apache is running, the words Hello world will appear in the browser in response to a call to the server. But the PHP file is necessary to check the operation of PHP, which is discussed below. If PHP is running, PHP configuration information will appear in the browser in response to a call to the server.
Checking the functionality of the web server.
To check the functionality of the web server, we will install a content management system on test.local , for example, OctoberCMS, MODX Revolution or WordPress.
To do this, download the WordPress system archive from the official page and unpack it into the directory we created
: C:\Projects\test.local\public_html
or
/home/main/projects/test.local/public_html
To install the system, you need to open the wizard. Let's open the address https://test.local in the browser. After this, answer all the wizard’s questions and click on the “Forward” testlocal database , etc..
Let's wait for the installation process to complete. Ready!
Install and configure Apache HTTPD
Apache HTTPD or simply “Apache” is most often used to process requests and send scripted responses over the HTTP and HTTPS
2.1 protocols. Download the archive with the latest version of Apache HTTPD for 64-bit Windows: httpd-2.4.38-win64-VC15.zip. Just in case, check the official Apache Lounge website for a newer version: apachelounge.com/download.
An official build of Apache for Windows is not released; builds are prepared by individual organizations, the most active of which is Apache Lounge. Apache itself runs over HTTP and works as a background process on Windows, and as a daemon on Linux, hence the name HTTPD. Apache also exists for 32-bit versions of Windows; they require the Win32 version, not Win64. The VC15, VC14 and VC11 specified in the file name indicate the version of Visual Studio with which Apache is compiled. Select the latest version and install the latest Visual Studio support files from the official Microsoft website: VC_redist.x64.exe.
2.2. Unpack the archive and transfer the contents of the Apache24 folder to the D:\web\apache folder.
It is important not to confuse anything and transfer not the entire contents of the archive, but only the contents of the subfolder named Apache24. The archive may contain readme files and other information that is not needed for the server to operate.
2.3. Open the file D:\web\apache\conf\httpd.conf. Search the file to find and change the SRVROOT value to D:/web/apache. Find and change the DocumentRoot and Directory values to D:/web/www.
Apache has several files with settings, all of them are located in the conf folder (from the word configuration, “configuration” in English). Basic settings are specified in the httpd.conf file. The ServerRoot parameter specifies the root folder of the Apache program itself, and DocumentRoot and Directory specify the root folder of the host, that is, the folder in which the site files are stored. The line numbers with parameters may change in new versions of Apache, so I do not list them, look for the parameters in the documents. To open the search box in your text editor, press Ctrl + F.
2.4. In the same httpd.conf file, find, uncomment and change the ServerName value to localhost:80.
The ServerName parameter specifies the domain name by which the host (in other words, the site) will respond. It so happened that the domain inside the computer is called localhost and this domain corresponds to the IP address 127.0.0.1. To access a site, you can use either a domain name or an IP address. Port number 80 is used on the web for the HTTP protocol without encryption. Comments in the Apache configuration file are preceded by an octothorpe (hash symbol), the server will ignore such lines.
2.5. In the same httpd.conf file, find and change the ErrorLog value to "D:/web/log/apache-error.log" and the CustomLog value to "D:/web/log/apache-access.log" common. Save the httpd.conf file with an overwrite.
As a rule, a running server produces errors. Even experienced developers rarely manage to avoid them. The ErrorLog and CustomLog parameters store the addresses of files with server error logs. If there is something wrong with the server, look at these files.
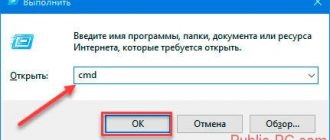
2.6. Install Apache via the command line. Open a command prompt (or run cmd in PowerShell) as an administrator and run the command D:\web\apache\bin\httpd.exe -k install.
The server will be installed right there, directly in command line mode. If all preparation went without errors, Apache will install, but will not start yet. If you want to uninstall Apache, run the command D:\web\apache\bin\httpd.exe -k uninstall on the command line.
2.7. Launch Windows Task Manager and go to the Services tab. Find Apache2.4 in the list of services, call the context menu: this way you can start, stop or restart the server. Start the server.
The Apache server files for Windows also contain the Apache Monitor program, a graphical interface whose meaning is exactly the same: start, stop and restart the Apache2.4 service. But in the latest version of Windows 10 it is much easier to get into the list of services, so there is no point in using Apache Monitor anymore.
2.8. Open your browser and type https://localhost/ or https://127.0.0.1/ - you should see Hello world.
The browser will make a request via port 80 to the same computer on which it is installed and will wait for a response. If the Apache installation went through without errors, but the response does not say Hello world, check if there is an index.html file in the D:/web/www directory and go through all the points again. If everything went well and you received an index.html file in response, then congratulations, you can already supplement it with HTML, CSS and JavaScript code and access files by host name.
2.0. Upgrading Apache is easy. Rename the D:\web\apache folder to apache_old, extract the new version of Apache to D:\web\apache, move httpd.conf from the apache_old folder to the apache folder. If everything works, remove apache_old.
What is Windows Subsystem for Linux?
Microsoft Windows 10 has a new optional feature called Windows Subsystem for Linux (WSL). It was added to the system starting with the Anniversary Update and is available only in 64-bit editions of this operating system.
WSL is a subsystem for Windows 10 OS through which you can run Linux applications. In this article we will look at how you can configure a web server (Apache, MySQL, PHP) on this subsystem for local development of web projects.
Windows 10, starting from version 2004, already includes WSL 2.
Add virtual hosts to Apache
You can use Apache Monitor to start, stop and restart Apache, but it’s just as easy to restart the Apache2.4 service directly from Task Manager
3.1. Open the file C:\Windows\System32\drivers\etc\hosts as an administrator. Add the lines 127.0.0.1 host1.localhost and 127.0.0.1 host2.localhost to it. Save the hosts file.
If the text editor cannot run as administrator in a protected Windows folder, then the host file can be copied to an unprotected folder. For example, to the Desktop, where you can edit it, save it, move it back, and confirm the operation with administrative privileges when Windows asks for them. The Visual Studio Code editor may prompt you for privileges while saving protected files.
3.2. Create folders D:\web\www\host1.localhost and D:\web\www\host2.localhost for virtual hosts. Inside each folder, create an index.html file with the text host1 and host2, respectively, as well as an index.php file with the text .
HTML files are required to test the functionality of new Apache hosts. If the host is working, then in response to a call to the host, the corresponding text will appear in the browser.
3.3. Create folders D:\web\log\host1.localhost and D:\web\log\host2.localhost for virtual host error logs.
3.4. Open the file D:\web\apache\conf\httpd.conf. Uncomment the line Include conf/extra/httpd-vhosts.conf. Save the httpd.conf file.
When Apache sees that it has access to httpd-vhosts.conf, it will no longer take into account the previously specified DocumentRoot, ServerName, ErrorLog and CustomLog parameters in the httpd.conf file. All these parameters will be taken from the virtual hosts configuration file, and the very first host specified will be considered localhost.
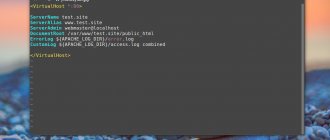
3.5. Open the file D:\web\apache\conf\extra\httpd-vhosts.conf. Describe the virtual hosts in the following notation, and then restart Apache:
ServerAdminost DocumentRoot "D:/web/www/host1.localhost" ServerName host1.localhost ServerAlias www.host1.localhost ErrorLog "D:/web/log/host1.localhost/error.log" CustomLog "D:/web/log/ host1.localhost/access.log" common
ServerAdminost DocumentRoot "D:/web/www/host2.localhost" ServerName host2.localhost ServerAlias www.host2.localhost ErrorLog "D:/web/log/host2.localhost/error.log" CustomLog "D:/web/log/ host2.localhost/access.log" common
3.6. Open your browser and go to https://host1.localhost/ and https://host2.localhost/ - you should see host1 and host2 respectively.
If you want to work with two or more projects on one computer, then it’s easy to create separate virtual hosts for each of them. Another host can be easily created by following the instructions first: create a host folder in D:\web\www, an error log folder in D:\web\log, a line with the host name in the hosts file and a VirtualHost block in the httpd-vhosts.conf file .
3.0. Preserving virtual hosts when upgrading Apache is also easy. Just don't forget to move D:\web\apache_old\conf\extra\httpd-vhosts.conf to the new apache folder.
Changing MySQL root user authentication method
To change the MySQL authentication method for the root user, follow these steps:
1. Let's start the mysql service.
sudo service mysql start
2. Connect to the MySQL server under the standard root user, which is created when installing MySQL on your computer:
sudo mysql -uroot -p
3. Click on Enter, because By default, the root user created during installation does not have a password.
4. Let's check the authentication method used for the root user.
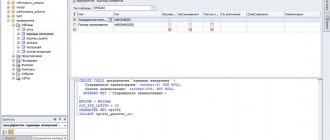
SELECT user, authentication_string, plugin, host FROM mysql.user WHERE user=”root”;
If the user uses authentication using the auth_socket plugin, then we will change this setting to use an empty password. To do this, enter the command:
ALTER USER 'root'@'localhost' IDENTIFIED WITH mysql_native_password BY ";
Let's run the FLUSH PRIVILEGES command, which will apply the changes made:
FLUSH PRIVILEGES;
Install and configure PHP
Despite high competition, PHP remains the most common server-side programming language with advanced object-oriented
4.1 capabilities. Download the archive with the latest version of PHP for 64-bit Windows: php-7.3.2-Win32-VC15-x64.zip. Just in case, check on the official PHP website to see if there is a newer version: https://windows.php.net/download/.
Please note that you need a version of Thread Safe, that is, running in multiple threads, and it must exactly match the version of Visual Studio with which Apache was compiled, for example - VC15. The bit size should also be the same as Apache, 64-bit versions are designated x64, and 32-bit versions are designated x86.
4.2. Unpack the archive and transfer all its contents to the D:\web\php folder.
4.3. Open the file D:\web\apache\conf\httpd.conf. Find a section of the file with many lines LoadModule and at the very end add two lines, the first - LoadModule php7_module "D:/web/php/php7apache2_4.dll", and the second - AddHandler application/x-httpd-php .php.
A separate section of the Apache configuration file is dedicated to modules that expand the capabilities of the server. The lines could be specified anywhere, but it is customary to indicate them in this section. Here we supplement the server functionality with the PHP library and specify the file extensions for this language - .php. There are hundreds of other popular and useful modules that greatly improve the performance of Apache.
4.4. In the same httpd.conf file, immediately after the LoadModule section, add the line PHPIniDir “D:/web/php”.
The PHPIniDir directive specifies the address of the php.ini file. This file contains many important settings for PHP itself: acceptable file sizes for processing, script runtime limits, user session parameters, and much more.
4.5. In the same httpd.conf file, find and change the DirectoryIndex value to index.php index.html. Save the httpd.conf file with an overwrite.
4.6. Restart Apache, open your browser and go to https://localhost/ or https://127.0.0.1/ - you should see PHP and Apache configuration information.
This means you did everything right.
4.7. Open the file D:\web\php\php.ini-development and save it as D:\web\php\php.ini.
Initially, php.ini is missing for security reasons; the server owner must create and verify it himself.
4.8. In the D:\web\php\php.ini file, find, uncomment and edit the following parameters: parameter extension_dir = "D:/web/php/ext", parameter sys_temp_dir = "D:/web/tmp", parameter extension=mysqli , parameter extension=mbstring, parameter date.timezone = Europe/Moscow (specify your time zone in accordance with the documentation php.net/manual/ru/timezones.php). Save php.ini and restart Apache.
While PHP works as an extension to Apache, PHP itself also has many important and useful extensions in the form of libraries, many of which come bundled with PHP; Before connecting these extensions, you must specify their address in the extension_dir parameter. During the operation of most popular scripts, temporary files are created; you must specify the folder for these files in the sys_temp_dir parameter. One of the most popular extensions is mysqli, a standard library for PHP that allows you to connect to databases running MySQL. When working with databases, you often need to split or assemble strings of several megabytes, for which the mbstring library will be useful. Also, do not forget about your time zone - it is specified manually. With this minimum set, you can run scripts in PHP, although you do not yet have a local database.
4.0. Updating PHP is easy. Rename the folder D:\web\php to php_old, extract the new version of PHP to D:\web\php, move php.ini from the php_old folder to the php folder. If everything works, remove php_old.
How to install phpMyAdmin on Windows
Download site for phpMyAdmin: phpmyadmin.net.
Direct link to the latest version: phpMyAdmin-latest-all-languages.zip.
Copy the contents of the just downloaded archive into the c:Serverdatahtdocs Rename this folder to phpmyadmin .
In the c:Serverdatahtdocsphpmyadmin , create a file config.inc.php and copy there:
root as the username . Leave the password field empty .
Install and configure MySQL
Today MySQL is developed by Oracle, which offers other database servers, but MySQL remains the number one choice for small and medium-sized sites
5.1. Download the latest version of MySQL Installer for Windows: mysql-installer-community-8.0.15.0.msi. Just in case, check on the official MySQL website to see if there is a newer version: dev.mysql.com/downloads/windows/installer/.
Please note that this is an installer only and is built for 32-bit Windows. Already during the installation, you will choose which version of MySQL you need: for 64- or 32-bit systems.
5.2. Install MySQL Installer. The program will install without any unnecessary dialogs and will immediately start with a proposal to accept the license agreement and install MySQL itself. Accept the license agreement.
The installer will be useful in the future for updating MySQL - MySQL itself cannot be updated. If the installer interferes, you can remove it and install it again when you want to update MySQL. The program can easily detect the installed version of MySQL and offer to update it. New minor versions of MySQL are released quite often, so it’s a good idea to check the installer periodically. However, when a major update is released, you may need to completely remove and reinstall both MySQL itself and the MySQL Installer.
5.3. Select the Custom type at the Choosing a Setup Type stage and click Next.
Other installation types include a large number of programs that may not be useful. At any time, you can restart the installation and add English documentation, examples, the MySQL command line, a proprietary visual editor, universal ODBC drivers, and more.
5.4. Select MySQL 8.0.15 – X64 from the MySQL Servers tree list in the Available Products field, click the arrow to move this item to the Products/Features to be Installed field, click Next, confirm the installation of the redistribution Visual Studio by clicking Execute, click Next, click Execute again to install the server and proceed to the configuration by clicking Next twice more.
A lengthy installation procedure is only needed to eliminate ambiguities and double-check each component a hundred times, because the database server may turn out to be the most critical link in the infrastructure.
5.5. Select Standalone MySQL Server in the first step of the installation configuration dialog.
In MySQL version 8.0, it became possible to install a test cluster for InnoDB databases, but this is a highly specialized task, not for a wide range of novice enthusiasts.
5.6. Leave the default settings in the second step and click Next.
If you have a small database, it is better to leave Development Computer in the Config Type field. If the database is large and requires a lot of RAM, look at other options. In the Connectivity form, it is still better not to change anything.
5.7. Select Use Legacy Authentication Method in the third step and click Next.
The new method of authenticating the login and password for accessing the MySQL server is much more reliable, but in 2020 few website engines support it.
5.8. Create a password for the root user of the server in the fourth step, the easiest way is to use the same password - root, and click Next.
There is no one on the local computer to hack you; the complexity of the password does not matter. Additional users are also unlikely to be needed.
5.9. Uncheck Start the MySQL Server at System Startup in step five, and click Next.
It makes sense to uncheck this box if you do not need MySQL with all its databases to hang in RAM from the very start of Windows. If you don’t mind memory, and you don’t forget to stop the MySQL80 service when you don’t need it, you can leave autoloading.
5.10. Click Execute. MySQL server will be installed and running. Click Finish to exit the MySQL installer - you will be returned to the MySQL Installer, click Next and Finish there.
Launch Windows Task Manager and see mysqld.exe in background processes (d stands for daemon, an analogue of Windows processes in Linux systems). Open the Services tab and you will see a service called MySQL80, which you can stop and start by right-clicking. Congratulations, you have installed the MySQL DBMS and it’s time to connect to it.
5.0. Updating MySQL is even easier. Install or run the already installed MySQL Installer and check for updates. And if you need to find the database files themselves running MySQL, for example, for transferring to a new major version, you will find them along the path C:\ProgramData\MySQL\MySQL Server 8.0\Data.
Installing XAMPP
Let's start installing the XAMPP Web server assembly, it is simple, so there should be no problems.
Step 1
Run the downloaded file xampp-win32-5.6.8-0-VC11-installer.exe . The first window of the installation program is the welcome window, click “Next”.
Step 2
Next, select the components that need to be installed, by default everything is selected, but if you do not want to install something, i.e. You don’t need this, then you can uncheck the corresponding item, for example, I don’t need Perl, click “Next”.
The note! Advantages of different types of hosting: choose the best option for your website.
Step 3
Then select the directory in which we will install XAMPP, I will leave it as default, click “Next”.
Step 4
At this step, we can leave or uncheck the “Learn more about Bitnami for XAMPP” checkbox; I unchecked the checkbox and click “Next”.
Step 5
Everything is ready for installation, click “Next”.
The installation has started.
After the installation is completed, we will be prompted to immediately launch “Control Panel”, click “Finish”.
That's all, we have launched the XAMPP control panel.