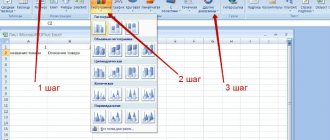
Greetings, dear readers! Fedor Lykov is in touch. In today's article we will discuss the question of how to make a shadow in Photoshop.
What exactly is this shadow? This is an optical phenomenon that occurs due to the presence of an object between the surface and the light source. The figure and contours will be identical to this very object.
The ability to create shadows will be very useful when creating certain collages, when you add, for example, an object or person to a photo and want it to look realistic. The same applies to objects that in a real environment would cast a shadow from a light source.
Fortunately, Adobe Photoshop is not in vain considered one of the best programs for graphic design and it has several options for forming the cast shadow of objects, depending on your goals. Today we will look at several examples at once.
Before that, I want to recommend that you read an earlier article on the topic of image editors. There I talked about the difference between raster and vector graphics, giving examples of programs that work with them. In general, very interesting.
We will no longer dwell on the introduction and move directly to the topic of our article. Happy reading!
Creation options
So, we have the opportunity to create a shadow using automated program tools, and we can also draw it manually. Each of the methods has its own application, because it is not always advisable to try to select an object and make a separate layer out of it in order to be able to use the blending tool.
Let's take a closer look at the methods:
| Method name | Description | Usage |
| "Shadow" in layer blending options | The tool creates an outer shadow to which you can apply various options | When there is an object, person or any other object as a separate layer. One of the most convenient ways to create shadows. |
| "Inner Shadow" in Layer Blending Options | The formation of a shadow inside an object, to which you can apply different parameters. | Used to create a three-dimensional effect on two-dimensional objects, and can also be useful for casting a shadow on one side of an object. |
| Manual rendering | We draw the outline of the shadow ourselves. | When the previous methods are not suitable or when it can be done this way better and more accurately. |
As you may have noticed, the same layer overlay options window is used here as in the previous article, in which we looked at how to make a stroke. I recommend reading it if you haven't already.
Let's start looking at these options in order using the version of Photoshop CC 2020, which is the latest at the moment, but there is no difference in the algorithm of actions. Therefore, for versions younger (cs6, cs5, etc.) this instruction is also suitable.
Shadow mask
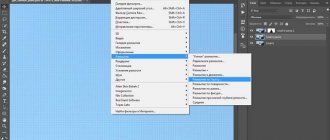
To create a shadow mask in Photoshop, you need to copy an image directly onto the background on which it will be displayed. Next, you need to deform the object by pressing Ctrl+T . Then you should open the “ Layer ” option and in it “ Layer Mask ” - “ Show All ”. a white triangle will appear in the layers panel ; this is the “ Layer Mask ”.
Editing the mask occurs only after clicking on the designated thumbnail. Next, you need to select the “ Gradient ” tool, where you need to click on the black and white gradient. This way you can get the effect of a disappearing shadow.
Making a Shadow Using Layer Blending Options
So, for this we need an object on a separate layer. Accordingly, either use the selection tools and move it to a separate layer (Ctrl+J), or you will need a png format object. This format supports transparency, and therefore the background has transparency.
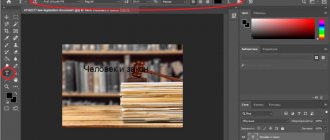
For example, I did just that and found a photo of a person in png format on Google. Next, I made a request for “Street” and found a photo from Moscow. An example would be the shadow of a person on the ground.
So, now we have a finished composition. Open both in Photoshop. The street photo will serve as the background, and we will need to insert a person.
This option will be used similarly for any other objects, for example, to display the shadow of an object below.
I immediately noticed that in the photo of a person the light falls from the right side, and in the photo of the street - from the left. So we need to flip this guy's photo horizontally. Also change the size depending on where we want to put it.
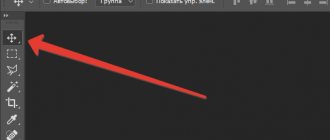
The “free transform” tool will help us with this. To enter it and control exactly the size of the man, select the layer with it and press “Ctrl + T”.
As you can see, the photo is now framed and with this frame we can change the size. To maintain proportions when zooming in, hold down the Shift button and drag the top right corner.
To flip, right-click on the photo inside the frame and select Flip Horizontal. This is what you should get:
Now let's create the shadow. To do this, double-click with the left button on the layer with the person or right-click and select “overlay options” from the menu.
Here we need the “Shadow” item. Select it, check the box on the left and start configuring.
Here you can play with the settings. We will need to immediately set the opacity to about 50% (depending on the situation in the photo), the size (otherwise the shadow will be too clear) and the angle, which depends on the light source. In our case, it falls from left to right, which means we select it as in the picture.
To visually see the settings, move the shadow a little with the “offset” slider, but then return it back.
Once you apply all the settings and save, go back to the “layers” tab and right-click on the “shadow” item and select “form layer”. In the confirmation window, confirm your action.
This will transfer the shadow to a new layer, and we can already place it in the right place.
Now, select it and move it to the side for scaling. To do this, we will again use “free transformation”. Let me remind you that to do this you need to press the key combination Ctrl+T. We'll need to rotate it to the side and place it directly under the guy. It also makes sense to reduce the width of the shadow, since the light comes exactly from left to right.
This is how it turned out for me.
You can adjust transparency using the items at the top of the “layers” menu using the “opacity” and “fill” parameters.
This is how you can make a shadow from a person in Photoshop. But in this way it is quite possible to make very stylish text. So, let me show you clearly.
This is all done in the same way as above. It is not always necessary to create a separate layer to come up with a beautiful design.
Create a text layer using the “T” tool and after writing the desired phrase or word, go to the “Blending Options” in the same way.
A good result can be achieved by adjusting the parameters inside this window. With this, we briefly figured out how to cast a shadow from the text.
Binding the Shadow
If an object is mounted on an uneven surface, for example on sand, stones, rocks, water, then it becomes necessary to deform the shadow so that it follows the relief of the background image. To implement this technique, you should use a displacement map - a halftone image created from a background image.
Let's consider the algorithm for creating the montage shown in Fig. 4.
Rice. 4. An example of a shadow that follows the curves of the curtain
Rice. 5. The result of creating a blank for a tit’s shadow
- Let's assume that both source images are combined, a shadow based on the tit image is created similarly to the previous example (Fig. 5). Now you need to deform the tit's shadow so that it follows the curves of the curtain.
- First you need to create a displacement map based on the alpha channel. To do this, you need to activate the background layer, select the entire image by pressing the key combination Ctrl + A (in Mac OS - Command + A). Copy the image to the clipboard using the keyboard shortcut Ctrl + C (in Mac OS - Command + C). Go to the Channels palette, create a new alpha channel by clicking the blank sheet icon, and paste a background image from the clipboard using the keyboard shortcut Ctrl + V (in Mac OS - Command + V). Remove selection.
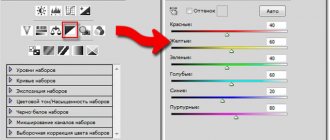
- Now you need to increase the contrast of the halftone image. To do this, you can use the Levels dialog box. To increase contrast, you should move the black slider to the right, the white slider to the left, but the position of the gray slider does not need to be changed. To blur a halftone image, you can use the Gaussian Blur filter. The result is shown in Fig. 6.
- When the alpha channel is changed, you can create a new file based on it. By right-clicking on the alpha channel line, you need to call up the context menu and select the Duplicate Channel command from it. In the dialog box that appears, select New from the Document list. Confirm the creation of the file by clicking OK (Fig. 7).
- The created document must be saved in PSD format on your hard drive. This is the displacement map. This file will be used in the future to work with the Displace filter. The created alpha channel is no longer needed, so you should delete it and go to the Layers palette.
- Having activated the layer with the shadow, you need to apply the command Filter (Filter) -> Distortion (Distort) -> Displace (Displace) to it. Enter values in the Horizontal Scale and Vertical Scale fields, for example 20%. The values of the remaining switches should not be changed (Fig. 8).
Rice. 6. An example of an alpha channel based on which a displacement map will be created
Rice. 7. Dialog box Create Duplicate Channel
Rice. 8. Offset filter dialog box
As a result of applying the filter, the shadow was distorted (Fig. 9). And finally, for the shadow layer, you can change the blending mode to Multiply, reduce the opacity value, for example, to 90%, blur the image a little and remove unnecessary shadow fragments.
Rice. 9. Distorting Shadows Using the Displacement Filter
Inner shadow
An equally important setting item. Most often suitable for text and creating volume, but I often use this function to create shadows on the face. For example, if you have a photo of a person and you want to make a composition with him, as in the option above, but his face is completely light.
In this case, you have the light source on the left. So the right side needs to be darkened, right? On the last photo of the street I added another person, but with a completely light face.
With this option I will add a shadow to the right side. To do this, I set the following settings:
In general, it is still better to draw the shadow on the face by hand, but more on that later. To create volume for two-dimensional objects, this function is much more suitable.
I show this using an example text. Add a text layer as before. It is better to use thicker fonts for clarity. This is the text you can get if you use this parameter:
If you combine this with the “Embossing” and “Outline” items, you can really make voluminous text. We’ll talk about these settings another time, but now let’s move on to see how to make a shadow in Photoshop.
Practical recommendations for beginners before starting work
Dilute the density of the black shade with related tones;
Take into account the distance of the shadow to the image (the closer it is, the brighter, the further away, the dimmer);
Studying the angle of incidence of the shade in reality, since you need to create a shadow from an object in Photoshop as naturally as possible;
Manual drawing with a brush
This option is suitable when it is not possible to select objects or the quality of the automated capabilities does not suit you. In general, most often the shadow on the face is drawn by hand.
You don't need any special skills for this. Load the photo into Photoshop and create a new layer. This is done using the small button on the layers panel at the bottom or using the keyboard shortcut Shift + Ctrl + N.
Now take the “Brush” tool with the corresponding logo on the toolbar. And now we just draw in black! Make sure you are on the created layer.
After you draw, you will need the already mentioned “opacity” scale. For shade, it should be in the range of about 30 to 50 percent.
This is what it will look like without setting transparency. To get a good and high-quality result, try to draw the shadows much better than I did. I'm just showing an example.
This is what it will look like with the opacity set to 40%. Similarly, everything is done with a brush and with other objects.
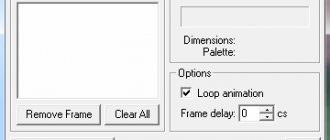
2 Method. Creating shadows using brushes
Let's take the background image and first neutralize the colors to reduce the impact of the blue tint.
Step 1 - Neutralize the Color
This method is useful when there are excess shades of the same color and will not always be necessary. You can skip this point if there is no such problem. Go to the top menu Image
further
Correction
and
Select color
.
In the window that opens, click the checkbox in the Neutralize
Neutralize the color
On the left is the original, on the right is the modified version of the picture.
Step 2 — Create a Layer and Draw a Shadow
Now move the picture with the object to the background image and name the new layer, for example, “Man”. Create a new layer using the keyboard shortcut CTRL+SHIFT+N and in the pop-up window click “OK”, name the layer “man’s shadow” and lower it under the “Man” layer
Create a new layer
Create a shadow manually, for this we select a brush with parameters B and select size 50
(you can adjust it yourself)
Opacity 15%
,
Pressure 25%
Main color black. We begin to apply dark shades with a brush to the areas behind the man.
Setting up the brush
The shadow will be diffuse, emphasizing only the silhouette.
We need to apply individual brightness/contrast to the “Man” layer. To do this, on the right side of the layers menu, click on the half-filled circle icon and select the “Brightness/Contrast” line, hold down the ALT key and move the cursor to the “Man” layer and a down arrow will appear.
Select the “Brightness/Contrast” layer and at the top above the layers panel set the necessary parameters so that the picture matches the background image.
Create a new layer using the keyboard shortcut CTRL+SHIFT+N, call it “shadow” and apply it only to the “Man” layer.
On this layer we will darken the man himself. This method is convenient because in case of errors we can always delete the layer and create it again without changing the main images.
Select the “shadow” layer, brush B with parameters size 30
(you can adjust it yourself)
Opacity 15%
,
Pressure 25%
Main color black. We begin to apply dark shades with a brush behind the light area. For example, we can compare the result with and without shadows.
Lighting an object from behind
In order to create illumination of an object or object from behind, you will need to use the “ Perspective ” command, as well as the “ Gaussian Blur” filter. The algorithm of actions is simple, but requires consistency. So:
- First of all, you need to combine both images and accordingly create an additional layer with a shadow. To do this, you need to select the layer using commands such as: “Editing” - “Transform” - “Flip Vertical” . Then you should use the “ Move ” tool available on the program panel and move the shadow down.
- Then execute the “ Editing” - “Transform” , but also add the “ Perspective ” command. Next, you need to use the lower left corner marker and drag to the left, and the upper left corner, respectively, to the right. It should also be said that to freely transform an image, you can use the key combination Ctrl + T (for Mac OS - Command + T). By pressing the indicated keys, you must move the boundaries of the frames that appear, but you should do this so that the upper boundary does not go beyond the corresponding limits. To complete the started transformation, you need to click on the Enter key.
- The next step is to blur the shadow . You can blur if you use the following commands: “Filter” - “Blur” - “Gaussian Blur” .
- Next, you need to make a perspective blur of the shadow by moving the selection frame, thanks to which you can blur a specific fragment. To complete the effect, remove the selection. To do this, press the key combination Ctrl + D and be sure to reduce the opacity of the layer.
Gradient in Photoshop - what is it and how to use it
In conclusion, it should be said that the presented methods of adding a realistic shadow in Photoshop are not difficult, but in order to achieve the desired result, you will have to initially practice using various tools.
Creating an Object
Step 1
Create a new document in Photoshop (Ctrl + N) sized 750x750 px and fill the background layer with color #cf3f30.
Step 2
Select the Rounded Rectangle Tool (U), configure it as shown in the screenshot, and create a square shape measuring 450x450 px.
Step 3
Using the Horizontal Type Tool (T), write two lines of text using different fonts.
Step 4
Open the Character panel (Window ? Character) and configure the font as shown in the screenshot.
Step 5
Select all three layers, select the Move Tool (V) and click on the Align horizontal centers button in the top panel.
From development to digital technology
Dodging and burning is a traditional darkroom printing technique that is used to give certain areas of a printed image more or less exposure. The goal of the method is to restore lost information, usually caused by high-contrast exposure.
This technique can be easily applied in Photoshop and will help you restore your images. Have you ever taken photos with overexposed highlights? Or landscapes with lost detail in the shadows? This technique is a lifesaver for such situations and can be used in all tonal corrections of certain areas of images.
In the image above that I used as an example, the lentils and chicken underneath the fried egg were too dark and I was losing some important detail. Also notice how the white areas of the egg and the edge of the white napkin are overexposed. Dodging and burning will help correct these two problems.
First I'll lighten the dark areas.
What are shadows for?
In nature, shadows emanate from any object, animate or inanimate. They look different, depending on the size of the object, the strength of the light source, and its distance from the object.
In sunlight outside, objects produce clearly visible shadows. Indoors, the shadow of objects appears with barely visible contours.
By adding reflection to our work in Photoshop, we make it natural and voluminous. As a result, the final picture or collage with shadows turns out much more interesting than without them.
Natural shadow in a minute
While on the layer with the created effect, you need to right-click on the word “effects”. In the drop-down menu, find “Create a new layer”.
By clicking on this function, we will get our shadow as a separate layer. Using transformation, select “Distortion” and change the resulting shape as you like.
To make a shadow for text in Photoshop as if the text is convex/concave, layer styles are also used.