Control
Activity
The active image is the one that is currently being worked on. To activate, you need to left-click on the image thumbnail once.
Moving
The location of an object on the palette can be changed. To do this, hover the cursor over it, hold down the left mouse button and drag to the desired location.
Renaming
To set a new name , double-click on the image name, enter a new one and press Enter.
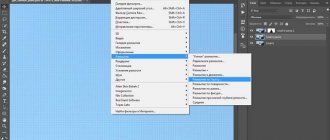
Grid in Photoshop - how to enable, configure and use
Creating a duplicate
A copy is created using the hotkeys Ctrl+ J or by dragging an object onto the create icon.
Gluing layers
You can think of merging as a safer version of merging because it allows the newly created merging to appear on a new layer, leaving the originals intact. You will just need to turn off the visibility of the sources so as not to interfere. Then at any time you can always return to them.
Scientifically, this action in Photoshop is called Print Layers
.
There are two ways to glue layers in Photoshop.
.
Gluing selected
The command can only be accessed using the hotkeys Ctrl+Alt+E. First you need the layers that you want to glue together.
To avoid confusion, the new layer will automatically be prefixed to the name “United”
.
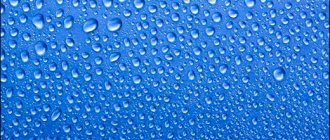
For example, you need to glue layers 2 and 4. Select them in the palette using the Ctrl key held down:
Then we use the hotkey combination:
Bonding visible
Turn off the visibility of the layers you don't want to stamp by clicking on the visibility icons and then pressing Ctrl+Shift+Alt+E.
Alternatively, you can also hold down the Alt key while selecting the command.
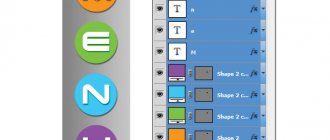
For example, you need to glue layers 3 and 4, which means you need to remove the visibility icon from the rest:
Now either press the hotkey combination, or you can call up the context menu and, while clicking on the command, hold down the Alt key.
The result will be gluing while preserving the originals:
How to make a transparent layer
Most beginners are interested in how to make a certain design element transparent? These settings are at the top of the Layers panel - Opacity and Fill . Both settings make the layer transparent. At first glance, the difference between them is not clear. Nevertheless, it is there.
- Opacity - removes the visibility of the entire layer.
- Fill - removes the visibility of only the fill content of the layer, but leaves everything else visible.
While we are dealing with a regular layer, this “everything else” that Fill does not bother us at all. to use Fill only when we want to reduce the visibility of a layer, but not touch the layer style effects, if any. In all other cases you need to use Opacity . more about the differences between Opacity and Fill in the article Advanced blending modes - Opacity and Fill .
An interesting detail: it seems that if Opacity and Fill are set to 50%, the layer should disappear. After all, each setting took away half of his visibility. But together these settings work differently. First we set it to 50% of one of the Opacity or Fill . This will remove 50% of absolute visibility. The following setting will remove 50% of the 50% already removed. That is 25%. Thus Opacity 50% and Fill 50% equal a total of 75% invisibility.
How to group layers?
Sometimes there are so many layers that they need to be grouped somehow. If you are designing a website, there can be hundreds of elements. The same goes for a complex poster or cover. To group layers, select the desired layers in the Layers and press CTRL+G . In any vector program, this shortcut groups objects into one block. In Photoshop, this shortcut creates a special folder and puts all the layers into it.
You can also create an empty folder from the Layers panel. To do this, click on the folder icon. And drag the layers into it manually. To ungroup layers press CTRL+SHIFT+G or Layer > Ungroup Layers.
When deleting a group, Photoshop wonders what exactly needs to be deleted? Group and content or just Group?
And, of course, ALT + clicking on the group icon brings up the group dialog box, which you are unlikely to ever need.
Working with layers
Shift + Ctrl + N – create a new layer
Ctrl + J – create a layer by copying
Shift + Ctrl + J – create a layer by cutting
Ctrl + E – merge layer with bottom layer
Shift + Ctrl + E – merge visible layers
Ctrl + ] – raise the selected layer one level
Ctrl + [ – lower the selected layer one level
Shift + Ctrl + ] – make the selected layer the top one
Shift + Ctrl + [ – make the selected layer the bottom one
New items in the Premium section
499
Collaging
Collage “At a masquerade”
0 0
499
Working with photos
Artistic processing by Madina Akhtaeva. Series "Summer"
0 0
99
Web and applications
We create a form for ordering air tickets
12 791 212
499
Collaging
Collage “An unusual walk”
0 0
99
Web and applications
Creating an order form
18 873 292
99
Working with photos
We do artistic retouching of a portrait
26 903 374
- part of the Photoshop Master website, where 60 video lessons and 36 express courses from professionals await you.
You can buy them separately, or you can subscribe to the entire section (from 5 rubles/day).
Layer Lock Modes
A novice user may encounter a situation in which the layer does not respond to his actions. Does not move, cannot be manipulated. Most likely the layer is locked. Layer lock modes are at the top of the Layers panel . There are four of them in total. Some of them prohibit specific commands, others all together.
- Lock transparency pixel - from the name it is clear that this setting prohibits manipulation of invisible pixels. That is, the layer can be moved, deleted or modified. But you cannot change the invisibility information. These pixels are blocked. In practice, this is convenient to use if you need to tint the elements of a layer without touching invisible areas. Usually we create a selection to work only on the selected area of the layer, but Lock transparency pixel is a good alternative. Artists must have. It only took me a couple of mouse movements with a wide, soft-edged brush to create a semblance of shadows without affecting invisible areas.
- Lock image pixels - prohibits changing all pixels. Both visible and invisible. That is, you can move it, but you cannot change the content of the graphics. Brushes, stamps, gradients and other editing and retouching tools. Everything is prohibited.
- Lock position —it is forbidden to change the layer position. The layer cannot be moved. His location is recorded. Everything else is possible. It is convenient to use, of course, in cases where a lot of time was spent finding the right place for the layer, and it is very undesirable to accidentally move it. On the other hand, the layer must be editable.
- Lock All - and of course the simplest thing - completely locking the layer. You cannot move or change the graphics.
A locked layer is marked with a special lock icon. Therefore, it is very easy to determine which layer is locked and which is not.