In fact, replacing a face in Photoshop is not that difficult. We will use an image editing method that will allow you to quickly and believably change the face of one person to another. This method is useful for beginners who do not know how to change a face in Photoshop. If your level of proficiency in the program is still low, first of all, it is worth considering a number of rules:
- The face should look straight;
- The lighting is placed on one side in the same way in both photographs;
- All facial features should be easily distinguishable and not obscured by hair or due to the rotation of the head.
In this article we will learn the technique of “How to put a face on a face in Photoshop”
in just 10 simple steps.
Quick navigation:
- #
Opening a file - #
Selecting the face you want to change - #
Copying an image - #
Inserting an image - #
Resizing an Image - #
Copying a new background layer - #
Creating a clipping mask - #
Setting up a clipping mask - #
Removing unnecessary parts - #
Merging layers
Retouching skin in Photoshop
Retouching a photo in Photoshop involves removing unevenness and skin defects, reducing oily shine, if any, as well as general image correction (light and shadow, color correction).
Open the photo and create a duplicate layer.
Processing a portrait in Photoshop begins with neutralizing oily shine. Create an empty layer and change its blending mode to “Darken” .
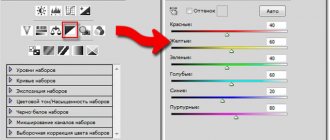
Then select a soft “Brush” and configure it as in the screenshots.
ALT key and take a sample of the color in the photo. We choose the shade that is as average as possible, that is, not the darkest and not the lightest.
Now we paint over the areas with shine on the newly created layer. Once the process is complete, you can play with the transparency of the layer if it suddenly seems that the effect is too strong.
Tip: it is advisable to perform all actions at 100% photo scale.
The next step is to eliminate major defects. Create a copy of all layers using the keyboard shortcut CTRL+ALT+SHIFT+E . Then select the Healing Brush . Set the brush size to approximately 10 pixels.
Hold down the ALT and take a skin sample as close to the defect as possible, and then click on the irregularity (pimple or freckle).
In this way, we remove all unevenness from the model’s skin, including the neck and other open areas. Wrinkles are also removed using the same method.
Next, smooth out the model’s skin. Let’s rename the layer “Texture” (you’ll understand why later) and create two copies.
Apply the Surface Blur .
Using the sliders we achieve smoothness of the skin, just don’t overdo it, the main contours of the face should not be affected. If minor defects have not disappeared, it is better to apply the filter again (repeat the procedure).
Apply the filter by clicking "OK" and add a black mask to the layer. To do this, select black as the main color, hold down the ALT and click the “Add vector mask” .
Now select a soft white brush, set the opacity and pressure to no more than 40% and go over the problem areas of the skin, achieving the desired effect.
If the result seems unsatisfactory, the procedure can be repeated by creating a merged copy of the layers using the combination CTRL+ALT+SHIFT+E , and then applying the same technique (layer copy, Surface Blur , black mask, etc.).
As you can see, we destroyed the natural texture of the skin along with the defects, turning it into “Soap”. This is where a layer called “Texture” .
Create a merged copy of the layers again and drag the “Texture” on top of all of them.
Apply the Color Contrast .
Use the slider to ensure that only the smallest details of the image are revealed.
We desaturate the layer by pressing the combination CTRL+SHIFT+U and change its blending mode to “Overlay” .
If the effect is too strong, then simply reduce the transparency of the layer.
Now the model's skin looks more natural.
Let's use another interesting technique to even out skin color, since after all the manipulations some spots and unevenness in color appeared on the face.
Call the “Levels” and use the midtone slider to lighten the image until the color is equal (the spots disappear).
Then we create a copy of all layers, and then a copy of the resulting layer. We desaturate the copy ( CTRL+SHIFT+U ) and change the blending mode to “Soft Light” .
Gaussian Blur filter to this layer .
If the brightness of the image is not satisfactory, then apply “Levels” , but only to the decolorized layer by clicking on the button shown in the screenshot.
By applying the techniques from this lesson, you can make your skin perfect in Photoshop.
We are glad that we were able to help you solve the problem. Add the Lumpics.ru website to your bookmarks and we will be useful to you. Thank the author and share the article on social networks.
Describe what didn't work for you. Our specialists will try to answer as quickly as possible.
Did this article help you?
NO
2Selecting the face you want to change
On the left side of the toolbar, select Lasso.
or by pressing the L key on your keyboard. Carefully outline the eyebrows, nose and lips as shown in the picture.
selecting the contour of the face
To correctly replace a face in Photoshop, when selecting a contour, clearly outline the facial features and do not capture areas of the skin in order to get a realistic result.
When you're done, you'll have a flashing dotted line.
Installation process
After choosing a photo, we proceed to replacing the face:
- Open both images in Photoshop.
- Select any area selection or Lasso with the function you like. If “Lasso” is used, then the feathering should be set to a value of 5 . Using these tools, select the face that needs to be cut out. You can’t trace very carefully, the main thing is not to include the ears and the upper part of the forehead. After finishing the selection, copy the resulting area by pressing CTRL+C.
- In the second photo, create a new layer by pressing Ctrl + Shift + N and paste the selected area into it using the standard keyboard shortcut Ctrl + V.
- Now you need to align the cut out area with the object's head. To do this, reduce the opacity of the fragment to 50-65% and combine the eyes. Use the “ Free Transform ” option by pressing CTRL+T. When transforming, hold SHIFT to maintain proportions. You want to achieve the best possible overlay.
- Using the “ Eraser ”, trim the inserted face and raise the opacity to 100%.
- After the “rough” processing, we will move on to more subtle correction. You want to achieve as natural a look as possible. Create a new adjustment layer in the layers panel and click on the “ Hue” option. Saturation ." A window will pop up in which you need to check the box “ Use the previous layer to create a clipping mask ” and confirm. The same should be applied to the “ Brightness” layer. Contrast ."
- Using an eraser, a brush and a slight blur we achieve maximum naturalness of the resulting image.
- In the resulting image, you can adjust the complexion by creating a “ Color Tone” layer. Saturation ." In it, changing the parameters, we get a beautiful color.
- Create a duplicate layer . In the “ Images ” menu, find the “ Correction ” and “ Levels ” items. They can be used to remove shadows and make a photo brighter.
Undoing recent actions in Photoshop - using history and additional tools
This way, you can change the face in a photo and play a prank on your friends.
5Resizing an image
Adjust the layer to 30%
opacity so you can see underneath the layer.
change the transparency
Using CTRL + T position the face, aligning the eyes and mouth and stretching as necessary to match them as closely as possible. To change the scale proportionally, hold down the Shift key and drag the corner of the picture. If you hover over the corners of the image, rotary switches will appear that allow you to rotate the image.
To carefully change a face in Photoshop you will need a little patience. Finding a position that looks as natural as possible is one of the main difficulties.
How to smooth skin in Photoshop, retouch and remove acne
Once you have decided on the position, press Enter to complete the placement. If you don't do this, your efforts will be in vain.
change the size of the face picture
Then adjust the transparency back to 100%
Stage #1: Preparation
See also: “How to add a photo to Photoshop”
- First, as usual, you need to open both photos in Photoshop.
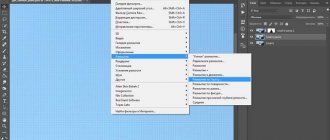
- Afterwards, go to the main menu "Window" -> “Arrange” and choose “Place everything vertically”.
After applying the ordering, you will see two windows with open images:
- You need to make sure that the tool is selected in the toolbar “Move”
and, holding down the SHIFT , drag the second image into the document with the first.
Lesson: “Inserting an image in Photoshop: a step-by-step guide”
6Copying a new background layer
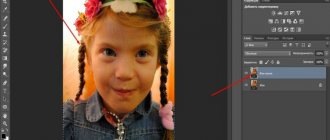
Then you will need to copy your background layer. From the Layers menu, select the background layer, then right-click and select Duplicate Layer.
or you can use the keyboard shortcut by pressing CTRL + J. Rename the copied layer to “body” because it will make up the majority of your final photograph. And then click on the eye icon to hide the main background layer.
create a duplicate layer
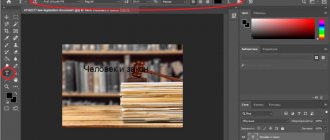
Editing.
Using the straight-line lasso tool, we designate the area that we will transfer, and right-click to copy it to a new layer (or Ctrl+C and Ctrl+V).
For convenience, we make the area inserted on top semi-transparent in order to determine the size and position of the overlaid image. If necessary, by transforming (Ctrl+T) and moving we achieve the desired size and position of the top image. It is desirable that the features of one and the second person approximately coincide. In this case, I had to increase the overlap a little to hide unwanted details on the lower face. Apply size transformation and look at the defects.
Using the ERASER tool, carefully clean up the excess areas of the top photo card along the edges of the area. If it is necessary to leave some part of the lower layer - for example, the eyes, then, accordingly, remove the eye area of the upper layer with an eraser. In our example, we don’t do this and retain all the features of the upper face. Adjust the eraser parameters in the properties panel: opacity about 60%, softness should be applied according to the situation - where you need a smooth transition - a soft brush, where sharp (along the edge) without softness. Using an eraser, we achieve the smoothest transition between the properties of the skin of the upper and lower face. Make the top layer opaque and check the differences between the layers. In this case, in the IMAGE – CORRECTION drop-down menu, you need to slightly remove the saturation of the top layer and slightly reduce the brightness.
As a result, we got a handsome young man. Now it's the other way around. Using the same techniques, we insert the face from the boy into the girl. Thus, by erasing and working on skin color, you can combine individual areas: eyes, lips, nose, etc. from one photo card to another. Examples in my gallery.
The video shows a practical example of how to insert a face in Photoshop.
7Creating a clipping mask
On the right side of the layers menu, click on the face layer that was inserted while holding down the CTRL button. The selected outline of the face appears.
highlight the contour of the face
And then hide this layer by clicking on the eye icon
After all this is done, there will only be one visible layer “body”
with outline.
How to do face retouching for free in Photoshop
Remove major blemishes (pimples, blemishes) before getting a free face retouch. Then create a copy of the layer. You can rename it “Sharpness”.
The following actions must be applied to this layer:
- “Filter” – “Other” – “Color Contrast”
- In the window that opens, set the indicator so that the skin texture is visible. In our case – 3.2
- Click “OK”
- In the layer blending option, select “Overlay”
This layer needs to be disabled for a while. Do this by clicking on the “Eye” icon next to the layer.
Go back to the very first layer and duplicate it again. This time calling it, for example, “Blur”.
Do this with this layer:
- “Filter” – “Blur” – “Gaussian Blur”
- Set the same value as when adding a filter to the previous layer. That is, in our case – 3.2
- Click “OK”
- Stay on this layer. Activate the Mix Brush tool. Please note that the 4 indicators in the panel at the top should equal 20%
- Choose a convenient brush size
- Aim at any area of the face
- Hold down the Alt key and click the left mouse button. This way you will copy the color from exactly this area.
- Then, holding down the left mouse button, drag the brush over the area where the color was copied
- Do this over the entire area of the image where there is skin. Avoid lips, eyes, eyebrows, hair
Please note that you need to do this step as often as possible in order to get your face retouched for free. After all, different parts of the face have different skin colors.
The entire retouching process is shown in the video:
The maximum value of the “Color Contrast” and “Gaussian Blur” filters can be 100%, but we recommend setting the value in the range of 2-11%.
The frequency decomposition method is quite difficult and is not a quick face retouching. You might have questions during free photo processing and face retouching in the photo editor. Ask them in the comments.
8Setting a clipping mask
Go to the top menu of Photoshop and select the “select”
then
“modify”
and then the
“compress” tab (contract)
compress the contour of the face
In the dialog box, enter 10 pixels. This will reduce the clipping mask by 10 pixels
, which will allow the face to overlap the body by a few pixels.
Step-by-step instruction
I sincerely wanted to find a woman to try out, but there are very few raw photos on the Internet. I had to use a man. Among them, imperfect skin was more common. So, I open the program, and then the photo that I will process. First of all, I copy the image to a new layer, to do this I press Ctrl+J.
Now we need to get rid of serious shortcomings. There are several tools. The most obvious problems are easiest to mask with a patch. If you don't see it, just hold down the left mouse button on the icon that resembles a patch for a few seconds. A list of additional tools will appear.
Select the imperfect area and drag it to a nearby area of skin that is more even and correct.
When the most serious defects are finished, create a new layer.
Select the Spot Healing Brush.
The rigidity is about 50%, the angle is 160, the shape is slightly flattened - 85%.
You can decrease or increase the diameter of the brush using the “[” and “]” keys.
I almost forgot. In the settings, be sure to check the box next to “Sample from all layers” to select the most correct color.
You get rid of smaller imperfections - acne, blemishes, unnecessary moles. Just click on the wrong dots and they change color. For convenience, use Alt+mouse wheel to zoom in or out, and you can read about working with object sizes in the previous publication.
So, you're done.
If you remove the eye icon (visibility) from the top layer, you will see how the photo looked before the changes. It's a little better now.
Now we make a duplicate of all layers, for this we hold down Shift+Ctrl+Alt+E.
And create a duplicate for this new layer. Ctrl+J.