Antivirus programs, unlike regular ones, cannot be simply removed. They firmly root themselves into the system so that not a single virus can resist their power. Otherwise, what kind of protection is this?
To remove the antivirus completely, you need to use special uninstaller programs or perform a number of special manual operations. Otherwise, difficulties with installing new security software cannot be avoided.
Uninstalling antivirus programs using proprietary utilities
When you remove programs using standard tools, traces of their existence always remain in the operating system: files, registry entries, changed settings, etc. Uninstaller utilities completely clean out the remnants of a\v products from the system, thereby preventing conflicts when installing other security software.
Avast
To remove Avast correctly, completely without tails and forgotten files, download the Avast Clear utility and do the following:
- Save all open documents and run the avastclear.exe as administrator.
- In the dialog box warning you that it is advisable to run the tool in safe mode, click “Yes”. The computer will restart.
- In the Avast Clear window, select the directory with the antivirus. If you did not change the directory during installation, it is located in \Program Files\AVAST Software\Avast . Click “Delete”
- There is no need to manually disable Avast; the utility itself will stop all its services and perform the uninstallation automatically. You just need to wait a few minutes and then restart the system as usual.
Kaspersky Anti-Virus
Antivirus products from Kaspersky Lab are removed using a special utility called KAVRemover.
Important: when you remove an antivirus using KAVRemover, all license information will be cleared. If you simply need to reinstall the protection, make sure that the license key is saved for the next activation.
- Download KAVRemover from the official website.
- Run the file by double clicking.
- Read the license agreement and click “I agree.”
- Enter the code from the picture and click on the “Delete” button. This will remove the protection that prevents unauthorized removal of the product by malware. If the characters are difficult to understand, refresh the image by clicking the button to the right of the image.
The KAVRemover utility automatically detects which Kaspersky Lab product is installed on the PC. If there are several products, you need to remove them one by one. After uninstalling each one, you need to restart the computer.
AVG
In the latest versions, AVG developers have strengthened its self-defense so much that now, before launching the uninstallation tool for this company’s products, you need to do a lot of manual work - disable all antivirus protective settings.
- In the Computer section, turn off file protection and behavior analysis.
- In “Internet and email”, disable the “Web protection” and “Mail protection” items.
- In the Malicious Attacks section, disable the Enhanced Firewall and Ransomware Protection sections. Click "Open" and move the marker to the Off position.
- "Privacy" - turn off webcam protection.
- “Payments” - remove protection from fake sites. When the settings are disabled, all tiles will be highlighted in red.
- Open “Menu”/“Settings” and uncheck all the boxes in the “General” and “Troubleshooting” sections. Also check if the sliders are set to Off in the Components and Refresh sections.
- After disabling all menu items and all settings, download AVG Remover from the developer’s website. Run the AVG_Remover.exe . The utility's interface is in English, but it is not difficult to understand.
- Click the Continue button in the right tile of the main window.
- In the next window, click Run anyway.
- After scanning, click on the Restart button. The computer will restart.
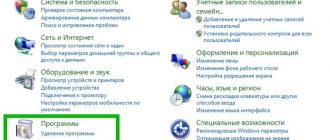
- To complete the removal of AVG antivirus (its tray icon will no longer be present), open the “Control Panel”.
- Switch to Category view and select Uninstall a program.
- Select the antivirus in the installed list with the mouse and click “Delete”.
In addition to AVG Remover, you can use the universal utility IObit Uninstaller. After installing it on your computer, a “Power Uninstall” button will appear in the “Programs and Features” window. By clicking this button, you will not only completely remove the program, but also clean the system of residual files.
Before uninstalling programs, IObit Uninstaller creates a checkpoint to restore the system in case something goes wrong. So that you can roll everything back and try again.
- To uninstall AVG using the IObit Uninstaller program, select the “Uninstall” option in the main window.
- Click “Delete” again in the window to create a checkpoint and run a scan for residual files.
- Next, the uninstaller built into AVG will open. Here also click “Delete”, then “Delete” and “Continue”.
- Write the reason for deletion (optional) and click “Continue” again.
The process takes several minutes. After it finishes, restart your computer.
McAfee
McAfee antivirus is a frequent guest on the computers of inexperienced users. This is not a bad product in itself, but it is often installed without the user's permission along with various free programs. Even a stationary antivirus does not interfere with it, and this sometimes causes conflict between them and a lot of problems. The only good thing is that in most cases, removing McAfee does not cause any difficulties.
You can remove McAfee either through Control Panel/Uninstall Programs or using special utilities. Whether it is a utility for uninstalling McAfee products - McAfee Consumer Product Removal (MCPR) or IObit Uninstaller, there is no fundamental difference.
Let's look at the procedure for removing McAfee using MCPR as an example.
- Open Control Panel.
- Open "Uninstall a program".
- Select McAfee from the list and click Uninstall.
- Click “Remove” in the window that opens, wait until it’s finished and click “Close.”
- Download the MCPR utility. You can download it on the official website.
- Run the MCPR.exe file.
- In the window that opens, click “Next”.
- Switch the marker to "Agree" in the license agreement and click "Next".
- Enter the code from the image and click “Next” again.
- Wait for it to complete and restart your computer.
360 Total Security
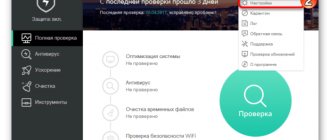
360 Total Security is a good antivirus tool. But lately, problems have often arisen with it on “not entirely licensed” operating systems Windows 7 and 8 during the download and installation of updates. It does not have its own uninstall utility like Avast or Kaspersky. The procedure for uninstalling it is standard: first, use standard Windows tools, and then clean up the remains using special utilities.
- Open “Control Panel” - “Uninstall a program”.
- Select 360 Total Security from the list, select it with a mouse click and click “Delete”.
- In the new window, click “Continue removal.”
- Confirm your intention once again by checking the boxes for quarantined files and game settings. Click "Next".
- Confirm the operation in the dialog box, wait for it to complete and restart your computer.
- Next, open C:\Program Files (x86), find the “360” folder there and delete it with the Delete key.
ESET
To uninstall ESET products, there is a utility called ESET AV Remover. The developer recommends using it if problems arise with standard removal. It is suitable for all editions of Windows, but you need to download the version for the system bit size that you have installed.
- Run the file avremover_nt_enu.exe.
- Click Continue.
- In the next window, accept the license agreement - click Accept. Next, the system scan process will begin to determine the installed ESET antivirus product.
- Select the check box for the program you want to remove and click Remove.
Unfortunately, this method does not always work. Some ESET products cannot be removed using the utility. If this is your case, you will see a window telling you that the program is not supported. Then you just have to remove the antivirus manually.
How to do it:
- Open the Run system application using the Win+R key combination.
- In the dialog box, write the command ncpa.cpl and click OK. The “Control Panel”/“Network and Internet”/“Network Connections” will open.
- Select your connection, right-click on it and click “Properties”.
- Remove the “Epfw NDIS LightWeight Filter” item, if available.
- Download the ESET Uninstaller utility.
- Save it on your desktop.
- Restart your computer in Safe Mode. To do this, open the Run utility and write the msconfig .
- Go to the "Download" tab. Select your operating system, if there is more than one, and check the “Safe Mode” checkbox.
- Click “Ok” and “Reboot” again.
- In safe mode, launch the utility from the desktop by double-clicking the mouse.
- A command prompt will open. Enter the Yes command into it (Y key on the English keyboard), then the number 1 and confirm by pressing Enter.
- Press the Y key again. When the message “Press any key to exit” appears in the command line window, press any key to exit the program.
- Then disable Safe Mode in the same way and restart your computer.
Avira
To remove Avira, there is also special software that can clear all remnants from the registry after standard removal.
- Uninstall the antivirus in the usual way through the Control Panel.
- Download the Avira RegistryCleaner utility and save it to your desktop.
- Reboot your computer into safe mode and run the utility.
- Accept the agreement.
- Check all the boxes to be scanned and click “Delete”. The program will erase all entries and keys in the registry.
Dr.Web
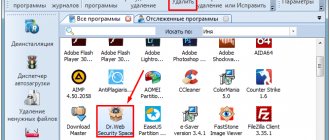
When trying to remove Dr.Web using standard Windows tools, difficulties sometimes arise. For example, in the root directory of the program there is no built-in uninstaller - the Uninstall file. Then the CCleaner utility will help you.
- Download CCleaner from the official Piriform website, install and run.
- Switch to the Tools and Uninstall Programs tab.
- Find Dr.Web in the list, select it and click “Uninstall”.
- Check all the boxes and click Next.
- Enter the captcha and click “Uninstall a program.” Then restart your computer.
- Open the Registry tab in CCleaner and search for problems.
- After cleaning the registry and restarting the computer, open the local drive C:\Program Files and simply delete the folder called Dr.Web.
Using CCleaner you can remove any software, including antivirus products.
Complete removal of Avira antivirus from your computer
When removing Avira antivirus, problems usually do not arise. But when the user then tries to install Friend Defender, unpleasant surprises begin. This is due to the fact that the standard Windows wizard cannot delete all program files, which then in every possible way interfere with the installation of another anti-virus system. Let's see how you can completely remove Avira from Windows 7.
Download Avira antivirus
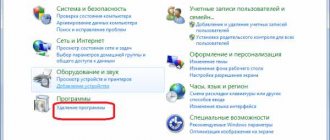
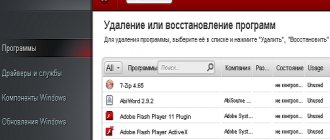
Removal using built-in Windows 7 tools
1. Through the “Start” menu, go to the window for removing and changing programs. We find our Avira antivirus.
2. Click “Delete”. The application will display a message indicating a security risk. We confirm our intention to remove Avira antivirus.
This uninstallation step is now complete. Now let's move on to cleaning the computer from remaining files.
Cleaning the system of unnecessary objects
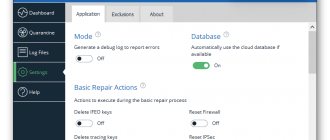
1. I will use the Ashampoo WinOptimizer tool to complete this task. Open “1-click optimization”. We wait for the verification to complete and click “Delete”.
This is how you can completely remove Avira from your computer. You can also use a special utility to remove Avira.
Using the special Avira RegistryCleaner utility
1. Reboot the computer and log into the system in safe mode. We launch the special utility Avira RegistryCleaner. The first thing we see is the license agreement. We confirm.
2. Then the Avira uninstall utility will ask you to select the product that we want to remove. I chose everything. And click “Remove”.
4. If you see such a warning, it means you forgot to enter safe mode. We reboot the computer and continuously press the “F8” key during the boot process. In the window that opens, select “Safe Mode”.
5. After uninstalling Avira products, check the list of installed programs. Two of them remain. Therefore it is necessary to clean them manually. Afterwards, I recommend using the Ashampoo WinOptimizer tool.
Please note that Avira Launcher should be uninstalled last. It is needed for other Avira products to work and you cannot simply remove it.
We are glad that we were able to help you solve the problem.
Poll: did this article help you?
Yes No
lumpics.ru
Comprehensive utility AV Uninstall Tools Pack
AV Uninstall Tools Pack is a set of utilities for uninstalling antivirus products from various vendors. The program is portable, meaning it does not require installation. To work with it, just unpack it from the archive, and to run it, just click on the autorun.exe file.
The Tools folder contains all available utilities for removing antiviruses. They can also be launched from here.
In addition to the products already described, using AV Uninstall Tools Pack you can remove other antiviruses, such as Panda, Bitdefender, Symantec (Norton), Grizzly, etc. The set of tools included in it is expanded with each new release.
How not to remove your antivirus
The first and most important thing you shouldn’t do if you need to remove an antivirus is to look for it in computer folders, for example in Program Files, and try to delete the Kaspersky, ESET, Avast or some other folder there. Where it leads:
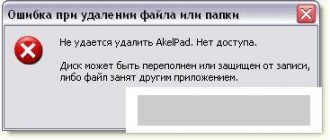
- During the deletion process, the error “Cannot delete filename. No access. The disk may be full or write-protected, or the file may be in use by another application." This happens because the antivirus is running, even if you previously exited it - most likely the antivirus system services are running.
- Further removal of the antivirus program may be difficult for the reason that at the first stage, some necessary files will still be deleted and their absence may prevent the antivirus from being removed using standard means.
Despite the fact that it seems obvious and has long been known to all users that no programs can be removed in this way (except for various portable and programs that do not require installation), nevertheless, the situation described is the most common reason for which it is not possible to remove an antivirus.
How to remove antivirus from your phone
Installing and uninstalling antiviruses on phones running the Android operating system is no different from installing and uninstalling games and applications. Depending on the Android version, the sequence of actions may differ slightly.
Using Android 7.1.2 as an example:
- Open settings - swipe up. In the Applications section, open All Applications.
- Click on the cart icon.
- Find the antivirus you need to uninstall. Select it and click "Delete".
Disabling Windows 10 Defender
It happens that Windows 10 Defender provokes a software conflict when installing or uninstalling third-party antivirus products. To avoid this, you can disable active protection in the “Update and Security” section of the “Settings” system utility. Read more here.
Other articles on the site
- Choosing an antivirus for Windows 10: taking into account test results
- 10 ways to check your computer for viruses online
- Do you need an antivirus on Android: pros and cons
- How to check a website for viruses and protect it from infection and hacking
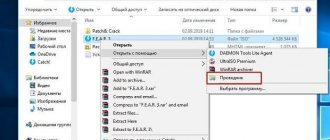
Uninstalling using Revo Uninstaller
Instructions for using the uninstaller program:
- Open the web page in your browser - revouninstaller.com/revo_uninstaller_free_download.html.
- Next, click on download and download the file.
- Install it on your computer.
- Find the antivirus in the list that opens and click “Delete”.
- We start the system analysis by selecting the “Advanced” mode.
- After completing the cleaning process, remove all remaining debris.