1.Batch processing of raw files in Photoshop
Photoshop has a built-in Adobe Camera Raw module that allows you to edit raw files and convert them to familiar formats, Jpeg, TIFF or PSD. In order to simultaneously process the required number of sources in the RAV format, we open them in Photoshop using the usual command in the “file-open” menu.
In the window that opens, select the necessary files, let's say 30 or 50, maybe more, but this will be enough for testing.
After this, the Adobe Camera RAV module will open, in the window of which all our selected files will appear.
If these photographs were taken under the same conditions, under the same lighting, and the same white balance, then we have the opportunity to edit one of them as we wish, and apply the same settings to all other photographs in this series.
Edit the first photo in the queue, if necessary, using the editing panel, for example, adjust exposure, white balance, remove noise, remove chromatic aberration, etc. Then apply these corrections to all images opened in the module.
Then apply these corrections to all images opened in the module. To do this, click the “Select All” button in the file browser and then click the “Synchronize” button.
To save yourself the hassle, select “Synchronize everything.” After that, view all the frames by activating them one by one in the file browser. And if necessary, make corrections for this or that frame individually. When we are satisfied with the corrections made, we can convert our raw files into the format we need, for example, Jpeg, or into TIFF if you plan to continue their further fine-tuning in Photoshop.
To do this, click “Save image” and in the new window that opens, specify the saving parameters, quality and format, as well as the folder in which we will save our pictures. Did you indicate? Click “Save” That’s it! The process has begun, Photoshop saves frame by frame, and we enjoy ourselves and go drink coffee. Or is tea better? Processing speed will depend on your computer hardware.
Batch photo processing in FastStone Image Viewer
A new window will open containing two sections with files and several commands:
The right column with files shows all files in the current folder, the left column shows those selected for batch processing. You can add or remove selected files using the “Add”, “Add All”, “Delete”, “Clear” buttons
At the bottom left are tools for mass renaming and changing the creation date of pictures; working with them is intuitive.
In the “Output Folder” line, you can select or create a new folder to save the converted photos.
To perform most bulk operations, check the “Change settings (sizes...)” checkbox and click on the “Advanced” button:
Clicking the button opens a new window:
Using this window we can specify one or more types of image editing:
- Change of size
- Turn
- Trimming
- Changing the Canvas Size
- Color Depth Correction
- Changing contrast, brightness, saturation, color gamut, blurring the image, converting to negative, black and white and sepia
- Image resolution
- Text overlay
- Watermarking
- Adding a frame to photos
I repeat, a significant advantage of bulk photo editing using FastStone Image Viewer is that we can apply one or several types of editing at once.
For example, I want to change the brightness of selected photos. To do this, I click on the “Image Settings” tab, check the “Change brightness, contrast, gamma, saturation” checkbox and the following parameters appear in the window:
Changing any parameters in such a window is not convenient, because we don't see the image itself. Therefore, we click on the “Design and Preview” button, and a new window opens for us, where there are all these settings, and most importantly, the photo itself is displayed:
The interface of this window is convenient and intuitive.
On the right, in the “Input List” section, you can select a photo for preview.
There are zoom buttons at the top right: With their help, you can view the photo in real size, adjust it to the size of the window, increase or decrease the display scale.
To see the result of the changes, click the “Preview” button.
After you have set the necessary settings, click the “Close” button, the window closes, we get to the previous window and can proceed directly to the conversion by clicking OK or add more settings by selecting the desired tab at the top.
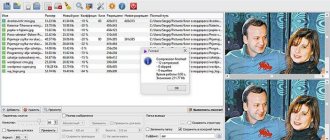
After clicking OK, the window closes and we return to the main batch conversion dialog. Click the “Start” button. The batch conversion process starts, and the process status is displayed:
When finished, click OK. Ready! The processed images are saved under the old names in the specified save folder, or, if the folder was not specified, the images are saved in the original folder under the old names with numbers and/or prefixes and/or suffixes added, depending on your settings.
2. Batch processing of jeeps in Photoshop
Well, if we need to quickly process a huge number of images in Jpeg format, then we can do this using one or another action and apply it to the entire mass of images. For example, I often use an action when preparing a photo for publication on the Internet, or before sending it to a customer by email. It saves a lot of time
Or, for example, you need to correct an incorrect exposure, say, overly dark pictures, then you can create a special “lighten” action for them and apply it to all the pictures in the folder. Or add sharpness. There can be a huge number of options here.
3. Actions for Photoshop
Where can you get the actions you need in this case? There are two options here. The first is to create the desired action, i.e. this or that action in Photoshop yourself. The procedure is very simple and quite described on the Internet. A simple action consisting of several actions is done within a minute. For myself, I create this or that action situationally for each specific task. For example, to compress images without losing quality, I use the “1000” px action I created, which reduces the size of the image to 1000 pixels on the long side and then adds a little sharpening. You can read more in this article
If you have never used actions before and don’t know how to call them, then open any image in Photoshop and go to the “Window-Actions” menu or press Alt+ F9. You will see the “Actions” panel, in it you will see a list of actions that are available by default, select any one, for example, any “50 pixel frame” and launch it by clicking the green triangle at the bottom of the panel. This is for training so that you know what we are talking about.
The second way is to download the desired action game for free on the Internet. Now there are a huge variety of them. Moreover, from purely technical to creative, for example, “portrait retouching” or some other effective technique. Just download and install it by copying it to your Photoshop folder and you can use it as much as you like. Approximately the copy path could be C:\Program Files\Adobe\Adobe Photoshop\Presets\Actions
4.Automation in Photoshop
Well, now the most important thing. Let's put batch processing into practice. For example, I use my “1000px” action. Well, for the experiment you can specify which one you want. So, open Photoshop. In the “file” menu, look for the “Automation - batch processing” item.
You will see a window like this in which you indicate the “source” - the source folder with the pictures that need to be processed. We indicate the action that we will use and indicate the output folder into which the program will store the processed images. Of course, this folder needs to be created in advance.
Leave the rest of the settings as in the screenshot. Have you indicated everything? Click "OK". That's it, the process has begun, we look at the monitor with square eyes, pointing a finger at it, watching in amazement as files open on their own, change before our eyes and close, giving way to new ones. I don’t suggest going and drinking tea, you won’t have time, because everything happens very quickly, although of course everything will depend on the number of pictures in a given folder and the power of your computer.
Give it a try. This will really save your time and effort. Good luck
Articles on similar topics
- Easter for a photographer Easter for a photographer, in addition to the universal human content that is similar for all people, has a special magical property -…
- Upgrading the gallery of a WordPress site is how to make the display of the built-in gallery of a WordPress site beautiful, stylish, full-screen and adaptive, using...
- Photoshop, how to make it in English This article will talk about how to easily and quickly make a Russian-language version of Photoshop...
ImBatch is a free batch processing program.
The ImBatch program has quite a lot of features. It has a nice interface and is available in many languages. Hence, you will not have any problems using it. It can rotate images, add watermarks, change sizes, create motion effects, and more. And the program will do all this on a decent number of pictures.
How else does ImBatch differ from other similar programs? Batch image processing using ImBatch can create large lists of custom jobs. The software will complete these tasks in one pass.
For example, various rotations of pictures, inserting a watermark, resizing. Also, ImBatch has the ability to automatically save images in various formats. For example, in the popular PNG and JPEG.
What’s interesting is that tasks can be combined to suit your needs. For example, change their order, filter photos that need to be processed differently, etc. This software can be compared to a Swiss Army knife in an environment of similar programs. Let's take a quick look at some of the features of this batch image processing program.