© 2013 Vasili-photo.com
At the time of writing this article, I am using the Adobe Camera Raw plugin version 7, which comes with Adobe Photoshop CS6. This is the first version of Adobe Camera Raw (ACR) to feature fully automatic chromatic aberration correction, which is very important to me. I find earlier versions of ACR unacceptable, and until the release of Adobe Camera Raw 7, I used DxO Optics Pro as my main RAW converter. DxO does not have a very user-friendly interface, but it provides excellent quality for converting RAW files, which Adobe was able to approach only in 2012. Since the ACR interface is more convenient for me, I, having appreciated the advantages of the seventh version, changed the converter.
If you are using any other RAW converter, try to follow the same steps as described in this article. The general principle of operation of all converters is the same, and they differ, by and large, in details. Among the popular converters, in addition to Adobe Camera Raw, I can recommend DxO Optics Pro and Phase One Capture One PRO. Converters from photographic equipment manufacturers - Canon Digital Photo Professional and Nikon Capture NX do an excellent job of converting images taken using Canon and Nikon cameras, respectively, but have an extremely inconvenient interface. The widely used Adobe Lightroom runs on the Adobe Camera Raw engine, and therefore does not differ from the latter in conversion quality.
When choosing a RAW converter, make sure that the images converted with it are no worse in quality than the JPEG obtained using the camera. In recent years, in-camera conversion has provided (if properly configured) such good results that often shooting in JPEG is preferable to inept processing of a RAW file in a converter that is not the latest (see “RAW or JPEG?”).
***
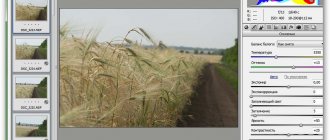
Let's look at the basics of processing RAW files using the example of a photograph of a picturesque valley in the Skole Beskids. Let's open the file in Adobe Photoshop, and the Adobe Camera Raw window will open in front of us. The raw landscape, as always happens with RAW files, looks quite washed out, but we'll fix that soon.
At the top left is a panel of the most frequently used tools from the point of view of program developers. I usually have a magnifying glass ( Zoom Tool - Z key) or a hand selected ( Hand Tool - H key or holding down Spacebar). In the upper right corner you can see a color histogram, and below it there are tabs for groups of tools for image editing.
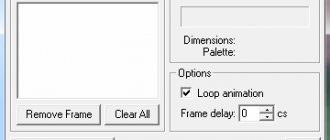
If you open several RAW files at once in ACR, you will see them on the left as a row of icons. Camera Raw supports batch processing of files, i.e. By selecting multiple images, you can change different settings simultaneously for the entire batch. You can also apply uniform parameters to all open files based on an already edited sample using the Synchronize function.
Before you start working with Adobe Camera Raw for the first time, you should configure some plugin settings so that you won't be distracted by them in the future.
Setting up Adobe Camera Raw
Skip the tediousness
First of all, open the ACR settings dialog. It can be found in the top toolbar (third button from the right) or called by pressing Ctrl/Cmd+K.
In the General section, in the Save image settings in item, select where the processing parameters for each edited image should be saved - in separate .xmp files (Sidecar “.xmp” files) or in a special database (Camera Raw database). I prefer the first option, i.e. After saving the results of the work, the program creates next to each RAW file an additional settings file with the .xmp extension, into which it records all the changes made. In the case of a database, all information is stored centrally, which is inconvenient for me. In both cases, the RAW file itself does not undergo any changes, and therefore you can always go back in the editing process or even reset all settings and start editing again. Also, settings are reset when deleting the .xmp file or ACR database.
In the Default Image Settings , uncheck all the boxes to prevent the program from arbitrarily adjusting images.
In the Camera Raw Cache , specify the maximum amount of temporary files acceptable to you (at least 1 Gb) and the folder where they should be stored (preferably not on the system drive).
DNG File Handling section can be left alone, but in the JPEG and TIFF Handling , disable support for JPEG and TIFF formats (Disable JPEG support and Disable TIFF support), since these formats are best processed directly through Photoshop.
Save the settings by clicking "OK".
At the very bottom of the Adobe Camera Raw window, in the form of a blue link with an underline, there is a description of the workspace that will be assigned to the image after you finish working in ACR and open it in Photoshop. Click on the "link". In the window that opens, check the following points:
Space (color space). If you don't know what this is, then you should choose sRGB. However, even if you are familiar with the concept of color space, I do not advise you to switch to Adobe RGB, much less ProPhoto RGB, without a good reason. The final result of your work, whether intended for print or online publication, will still eventually need to be converted to the commonly used sRGB, and the less often you change the color space, the less the quality of your photos will suffer.
I’ll make a reservation that Adobe Camera Raw is completely indifferent to what color space is in your camera settings (these settings are for JPEG, not RAW), and therefore, even if you plan to use Adobe RGB when editing, you can shoot everything with a clear conscience in sRGB - you won’t lose a single bit of information for RAW images, but you will be sure that your JPEG images will be displayed correctly everywhere.
Depth (bit depth or color depth). In theory, the more bits, the higher the quality, but in practice the difference between 8 and 16 bits only becomes noticeable with very aggressive editing, so in most cases I use 8 Bits/Channel and only go to 16 bits when really necessary. If you're not trying to save space on your hard drive, you can immediately select 16 Bits/Channel, but remember that when saving the image in JPEG format, the color depth will still be changed to 8 bits.
The choice of color depth can only be important for subsequent processing in Photoshop. Camera Raw, where I advise you to perform basic manipulations with brightness and contrast, will in any case work with the native color depth for your camera, i.e. 12 or 14 bit.
The image size (Size) and resolution (Resolution) can be left unchanged, and in the Sharpen For item you should select None - it is always better to sharpen manually.
Make sure there is no checkmark in Open in Photoshop as Smart Objects and click OK.
Now find the Camera Calibration and in the Camera Profile , select the profile that will be responsible for the basic color rendering and overall contrast settings. I usually use Camera Neutral because I find it easier to work by increasing contrast and saturation as needed rather than decreasing them. Any profile can be customized to your liking.
If you choose a profile other than the default Adobe Standard, you can change the default settings so that each new RAW file opens with the profile you want. To do this, click on the subtle menu icon to the right of the tab name and select Save New Camera Raw Defaults. In principle, you can set any changes that you routinely make to all images to default settings to save yourself from unnecessary steps.
Adobe Photoshop CS6 13.0.1.3 Extended RePack by JFK2005 (Upd. 04/09/14) [Multi/Ru]
Program version:
13.0.1.3 Extended
Official website:
link
Interface language:
Russian, English, Ukrainian
Treatment:
not required
System requirements:
- Intel® Pentium® 4 or AMD Athlon® 64 processor
- Microsoft® Windows® XP* with Service Pack 3 or Windows 7 with Service Pack 1
- 1GB of RAM
- 1GB of available hard-disk space for installation; additional free space required during installation (cannot install on removable flash storage devices)
- 1024×768 display (1280×800 recommended) with 16-bit color and 512MB of VRAM
- OpenGL 2.0–capable system
- DVD-ROM drive
- This software will not operate without activation. Broadband Internet connection and registration are required for software activation, validation of subscriptions, and access to online services.† Phone activation is not available.
- Content-aware patch.
Apply patches to images with precision using the Content-Aware Patch tool, which lets you select a sample area to apply the patch to. - Mercury Graphics Engine.
Instantly display results when using essential editing tools such as lithe and puppet warp. The new Adobe Mercury Graphics Engine delivers extremely responsive applications for a smoother experience.* - New and improved design tools.
Create amazing projects even faster. Create consistent designs: Apply text styles, use vector layers to apply strokes and add gradients to vector objects, create custom strokes and dashed lines, quickly find the layers you need, and more. - New gallery of blur effects.
Easily create photographic blur effects using a new, simple interface and intuitive image controls. Create tilt-shift effects, blur an entire image and sharpen a single focal point, and apply different types of blur to multiple focal points. The Mercury Graphics Engine lets you see results instantly. - Brand new Frame tool.
The new fast and precise Crop tool lets you crop images reversibly. Easily manipulate images on your canvas and see changes in real time with the Mercury Graphics Engine. - Modern user interface.
Experience a sleek new interface that includes dark background options to create dynamic images, plus hundreds of improved features for a smoother, faster experience. - Intuitive video creation.
Use Photoshop's powerful editing tools to work with your footage. Easily edit your clips using a full set of familiar Photoshop tools, and create video footage using an intuitive set of video tools. - Style migration and exchange.
Easily migrate styles, workspaces, options, and settings—you can set up Photoshop the same way across all your computers, share settings, and use settings from previous versions of Photoshop CS6. - Adaptive wide angle.
Easily straighten objects that appear crooked in panoramas and photos taken with a fisheye or wide-angle lens. New on-canvas editing tools use the physics of a specific lens model to automatically correct distortion—and the Mercury Graphics Engine lets you instantly preview your editing results. - Background saving.
Keep working while saving large Photoshop files in the background to greatly improve your productivity. - Auto recovery.
Use AutoRecover to save changes without interrupting your work. A copy of your project is saved every 10 minutes; in the event of an unexpected failure, the saved copy will be restored. - Improved auto-correction.
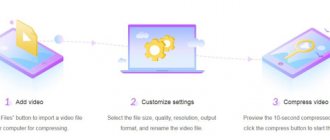
Enhance your images with improved Auto Curves, Levels, and Brightness/Contrast tools. Learn how to process thousands of hand-retouched images to help you get started with your image. - Adobe Photoshop Camera Raw Plug-in 7:
Unleash the power of JPEG and RAW files with enhanced processing features and an improved set of controls; Increase detail in bright areas of an image while preserving rich dark areas—and more. - Content-aware movement.
Use the Content-Aware Move tool to move and expand a selection to another area of the image, then see the results of recomposing and overlaying images. - Highlights and conceals based on skin tone.
Perform precise selections and create masks to customize and preserve skin color; Easily highlight complex image elements, such as hair; and use other features. - Revolutionary blur brushes.
Use natural and realistic brush tips that will wear out as you work. You can endlessly wear and sharpen a charcoal pencil or pastel to create different effects—you can even save the familiar worn tips as styles. Patterns according to the script. Create geometric pattern fills even faster with the new Scripted Patterns tool. - Supports a large number of camera models.
Use the Adobe Photoshop Camera Raw 7 plug-in to process images from virtually any camera. The external module provides support for more than 350 camera models. - Supports 10-bit color depth.
Use 10-bit monitor support to simulate printing images on film. View only the pixels stored in the image—no anti-aliasing, and remove edges and stripes. - Support for 3D color encoding tables.
Easily retouch images for film printing using 3D color coding tables (LUTs)—including Adobe SpeedGrade™. Use color coding to adjust the colors in a RAW image. - Text styles.
Save time and create consistent designs with text styles that let you apply formatting to selected characters, lines, and paragraphs of text with one click. - Vector layers.
Use vector layers to apply strokes and even add gradients to vector objects. - Improved vector graphics rendering.
Snap the edges of vector objects to pixels with one click for highly sharp renderings. - Custom strokes and dotted lines.
Easily create custom strokes and dashed lines. - Search in layers.
Use the layer search function to quickly select the desired layer. - Lighting effects Gallery.
New lighting effects gallery with 64-bit support improves performance and results. The built-in module uses the Mercury Graphics Engine and provides on-canvas controls and previews to easily visualize lighting effects. - Oil paint filter.
Easily create an oil paint effect with the Oil Paint Filter powered by the Mercury Graphics Engine. Change brush styles and the direction and strength of lighting to create stunning results. - Airbrush tips.
Create realistic airbrush effects with dynamic, natural controls and precise control over paint particles. - New drawing styles.
New styles make the painting process much easier and let you quickly start creating realistic painting effects. - Properties panel.
The context-sensitive Properties panel lets you quickly change the properties of masks, adjustments, and video layers. - Adobe Bridge CS6.
Adobe Bridge CS6 software provides visual tools for organizing and managing media content. This integrated application provides 64-bit computing support for more efficient work. - Updated Adobe Mini Bridge application.
Adobe Mini Bridge provides quick and easy access to images and documents presented in film form. - Expanded support for the TIFF format.
Work with a wide variety of TIFF files. Expanded support for the TIFF format allows you to work with large images with great color depth. - Automatic resampling.
The program automatically selects the optimal resampling method as you resize the image, delivering superior results. - Alt text.
Save time by inserting "lorem ipsum" alt text when working with text. Increased maximum brush size. Edit and paint on images using brushes up to 5000 pixels in size. - Compatible with Adobe mobile apps.
Unlock creative possibilities beyond Photoshop CS6 with Adobe Touch Apps and Photoshop companion apps (sold separately). Intuitive touchscreen functions allow you to create a variety of creative projects with precision.
Description:
Adobe Photoshop is a program for processing raster graphics. Many graphic formats are supported. Adobe Photoshop allows you to both create new images and edit them. Photoshop is used to create photorealistic images, to work with color scanned images, for retouching, color correction, collaging, graphics transformation, color separation, etc. Adobe Photoshop has all the methods for working with bitmap images, while it has the ability to work with layers and uses paths. The program is the undisputed leader among professional graphic editors due to its extensive capabilities, high efficiency and speed. Adobe Photoshop provides all the necessary tools for correction, editing, preparing images for printing and high-quality output.
"New Features in Adobe Photoshop CS6:"
"Assembly Features:"
- Full featured Photoshop CS6 Extended
- Interface languages: Russian, English, Ukrainian
- medicine is built in
- Camera Raw and Nvidia DDS have been added from plugins
- All lens profiles available for Camera Raw and Lens Correction
- the assembly does not spoil the profiles of other Adobe applications installed on the computer
- x86/x64 in one installer
- Improved performance (by disabling protection and some other functions, such as checking images for banknotes).
- The Photoshop CS6 build launches and runs under Windows XP.
Keys for silent installation: -gm2 -y The assembly includes all plugins from Imagenomic and Nik Software, no activation required.
[hr]
- The Camera Raw plugin has been updated to version 8.4.
Checksums:MD5:
6de88703aac6459eb1a7b565cfd3a996
Image processing
I usually work with the tool tabs roughly in the order in which they are arranged by the ACR developers. Let's look at each of the tabs in order, as well as all the manipulations that I will carry out during editing.
Basic tab
Here are the main parameters that affect the overall appearance of the image:
White Balance – white balance. If you are not satisfied with the white balance saved by the camera at the time of shooting (As Shot), you can change it by selecting any of the options offered in the drop-down menu, or adjust the white balance manually using the following two tools:
Temperature – color temperature in Kelvin. Smaller values make the image cooler, larger values warmer. I'll probably stick with 6000 K, although I usually prefer a warmer color for landscapes.
Tint – offset. Controls whether the color balance is biased towards green or purple. In this particular case, I'll give it +15.
Both Tint and Temperature values are highly dependent on lighting conditions and the color rendering of your camera. In landscapes, I am guided solely by my own taste and common sense, and for studio photographs I set the white balance more precisely using the White Balance Tool , called up with the I key. By pointing to an area that should have a neutral tint (white paper or a special gray card), you align the color balance according to this sample.
Exposure – exposure, or rather exposure compensation. Changes the overall brightness of the image, allowing, for example, to brighten a slightly underexposed photo. In the case of our landscape, I'll increase the exposure by half a stop, setting it to +0.50. Unlike previous versions of Adobe Camera Raw, where the Exposure slider shifted the entire histogram evenly, in version 7 Exposure affects primarily midtones and, to a much lesser extent, highlights and shadows, for which there are special tools.
Don't forget that the more you brighten the image, the more noise will appear, which clearly confirms the validity of the ETTR (Exposure To The Right) rule.
Try to avoid clipping in highlights by constantly monitoring your histogram. By pressing the O key you can turn on the highlight clipping warning. Clipping shadows is much more common, but also requires caution.
Contrast - contrast. Controls the overall contrast of an image using an S-curve, changing the difference in brightness between the darkest and lightest areas. I rarely use Contrast values above +25, and now I won't touch it at all.
The following two tools work in tandem to selectively control the brightness of highlights and shadows:
Highlights - light. Helps bring out details in overly bright light. I'll give it -50.
Shadows - shadows. Brightens shadows like a fill flash. +25 will be enough.
The next pair of tools operate even more narrowly, affecting only the extreme points of the histogram, which is sometimes necessary to combat clipping, or, conversely, lack of contrast:
Whites – a point of white color. I'll move the edge of the histogram to the right by +30, although I use negative values much more often.
Blacks – a point of black color. I’ll leave it unchanged – the black color is still in its place.
Experiment with Highlights/Shadows and Whites/Blacks to see how they differ from each other.
Clarity – clarity or local contrast. Clarity is the most useful tool because in many scenes you have to deal with a lack of local contrast, while the overall contrast is fine, or even excessive. But be careful: in the pursuit of detail, it’s easy to go too far and get unnatural halos around objects. I usually don't go above Clarity +50, but today I'll make an exception and set it to +75.
Vibrance and Saturation control the color saturation. The difference between them is selectivity. If Saturation increases the saturation of all colors indiscriminately, then Vibrance works more delicately, increasing the intensity of only the least rich colors. I'll set the Vibrance to +50 and Saturation to +15, which is quite high. More often you have to use lower values in order to then selectively increase the saturation of only individual color channels.
Often, after I've adjusted all the Basic tab tools, I'll go back to the white balance sliders to adjust them to account for any changes in brightness, contrast, or color saturation that might have affected the color balance.
This is what we got at this stage. You can compare the processing results with the original image by hovering your cursor over the image.
I am unhappy with the sky - it is too light, has an unnatural gradient of brightness from left to right, and its color is not intense enough. In addition, I would like the mountains closest to us (to the left and to the right) to look a little more contrasting and more prominent. I'll deal with the mountains later in Photoshop, and a gradient filter ( Graduated Filter - G key) will help me improve the sky. It is an imitation of a real gradient filter, but has a wide variety of customizable parameters.
First of all, to shade the top left corner, I will apply a diagonally oriented gradient filter to it with the parameters: Temperature -10; Exposure -0.50. Then, across the entire sky, from the top edge of the photo to the horizon, I will draw another gradient with the parameters: Temperature -20; Exposure -0.50; Contrast -25; Highlights -25; Clarity -50; Saturation +15.
Note that the gradient filter allows you to selectively change the color balance in certain areas of the image, which can be useful if, for example, you want to warm up a landscape while keeping the sky cool and blue.
Since I'm already working on gradients, I'll probably add one more at the very bottom of the photo with the goal of making the water in the river bluer and the grass on the near bank greener. The only parameter: Temperature -20.
Compare the image with and without gradient filters.
To influence areas of the image that have complex boundaries, it is advisable to use not a gradient filter, but its analogue in the form of an adjustment brush ( Adjustment Brush - K key).
Tone Curve Tab
Here you can finely adjust the brightness and contrast of the image using curves. I rarely use curves in Camera Raw because... I usually have enough options in the Basic tab.
Detail tab
This tab is responsible for sharpening ( Sharpening ) and noise reduction ( Noise Reduction ). I prefer to increase sharpness in Photoshop, and therefore in ACR I turn off sharpening by setting Amount to 0. ACR copes quite well with suppressing moderate noise, especially chromatic noise. Typically I use the following settings: Luminance 25; Luminance Detail 100; Luminance Contrast 100; Color 50; Color Detail 100. The first three parameters are responsible for achromatic (brightness) noise, the rest are for chromatic (color). When suppressing luminance noise, special care must be taken to avoid creating a washed-out picture. When working in the Detail tab, always view the image at 100% zoom, otherwise you won't be able to see what's going on with the fine details.
HSL/Grayscale tab
An indispensable color correction tool. The HSL/Grayscale tab is designed for working with individual colors and includes three subtabs:
Hue – shade or tone. Here I'll move the Oranges to the left by -10 to make the clay on the shore redder, and the Aquas to the right by +10 to make the lower sky area look fresher.
In general, I find that Adobe Camera Raw tends to make the image a little more yellow-green than I would like, and therefore I have to adjust individual shades one way or another. If you're personally happy with ACR's color rendering, you can leave the Hue subtab alone.
Saturation - saturation. To improve the appearance of the clay I will set the Oranges slider to +25. Often I increase the saturation of the blue color (Blues), but in this case I solved the issue with the color of the sky and water mainly using gradient filters.
Luminance – lightness or brightness. I'll make the sky a little darker by moving the Blues slider to -15.
The Split Toning tab is designed for toning black and white photos and we will skip it now.
Lens Corrections Tab
Here you can correct lens aberrations, as well as perspective distortions. There are two sub-tabs – for automatic and manual correction:
Profile – automatic correction of lens aberrations based on a special profile. Profiles for most popular lenses come standard with Adobe Camera Raw. To enable automatic correction of lens distortion and vignetting, check the box next to Enable Lens Profile Corrections. I recommend doing this only in cases where distortion or vignetting is visible to the naked eye, since eliminating distortion leads to a slight deterioration in sharpness, and vignetting is not even always a disadvantage. In the case of our example, everything suits me anyway, and therefore I will only check the box next to Remove Chromatic Aberrations. The elimination of chromatic aberrations works perfectly in ACR 7 (which cannot be said about earlier versions), and I always use it, especially since it improves sharpness at the edges of the frame.
Manual – manual correction. Here you can correct a littered horizon and distortions introduced by perspective. In my photo, both the horizon and perspective are fine, so I'll leave everything unchanged. If you work in manual correction mode, I advise you to turn on the grid by pressing the V key to better see both the distortions themselves and your edits.
At this stage, I usually use the Crop Tool (C key) if the standard 3:2 aspect ratio does not suit me or if the edge of the photo has captured some foreign objects. No cropping is required now.
Effects Tab
There are only two effects: grain ( Grain ) and vignetting ( Post Crop Vignetting ). I will leave grain for lovers of pseudo-vintage photographs, but moderate vignetting can decorate many photographs. I'll shade the edges of the image slightly by setting the Amount to -15.
So, we went through all the functional tabs. You are already familiar with the Camera Calibration tab, but there are still two additional tabs:
Presets Tab
You can save all the changes you make to an image as presets, which can later be applied to any other images.
Camera RAW as a filter
Go to the menu item Filter > Camera RAW Filter (Filter – Camera RAW Filter). Important: Before you run the filter, make sure the layer you will be making changes to is selected in Photoshop. In my case, this is a duplicate of the background layer.
Once I do this, Camera RAW will launch on top of Photoshop.