At my master classes, I always talk not only about photography techniques, but also about photo processing. After all, high-quality RAW processing is an integral part of the work of a modern photographer.
I am often asked why I work with RAW in Capture One Pro, and not in Adobe Lightroom or other excellent RAW converters.
I don’t want to create holivars and argue about which RAW converter is better. Instead, I decided to simply write down why I work in Capture One Pro.
So here are my five reasons to start using Capture One Pro:
No. 0. Color
Capture One (C1) works better with color.
In my opinion, both the initial camera profiles and the general algorithms for working with color in Capture One are implemented an order of magnitude better than in any other RAW converters.
Capture One has its own ICC profiles for all modern digital cameras. It is thanks to this that the “picture” of the C1 is realistic, and the colors in the photographs are exactly what they should be.
How important is the correct color profile?
The correct color profile is essential for serious photo editing. That's why Capture One has several profile options for professional cameras—each one representing colors slightly differently.
The same photo opened with two different Nikon D3 ICC profiles.
Of course, the perception of color, and especially its processing, is a very subjective thing.
But I just can't work with Lightroom colors after Capture One Pro. And many photographers I know who tried working with color in Capture One will never return to Aperture and other wonderful RAW converters.
This is my personal feeling. For you it may be completely different.
So let's move on to the completely objective strengths of Capture One Pro.
Accurate color rendition of the raw file
Perhaps this is why I fell in love with C1 eight years ago, and remain faithful to it to this day.
When I load a raw file into Capture One, I immediately see a picture on the computer monitor that is absolutely identical to the one displayed on the camera display.
The fact is that Phase One
, in their laboratories they test hundreds of thousands of frames under various conditions, creating ICC profiles that are as close as possible to the processor of your camera.
No. 1. Processing capabilities
For me, Capture One is, first and foremost, a professional photo editing tool.
In this review article I will talk about just a few of the tools that I constantly use in my work. But each of them deserves a separate article.
Shadow/Highlights
Shadow/Highlights - allows you to lighten shadows (Shadows) and darken highlights (Highlights) in the frame.
How is this used in practice?
During my trip to America, in San Francisco, I took this shot:
Beautiful landscape, but the photo clearly lacks contrast, open the exposure settings and increase Contrast:
The picture immediately became more interesting, but now there are too many dark areas in the frame:
Of course, we can simply lighten the photo. The problem is that then we will reduce the contrast of the picture.
For this case, it is better to use the Shadow/Highlights tool - we will brighten the dark areas and maintain the contrast of the image.
Open the Shadow/Highlights menu and move the Shadow slider, thus “pulling” information from the dark areas of the frame.
The photo became what we wanted: bright, contrasty and saturated.
This technique is used by many professional photographers - it is simple and immediately makes the picture “tastier.”
Our picture has become more interesting, but I’m sure you don’t like this large bright area in the frame either:
With Capture One you can remove it very easily. To do this, we will use the Local Adjustments tool.
Local Adjustments
With the help of Local Adjustments we can work individually with certain areas of the frame.
In our case, we need to darken the light cloud a little.
First, let's create a new layer in which we will work, and call it “Cloud”.
Now select the desired area with a brush:
And darken it:
We “stretched out” the texture of the clouds and now the frame looks much better:
Essentially, working with Local Adjustments is an evolution of classic HDR processing, but instead of stitching together several frames, we simply “paint” HDR.
Curves and Levels
In Capture One, you can work with curves and levels both in RGB mode and separately with each channel: Red, Green, Blue. This is one of the most effective techniques for fine RAW color correction.
How is this used in practice?
We've got a nice shot, but it would be nice to tone down the orange-red tone a little.
For such a task it is very convenient to use Curves.
Let's open the red channel and change the position of the curve quite a bit:
And we immediately get the result we need:
You can read more about working with curves in Pavel Kosenko’s excellent article “How Curves Work”
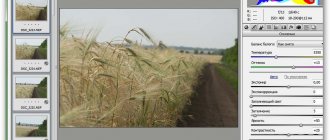
White Balance
I already wrote about working with white balance in Capture One in the article “Five Techniques for Photographing Concerts”
In general, working with white balance (WB) is almost identical in all modern RAW converters, but many novice photographers simply do not fully understand all the capabilities of this tool.
Therefore, I will quote part of my article with an example of BB processing of a concert photograph:
“We have a typical shot spoiled by poor lighting (the whole picture is filled with one color).
Let's see what we can do using the white balance settings.
Obviously, we have too much magenta in the frame - move Tint to the left and add greenery.
Magenta is gone, but the colors of the picture have become unhealthily cold. No problem - we increase the color temperature to 12,000 Kelvin:
For clarity:
Of course, you can still work and work on the color here, but it’s just a couple of passes in the Raw converter, it’s a matter of minutes, and the picture has become much more interesting.”
How to download Capture One
Go to the website www.phaseone.com This site is the official website of the CAPTURE ONE
For convenience, you can go directly to the program download page.
Choose Windows or Mac and download a free trial for 30 days.
But since we are not registered, we will be redirected to the registration page.
Select “create a new user” and fill out a simple form.
We will receive an email confirming your registration. We need to follow the specified link in the letter.
When we click on the link, we return to the program download page, at this time it should have already downloaded automatically, and if it has not downloaded, then click again” .
A disk with the program will appear in the downloads folder.
We click on it and a window appears where we must accept the conditions.
Next we have this. Drag the program icon into this folder with the mouse.
Now CAPTURE ONE will be located on your computer in the “Programs” folder. To launch it , click on its icon.
CAPTURE ONE every time , after starting the program, right-click on the CAPTURE ONE in the Dock menu and click “leave in Dock”. Now it will be even easier to call him.
After the first launch, a warning window may appear indicating that we downloaded this program from the Internet. We confirm that we still want to open it.
Which version of Capture One should I choose?
The first thing we will see after launch is the program specification selection window.
Sony owners will be interested in 2 versions , which differ only in the depth of capabilities.
- The Express version is free to activate and only works with Sony RAW files and is useless for other cameras. Has a standard set of functions.
- The Pro version works for 30 days for free, and then you can purchase a license or continue to use the Express version. Has an expanded set of functions.
Difference between Express and Pro
Capture One Express for Sony Capture One Express is a simplified version of a professional RAW converter. It has everything for full-fledged work with photographs:
- Accurate and realistic color interpretation of RAW files. This is one of the main reasons why professionals choose Capture One and the Express version is no different from the Pro version.
- All basic processing tools. You'll be able to control exposure, contrast, white balance and clarity of your photos, work with basic levels and curve settings, work with color in detail, eliminate noise, and sharpen frames.
- Extensive possibilities for storing and cataloging photographs. Capture One is a program not only for processing, but also for cataloging photographs. The Express version supports all the tools for creating a thoughtful photo archive with keywords, ratings and tags, as well as quickly searching for photos in it.
But the most important thing is that you get professional quality work with RAW completely free of charge !
Additional features of Capture One Pro
Capture One Express is perfect for maintaining a photo archive, high-quality basic photo processing and converting into ready-made JPG/TIFF files.
But for more advanced processing, of course, you need the Pro version. Capture One Pro for Sony Capture One Pro for Sony is designed to solve professional problems: shooting on a computer, complex processing and detailed color correction of photographs, working in layers and editing frames.
- Channel-by-channel Levels corrections
- Channel-by-channel Curves corrections
- Color Editor Advanced, Skin Tone operating modes
- Tools for working with layers and retouching (Local Adjustments, Repair Layers)
- Color Balance
- Imitation of film grain (Film Grain)
- Keystone Correction (Keystone)
- Tools for precise determination of focus Focus Tool and Focus MaskSessions operating mode
- Advanced file conversion settings
- Taking photos on a computer
- Customize the program interface for yourself.
If you conduct commercial shooting or are seriously interested in photography, you cannot do without these tools.
Bonuses:
- For owners of Sony cameras, a license for the Pro version is significantly cheaper: 50 euros versus 279 euros for the standard Capture One Pro 9.
- You can activate the program on two computers simultaneously, which is very convenient if you have not only a desktop computer, but also a work laptop.
No. 2. Color processing
Color processing capabilities are Capture One Pro's main strength. There is plenty of room here for connoisseurs of quality color work.
The main color correction tool in Capture One is called the Color Editor.
You can select any color and change its Hue rotation, Saturation and Lightness.
In general, this is standard functionality for any professional RAW converter.
Capture One's strength lies in its choice of color for correction.
To do this, the Color Editor has three options: Basic, Advanced and Skin Tone.
Basic
Basic is the easiest way to quickly select the color you want and adjust it.
How it works?
Let's take a landscape photograph - it will be easiest to show the work of this tool.
For clarity, I will simply desaturate different areas of the frame. This is more convenient to show the color options, but during the “real” processing you can increase their saturation, change their brightness, or paint them a different shade.
So, first, let's select the blue color and its neighboring shades to decolorize the sky in the frame.
As you can see, it's very simple. Now let’s highlight the colors of the lawn:
If you need to quickly process certain colors in a frame, Basic is a very handy tool.
But for more serious work with color in the Color Editor, it’s best to use the Advanced mode
Advanced
Advanced has two advantages:
1) You can quickly select the desired color for correction. 2) In Advanced mode you can work with selected areas Local Adjustments
I'll tell you briefly about each function.
Color selection
Let's take any photograph, for example, a frame with my nephews - Vladik and Sonya:
We can select all the children’s blue clothes in one click: to do this, just take the selection dropper and click, for example, on a blue T-shirt.
Capture One itself will determine the desired shades of color that are contained in this color area.
And for clarity, let’s desaturate the selected colors:
Color selection with a pipette is a very convenient tool for detailed processing.
But what if we need to change the color of just one item of clothing - for example, a T-shirt?
Selecting a T-shirt so that no other colors change will not work. Simply because children’s jeans are also “dyed” in blue and its shades.
This task is very easy to solve using Advanced mode with the Local Adjustments tool.
Advanced and Local Adjustments
Open Local Adjustments and create a new layer, call it “Vladik’s Mike”:
Take a brush and highlight the T-shirt in the frame:
Now all color changes will occur only in this selected area of the photo.
Go to the Advanced mode of the Color Editor, select the colors of the T-shirt and completely desaturate them.
The entire frame remained unchanged and only the T-shirt changed its color:
The combination of the Advanced and Local Adjustments tools opens up enormous possibilities for RAW processing: you can change the color of any part of the frame directly in the RAW converter.
Skin Tone
Skin Tone is an interesting feature designed to even out skin tone.
But this is already a serious, professional tool, which cannot be discussed in a review article.
Local Adjustments, Curves, Color Editor and other great processing features are just a few of the features you can use to work with RAW in Capture One.
I work with C1 not only because of its extensive processing capabilities, but also simply because it is a very convenient program for professional work.
Layers and masks
Working in a raw converter is often an intermediate process on the way to the finished result. The final processing of the frame occurs in Photoshop. Capture One Pro 12 allows you to save time and perform most operations in its own shell.
Similar to Photoshop, it works with layers. This means you can locally influence specific areas of your photos. It is enough to fill with a mask one or another object in the frame and work on it separately, without affecting the entire photo as a whole.
No. 3. Interface settings and hotkeys
For me, a professional tool is not complete without customization and customization options.
In Capture One, you can change the appearance of anything and everything, from the layout of interface elements to the functionality of each tab with processing tools.
How can (and should) this be used at work?
First, let's arrange all the interface elements in a convenient order.
The standard Capture One interface looks like this:
But personally, I prefer a different arrangement of controls:
I want the processing tools to be on the right:
And the photo gallery is on the left, not at the bottom of the screen:
If you don't need the frame information (ISO, aperture, etc.), you can simply hide it:
Now we optimize our workspace for processing, say, reportage photography.
What's the most important thing to have on hand when editing a report?
Of course, these are exposure settings, white balance and the Rotation function for quickly adjusting the horizon.
The problem is that in most programs these tools are located in different thematic tabs.
Same thing in Capture One. But C1 allows you to move any functionality to any place in the interface.
Therefore, we can simply drag and drop all the necessary tools into one tab:
Thus, we have all the necessary tools for processing reportage footage in quick access:
Now we will save all this happiness in a separate workspace (let’s call it “reporting”) and will be able to return to these interface settings at any time.
In a similar way, you can create a workspace for processing studio shots or, for example, landscape photography.
I don’t think there’s any need to talk about the fact that all Capture One functions are controlled through customizable hotkeys. This is the standard for any professional level program.
Optimizing the workflow saves only a fraction of a second during processing, but those seconds add up to hours of time saved if you work with a large volume of photos.
Capture One Pro 20 / Strengths
Capture One Pro is feature-rich with almost everything a photographer needs in an editing app.
As far as photo editors go, there are a few places where Capture One just rocks it. I've already mentioned the ability to customize the interface, but that's just the starting point.
Here are some of the other benefits of using Capture One Pro over Lightroom, or most other image editing programs out there:
Excellent RAW File Conversion
Each brand has its own special recipe for rendering RAW files, but Capture One has long been known to be exceptional.
I knew this was coming and I wasn't disappointed. especially in terms of excellent color rendition, dynamic range and detail capture.
For me, the way Capture One displays and processes RAW files is far superior to anything I've seen in Lightroom or any other image editing app in 2020.
Take a look at the video below to see how a photographer uses Capture One Pro to edit high-quality fashion portraits.
It's also interesting to hear how he uses Capture One in conjunction with Photoshop to create his final piece—it's obviously easy to switch from one program to the other for a seamless editing workflow.
Tools Adjustment Tools
When it comes to the level and selection of standard adjustment tools—exposure, contrast, shadows, highlights, white balance, etc.—Capture One is up there with the best. The Pro version has everything you need .
However, some things are done differently. For example, for beginners, the “vibration” setting seems to be missing, but grab one user adjustment “saturation” as a vibration adjustment.
To edit direct saturation you need to go to another tab. I wouldn't know this if I didn't do the research, but I think this happens whenever you use brand new software.
Capture One Pro comes with excellent capstone adjustment.
There are many useful AutoCorrect options for almost every tool, and they work better than my version of Lightroom. (I'm not using the AI version.)
The automatic level adjustment seems particularly noticeable. I'm not a big fan of autocorrect on my portfolio photos, but for non-critical photos I don't mind speeding up my workflow by using them.
It would take a whole separate blog post to go through all of Capture One Pro's offerings in terms of adjustments, but suffice it to say that you'll find almost everything you need at a professional level as well. (The Express version is obviously a little more limited.)
Masks masks and layers
Like Photoshop, Capture One Pro (not Express) allows you to edit layers . Lightroom has adjustment points for brushes or gradients, but it's not quite the same. (Capture One has them too.)
When you use layers in Capture One Pro, you can make targeted adjustments to your photos and still use most of the image editing tools available, not just the ones found in this tool. This is a huge benefit for those who like a great level of control over photo manipulation.
To create masks, you can draw them by hand, create a linear gradient mask, or create a radial gradient mask (similar to Luminar). It also offers instructions for working with the zoom program in Russian and a tool for refining the edge.
The Luminance Range feature in Capture One Pro is a particularly useful way of selecting areas of an image.
All the tools from Levels to Color Balance work in layers, and you can adjust the opacity of each editing layer—something that can only be done using a third-party plugin in Lightroom.
This latest version of Capture One Pro 12 now has luminance masks. They are called Luma and can be found in the Layers dialog box.
This is definitely a winning feature for Capture One and the reason why many professionals really love it.
Color correction
If you're someone who loves fine-tuning your color, you'll fall in love with what the capture can do. This is one of the places where it has always been ahead of Lightroom.
One tool's capture of color balance is more like color sorting. Unlike most other editing programs, Capture One doesn't limit you to an 8-color HSL panel—the Pick Color tool lets you select any color or color range in your image.
From there, you can adjust the appropriate color range, hue, saturation, and brightness. The 3-Way option even allows you to adjust the color tone separately in the shadow, midtone, and highlight areas.
Do you want to influence the blues in your photography, but not the blue-greens? Take it easy! Should skin tones be smoothed? No problem. Simply select the skin tone tab, select a color range, and adjust the uniformity sliders.
Of course, most of Capture One's truly advanced color tools are only available in the Pro version. The Express version just has a basic tab.
Additionally, these are not settings that most beginners (or even some pros) will necessarily gravitate towards, and they do take some time to learn.
However, if you want complete control over your color , Capture One certainly wins hands down over Lightroom and everyone else in the same niche.
Kinovyaz
If you shoot in a studio, chances are you know the value of shooting tethered. There's nothing better than seeing images unfolded on your computer screen as you take them. This allows you to check details that you simply cannot see on your camera screen.
Most studio photographers who shoot tethered are already using Capture One. After all, that's what it was originally made for, and it particularly excels in this area.
The snapping feature in Capture One Pro makes it an obvious choice for studio photographers.
With it, you can control almost everything via cable, including details such as the flash curtain's timing mode. You can also see a live view of your camera on your computer screen.
If you've ever thought about shooting tethered, Capture One is the editing software you need to try first.
Healing Spots capture one pro 20 quick start
While most modern editing programs have some version of spot healing, Capture One does it faster and smoother than Lightroom and Luminar. (I haven't tried On One yet, but will review it soon.)
Unlike Lightroom, the healing points do not overlap, making fine adjustments easier. It also just looks better - almost on par with Photoshop (which is where I usually do my more complex spot healing).
Comments
Whether you're submitting your work to the Editor or working with a team, Capture One Pro has an annotation feature that makes collaboration much easier .
The annotations feature works well in Capture One Pro, especially with a Microsoft Surface Pro or tablet device.
It allows you to add notes directly to a photo in basically a layer that you can draw/write on. Definitely useful for co-editing or sending an image with notes to a client.
Choosing between sessions and directory
Not everyone enjoys working with a catalog system, especially if you have a particularly large volume of photos, many individual shots, and/or already have a good file organization system on your hard drive.
Capture One allows you to organize photo sessions according to your preferences, rather than using a catalog. That's why Capture One is a popular choice for studio professionals .
If you're coming from Lightroom, you'll probably be automatically drawn to the catalog, but it's nice to know you have a choice.
Speed speed and performance
Many people say that Capture One is actually superior to Lightroom in both speed and stability.
To be honest, I haven't tested the two software side by side extensively enough to draw my own conclusions on this matter.
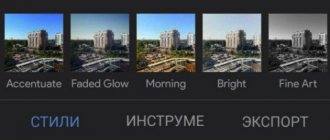
Styles
Like Lightroom presets but much more powerful, Capture One Styles are one-click solutions for bringing your RAW files to life.
You can apply styles to enhance the curves, saturation, and tonal settings in your images—all without changing key capture parameters like exposure and white balance. There are several styles available from famous photographers that help you emulate their color gradation.
SIM Simulation of Fujifilm Films
One of the huge benefits of using a Fujifilm X-series camera is the built-in film simulations such as Acros, Classic Chrome, Velvia, etc.
Capture One 12 now adds the ability to change the starting point of your edit for one of the simulation movies, like curves in the Base Features tool.
No. 4. Batch Processing
Since one of my main specializations is reportage photography, batch photo processing is fundamentally important to me. That is, fast processing of a large number of photos.
And Capture One has all the conditions for comfortable processing of a large number of files.
I'll tell you about the three main functions of batch processing:
1) Auto Adjustments
Auto Adjustments allows you to apply automatic processing algorithms to a large number of files at once. For example, increase the contrast a little or darken/lighten the picture.
The program itself will determine how strong changes need to be made and, as a rule, copes well with this.
Photos taken in difficult conditions (with strong differences in light and shadow) must, of course, be processed manually; no “automatic machine” will help here.
But the program copes quite successfully with footage taken under “normal” conditions.
Although such processing can by no means be considered complete, it is simply convenient that the program will quickly apply functions that you would do yourself (a slight increase in contrast, etc.) to all photographs.
It is important to note that you can choose which parameters will be changed: Exposure, White balance, Levels and others.
2) Copy&Paste Adjustments and styles
Once you've processed a picture, you can copy all or selected file settings and apply them to any other photo. A very convenient feature that significantly speeds up the processing process.
After all, if you have several photographs taken under the same conditions, you can process one in detail, and apply the same settings to others with minor edits.
In addition, to simply copy processing settings, you can save them as a separate “style” and use them to work with other photo sessions.
How can this be used?
For example, you can create a style with sharpness settings that are universal for reportage photographs, or preserve interesting color or black and white processing.
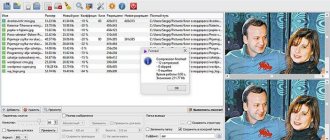
3) Photo conversion
Capture One's photo conversion capabilities will delight any professional photographer.
As with any professional RAW converter, you can configure all file conversion parameters: size, quality, color profile and other characteristics.
But in addition to this, Capture One allows you to convert a RAW file into several formats at once.
For example, with one click you can convert a photo to TIF, full-size JPG and small JPG 800px long side.
In this case, each file will be saved in its own folder.
An amazingly convenient thing that saves a lot of time.
Phase One Capture One 20 Pro 13.1.2.35 + Styles VIP
Subscribe to updates
When the news changes, you will receive a notification by E-mail.
Subscribe
Already subscribed: 12
Phase One Capture One PRO
one of the most powerful professional digital photo converters in RAW format with support for a wide range of modern cameras. The program allows you to convert files on the fly in single and batch modes into full-size TIFF (RGB / CMYK) and JPG formats, adjust white balance, effectively process “overexposed” and “underexposed” images, fine-tune the sharpness of the image and eliminate color noise.
Capture One
allows you to use several adjustment options for the same image. The original RAW is used as a template, not the result of previous adjustments. The work area is divided into several areas. Their number is equal to the number of processing options for the original digital negative. White balance is adjusted using color temperature and hue controls. In addition, it is possible to select scene programs, traditional for many cameras. You can also use a pipette. The photograph indicates a neutral gray point, from which the white balance is built.
The program allows you to optimize the dynamic range. If there are too dark or light areas in the photo, they can be developed by restoring shadows and highlights. You can turn on and off the backlighting of highlighted areas of the image and shadows. Removing noise in photographs is carried out in two directions. You can suppress grain and color noise. Capture One Pro has always distinguished itself from its competitors with a unique algorithm for sharpening images. Photos converted with this RAW converter look slightly sharper than those of its competitors.
Capture One Pro is designed to be all-in-one, reducing the need for post-processing, which in practice means you don't have to use Photoshop to process your photos. Simple tools, simple menus and clear symbols make the complex process of processing RAW files simple, intuitive and effortless.
Program features:
- Import photos with previews.
- Batch processing of images with pre-specified settings.
- Simultaneously convert one RAW file into several formats.
- Correct support for ICC color profiles.
- Correction of chromatic aberrations, distortion, vignetting and other optical image defects.
- Fine-tune color tones and white balance using the wheel.
- A separate panel for setting skin tones, with the ability to save presets.
- Possibility of separate toning globally or by control points directly on the photo through the color editor.
- Supports the most popular DSLRs and digital backs from Phase One.
- Directly capture images from cameras when connected via cable or Wi-Fi.
- Overlay feature for composition and design.
- Supports work on multiple monitors.
OS:
Windows 7 SP1 64-bit, Windows 8.x 64-bit, Windows 10 64-bit
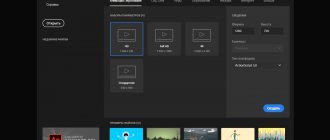
Video
Download speed is 300 kb/s, to download files faster, purchase Premium!
Download Phase One Capture One 20 Pro 13.1.2.35 + Styles [474.55 Mb]
Buy Premium - More details
To report a new version/bug, please register
photos, RAW, image converters
No. 5. Removing matrix dirt and other joys
If you shoot a lot, you will definitely get dust on the sensor.
You can remove it at home or take it to a professional photo shop.
But when there are only one or two small spots on the frame, you don’t want to bother with cleaning, and it’s a pity to spend money on a workshop.
For such situations, Capture One has an excellent matrix dirt removal system. You simply mark the places of contamination and the program itself “retouches” them.
The cleaning is done very efficiently, leaving virtually no traces of retouching.
But the most convenient thing is that once you notice the dirt on one frame, you can apply “retouching” to all photos.
To do this, you just need to use the already familiar Copy&Paste Adjustments function, copying only the Dust settings.