Return of the toolbar in version 2003
This part of the interface disappears for two reasons: accidental disabling of an element and corruption of the settings file. In the first case, there are 2 ways to return the toolbar in Word. The first and simpler one is as follows:
- In any free space next to the menu bar, you need to right-click (right mouse button).
- In the long list that opens, select the disappeared combination of instruments.
The second method is a little more complicated. To use it to return the toolbar to its place, you need to:
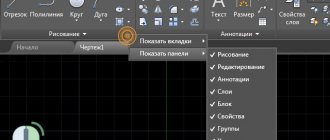
- In the “Service” drop-down menu, select “Settings”.
- In the window that opens, go to the “Toolbars” tab.
- In the list on the left side of the window, check the boxes next to the required elements.
- Click "Close".
In the same window, you can create your own empty toolbar using the “Create” button. If the settings file is damaged, you will have to recreate everything again.
How to get the toolbar back in Word 2007
In all Microsoft Office programs from 2007 and later, the toolbar refers to the toolbar. She cannot fall into the abyss, as happens in the 2003 version. The reason is that it combines a standard menu bar and a toolbar. But the ribbon can be minimized if you left-click on any free space in the editor window. To get rid of this property, you need to:
- Right-click on the line where the tab names are placed.
- In the drop-down menu that appears, click on the “Collapse Ribbon” item.
The second way to return the toolbar in Word is as follows:
- On the Quick Access Toolbar (located near the Office button), click on the “Customize Quick Access Toolbar” button.
- In the menu that opens, select “Collapse Ribbon”.
There is also a hotkey associated with this function in Word 2007: Ctrl + F1.
Microsoft Word 2010 interface
general information
The Word 2010 interface is a further development of the user interface, which was first used in the release of the Microsoft Office 2007 system. When creating the interface, the developers set the task: to make the main Microsoft Office applications more convenient to use. The result is the Microsoft Office Fluent user interface, which makes it easier for users to work with Microsoft Office applications and get better results, faster.
In previous releases of Microsoft Office applications, users were provided with a system of menus, toolbars, and dialog boxes. This interface worked well as long as the applications had a limited number of commands. Now that programs perform many more functions, it becomes difficult for users to work with the old system: there are too many software features and they are difficult to find.
Office Fluent has redesigned the user interface to make it easier to find and use the full range of features these applications provide. In addition, it was intended to prevent clutter in the work area so that users would be less distracted by searching and could spend more time and energy on their work.
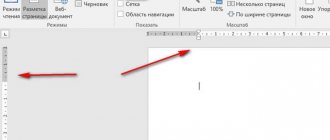
Ribbon
The main user interface element of Microsoft Word 2010 is the ribbon that runs along the top of each application window, instead of traditional menus and toolbars (Figure 1.1).
Rice.
1.1. Ribbon
Using the ribbon, you can quickly find the necessary commands (controls: buttons, drop-down lists, counters, checkboxes, etc.). The commands are organized into logical groups, organized into tabs.
You cannot replace the ribbon with toolbars or menus from previous versions of Microsoft Word.
You also cannot delete the tape. However, to increase the work area, the ribbon can be hidden (collapsed).
- Click the button Collapse the ribbon
, located on the right side of the line of tab names (Fig. 1.2).Rice.
1.2. Rolling up the tape - The ribbon will be hidden, the names of the tabs will remain (Fig. 1.3).
Rice.
1.3. Window with rolled tape
The ribbon can be folded in another way.
- Right-click anywhere on the ribbon (see Figure 1.2).
- From the context menu, select Collapse Ribbon
.
To use the ribbon in its minimized state, click the name of the tab you want, and then select the option or command you want to use. For example, with a tab minimized, you can select text in a Word document, click the Home
and in the
Font
select the desired font size. After selecting the font size, the ribbon will collapse again.
To quickly collapse the ribbon, double-click the name of the active tab. To restore the feed, double-click the tab.
You can also press Ctrl + F1
.
The appearance of the ribbon depends on the width of the window: the larger the width, the more detailed the tab elements are displayed. The pictures show the display of the Home
with different window widths.
Rice.
1.4. Displaying the Home tab ribbon when the window width is 1024 pixels
Rice.
1.5. Displaying the Home tab ribbon when the window width is 800 pixels
Despite hiding individual elements of the ribbon, they all remain accessible. Just click on the icon or arrow of the group name button (Fig. 1.6), and all elements of the group will be displayed.
Rice.
1.6. Displaying hidden elements of the Home tab ribbon when the window width is 800 pixels
If the window width is significantly reduced (less than 300 pixels), the ribbon and tab names are no longer displayed.
Rice.
1.7. Hiding the ribbon and tabs when the window width is reduced
The same thing happens with a significant decrease (less than 250 points) in the window height (Fig. 1.8).
Rice.
1.8. Hiding the Ribbon and Tabs when Window Height is Reduced
When you increase the window size, the ribbon automatically reappears.
In Microsoft Word 2007, the content of the ribbon for each tab was constant and unchanging. It was impossible to add any element to the tab, nor to remove it from there. In the current version, the ribbon can be customized: rename and change the order of permanent tabs, create new tabs and delete them, create, delete, change the arrangement of groups of elements on tabs, add and delete individual elements, etc.
- Right-click anywhere on the ribbon (see Figure 1.2).
- From the context menu, select Customize Ribbon
.
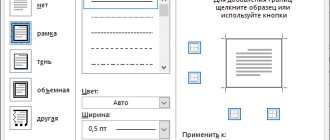
Ribbon customization is done in the Ribbon Customization
Word Options
window (Fig. 1.9).
To restore the ribbon to its default settings, click the Reset
and choose the command you want to restore only the selected ribbon tab or to reset all ribbon changes.
Rice. 1.9. Customize the Ribbon
The return of the toolbar in versions 2013 and 2020
The interface of these versions of the text editor is very similar to 2007 and 2010, but the functionality and customization options are very different. It provides the user with 3 feed display modes:
- Complete hiding (similar to Expert Mode in 3ds Max 8).
- Only the name of the tabs. Clicking on them expands the tool ribbon completely, and clicking on an empty space collapses it again.
- Tabs and all commands.
To select the most appropriate display mode, you need to click on the button with a rectangle with an upward arrow on it on the right side of the window (next to the window control buttons). It will bring up a small menu where you can select one of three modes.
In addition to controlling the display of the ribbon, in versions 2013 and 2020 there is the ability to customize it. Customization allows you to remove unnecessary tabs and create your own. This innovation leads to the problem of missing tabs. The method of how to return the toolbar in Word comes down to the following algorithm:
- Click the “File” button (replacing the round “Office” button).
- In the window that opens, select the “Options” sub-item.
- In the new window, go to the “Customize Ribbon” subsection.
- On the right side of the window, check the boxes next to the names of the missing tabs.
- Click OK to save the settings.
What to do if the toolbar has disappeared in MS Word
Has the toolbar disappeared in Microsoft Word? What to do and how to get access to all those tools without which working with documents is simply impossible? The main thing is not to panic, just as it disappeared, it will return, especially since finding this loss is quite simple.
As they say, everything that isn't done is for the best, so thanks to the mysterious disappearance of the Quick Access Toolbar, you can learn not only how to get it back, but also how to customize the elements that appear on it. So let's get started.
Enable the entire toolbar
If you are using Word 2012 or higher, you just need to click one button to return the toolbar. It is located in the upper right part of the program window and looks like an upward arrow located in a rectangle.
You press this button once, the disappeared toolbar returns, press it again - it disappears again. By the way, sometimes you really need to hide it, for example, when you need to concentrate entirely on the content of the document, and so that nothing unnecessary distracts.
This button has three display modes; you can select the appropriate one just by clicking on it:
- Automatically hide the feed;
- Show tabs only;
- Show tabs and commands.
The name of each of these display modes speaks for itself. Choose the one that will be most convenient for you while working.
If you are using MS Word 2003 - 2010, to enable the toolbar you must perform the following manipulations.
1. Open the View and select Toolbars .
2. Check the boxes next to the items that you need to work.
3. Now they will all appear on the Quick Access Toolbar as separate tabs and/or tool groups.