Toolbar in AutoCAD - a brief overview
The commands necessary for constructing a drawing and editing it are located on the toolbars (“Drawing”, “Editing”, “Layers”, etc.). These commands will help you start learning the AutoCAD program, and our articles from the “AutoCAD for Beginners” tutorial section will give a complete understanding of them. The commands are structured and located on the menu ribbon. Thematic tabs such as “Insert”, “Annotations”, etc. contain sets of toolbars. This allows you to quickly find the required command.
How to hide/add new toolbars to the ribbon?
To do this, right-click on any panel. A list will appear in which you need to select “Show panels”. By checking or unchecking the box next to the panel name, you will, accordingly, add it or hide it from the ribbon.
This is important when you have a small monitor. In AutoCAD, the toolbar is minimized to buttons . It becomes inconvenient to select the desired command. In this case, it is advisable to remove panels that you do not use.
In addition, toolbars can be dragged to a convenient location on the ribbon. Just hold LMB at the bottom of the panel and move it to a suitable location with the mouse.
How to enable (display) the hidden toolbar in AutoCAD
Classic toolbars
To display the hidden toolbar in AutoCAD, you need to right-click on any visible AutoCAD panel. For example, right-click on the “Drawing” toolbar in AutoCAD. In the drop-down list of toolbars, click the checkbox next to the AutoCAD panel that you want to display. Accordingly, the AutoCAD toolbars that are displayed in the interface are checked in this list, and hiding the AutoCAD toolbar is not checked.
- How to show (hide) the classic toolbar in AutoCAD.
Toolbars in the Ribbon
To display a hidden toolbar in AutoCAD in the toolbar (the toolbar in AutoCAD consists of toolbars sorted into tabs, article AutoCAD interface), you must also right-click on any visible AutoCAD toolbar in the ribbon. A list will appear in which you need to select the line “Show AutoCAD panels”. By checking or unchecking the box next to the name of the AutoCAD panel, respectively, you will hide or add the toolbar to the ribbon.
- How to enable or disable the toolbar in AutoCAD in the toolbar.
When you have a small monitor (or rather, a small screen extension), it is advisable to hide unnecessary/unused toolbars in AutoCAD, and add frequently used panels to the AutoCAD interface.
Note
In AutoCAD, the toolbars in the ribbon can be moved to any convenient place, and you can also drag the AutoCAD panel onto the working area of the drawing. Just hold down the left mouse button at the bottom of the panel and move it to the desired location. If you move the AutoCAD toolbar to the working area of the drawing, it will acquire the status of a floating panel .
- How to move (drag) the AutoCAD toolbar.
Working with the Quick Access Toolbar.
The Quick Access Toolbar is designed to display frequently used tools. By default, this panel contains some tools. They can be deleted by right-clicking → “Remove from Quick Access Toolbar”.
For convenience, you can take out the necessary tools. To do this, just select the appropriate command on the ribbon, right-click → Add to the “Quick Access” panel. This optimizes your experience in AutoCAD.
What to do if tools are missing in AutoCAD?
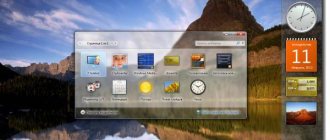
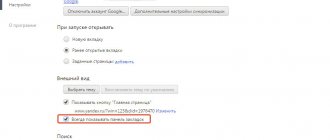
If the toolbar has disappeared in AutoCAD, then perhaps you simply changed the presentation of the ribbon. To put everything back in place, use the button in the upper right corner, as shown in the figure:
This can be done by brute force, or you can select the desired display from the list by clicking the arrow next to it. Try this if you have lost the toolbar in AutoCAD. So, there are three options:
– collapse to panel buttons;
– collapse to panel names;
– collapse to tabs;
Be sure to check if you have hidden the AutoCAD toolbar you need.
Now you know what to do if the toolbar disappears in AutoCAD . Don't be afraid to experiment and explore the interface yourself!
AutoCAD toolbars are missing
“All toolbars in AutoCAD have disappeared!” — you may have changed the appearance of the toolbar. Toolbars in the ribbon can be minimized to panel buttons, names, or you can leave only the tab names in the ribbon, so just click on the button in the far right position of the tab names of the AutoCAD tool ribbon (see figure). Either by brute force, or select the desired “Browse through all options” toolbar view from the list.
- How to fix the toolbar in AutoCAD.
Customizing the toolbar in AutoCAD
AutoCAD is a huge program in its capabilities, and those panels that are displayed by default immediately after installing the program represent only very small of its capabilities, only the most necessary ones. That is why, first of all, it is very important to solve the question of how to open the toolbar in AutoCAD - just to understand everything that the developers provide. Not to mention the fact that these objects can be customized at will - some rarely used features can be removed, and some, on the contrary, can be displayed.
How to open and pin the toolbar in AutoCAD
Toolbars in AutoCAD contain many commands (tools), so to make the display of AutoCAD panels compact in the toolbar, some of them are hidden. Therefore, some commands are also hidden. To open the AutoCAD toolbar completely (display the extended toolbar), click on the arrow to the right of the AutoCAD panel name.
- How to open the AutoCAD toolbar completely.
You can pin the AutoCAD toolbar in an extended view. Click on the pin in the lower left corner of the AutoCAD panel.
- How to pin the AutoCAD toolbar.
Panels in the latest versions of AutoCAD
So, if the toolbar has disappeared in AutoCAD, returning it to its place will not be difficult. In newer programs, panels are presented in two forms - a ribbon and a classic menu. If you have a “tape” and it has disappeared, then to output it, just press the key combination “Ctrl + 0”. When you press the same key combination again, the panel will disappear again.
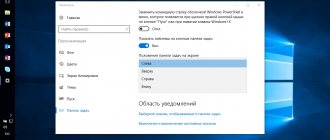
If classic is assigned, then to activate the “ribbon”, in order to also see the available commands, you need to go to the “Tools” tab, then select “Palettes” and the “Ribbon” line. If the panel is very modest - only one line, and there is no “Service”, then you need to turn to the down arrow button, this button is the one on the far right in the menu bar.
We click on this button and such a wide menu is turned on again. Now the button already has an up arrow, press it again, and the menu shrinks. This is useful when the display size is not so large and there is not enough space to display the drawing.
How to get the toolbar back in AutoCAD
1. If you find that familiar tabs and panels have disappeared at the top of the screen, press the hotkey combination “Ctrl+0” (zero). In the same way, you can disable the toolbar, freeing up more free space on the screen.
Want to work faster in AutoCAD? Read the article: Keyboard shortcuts in AutoCAD
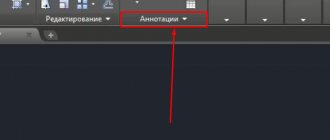
2. Let's assume you are working in the classic AutoCAD interface and the upper part of the screen looks as shown in the screenshot. To activate the Tools Ribbon, click on the Tools tab, then Palettes, and then the Ribbon.
3. Using AutoCAD, you may find that your toolbox looks like this:
You also need to have instant access to tool icons. To do this, simply click the small arrow icon. Now you have a full feed again!
With these simple steps we activated the toolbar. Set it up the way you want and use it for your projects!
Working with panels in a more familiar way
Another, more familiar way to solve the problem, how to return the toolbar, any of almost two dozen, is offered in versions up to and including 2006.
Here we proceed as follows:
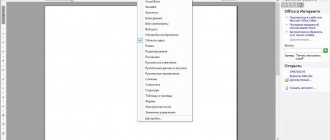
- Go to the “View” menu.
- In the field that opens, select “Toolbars” in the bottom line.
- The user settings open - there are 4 tabs, but we will be interested in the second one - “Toolbars”.
- We note that opposite each line there is a position for setting the output checkbox. Those that are currently being displayed are provided with a tick; those that are not being displayed do not have a tick. The conclusion is made by simply checking this box. Initially, the panel is placed like a window, with a closing “cross”, but by grabbing the header with the name with the mouse, it can be moved to any other place; if the object is moved all the way to the left, right, up or down, it becomes an elongated line of command icons.
Ribbon or toolbars become blank or not visible in AutoCAD
Author:
Support
Problem
Causes
- The screen cleaning feature is enabled.
- The feed is accidentally disabled or set to auto-hide.
- Toolbars were unintentionally hidden.
- The AutoCAD workspace is not selected or modified.
- After installing the CAP 2020 service, your workspace settings have changed.
Solution
Disabling Screen Clearing in AutoCAD
The screen wipe feature increases your drawing area by hiding the ribbon, toolbars, and palettes. Press CTRL + 0 (zero) to toggle the screen clearing option. If the Command Prompt displays CLEAR ON at this time, press CTRL+0 again to turn it off.
Turn on the tape
At the command prompt, enter the command TAPE to restore the tape. If you also want to customize the ribbon view, click the cycle button to the right of the ribbon tab to switch between panel views.
Enable toolbars
Type MENUBAR and set the value to 1 to enable the menu bar. Then click Tools → Toolbars to enable toolbars. Alternatively, at the command prompt, you can enter -BARN , followed by All and Show to display all toolbars.
Select or reset the current workspace
- On the status bar, click the drop-down arrow next to the workspace gear icon.
- Select or switch to a different workspace.
- If necessary, return the desired workspace.
Restoring AutoCAD to Default Settings
Installing AutoCAD updates
Video card driver update
See Install the latest certified video driver. If your video card is not certified and installing the latest driver does not resolve the issue, the problem may be hardware related. Try installing a certified graphics card or running AutoCAD without hardware acceleration (see Run AutoCAD-based programs without hardware video acceleration).
Reinstalling the .NET Framework and Visual C++
Uninstall and reinstall the .NET Framework (or upgrade to the latest version of Windows 10) and Visual C++ (see Uninstall and reinstall the Microsoft .NET Framework and Uninstall and reinstall the Microsoft Visual C++ Runtime Libraries).
Login with local administrator credentials
AutoCAD may be prevented from running by high levels of user account restrictions (see AutoCAD will not run as a restricted user).
Repairing or reinstalling AutoCAD
In Programs and Features in Windows Control Panel, run AutoCAD Repair. If restoring does not fix the problem, reinstall. If reinstallation does not work, completely uninstall and reinstall the software (see Repairing or reinstalling AutoCAD).
How to open and return the toolbar in AutoCAD
Computer-aided design systems are required to create drawings and edit diagrams.
To create drawings and edit diagrams, computer-aided design systems are required to simplify the creation process for architects and designers. The user configures the workspace at his discretion and must know what to do if the toolbar in AutoCAD disappears. A structured menu and thematic tabs help you work quickly. But if the user does not know how to return the toolbar in AutoCAD, the process slows down.
How to return (call up) the toolbar in AutoCAD using the Panel command
The most universal and simple way to return the toolbar is to use the Panel in AutoCAD.
Call the Panel from the AutoCAD command line. AutoCAD will issue a request:
Panel name or [ALL]:
Enter into the command line the name of the hidden AutoCAD panel that you want to return to the interface. Press Enter. The following prompt appears on the command line:
Set the parameter [show, hide, left, right, top, bottom, float]:
- How to return the toolbar to AutoCAD or show it using the Panel command.
That is, if you want to open the toolbar in AutoCAD, then select the Show panel option.
If you hide the AutoCAD panel, then select the Hide panel option.
In order to position the toolbar in the program window, select the remaining command options (you will need to specify the positioning coordinates of the AutoCAD panel relative to the screen).
Why did the toolbar and menu disappear?
There are several reasons why the toolbar and menu disappeared in AutoCAD:
- the presence of a large selection in the functionality of the program and the need to hide unused tools;
- accidental closing of the toolkit line;
- software failure;
- incorrect installation;
- There is an error in the installer package.
The most common reason why the toolbar disappears in the AutoCAD package is accidental closing.
How to restore the toolbar?
Before opening the toolbar in AutoCAD, you need to determine the interface type.
AutoCAD versions before 2006
In versions of AutoCAD before 2006 (classic version), to open the functionality the user must do the following:
- open “View”;
- select “Toolbars”;
- when opening a dialog box of 4 tabs, click on “Toolbar”;
- To display the functionality on the screen, click on the required option (selected options are marked with check marks, hidden options are not marked).
If the user works in the classic version, then to facilitate the work and display the toolbars in the form of a ribbon, it is necessary to make a transformation: “Tools - “Palettes” - “Ribbon”. In this case, the menu is displayed not in the classic form of buttons with a list opening, but in the form of tabs, each of which displays a toolkit.
Latest versions of AutoCAD
When working with an interface with later releases of a software product, the user must use one of the following methods to activate the ribbon:
- click on the arrow icon at the end of the tab line;
- right-click (RMB) on the visible line of the toolkit and select “Show AutoCAD panels” in the list that appears (the option collapses or expands the ribbon);
- press the key combination: “CTRL+0” (zero) (pressing the keys again hides the ribbon);
- Right-click on the functionality line and select the required tools in the context menu.
Note:
- in the context menu that appears, visible (enabled) functionality is checked, hidden functionality is unchecked;
- in AutoCAD, function lines are moved across the work area and installed in the working area of the drawing (optional). To perform this action, the user must hold down the left mouse button at the bottom of the panel and move it to the desired location.
When opened, the toolbar is a window with a red cross. If the window is pulled point-blank to the borders of the working window, then the toolkit takes on its usual appearance - elongated lines with icons.
It is important to be able to enable and secure functionality in AutoCAD. To pin, the user clicks the pin icon located in the lower left corner of the panel.
Creating a toolbar in autocad
Often, as you work in the program, you have to use some autocad command that is not on the standard toolbars and is called through the menu. It becomes inconvenient to access the menu and in this situation it is much better to create autocad toolbar and call the command by clicking on it. Another situation when using a separate autocad toolbar is justified is that the standard toolbar is too large, and you only use one or two commands from it.So let's learn how to create your own autocad toolbar. To do this, on the Ribbon, go to the Management tab, then click User Interface. Or in the Tools menu, select Adaptation - Interface. Or even easier, type the letters mon in the command line and press Enter. In any case, a window will appear:
If the window does not look like the picture, click on the arrow in the lower right corner and it will take on a similar appearance. Please note that you are on the Customization tab of the User Interface Customization window. In the upper left pane of Adaptations: All files, find the Panels item. Right-click on it and select New Toolbar from the menu that appears. Give the panel a name, for example, the name of the command.
Now we need to place the desired command on the created toolbar. This is done as follows: in the lower window of the List of commands you need to find the required autocad command. The correct name of the command can be found out from the menu where the command is called, from the tooltip that appears when you hover the cursor over the panel with the command. To quickly search for a command, you can enter its name or just the first letters of the name in the line to the left of the magnifying glass icon. Having found the desired command in the list of commands, click on it with the left mouse button and, without releasing the button, drag it onto the created autocad toolbar until a small arrow appears to the right of the panel name, as in the picture. Next, if everything was done correctly, you will see that the command is on the created panel.
Additionally, autocad has the ability to change the icon of our autocad toolbar. Select it in the Adaptations: All files subwindow and on the right in the Icon subwindow, you can select any icon for the new panel or even draw your own by clicking the Change button. Now all that’s left to do is click Apply and OK. The window will close and a new autocad toolbar will appear on the screen. Drag it to a convenient place on the screen and use it!
Find out also in this section: Initial setup of the autocad interface. Setting up autocad - setting up the drawing area. What are autocad panels used for? Is it worth using the ribbon in autocad. Learn more from the autocad tutorial.
Tweet