When working in a text editor, there is a need to add or change the text background in Word, select a different color instead of the default white document background. According to the user, it was necessary to make a different background color to visually change the original appearance of the Microsoft Word document.
The background for a Word document will change the visual appearance of the entire document or individual blocks of text on the document page. The need to change the background color in Word arises when creating e-books, brochures or booklets, and in other cases.
In some situations, the user needs to highlight a separate fragment in the text of the document to draw attention to a certain test block, or to individual sentences. Users often encounter this type of highlighting or attracting attention on websites on the Internet.
Let's figure out how to make a background in Word in different ways and what program settings you need to use. The application has several options for changing the background in the document:
- filling the entire document page with color;
- use as a background for a picture;
- Change the background color just below the text.
The background in Word can be not only monochromatic. To design a suitable document look, you can make the page background with special effects in the form of a texture or pattern, or add a drawing downloaded from your computer as a background image.
Changes to the background on the page are performed in two modes, which serve to display the document in the Word program window:
- Page layout.
- Web document.
In this guide, you will find instructions on how to change the background in Word 2020, 2020, 2013, 2010, 2007 in several ways: fill the background to the entire page, add a picture (image) as the page background, how to change the background behind the text, not changing the background of the entire page.
How to make a page background in Word
First, we will figure out how to make the background in Word colored for a document page. With this method of changing the background, it makes no difference whether there is text on the page now, or whether the document page is still without text. After applying the page background change, text can be added to the document later.
Follow these steps:
- Open a Word document, go to the “Design” tab (in Word 2019).
In Word 2020 and Word 2013, go to the Design tab, and in Word 2010 and Word 2007, go to the Page Layout tab.
- In the upper right corner of the ribbon, click on the “Page Color” button located in the “Page Background” group.
- The Theme Colors window will open, in which you need to select a suitable color for filling the background of the page.
- If the standard colors do not suit you, click on “Other colors...” to select the desired option. In the “Color” window, in the “Regular” or “Spectrum” tabs, select the required color to fill the background.
After selecting a background color, the background in the document will change from white to another color selected by the user.
The selected background can be changed so that the document does not have a single color fill, but uses other fill options.
Configure the fill method settings:
- Click on the "Page Color" button.
- In the “Fill Methods” window there are tabs “Gradient”, “Texture”, “Pattern”, “Drawing”. Select the appropriate fill option and type.
The background of the document will change according to the selected options.
Changing the background of a Word document
It is also worth noting that you can make a background in Word in several ways, and in any case, the appearance of the document will be visually different. Let's tell you more about each of them.
Lesson: How to make a background in MS Word
Option 1: Change page color
This method allows you to make a page in Word colored and for this it is not at all necessary that it already contains text. You can print everything you need or add it later.
- Go to the “Design” tab (“Page Layout” in Word 2010 and previous versions; in Word 2003, the tools necessary for these purposes are in the “Format” tab), click there on the “Page Color” button located in the “Page Background” group "
- Choose an appropriate color for the page.
Note: If the standard colors do not suit you, you can choose any other color from the range by selecting “Other colors” .
- The page color will change.
Note: In the latest versions of Microsoft Word 2016, as well as in Office 365, instead of the “Design” tab, you must select “Design” - it just changed the name.
In addition to the usual “colored” background, you can also use other fill methods as the page background.
- Click on the "Page Color" button ("Design" tab, "Page Background" group) and select "Other fill methods."
- While switching between tabs, select the page fill type you want to use as the background:
- Gradient;
Texture;
- Pattern;
- Drawing (you can add your own image).
- The page background will change to match the fill type you selected.
Option 2: Changing the background behind the text
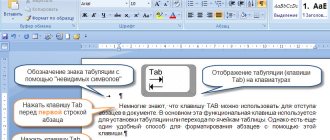
In addition to the background, which fills the entire area of the page or pages, you can change the background color in Word only for text. For these purposes, you can use one of two tools: “Text Highlight Color” or “Fill”, which can be found in the “Home” tab (formerly “Page Layout” or “Format”, depending on the version of the program used).
In the first case, the text will be filled with the color of your choice, but the space between the lines will remain white, and the background itself will begin and end in the same place as the text. In the second, a fragment of text or the entire text will be filled with a solid rectangular block, which will cover the area occupied by the text, but end/begin at the end/beginning of the line. Filling using any of these methods does not apply to document fields.
- Use your mouse to select a piece of text whose background you want to change. Use CTRL+A to select all text.
- Perform one of the following actions:
- Click the “Text Highlight Color” button located in the “Font” group and select the appropriate color;
Click the Fill button (Paragraph group) and select the desired fill color.
From the screenshots you can see how these background changing methods differ from each other.
Lesson: How to remove background behind text in Word
Printing documents with a changed background
Quite often the task is not only to change the background of a text document, but also to subsequently print it. At this stage, you may encounter a problem - the background is not printed. You can fix this as follows.
- Open the File menu and go to Options.
- In the window that opens, select the “Display” tab and check the box next to “Print background colors and pictures” located in the “Print Options” option block.
- Click "OK" to close the Options window, after which you can print the text document along with the changed background.
To eliminate possible problems and difficulties that you may encounter during the printing process, we recommend that you read the following article.
Read more: Printing documents in Microsoft Word
How to change the Word background to a picture - 1 way
Now we will make the background image of the document a drawing. The drawing (image, photo, picture) from the computer will be used as a background on the Word document page.
To do this, you must complete the following steps:
- Go to the “Design” menu (in Word 2019), in the “Page Background” group, click on the “Page Color” button.
In Word 2020 and Word 2013, go to the Design menu, and in Word 2010 and Word 2007, go to the Page Layout menu.
- In the “Theme Colors” window, click on the “Fill methods...” item.
- In the Fill Methods window, open the Drawing tab.
- Click on the “Drawing...” button.
- In the “Insert Images” window that opens, click on the “From file” button, or download a picture from the Internet.
- In the Explorer window, select a suitable image (a graphic file format supported by Microsoft Office) from your PC.
- In the window with the selected background image, click on the “OK” button.
The image you add from your computer will become the background image on the Word document page.
How to fill document pages with color in Word
Today we’ll talk about how we can make Word document pages of different colors.
We will talk not only about filling the page with one color of our choice, but also about the gradient and other types of filling. We will work in Word 2010. There is a special option for coloring or filling the page with color in the Word text editor. This option is called "Page Color" and is located in the "Page Background" section of the "Page Layout" top menu tab:
With this option we can make the pages of the document colored. It should be borne in mind that all pages of the document will be filled with the same color chosen by us. To put it even more simply, all pages (sheets) of the document will be the same color. You cannot fill document pages with different colors using this option. Neither selecting each page in turn, nor a page break, nor a section break will help us:
We can fill the pages of a document before entering text, or after we have already entered the text. In order to fill with color, we need to open the contents of this option with a regular mouse click and select the desired color:
If there is no desired color in the theme color palette, then we can select the desired color by opening the “Other colors” item:
And make a color choice, being “inside” the “Other colors” item:
To achieve a greater color effect, we can fill the page with a gradient. Access to the gradient fill is provided through the “Fill methods” item:
Click the mouse to reveal the contents of this item:
The window that opens contains four options for filling pages:
Gradient, Pattern, Texture, Drawing. By selecting the “Gradient” method in the menu of this window, we can fill the pages of the document with a gradient. The gradient fill settings, in my opinion, are very clear. We can see what the gradient fill of all pages of the document will be in the internal “Sample” window:
I chose a horizontal gradient of 2 colors and an option where the dark blue color is at the top of the page and the light blue color is at the bottom of the page. After we have made the settings, click the “Ok” button:
And all pages of our document will be filled with the selected gradient:
Since the main question on the agenda is: How to make pages of a Word document of different colors, we will not consider filling with patterns, textures and designs in detail today - we will concentrate on colored pages.
Wanting to know about the ability to use the Page Color option to color document sheets in different colors in Word 2020, I turned to the developer’s instructions. After reading them, I came to the conclusion: You cannot fill sheets with different colors using the “Page Color” option in Word 2020 either. Let's return to Word 2010 and continue to deal with filling pages with color.
We can make the areas intended for text multi-colored, which are limited (defined) by the fields that we have the ability to change. That is, increase or decrease. Well, or to put it another way - indents from the edges of the sheet. Right, left, top, bottom. Initially, in Word, page margins (indents) are configured. Let's not change anything and color the text areas on each sheet with our own specific color and do this on those sheets that we have already filled with a blue-blue gradient using the “Page Color” option.
Let's place the cursor at the beginning of the first page, and then expand the "Home" tab and head to the "Paragraph" section where we select the option to fill the background of the text or paragraph. Having expanded its contents, choose, for example, red color to fill the area on the first page:
After selecting the red color, the line on which the cursor is located is colored red. Now we will press the “Enter” key until we jump to the next page:
As soon as the first line appears on the next page, we return to the fill and select a different color, for example, blue. And the first red line on the second page is colored blue:
And we, again, continue to press the “Enter” key until we jump to the third page:
Let's change the color again. For example, on the yellow color and continue to press the “Enter” key:
When coloring the background to match the future text, you can not press the “Enter” key all the time, but periodically hold it down. In the process of coloring areas of future text, additional pages that we do not need may appear. To delete them, you need to place the cursor on the last extra page and start pressing the “Backspace” key until all the extra pages (sheets) disappear one by one.
You can make a selection to color the background of the text in another way.
Now I'll remove the gradient fill of the pages - for better visibility of another way to select areas for coloring:
This selection method can be used both to remove already painted areas and to fill with color.
First, let's delete one yellow line. Let's place the cursor at its beginning:
And then we turn to the fill option, where we select the “No fill” option, remembering that this fill is in the “Home” tab of the top menu. After our choice, the yellow stripe will disappear:
Now let's place the cursor at the beginning of the yellow field, that is, in its upper left corner:
And by clicking and continuing to hold the left mouse button, draw a vertical line from top to bottom:
After that, go back to the fill option and select the “No fill” option:
The yellow field has disappeared. Continuing to act, as they say, in the same spirit, we remove all colored areas for future text:
If you press the “Delete” key, both the page and the colored area will be deleted together.
In order for us to be able to use this selection method to color the fields for future text and not experience any difficulties, it would be best to first create several empty pages using the “Enter” key. And then, starting from the first page, select and color areas of the future text. And do this page by page:
We remove unnecessary pages (sheets) that appear using methods already known to us. It seems that it is better to remove extra pages after entering the text, in order to be sure that the prepared colored pages will be enough for the future text.
In fact, the idea of pre-coloring areas for future text is very bad. When entering text in the most normal way, the color of the areas will begin to change and shift:
It is better to fill with color after the text has been entered:
The most effective way to make text on a colored background, in my opinion, is to enter text while simultaneously creating the colored background (background) we need. Since we have already talked about a lot, this will be easier to do.
When starting to create a text document and placing the cursor at the beginning of the first line on the first page, we will not begin by entering text, but by choosing a color for the background behind the text. After our selection, the first line, according to the set margins (indents), will be filled with the selected color (blue in the example):
Image as the background of a Word page - method 2
There is another way to add a picture as a background image to a Word document page.
- Click the Insert tab in the Illustrations group.
- Click on the "Drawings" button ("Drawing").
- In the window that opens, select a picture from your PC.
- Click on the picture, markers will appear along the edges of the image, with which you can stretch the picture to the desired size.
- In the “Picture Format” tab, find the “Text Wrap” item, and select the “Behind Text” option in the context menu.
- Click on the image, enter the text that will be displayed on the image.
To ensure that the text you enter is clearly visible against the background of the picture, change the font color to match the color of the background picture.
Frames for part of the text
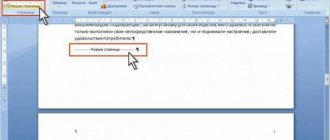
So, you can customize the frame on the Page Borders tab. In Word 2007 and 2010, you can select it on the Page Layout tab in the Page Background group. In newer ones, this tab is located in the Design tab (Fig. 1):
Picture 1
To make a frame for text, you need to select it. Let's take the following short text as an example:
“In fact, of course, the dust was to blame for everything. It doesn’t really stick to the face if it’s not sticky, but Motley’s face was sticky because he kept eating ice cream, which melted in his hands and smeared across his cheeks, nose, even ears, leaving wet streaks everywhere. Road dust stuck well to these stripes.” (“Dunno in the Sunny City”)
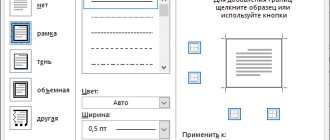
Select the text and click on Page Borders. This will open a dialog box called Border and Fill (Fig. 2):
Figure 2
In this case, we are interested in the Border, indicated by the number 1. Under the number 2 – Apply to – you can select a border for a paragraph or text. Under the number 3, which indicates Parameters, you can adjust the indents (exclusively in relation to the paragraph). Numbers 4-7 indicate customizable text border parameters: text type, type, color and line width. The number 8 indicates the sample, i.e. how the text will look when changing certain parameters. Let's customize the border design of our example. The result of this can be seen in Figure 3:
Figure 3
If we apply borders to the text, the result will be as follows (Fig. 4):
Figure 4
By left-clicking on the swatch, you can also adjust the borders for the paragraph.
How to Change Word Text Background
Earlier in this article, we looked at ways to add a background that occupies the entire page size of a Word document. In some cases, it becomes necessary to highlight the background behind individual pieces of text, paragraphs, sentences or words.
You may also be interested in:
- How to remove background in Word - 6 ways
- Word online for free - 5 ways
In this case, we will need to insert a background in Word only behind the entire text of the document or behind certain text in the document, without filling the entire page with the background. In Microsoft Word, there are two ways to highlight text as a background: filling a portion of the text or all of the text, or highlighting only the text, which leaves line spacing with a white background gap.
In both cases, the background will appear only behind the selected document text; the background of the entire page will not be filled.
How to Remove a Sheet Background in Word
If suddenly you no longer need the selected background, click: Design - Page Background - Page Color - No Color. It's that simple and fast.
Let's summarize. As a background for your Word worksheet, you can make: color fill, gradient, texture, pattern, picture. All these methods are placed in one menu: Design - Page Background - Page Color. The background can be either a built-in image or one found on the Internet, downloaded from a computer. To remove the background, click No color in the same menu.
That's all. I am sure you will quickly master this material. And if you have questions during the process, be sure to ask them in the comments, I will answer. The next article will be on a similar topic - inserting substrates. What is a backing and how does it differ from the background? You will find out in this article. Thank you for reading to the end, see you soon!
Adding a background after text - method 1
First, let's look at the method for selecting the background behind the text, without filling the space between the lines.
To add a background, follow these steps:
- Select text in a Word document.
- In MS Word, open the “Home” tab, in the “Font” group, click on the “Text Highlight Color” button.
- Select the color you want.
As a result, the lines with the text will be highlighted, and the space between the lines will remain with the default background.
In a similar way, you can highlight individual words or sentences.
How to insert a background image
If you go to the last tab in Fill Methods
, you will be able to
download the drawing
from your computer or network.
a watermark to the background
or
backing
. In the end it might look something like this.
In versions 2007, 2010, 2013, 2020, the corresponding button is located in the Page Background
Bookmarks
Design
(or
Page Layout
).
Several sample
and
drafts
.
You can download
additional substrates from office.com, or you can customize existing ones. To do this, click .
use a drawing as a background.
, which is selected from those available on the computer (with customizable scaling and the ability to discolor), or text. The last option offers basic formatting options. It can be placed diagonally on the sheet or horizontally.
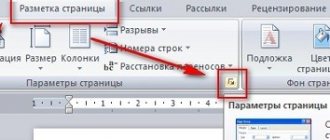
Even avid gamers sometimes work with the Word text editor. And an office worker has to deal with typing every day and all day long. But sometimes there are solemn moments. And this is where the same text editor can become an indispensable assistant. In order to congratulate a colleague on their anniversary, you can quickly create a beautiful card or even a certificate. If you decide to create a whole or, then you will even have to change the color of the page. In new versions of Word this is done quite simply, and you can even see in advance what will come of it. For those who still have Word 2003, I advise you to read this. We will now look at how to change the color of a page using Word 2010 as an example.
In order to make a color page in Word, we need to open a new document and go to the Page Layout
, and in the ribbon of this tab, find the
Page Background
and click on the small black arrow to the right of the
Page Color
. A palette will open in which you need to select the color of our future page.
And if you select Fill methods
, then this is a “untilled field” for your imagination.
- On the Gradient tab,
you can select transitions between colors and methods of filling the sheet. - On the Texture
, you can select a texture that suits your design, or upload your own. - On the Pattern
, you can select a simple pattern and cover the entire page of your document with it. - And on the Drawing
, you can upload your drawings or pictures and design the page in your style.
And after you have decided on the color of the page, you can print on it, or any other text. Or you can add pictures and create a postcard,
Word 2010 has built-in features to create the page background you want.
Customizing the page background includes functionality such as:
— Setting up the background
– adding hidden text or graphics behind the page content;
— Color Setting
– design of the page background color;
— Page Borders
– page border design.
All settings are made in an open Word document in the top panel on the Page Layout tab.
Let's look at each setting in more detail.
Setting up the background
In a Word 2010 document, in the top toolbar, go to Page Layout > Watermark and choose one of the suggested swatches.
It is also possible to customize your own version of the substrate. To do this, click Custom Underlay. The background can be configured as either a picture or text.
Setting the background pattern
You can select any drawing from your PC as a background, set the scale of the drawing and discolor it by checking the selection box
Setting the background text
If you need to write your own unique text as a background, then select Text and fill in the following fields:
Language
– from the drop-down list of languages;
Text
– from the drop-down list of texts, or write your own version in the line;
Font
– select a text style from the list provided;
Size
– select the font size;
Color
– from the color palette;
Translucent
- check the box if you want the background text to be translucent;
Position
– select one of the text placement options: diagonally or horizontally.
To save the result, click OK.
Saving a fragment to the underlay collection
In Word 2010, you can save a selected piece of text or a picture to the underlay collection.
Perform the following steps: In the document, use the cursor to highlight the desired text or picture to save. Go to Page Layout > Watermark. Next, select the action Select selected fragment to the collection of watermarks.
In the Create a new building block window, fill in the following fields:
Name
– specify the name of the new underlay option;
Collection
– select the desired collection to save;
Category
– select a category from the list;
Save to
– select a location to save the new underlay option;
Options
– select saving options.
Click OK.
Removing a document's underlay To perform this action, click Remove underlay.
Setting the background - highlight the page with color
To make this adjustment, go to Page Layout > Page Color and select a color from the suggested color themes.
If you want to choose a different color, then click on Other colors. Next, select the desired color from the proposed spectrum
Page background design - filling methods
In addition to choosing a color, you can customize filling methods such as gradient, texture, pattern and pattern. Gradient fill – combining colors. To select a gradient fill, click Fill Methods. On the Gradient tab, make the following settings: Colors: One color – shades of the same color from light to darker
Two colors – select two colors.
Preparation - use of ready-made color templates.
Hatch type—set up different color and shade transition options:
Select the hatch type - horizontal, vertical, etc. In the Options window, select one of four samples. In the Sample field you can see the final result. Click on the OK button.
Texture – adding volume
To select a texture for the page background, click Fill Methods. On the Texture tab, make the following settings:
Select one of the proposed options. By clicking on the Other texture button, you can select your own texture option from the library on your PC.
Click OK and get the result.
Pattern – decorate the background
To select a page background pattern, click Fill Methods. On the Pattern tab, do the following: Select one of the suggested pattern options.
You can set the hatch color and background color of the pattern. The preliminary result can be seen in the corner of the window - Sample Click OK.
Drawing – decorating the background with a pattern
To select a page background pattern, click Fill Methods. On the Picture tab, follow the steps:
Click on the Picture button. From the files on your PC, select the desired pattern.
Click OK.
Removing a Page Color
To remove a specified page color, go to Page Layout > Page Color and select the No Color type.
Page Border Design
To design page borders, go to Page Layout > Page Borders
Here you can select the border type from the proposed options, configure the line type, set its width and color. The settings you make are displayed in the Sample window. Depending on the selected document range, it can be applied to a paragraph, section, or the entire document.
To remove a border in a Word 2010 document, you need to select an area in the document, then go to Page Layout > Page Borders and select the No type and the scope as in the figure below.
Similarly, on the Page tab, you can set frames for document pages as a whole or for a selected section.
On the Fill tab, you can customize the fill color and pattern for the selected area of the document.
Making a background behind the text - method 2
With this method, certain text will be selected in the form of a rectangular block. In a similar way, you can select all the text on a page or just a specific fragment of text.
Do the following:
- Select the desired piece of text.
- In the “Home” tab, in the “Paragraph” group, click on the “Fill” button.
- In the Theme Colors window, select the color you want. In addition to the standard colors, there is an option to select other colors that can be used as the background in the document.
We get the result with a selected rectangular background, which is located behind the text.
How to Create a Color Sheet in Microsoft Word 2013
To set coloring you need:
- Open the Design tab.
- Left-click on the Page Color button.
- In the menu that opens, select the type of coloring.
You can change the coloring before you start entering text into the document, as you enter it, or after it. There is no difference for the Word program.
Attention! The colored background appears only in Document Layout and Web Document view modes. If the document is opened in Draft, Outline or Reading Mode, the sheets will be displayed not in color, but in white.
To switch to the Document Layout or Web Document view mode, you need to switch to the View tab and select the desired option.
Before placing text on a colored background, it is important to consider how the document will look when printed. If you plan to print on a black and white printer, then everything contained in the document will be displayed in shades of gray. Therefore, you will need to select contrasting colors to paint the sheet itself and the symbols.
Solid color fill
In order for the text to be placed on a colored sheet, you need to left-click on the square with the selected option in the palette.
If none of the proposed options presented in the palette are suitable, then click on the Other colors...
A dialog box will open that contains two tabs: Normal and Spectrum. Each tab contains a set of settings with which you can select the desired coloring option.
The Normal tab allows you to paint the sheet in one of the provided colors. To do this, click the left mouse button on the selected colored hexagon. To color a sheet black or shades of gray, use a group of hexagons that are located under the colored hexagons.
On the Spectrum tab, you can make more precise color selections.
To select the desired shade, first determine the color with a white target, and then use the slider to adjust the tone.
If the document is printed on a color printer, then to fine-tune the color gamut of the document, first select a color model from the list of the same name, and then enter numerical values for each of the parameters.
For example, if you need to paint a sheet red in the RGB model, then enter the following parameters:
In the HSL model, the red tone will be set by the following parameters:
- shade – 0;
- saturation – 255;
- brightness – 127.
On the Internet you can find tables of component parameters for each color for each color model.
Gradient fill
Coloring a page can be done in several colors. In the case when they smoothly transition into each other, the fill is called gradient.
To fill a sheet with a gradient, follow the following sequence of actions:
- On the Design tab, select the Page Color command.
- In the menu that opens, select the Fill Methods command.
- In the Fill Methods window, on the Gradient tab, set the gradient parameters.
The switches in the Colors group are used to select the fill type:
- one color – sets a gradient transition from the user-selected color tone in the Color 1 palette to white, gray or black, depending on the Darker-Lighter slider position setting;
- two colors – to select the color parameters of the gradient. Unlike the previous option, both color shades are selected;
- blank – for selecting a gradient from the Microsoft Word program library. The gradient option is selected from the Preset list. The selected type is displayed in the Sample box.
When setting a gradient background, the Transparency setting does not work.
To configure gradient hatching, use the Hatch Type switch group. For each selected type, several options are offered, which are displayed in the corresponding Options area.
The selected option with the specified parameters can be viewed in the Sample field.
Filling the page with texture
A texture pattern is an imitation of the image of the surface of a material.
To color the page with texture, use the Texture tab in the Fill Methods window.
It presents samples of standard textures located in the program library.
To fill with texture, left-click on the selected option and click OK.
Filling with a pattern
Microsoft Word allows you to use one of the standard patterns as a background.
To view and select the appropriate option, use the Pattern tab.
On the tab, you can select the type of hatching, as well as configure its parameters.
Using the Hatch and Background palettes, select the coloring of the strokes and background, respectively.
Removing the background
If you need to remove the background, perform the following procedure:
- Tab Design ® Page Color.
- Select No color from the menu.
Fill with different colors
When coloring document sheets using the Page Color command, all sheets will be filled with the selected color.
Attention! Using this command, you can paint with only one selected color.
However, if this is necessary, you can use the following methods:
Using a cover page.
If you need to fill the first page with color, while the others should remain white, then call the command Insert ® Cover Page.
Remove background
When the background is no longer needed, or if your experiments in selecting the optimal colors were unsuccessful, you can remove it from the document with one click. In the same menu, on the “Page Layout” tab, click on “Page Color” and select the item with no color. This is a method for removing the background in Word; it removes all the fill and pattern settings you previously selected. You can then choose a new background or leave it as is. Just remember that if your document has several areas with a customized background, the one on which the cursor is positioned when you click the button will be cleared, since it is the one that is considered active. If you want to undo an action, say, if you accidentally highlighted and cleared the wrong area, you can use the menu item of the same name or the Ctrl+Z hotkey combination.
How to Change Background Color in Word 2020
And so, if you need to change the background color in Word documents, then you need to make a few mouse clicks. First, launch the required document or create a new one specifically for training. Go to the Design tab. And on the right we look for the Page Background item. Click on the Page Color item and select the required one.
If the required color is not available, click on Other colors.
In the window that opens, you can select any color.
Filling the background with texture
To fill the sheet with texture, click on the ribbon Design - Page Background - Page Color - Fill Methods and go to the Texture tab.
In the menu, select one of the types of textures you want to cover the sheet with. If you don't see a suitable one in the list, click Other texture... and select a graphic file from Bing search, cloud storage, or your computer's hard drive. If the selected picture is smaller than the sheet size, it will be repeated. If it is larger, it will be cropped to fit the page.