Reverse or mirror text in Word
To reverse (or mirror) text in a document, you must first enter the text in the text box. After that, you can hide the inscription by removing its outline.
Using a text field
Insert text into your document and enter and format text.
Right-click the box and select Format Shape
.
In the Shape Format
Click the
Effects
.
In the volumetric rotation
Shape In the
X axis rotation
, enter
180°
.
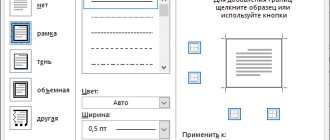
If a text box has a color fill applied to it, you can remove it in the Format Shape
.
Under Shape Options
, open the
Fill & Rows
, expand
Fill
, and select
No Fill
.
If you want to remove the outline of a text box, right-click the text box and select Outline
in the mini toolbar that appears, and then select
No Outline
.
Using WordArt Text
Select the WordArt you want to flip.
For more information, see Insert WordArt.
Select a shape
or
drawing tools
.
Select text effects
>
Rotation
>
3D Rotation Rotation Options
.
In the section rotation of a volumetric figure
Set
the X axis rotation
to
180°
.
Using a text field
To insert an inscription into the document, select the Insert
>
Caption
, and then enter and format your text.
Right-click the box and select Format Shape
.
In the Format Shape
On the left side
of the screen, select Rotate 3-D chart
.
In the X
enter
180 °
.
If the text box fills with color, you can remove it by right-clicking the text box, selecting the arrow next to the Shape Fill
on the mini toolbar that appears and selecting
No Fill
.
If you want to remove a text box outline, right-click the text box, and then in the mini toolbar that appears, select the arrow next to Shape Outline
and select
No outline
.
Using WordArt Text
Select the WordArt you want to flip.
For more information, see Insert WordArt.
Select Drawing Tools
>
Format
.
Select text effects
>
Rotation
>
3D Rotation Rotation Options
.
In the section rotation of a volumetric figure
Set
the X
parameter to
180°
.
Using a text field
Insert text into your document and enter and format text.
Select a field, and then select Format Area
.
In the Shape Format
Click the
Effects
.
In the volumetric rotation
Shape In the
X axis rotation
, enter
180°
.
Note:
If you have a color fill applied to your text box, you can remove it in the
Format Shape
.
Under Shape Options
, open the
Fill & Rows
, expand
Fill
, and select
No Fill
.
Using WordArt Text
Select the WordArt you want to flip. For more information, see Insert WordArt.
Select Shape Format
.
Select text effects
>
Rotation
>
3D Rotation Rotation Options
.
In the section rotation of a volumetric figure
Set
the X axis rotation
to
180°
.
Mirror text in Word, why is it needed?
Hello, friends! Mirror text in Word is displaying text in reverse. People who make money professionally via the Internet write similar texts. What are they needed for? After all, you can simply write plain text and then edit it.
As a rule, this type of text is used in pictures. First it is made in Word, and then in Photoshop it is combined with some picture, photo or illustration.
Or they write it directly in the Word text editor to show something with an example of how to make mirror text in Word. Next, we will do it in Word 2007 and 2010.
How to make a mirror image in Paint
Any Windows operating system comes pre-installed with the Paint graphic editor, which is where we'll start the list. In the search bar of the Start menu you need to write “paint” ⇒ launch the application.
After selecting the desired image on your computer, File ⇒ Open.
Click on the Image tab ⇒ Rotate ⇒ Flip Horizontal or Vertical, depending on the need.
Here is the result, if everything suits you, save it. I wrote in detail about working with the paint editor in the article on how to send a video by email.
How to make a mirror image in Word
The Word text editor is probably more familiar to many than the graphical one, and you can do a lot of things with it besides generating documents. So:
• create a new document or open an existing one
• right-click on it
• a menu will open where you select the Picture Format tab.
Here we are interested in three points of Rotation around an axis, but in this case, for mirroring, select the “X” item and enter 180°, after which the goal will be achieved.
Mirroring in Photoshop
This method is also very fast and simple like the previous two, but it requires the presence of the Photoshop graphic editor, which not everyone has in their arsenal.
Launch the program, insert a picture by dragging it or File ⇒ Open ⇒ Select a picture.
Edit ⇒ Transform ⇒ Flip Horizontal. At this point, all actions are completed, the drawing will take the desired form.
How to do mirror image online
If you don’t have any of the above programs, then it doesn’t matter, there are special online services and I’ll show you one of them now. Follow this link to the site, a window will open:
How to flip a picture in Word
- Select the picture in Word that you want to mirror.
How to Rotate a Picture in Word – Selecting the Picture You Want to Mirror Rotate
- Go to the Format tab and click the Rotate .
How to rotate a picture in Word – Rotate Picture button
- Select how you want to mirror the image in Word:
- Flip the picture from top to bottom (flip horizontally)
- Flip the picture from left to right (flip vertically)
How to rotate a picture in Word – Mirror a picture in Word
- For example, if you select Flip Left to Right, you will get the following result:
How to mirror an image in Word
A huge number of text documents are created in Word every day all over the world. For some, this is a work report, a dissertation, an essay, a term paper. And every second user is faced with adding pictures to a document. Although many, to the best of their ability or ignorance, omit this point. It just seems like inserting a picture takes a long time. And if you suddenly need to make a mirror image of a picture, then the older generation will probably ask a friend or loved one for help, or maybe skip this step altogether, citing lack of time. Let's figure out the problem that has arisen together.
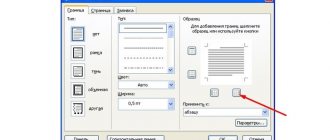
How to make mirror text in Word 2010
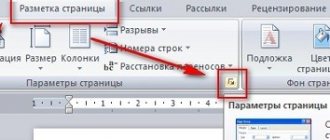
Above, we looked at creating mirror text in Word 2007. In a newer version, for example, 2010, the settings for mirror texts are done like this. Launch the Word graphic editor on your computer. Next, go to the “Insert” section and select the “Inscription” and “Simple Inscription” functions. This function will allow us to treat the text as an object. (Screen 4).
Then, paste or write text in this field. It can be edited a little. For example, change the font, or increase the text size. Then, go to the “Shape Style” section and click on the “Shape Format” button. After this, a menu should open on the right side of Word (Screen 5).
Then you need to click on the “Effects” icon (Screen 6).
And select “Rotate volumetric figure”. In the “Rotation around the X axis” field, you need to specify exactly 180 degrees. Or specify another value that you need. At the same time, the text will change its appearance and become mirrored, that is, it will be displayed in reverse. In this version of Word, you can also add various effects to the mirror text and change its location in the document.
Reflection of the image "mirror"
You can mirror your drawing using the following steps. Initially, insert the image into the Word document:
- Go to the “Insert” tab and click on “Drawing”;
- On the left side of the new window, select the location where the desired image is located. This could be your desktop, your Downloads folder, or any other folder;
- Find the image in the folder and click on it;
- Click “Insert”;
To display an image you need:
- First of all, you need to click on the picture, thereby selecting it (markers will appear along the edges of the entire image as in the picture below);
- After selecting an image in Word, a new tab “Working with Pictures” will be added;
- You need to click on “Format” in the “Working with Pictures” tab;
- The menu will present all the actions that can be applied to the picture;
- Now you need to click on the “Drawing Effects” button in the “Drawing Styles” section;
- In the drop-down menu, point to “Display” and select, for example, “Medium display, touch”;
- When you hover your mouse over any of the six options, the selected option will automatically be applied to the drawing. This can be seen in the image above.
- Here is the finished result.
How to make mirror text in Word
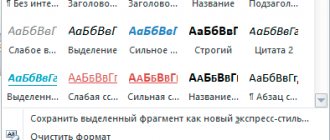
So, creating mirror texts in Word is very simple. To do this, open a Word document and click on the top panel of the document “Insert” then “WordArt”, which means “Express Styles” (Screen 1).
Select any of the options with the left mouse button. Next, insert the text prepared in advance into a special window and click the “OK” button. Now, we can solve the question of how to make mirror text in Word. To do this, click on the inserted text several times, then go to the “Format” section and click on the text rotation function (Screen 2).
If you click on “Flip text from top to bottom”, it will take the form of mirror text (Screen 3).
You can also tinker with the settings a little. You can change the outline of this shape or its fill at your discretion. You can rotate text right and left 90 degrees, or flip it from left to right.
Horizontal reflection of the picture
There are situations when it is necessary to change the direction of the drawing. In this case, it is necessary to change the direction of Santa Claus to the left. To flip the image horizontally you need to do the following:
- Select an image by clicking on it;
- Click on one of the markers;
- While holding down the marker with the mouse, slowly drag to the right. At the stage when the two images are reflected at the same level, release the marker.
- This is the result you should get.
Note. If you need to place two pictures next to the original result as in the screenshot above, you need to copy the picture and then set the desired reflection.
Mirror a picture in the paint.net application
As already mentioned, you can mirror a photo or picture in almost any photo editor application. One application that is freely available is Paint.NET. The official website of the program is https://www.getpaint.net.
To make a mirror image of a picture, open it in the application and select “Rotate horizontally” from the “Image” menu.
In Paint.NET you can create layers and the functionality even allows you to create a kaleidoscope effect. First, let's put two pictures together, one of which is reflected horizontally. To do this, we need to prepare the original image, and more specifically, increase the size of the canvas. Go to the “Image” menu and select “Canvas Size”.
We need to increase the size of the canvas exactly twice in width. Let's make a snap on the left side of the picture so that the right side ends up in the middle of the folded pictures.
The result will be one part of the sheet that is white. The white background will interfere in the future and it is better to get rid of it immediately. The easiest way to do this in this program is to create a new sheet with double the width of the sheet, select and remove the white background, and insert a picture from the clipboard. She will stand neatly in the left half. You can move it to the right yourself.
Now we need to create another layer and copy our image there. You can create a layer through the “Layers” menu and in the floating window at the bottom right.
Now all that remains is to make a mirror image of any layer. If you do it as described above, all layers will be mirrored at once. Therefore, select any layer by simply selecting it and in the “Layers” menu select “Rotate Horizontal”. As a result, we get pictures connected in the center.
To finally achieve the kaleidoscope effect, you need to reflect the image again, but this time vertically. It will be more convenient to do this if you combine two layers into one picture. This is done through the menu. Select the top layer and in the “Layers” menu select “Merge with Next Layer”.
The following is the action plan. Copy the image to the buffer, double the height of the canvas by first selecting the anchor point at the top, delete the entire background and paste the image from the buffer.
The only thing left to do is create a new layer, copy the image there and flip one layer vertically.
Save the result and admire it.
Setting to Mirror a Pattern
To achieve the desired effect when reflecting a photo, you can adjust all the parameters manually. Click on the photo and go to the “Format” tab.
Click on “Picture Effects”, then on “Reflection” and “Reflection Options”.
In the “Picture Format” window, set the desired type of “Blanks”, for example “Medium... touch”.
Note. You can mirror a photo with a shift of several points from the original picture; to do this, you need to select the “Reflection at 4 pt or 8 pt” option.
Next, we reduce or increase the indicators of such functions as: transparency, size, distance and blur.
Any shift can be observed even with the active Format Picture window open. To do this, move the parameters window to the left or right of the image that is located on the Word document sheet.
Mirroring a photo in Photoshop
Photoshop is considered one of the best photo editing applications, but very often you can get confused in its menu. Making a mirror image of a photo in Photoshop is no more difficult than in the programs discussed above.
Open the image in Photoshop and first of all make a duplicate of the layer or unlock the background. The fastest way to duplicate a layer is to go to the Layer menu and select Duplicate Layer.
Next, go to the “Edit” menu, and in the “Transform” item, select “Flip Horizontal”.
Everything is very simple and fast.
Why do you need the mirror function?
Let's say you need to make a beautiful composition for a website, where a pretty girl will be reflected in the mirror against the backdrop of nature. Or you just need to make a mirror image of a picture downloaded from some site so that it is not too similar to the original image. Or the photo turned out not very good, but if you turn it in a mirror, it will be better.
This is not a complete list of reasons why mirroring is done. Even if this function is not needed, it does not mean that it will not be needed tomorrow. You can mirror an image in any editor and in almost every image viewing program. This is done very simply: you just need to open the editor or program, find the “mirror” or “flip” button (choose horizontally or vertically as necessary), after which the photo will go into the state we need. The only difficulty is that this function is located in different places in different programs, so let’s look at the most popular utilities for viewing and editing graphic files for this function.
How to Mirror a Photo in Photoshop
By mirroring photographs, you can change the perception of the frame and make it more expressive. It is believed that people looking to the right in a photo are perceived more positively than people looking to the left. To the left - as if back into the past. In landscape and city photography, the situation is approximately the same: bridges, rivers, streets going to the right - this is movement into the future.
But, in addition to changing the perception of the image, you can achieve some interesting effects using mirroring and copying.
Let's take a look at how to mirror an image in Photoshop.
Open the image in Adobe Photoshop. Our photo will be opened as a Background layer. And, by default, no changes can be applied to such a layer. This is done on purpose so that when working you always have the original frame. To make it possible to change the base layer, you need to double-click on the lock icon on the right side of the layers panel. This will unlock the layer. Another option is to simply copy the layer and apply all changes to the copy.
In order to mirror a layer in Photoshop, there are two commands. They are located in the Edit menu → Transform .
Flip Horizontal / “Flip horizontally” - allows you to flip the photo horizontally.
Flip Vertical / “Flip Vertical” - does vertical mirroring.
Let's look at another example that shows how to mirror a layer in Photoshop and achieve a kaleidoscope effect.
First, let's create a copy of the original layer. To do this, you can either select the menu item Layer/“Layers” → Duplicate Layer…/“Create a duplicate layer…” , or drag the layer icon with the mouse onto the icon for creating a new layer in the layers panel.
Now let's increase the size of the canvas so that all parts of the future “kaleidoscope” are visible.
We need the menu item Image/"Image" → Canvas Size/"Canvas Size" .
We need to set the parameters in such a way that the canvas expands to the right by an amount equal to the width of the original image - we will add a mirror image on the opposite side. Therefore the settings will look like this:
as the anchor point Anchor/“Location” - it will remain in place. And they indicated that the width of the canvas should increase by 200% relative to the original width. Let's leave the height unchanged for now.
After clicking the Ok and applying all the changes made, the Photoshop window will look like the image below.
We make sure that the top layer is active, and mirror it relative to the vertical axis using the Edit command → Transform → Flip Horizontal . Then use the mouse to change the location of the two layers so that they align along one of the edges.
For precise and accurate positioning, it is convenient to use the Up, Down, Right and Left keys on the keyboard.
Now let's make a mirror image in another plane.
Let's merge the two current layers into one. This can be done with the command *Layer/“Layers” → Merge Visible/“Merge Visible” . Let's increase the canvas size in the same way as we did before, but this time vertically. The anchor point will be at the bottom border, and we will increase the height by 200%.
It will turn out like this.
Let's create a copy of the top layer (which already includes the original and mirrored images). And apply the reflection command Flip Vertical . After that, use the mouse to place the mirrored layer in a new place.
This kaleidoscope effect can be achieved by mirroring pictures in Photoshop.
Microsoft Office Picture Manager
This viewer is included in the Microsoft Office software package. It has a small set of functions: remove red eyes, adjust brightness and contrast, crop and flip photos. You can mirror it as follows: launch the utility and open the photo (or open the photo using the picture manager), in the top toolbar click on “Picture”, where from the drop-down list select “Rotate and flip”. Now in the panel on the right we determine exactly how to reflect it and save it.
How to take a mirror photo on Android: a selection of simple methods
Retouching, all kinds of filters, special effects and fashionable stickers... Today there are a huge number of ways to beautifully edit a photo. Often the editing process takes much longer than the photo shoot itself. Mobile apps for Android will help simplify the task. With their help, you can adjust exposure, contrast, apply a filter, mirror half of the photo, etc. We will talk about how to mirror a photo on Android in our article.
Especially for you, we have selected the most popular and simplest ways to mirror images.
- Mirror photos in standard Android camera settings
To flip a picture as a mirror, just open the image in the smartphone gallery and edit settings. Next, select the “Crop” tab and the “Vertical Rotate” tool. All that remains is to save the finished photo. Using standard camera settings is the easiest and fastest way to mirror photos on your phone. The names of the tools may vary depending on your phone model.
- Photo Mirror
The popular editing application Photo Mirror allows you to flip a photo. The program is free for Android owners. Despite the fact that the mirror effect is one of the main features of Photo Mirror, the service also has other useful functions. More than a dozen different effects are available to users. After editing, you can save the photo in your smartphone gallery or share it on social networks. Photo Mirror has an intuitive interface and is extremely convenient to use.
- Flipper
This is an application where you can mirror a photo in a matter of seconds. The popular program allows you not only to create a mirror effect, but also to take photographs and immediately apply various filters and use stickers. Thanks to its user-friendly interface, it is as easy as possible to use. With Flipper you can create creative photos that no one else will have.
- Mirror Photo Reflection Effect
How to mirror a photo on your phone and give the image a beautiful glass effect? The unique Mirror Photo Reflection Effect application is a collection of tools that will help you achieve amazing results in photo editing. Beautiful photo filters, frames, stickers, etc. are available to users. The Mirror Photo Reflection Effect collection has more than 30 types of 2D and 3D mirror effects. The finished result can be saved in the Android gallery or shared with friends on social networks.
- Snapseed
Everyone's favorite application that opens up wide scope for photo editing. With Snapseed you can create real masterpieces. Editing options are not limited to using filters, frames and text. Don’t know how to mirror a photo horizontally or vertically on Android? Using a unique program and its simple interface, you can perform a turn in a matter of seconds. To do this, go to “Tools” and select the “Rotate” button. And then, as they say, it’s a matter of technique.
Using these applications, you will create original photos with a mirror reflection on Android. Images can be shared on social media or used as the basis for cool gifts. For example, make an unusual print for a T-shirt or an interesting poster in an avant-garde style. In the Mimigram photo printing application you will find a lot of ideas for gifts for your loved ones. You can make a cool gift in a couple of clicks! Just install Mimigram on your smartphone, select the creative solution you like, upload a mirror photo from Android and submit your order.
You can find even more tips on photo editing, ideas for photo shoots and gift making on our blog.
FastStone Image Viewer
Quite a powerful viewer of graphic elements, which has a lot of different functions and effects, including “Mirror Image”. We go two ways:
- open the utility and find the desired image in the file tree;
- open the photo using this program directly.
Now right-click anywhere in the picture, find the “Change” item and select “flip horizontally” (vertically).
Taking a mirror photo in Windows 7
You can mirror an image on any computer using the free Paint
, installed by default in the Windows 7 operating system. After opening the image in this application, go to the
“Rotate”
, and select
“Flip vertically”
or
“Flip horizontally”
.
After this, the result must be saved.
Using the Adobe Photoshop graphics editor
Photoshop is perhaps the most famous graphics editor. This is all thanks to its impressive features for editing and creating graphic files. Of course, this utility will be able to reflect photos without any problems.
Open the image using Photoshop and go to the “Image” tab. In the list that appears, find the “Rotate canvas” item. We point at it and see how another list appears, in which you need to click “Flip canvas horizontally” or “Flip canvas vertically”.
Mirror a photo in Windows 10
In Windows 10, the built-in image editing program has changed a little, now called Paint 3D, but it still allows you to make a mirror image of a photo. To do this, you need to open the photo in the program and find the “Canvas” item in the top menu.
After selecting this menu item, an additional menu appears on the right, where icons indicate the options: flip horizontally and flip vertically.
Don't forget to save the result.
Reflecting the text
In addition to reflecting a picture, many text and graphics editors are capable of mirroring text. We will not consider all programs; we will focus on the most popular ones - Microsoft Word and Adobe Photoshop.
You can mirror text in Word as follows. Open the document and go to the “Insert” tab in the top toolbar. Here we find the “WordArt” tool, click on it and select the template you like. Next, write the required text. Now we have two ways to reflect what we have written:
- Click on the text, as a result of which dots appear around it to change the size. We clamp one such point, which is located in the middle on either side, and drag it in the opposite direction;
- Click on the text, after which the “Format” tab appears in the toolbar, highlighted in a certain color and labeled “Working with WordArt objects.” Go to it and find the “Rotate” tool (with the image of two triangles with an arrow).
We proceed in the same way as with the image. But first you need to write the text. In the toolbar, click on the “T” button (or the Shift+T combination), click on the sheet with the cursor and type the text. Then go to the “Image” tab, “Rotate Image” and “Flip Canvas”. But before you make a mirror image of what you have written, you need this particular layer to be selected, otherwise something else will be reflected.
Creating a Reflection
See also: “How to make a transparent picture background in Photoshop”
We will use the object below as an example. It is placed on a transparent background to make it easier to work with (when selecting, moving, etc.).
So, the action plan is as follows:
- First, we need to add to the canvas below the same amount of space as the original object occupies. To do this, go to the “Image” menu and select “Canvas Size”.
Note: If there is enough space on the canvas, skip this step and go straight to the third. - In the window that opens, increase the height value by 2 times plus a small margin (in our case, 1520 pixels is enough). To add an additional area at the bottom, click on the up arrow among the options for the “Location” parameter.
When ready, press the OK button. - Create a copy of the original layer by pressing the key combination Ctrl+J and switch to it.
- Press Ctrl+T to activate the Free Transform tool. As a result, a frame should appear around our object. Right-click inside it and in the context menu that opens, select one of two commands to perform reflection. In our case, we settled on the “Flip vertically” option. Press Enter to confirm the operation.
- Select the “Move” tool from the sidebar.
- We move the reflected object, placing it directly under the original one (their edges should touch).
- In the Palette, click on the button to add a layer mask for the top layer.
- Next, select “Gradient” on the toolbar.
- In the top line of the tool parameters, we make approximately the following settings. For more detailed settings, click on the current fill scheme, after which a window will open in which we can set the parameters more “subtly” (if necessary).
- Using the left mouse button held down, drag the pointer in the form of a cross from the bottom edge of the reflected object to the top.
- Thus, we were able to make the appearance of a reflection with a transition, ranging from completely invisible from below to completely visible from above.
- Click on the thumbnail of the layer with the reflected object.
- Next, go to the “Filter” menu and select the “Gaussian Blur” item in it. This tool will help give more realism.
- In the window that opens, set the blur radius (in pixels) according to your own vision of what the final result should be and click OK.
- If necessary, crop the image from below, remove gaps that may appear between the main and reflected objects (by moving using the appropriate tool).
- With this we can say that our work is completed.
For greater clarity, we created a background layer, placed it at the very bottom and filled it with white.
Note: the algorithm described above can also be used to mirror text. The difference is that at a certain stage (applying a filter) you will have to rasterize the text layer, i.e. turn it into a regular object (picture).
LiveInternetLiveInternet
—Categories
- INTERESTS (413)
- BUSINESS (63)
- laws of the universe (10)
- personal growth (11)
- trainings (18)
- success (22)
- EMBROIDERY (434)
- beading, bead embroidery (117)
- Richelieu (6)
- satin stitch embroidery (21)
- cross stitch (202)
- ribbon embroidery (24)
- embroidery different techniques (54)
- magazines, books, embroidery patterns (167)
- KNITTING (889)
- mittens, mittens, gloves (14)
- we knit for children (28)
- crochet.crochet patterns (219)
- knitting.knitting patterns (341)
- knitted toys (28)
- jackets, cardigans, coats, tunics, tops (99)
- jacquard (32)
- magazines, books (38)
- Irish lace (39)
- socks, footwear, knee socks, etc (5)
- various techniques (15)
- raglan (7)
- knitting tips (60)
- flowers, brushes, pom-poms, etc. (5)
- caps, hats, berets, (70)
- scarves, stoles, shawls (38)
- Fortune Telling (111)
- horoscope, numerology (29)
- rituals, amulets (27)
- simoron (18)
- tests (28)
- GENERATORS (4)
- DIARY (125)
- interesting blogs (12)
- codes (7)
- decoration (48)
- circuits (20)
- lessons for li ru (37)
- cheat sheets (11)
- HOUSE (173)
- bath (8)
- indoor plants (37)
- garden, cottage (74)
- repairs, alterations, furniture (13)
- tips for the home (28)
- HEALTH (492)
- gymnastics, massage (86)
- diet (18)
- healthy eating (10)
- beauty (95)
- medicinal plants, mushrooms (70)
- Alternative methods of treatment (3)
- gout (20)
- COMPUTER (82)
- internet (18)
- programs, convectors (50)
- COSMETICS,SKIN CARE (70)
- fragrances (12)
- makeup (11)
- manicure, hand care (5)
- masks (26)
- skin care (9)
- COOKING (1115)
- eggplant (17)
- dishes in pots (1)
- microwave meals (2)
- dishes in a slow cooker (17)
- meat dishes, minced meat (25)
- Easter dishes (9)
- jam, marmalade, confiture, postila (24)
- pastries, pies, pizzas (204)
- mushrooms (16)
- preparations (homemade sausage) (56)
- snack (92)
- pickling (17)
- porridge (11)
- canning (47)
- coffee (7)
- chicken (27)
- meat, tongue, lard (2)
- tinctures, liqueurs, drinks (59)
- vegetable dishes (52)
- cucumbers (3)
- Lenten dishes (4)
- fish, seafood (49)
- salads (64)
- sweets, delicacies (70)
- cooking tips (21)
- sauces (20)
- soups (14)
- cheese (15)
- cheesecakes, pancakes, pancakes, omelettes, pizzas (30)
- cottage cheese (5)
- dough (36)
- cakes, cookies, gingerbread (bakery decoration) (97)
- decorating desserts and various dishes with vegetables and berries (7)
- USEFUL TIPS (7)
- POLITICS (67)
- HOLIDAYS (145)
- Victory Day, May 9 (4)
- birthday (6)
- new year (106)
- PSYCHOLOGY, PSYCHOSOMATICS (32)
- RELIGION (177)
- icons (13)
- prayers, spells (56)
- about Orthodoxy (18)
- Easter (77)
- christmas (15)
- RUSSIA.RUSSIAN LANGUAGE (28)
- NEEDLEWORK (1462)
- angels (13)
- beading, bead embroidery (310)
- papermaking (86)
- felting (7)
- decor (36)
- decoupage (21)
- design (2)
- DIY toys (cotton toy) (102)
- quilling (4)
- rugs (35)
- puppet (135)
- modeling (polymer clay, dough, porcelain, papier mache, pl (55)
- macrame (2)
- master classes (29)
- DIY soap (12)
- soft toy (66)
- Christmas decorations (85)
- postcards (36)
- alterations (6)
- weaving (14)
- weaving from newspaper tubes (20)
- DIY gift (44)
- crafts from plastic bottles (23)
- crafts from clothespins (11)
- crafts from different materials (47)
- DIY CDs (4)
- button (9)
- miscellaneous (33)
- draw, coloring (37)
- scrapbooking (12)
- matches (1)
- handicraft links (8)
- slippers (30)
- packaging (36)
- floral design (8)
- eggshells (6)
- WATCH, LISTEN (152)
- audiobooks (15)
- online cinema, performances (32)
- music (60)
- cartoons (10)
- poems (20)
- TIPS (22)
- LINKS NEEDED (12)
- LESSONS (31)
- create a video (1)
- animation lessons (7)
- FLASH DRIVES (137)
- games (9)
- informers (2)
- watch (27)
- PHOTOSHOP (445)
- animation (43)
- generators (27)
- PNG images (46)
- different clipart (87)
- musical card (1)
- inscriptions (2)
- wallpaper (3)
- Easter (1)
- player (16)
- dividers (6)
- frames, collages (86)
- scrap paper (3)
- various scrap sets (16)
- summer scraps (2)
- New Year's scraps (8)
- stencils (17)
- learning to make frames (3)
- backgrounds (41)
- photo effects (6)
- fonts (8)
- ARTISTS (251)
- designer doll (15)
- photographers (18)
- READING (56)
- parables, quotes, anecdotes (14)
- story (9)
- poems (25)
- SEWING (1314)
- alterations, decor (textile decorations) (13)
- BURDA MODEN Magazine (2)
- dresses, tops, blouses, corsets (69)
- chenille (8)
- applique on fabric (82)
- trousers, overalls (6)
- bra (8)
- collars, cuffs (9)
- GENERATOR (8)
- Headwear (hats, hoods, snoods, etc.) (15)
- Details (2)
- children (20)
- denim ideas (25)
- magazines, books, postcards (on sewing and needlework) (118)
- fasteners (1)
- pincushion (21)
- from photo shirts (3)
- we correct clothing defects (8)
- pocket (1)
- quilting (1)
- leather (3)
- cutting, patterns, patterns, building the base (71)
- patchwork, patchwork (238)
- master class (7)
- fur, sheepskin coat (13)
- fashion, style (39)
- modeling (38)
- men (3)
- men (3)
- underwear (5)
- New Year's (3)
- newborns (4)
- node processing (39)
- overlock, sewing machine (6)
- coats, capes, cardigans, jackets, boleros, etc. (25)
- pets (2)
- bed linen, bedspreads, pillows (55)
- potholders, aprons, towels (20)
- sleeve (12)
- tips, secrets (88)
- stitch (12)
- lines, seams (12)
- bags, cosmetic bags, clutches, baskets (105)
- tildes (14)
- difficult to sew fabrics (1)
- color, color type (7)
- flowers (78)
- curtains (20)
- we sew with pleasure (182)
- skirts (19)
Flip the image horizontally
Step 1
Now we will learn how to flip an image horizontally in Photoshop. Let's go to the menu
Image – Image Rotation –Flip Canvas Horizontal (Image – Image Rotation – Flip the canvas horizontally).
Step 2
This will flip the image horizontally without using layers.
How to print an image in mirror format
Method 4:Printing mirror images in Microsoft Word, Excel or PowerPointMirror printing in Microsoft PublisherPrinting mirror images in Mac OS XChanging printer settings
Printing documents in mirror image format can be useful when you plan to use text or images on various items of clothing or for viewing in mirrors. In most cases, you can print images in mirror format by selecting a specific function in the program or changing the printer settings.
Mirror photo online
You can make a mirror image of a photo using many online services, and many of them offer not only reflection of a picture or photograph vertically and horizontally, but also rotation to any angle, and all this on one page.
Several online services for mirroring images: - https://ru.inettools.net/image/povernut-foto-onlayn-zerkalno-90-180-270-gradusov - https://www.imgonline.com.ua/mirror -reflections-from-halves-of-image.php
The first service, Inettools.net, offers to mirror the image vertically and horizontally, as well as rotate the image to any angle. Everything is extremely simple, upload an image and select an action.
The second service IMGonline.com.ua offers only mirror images in different variations. Regular mirroring is not offered.
Make mirror images using: - left half of the picture - right half of the picture (selected by default) - top half of the picture - bottom half of the picture - 1/4 of the picture on the top left - 1/4 of the picture on the top right - 1/4 of the picture on the bottom left — 1/4 of the picture on the bottom right
Mirror text in Microsoft Word
When working in MS Word the need arises to rotate text, not all users know how to do this.
To effectively solve this problem, you should look at the text not as a set of letters, but as an object. It is on the object that you can perform various manipulations, including rotation around an axis in any precise or arbitrary direction. We have already discussed the topic of text rotation earlier, in this article I would like to talk about how to make a mirror image of text in Word. Although the task seems more complicated, it can be solved using the same method and a couple of additional mouse clicks.
Lesson: How to rotate text in Word
Inserting text into a text field
1. Create a text field. To do this, in the “Insert” , in the “Text” , select “Text Field” .
2. Copy the text you want to mirror ( CTRL+C ) and paste into the text field ( CTRL+V ). If the text is not yet printed, enter it directly into the text field.
3. Perform the necessary manipulations on the text inside the text field - change the font, size, color and other important parameters.
Lesson: How to change the font in Word
Mirror text
You can mirror text in two directions - relative to the vertical (top to bottom) and horizontal (left to right) axes. In both cases, this can be done using the tools of the Format , which appears on the Quick Access toolbar after adding a shape.
1. Double-click on the text field to open the “Format” .
2. In the Arrange , click the Rotate and choose Flip Left to Right (horizontal flip) or Flip Top to Bottom (vertical flip).
3. The text inside the text box will be mirrored.
Make the text field transparent by following these steps:
- Right-click inside the field and click on the “Outline” ;
- From the drop-down menu, select the No Outline .
Horizontal reflection can also be done manually. To do this, you simply need to swap the top and bottom edges of the text box shape. That is, you need to click on the middle marker on the top edge and drag it down, placing it under the bottom edge. The text field shape, its rotation arrow will also be at the bottom.
Now you know how to mirror text in Word.
We are glad that we were able to help you solve the problem. Add the Lumpics.ru website to your bookmarks and we will be useful to you. Thank the author and share the article on social networks.
Describe what didn't work for you. Our specialists will try to answer as quickly as possible.
Did this article help you?
NO
Flip the image vertically
Step 1
Now we will learn how to flip an image vertically in Photoshop. Let's go to the menu
Image – Image Rotation –Flip Canvas Vertical (Image – Image Rotation – Flip the canvas vertically).
Step 2
This will flip the image vertically without using layers.
New items in the Premium section
499
Collaging
Collage “An unusual walk”
0 0
499
Collaging
Collage “At a masquerade”
0 0
99
Working with photos
We do artistic retouching of a portrait
26 909 374
99
Web and applications
Creating an order form
18 875 292
99
Web and applications
We create a form for ordering air tickets
12 792 212
499
Working with photos
Artistic processing by Madina Akhtaeva. Series "Summer"
0 0
- part of the Photoshop Master website, where 63 video lessons and 45 express courses from professionals await you.
You can buy them separately, or you can subscribe to the entire section (from 5 rubles/day).
How to mirror an image in Paint
In the era of Internet accessibility, there are times when it is not possible to use online services. If you find yourself in just such a situation, and you need to do mirroring urgently, a standard Windows utility, the graphic editor Paint, will come to the rescue. Most PC users are familiar with this editor, but not everyone knows about its capabilities.
A huge number of text documents are created in Word every day all over the world. For some, this is a work report, a dissertation, an essay, a term paper. And every second user is faced with adding pictures to a document. Although many, to the best of their ability or ignorance, omit this point. It just seems like inserting a picture takes a long time. And if you suddenly need to make a mirror image of a picture, then the older generation will probably ask a friend or loved one for help, or maybe skip this step altogether, citing lack of time. Let's figure out the problem that has arisen together.
How to flip an image in Word
How to flip an image in Word
In the process of preparing some material, we may need to make a mirror image of the images placed in the document. Today we’ll talk about the possibility and ways of making a mirror image of an image in Word.
The image we select is located on the sheet in the place where we placed or left the cursor. An image placed on a sheet is instantly captured by markers, and a special tab appears in the top menu containing various options, tools and templates that allow you to edit this image.
So let's get started.
Let's place an image on the sheet (page):
As we said, the image was captured by markers, and the “Working with Pictures” functionality appeared in the top menu, containing the “Format” tab. This tab is collapsed, and we do not see the options it contains:
Simply click on the tab name to expand it:
Now we have at our disposal a large number of different options and tools with which we can edit the image this way and that.
Since today we are talking about mirroring an image, we will turn our attention to the section of the “Drawing Styles” tab and the “Drawing Effects” tool contained in it:
By clicking on the name of this tool, we will reveal its functionality and look at the effects that we can apply to the image. Among the many effects, there is also the “Reflection” effect we need in this case. By hovering the mouse over the name of this effect, we will see reflection options:
And by hovering the mouse over the reflection options, we can immediately see what the reflection of a particular option will be like when we select it:
We can further edit the selected reflection option, that is, change it at our discretion. We can make the reflection less or more transparent, or blur it, or all three. Or we can move the reflection away from the image.
To start editing the reflection itself, you need to select the image again - it must be captured by markers. Then follow the already known path to the reflection options offered by Word and below the list of these options, select the “Reflection Options” option:
As soon as we select this option, the “Picture Format” window will immediately open, which contains, so to speak, levers of influence, or parameter controls:
By grabbing one or another slider with the mouse and moving it left and right, we influence the reflection. By moving a slider, such as “Blur,” we immediately see the changes taking place. It may happen that the window with the slider controls opens in such a way that it completely obscures the image. In this case, you need to grab the window with the mouse by its upper part, where the window name is located, and move (move) it to any side convenient for work.
For example, I'll move the blur slider a little to the right and we'll take a look at what the reflection looks like:
If we are satisfied with the selected option—preparing a reflection—then, of course, there is no need to change additional reflection parameters. In the case when we changed our minds and decided not to make a reflection of the picture, then to delete it we again go to the reflection options and select the “No reflection” option:
Let's consider the possibility of making a reflection yourself, without using the blank options offered by the Word program. This process is simple. All we need to do is copy the image and turn the copy made 180 degrees, and then place it below the original image.
Let's get started.
I suggest this copying method: Aim the mouse cursor at the center of the image, and then press the “Ctrl” key and hold it. Then, press the left mouse button and, holding it down, drag the copy of the image a little down:
You can “throw” a copy at this place:
If at the moment of moving the copy it has shifted a little, then you can help yourself with the arrow keys of the computer keyboard.
Of course, you can make a copy of the image in another convenient way.
Let's continue.
Grab the top middle copy marker with your mouse and drag it down. This action of ours is turning a copy of the image “upside down” (180 degrees):
When flipping a copy of an image, it is not necessary to try to visually achieve the size of the original image.
And when we saw the copy upside down and slightly narrowed in height, let’s release the left mouse button - stop holding the marker and look at what we got:
Now, grabbing the copy with the mouse or using the arrow keys of the computer keyboard, we will place the copy on the original image approximately in the middle:
Then, using the mouse to grab one marker and then another, we will combine the copy with the original:
Next, by grabbing the copy with the mouse or pressing the down arrow key on the computer keyboard, we will place the copy below the original, aligning the top and bottom sides, respectively:
From now on, we will call the copy of the image a reflection.
We can apply effects appropriate to the reflection. In order to do this, we need to select the reflection again if it is not selected. Let's do this by left-clicking with the cursor on the reflection body. Reflection was captured by selection (editing) markers, and the “Format” tab of the “Working with Pictures” functionality appeared in the top menu. Click the mouse to expand the contents of the tab. Now we can take advantage of the options and tools it contains.
For example, by selecting the “Artistic Effects” option, we can apply one or another suitable effect to the reflection:
Let's choose, for example, the “Blur” effect from the proposed options. Already when you hover your mouse over this effect, we can see the reflection change:
To apply the selected effect to the reflection, you need to left-click on the effect icon. We can strengthen or weaken the applied effect, or, in other words, edit it. To do this, you need to reopen the window with effect options and select the “Art Effects Options” option:
As a result of this choice, the effect settings window called “Picture Format” will open. In this very window we make our own parameter settings:
All we need to do to change the effect is move the slider. You can not use the slider, but set some of your own parameters using the arrow buttons. To cancel the parameter we have set, click the “Reset” button. In the same window we have the opportunity to change the initially selected effect to another effect:
And change its parameters in exactly the same way.
To quickly open the window for changing parameters (the window is called, as we remember, “Picture Format”), we just need to right-click with the cursor on the reflection body:
We can also open this same window by simply clicking on the small arrow in the lower right corner of the “Picture Styles” section:
We don’t have to limit ourselves to just one artistic effect applied to the reflection. So applying the “Blur” effect:
We turn to the “Correction” tool and add one of the options with adjusted brightness and contrast to the already blurred reflection:
The parameters of the last applied option can also be changed, and we already know how to do this.
If we want the reflection to not have a clear lower border and smoothly merge with the sheet, then in this case the “Shapes” functionality, which is located in the “Insert” tab of the top menu, will help us.
Let's expand the “Insert” tab with a regular mouse click and with the same regular mouse click we will expand the contents of the “Shapes” functionality, where we will select the rectangle drawing tool:
After this choice, the mouse cursor will turn into a crosshair of two lines - now you can start drawing a figure.
Our task is to place a rectangle on top of the bottom of the reflection without going beyond the edges of the reflection; in other words, the rectangle should be in the foreground. It's not difficult to do this.
Let's draw this rectangle. To make it easier to draw a rectangle, click the mouse to select the reflection. He was captured by markers. These markers are our assistants in drawing a rectangle. We draw a rectangle as if we were connecting the middle left and right side markers, with the left and right lower corner markers together.
As a result, we should get something like this:
In automatic mode, the rectangle is colored blue. In our example, the Word sheet is white. For this reason, we need to color the rectangle white. To achieve the desired effect, let’s not just paint the rectangle with white, but fill it with a white gradient, then make adjustments to the fill settings.
Let's get started.
As soon as we drew a rectangle, the “Format” tab of the “Drawing Tools” functionality immediately appeared in the top menu. If this tab is collapsed and we do not see the options and tools it contains, then simply click on the tab name to expand its contents and select the “Shape Fill” option:
From several filling options, we will select the “Gradient Fill” option we need in this case, and inside the gradient fill, the very first option from the proposed light options:
You can choose any other fill option, since we will completely change all its parameters.
So, the rectangle is filled with the selected gradient. If we reset the selection with markers (a regular mouse click on a blank sheet of paper), we will see the outlined outline of the rectangle. Select the rectangle again. We don’t need the outline stroke, let’s remove it by selecting the “Shape Outline” option in the top menu, and then the “No Outline” option:
We can get rid of the outline immediately after we have drawn the rectangle. We do what is convenient for us.
Let's continue working with the gradient.
After we have filled the rectangle with a template gradient, again in the top menu we will select the “Shape Fill” option, and then the “Gradient” option and then “Other gradient fills”:
The “Shape Format” window will open in front of us, informing us about the parameters (settings) of the gradient fill of the selected blank option. We need to change these parameters:
The main parameter changes include changes to the fill angle, color, and transparency. The sequence of changes made can be changed at your discretion.
Let's get started.
The first step is to change the fill angle. Clicking the up arrow button will change the angle from 45˚ to 270˚. To change a parameter more quickly, the button can be held down:
Now let's work with the gradient.
Click the mouse to select the middle ink tank to remove, and then press the button with a red cross:
Next, fill the left and right remaining inkwells with white. Select the left inkwell and go to the “Color” option and select white from the palette:
In the same way, fill the right inkwell with white and look at the result - the rectangle is completely white:
The final step in achieving the desired effect is to increase the transparency of the right ink tank. Click the mouse to select the right inkwell, if we reset its selection, and move the transparency slider to the right, setting the value to 100%:
So we have achieved the effect of smooth merging with the leaf. To enhance this effect, move the left inkwell slightly to the right:
We can further enhance the effect by changing the height of the rectangle.
Let's grab the middle top selection handle with our mouse and drag it up, while watching how the effect changes:
With a regular mouse click on a free field of the sheet, we will reset the selection with markers and look at the final result:
Although the process of creating a hand-made reflection can be considered labor-intensive, there is still one big advantage over using blank templates. This advantage is determined by the ability to work with reflection individually, applying various effects and simulating reflection on various surfaces without affecting the image itself.