Hello, dear visitors of my blog! Today we will consider the question of how to insert a Word document into Word. For example, you are preparing a document, and you need to insert any other file. It would be nice to have information on exactly how to carry out such an insertion. Let's figure it out.
In order to insert another document into a Word file, a special function “Insert Object” is provided, i.e. Word treats another document as an object.
Several ways to create a page break in Word
When working with documents in Microsoft Word, when formatting text, you often encounter the problem of transferring text to a new page.
Sometimes you need to make sure that the entire paragraph is on one sheet, start the next paragraph on a new page, or simply insert a blank sheet.
To easily solve all these problems, it is enough to understand how to create a page break in Word.
What is a page break?
Before you figure out how to make a page break in Word, it’s worth understanding what it is. A page break is a function in the Word program that allows, after a certain paragraph, to move the rest of the text to the next page, without making unnecessary efforts during further changes and corrections.
One of the common mistakes when wanting to wrap text to another page is to use the Enter key on the keyboard, which simply moves the cursor to the line below.
In this case, if there is still space left on the sheet in the lower part, and later some changes are made above, then all the text will “move away”, and on some sheets an empty space will appear at the top.
To avoid this and other incidents when drawing up a document, it is enough to learn how to create breaks between pages in Word.
Inserting a break
For most versions of the program, the process is completely identical; for example, the algorithm for how to make a page break in Word in 2010 is similar to all subsequent versions.
Having selected a place, usually at the end of a paragraph, after which there should be a page break, you need to select the “Insert” tab in the top quick access panel, in which there is a “Page Break” item in the “Pages” column.
After clicking on this button, the cursor will automatically go to a new, empty page, and if the current sheet was previously followed by another one, it will be one number further.
To return the text below to the top, to maintain a page break only between these sheets, just press the Delete key on the keyboard once. And to delete the inserted break itself, use the BackSpace button.
A similar result can be achieved in another way. Having selected the paragraph that should start on a new page, you need to right-click on it. In the menu that opens, you need to find the line “Paragraph” and click on it with the left mouse button.
After this, a window will appear in which there will be two tabs - “Indents and Spacing” and “Page Position”. Having selected the last one, you need to check the box “From a new page” and click the “Ok” button.
As a result, all text from the selected paragraph will move to a new sheet.
Hotkeys
The fastest way to create a page break in Word is to use hotkeys. Regardless of the version of the program, you need to place the cursor at the place after which the new sheet should begin, and simultaneously press the combination Ctrl + Enter.
Combining documents using “Text from file”
This method will help you combine multiple files into one, but be aware that this will lose formatting in the finished document.
Step 1.
Create a new blank document: Office icon, then New.
Step 2.
Go to the “Insert” tab, find the “Object” button in the “Text” section and click on the down arrow.
Step 3.
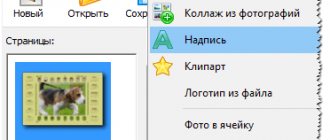
In the dialog box, select Text from File.
Step 4.
Select all the files you want to merge into one.
To select all files at once, press CTRL + A. If you want to select several files in a row, then select the first one, then hold down the SHIFT key and select the last one - intermediate ones will be selected automatically. If you need to select, for example, all odd-numbered files, then select them with the left mouse button while holding the CTRL key.
Step 5.
Once the files are selected, click on the “Insert” button and the documents will be sent to the document you created.
Landscape page orientation in Word 2020
Greetings to all those wandering through Word 2020 in search of information on the landscape orientation of pages (one, several or all) in a document. Today we will discuss this issue with you, as before in previous “Cribs,” in detail, with all the details. Anyone who reads this article, and even more so watches the video posted below, will no longer have any confusion about changing the format of Word pages. Let's get started?
How to make a landscape page in Word 2020 for the entire document
By default, all documents in the Word 2020 text editor, as well as all previous versions, are presented in book format. But, if you have an idea to make your creation in the form of an album, then it is very simple to implement it.
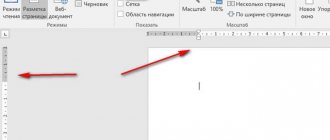
We carry out all operations on the panel of the “ Layout ” tab. Go to the first section on the left “ Page Options ”, click on the “ Orientation ” button. In the drop-down menu, select landscape design for the document. Mission accomplished.
But let’s also see what else Word offers us in “ Page Options ”:
- by clicking on the “Margins” button, you can select indents from six templates or set them as desired;
- the “ Size ” button will allow you to select the future print format in both portrait and landscape;
- using the “ Columns ” button you can split the text into 2, 3, 4, 5 columns, setting their width at your discretion;
- about the “ Break ” button in the “Cribs” on headers and footers and numbering; In the future, I plan to write a separate review about all the capabilities of this team.
And it should also be noted that if you change the orientation of the pages of the entire document, the format of the title pages will change accordingly. You can always select the appropriate one in the “ Insert ” tab, “ Pages ” section.
And now, dear Word researchers, let's look at a more interesting problem.
How to make several pages landscape in Word
That is, friends, you understand that we will not expand the entire document into landscape format, but only its individual pages.
Those of you who carefully read the “Cribs” about page numbering and headers and footers, by analogy with the material given there, may decide that we will again begin to divide the document into technical sections.
And they will be wrong! Cheers cheers! In this case, Word will do it for us. So the tedious preparatory work of separating selected pages into separate sections is not required.
So what needs to be done? Everything is very simple this time. In order to make only a few pages landscape in Word 2020, we take 7 simple steps:
- select the text intended for landscape pages;
- open the “ Layout ” tab panel;
- left-click on the arrow in the lower right corner of the “ Page Options ” section;
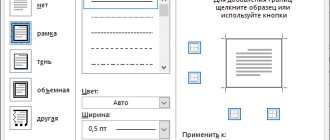
- in the window that opens, select the “ Fields ” tab;
- note landscape orientation;
- in the “ apply ” line, select “ to selected text ”;
Let me emphasize again that Word will automatically insert breaks before and after landscape pages.
Now, dear readers, you know how to make one or part of the pages landscape in Word. Good luck to you in revealing all the “secrets” of the Word 2020 text editor. I, a GALANT copywriter, for my part, am always happy to help you with this.
Difference between added file and link
If you decide to update the added document, you will have to double-click on the item to open the file and edit it. If you edit the original file (that is, outside of the Word document), the object in the document will remain the same. Do you know what work means in dreams?
While the link will always reflect changes to the linked file.
Thank you for reading and good luck in mastering the intricacies of the MS WORD text editor. Subscribe to updates, join groups and tell us in the comments whether you were able to insert the document into the body of the WORD document.
How to add a page in Word
When working in the Word text editor, the user often has to add one or more additional pages. For experienced users, this process does not cause difficulties, but this cannot be said for beginners. Therefore, today, in our article, we will look at the question of how to add a page in Word and do it in several ways, in different versions of the Word program.
You can add one or several blank pages to the Word text editor. What is this for? Sometimes - in order to later add some elements to the text: diagrams, graphs, drawings, etc. How to do it? This will be discussed below.
How to insert one blank page into a Word document
So, if you are using the Word 2003 program, then you need to go to the menu in the “Insert” section, then select the “Break” item. We confirm all actions by pressing the OK button.
If you prefer the 2007 version of Word, then to insert a new page you need to go to the “Insert” section, select “Pages”, and click on the “Blank Page” item.
In the 2010 version of Word, the actions are no different. You need to go to the “Insert” tab, then select “Pages”, click on the “Blank Page” item.
By the way, Word adds new blank pages automatically. This is done when the previous sheet is completely filled with text.
You can also add a page in Word by pressing the “CTRL” and “Enter” key combination. This method can be used in any version of a text editor.
Adding Multiple Blank Pages in Word
In this section, we will look at a method that allows you to add several blank pages at the same time to a text document.
The first method is the most obvious. It is enough just to do the above steps several times. The disadvantage of this method is that the process is quite lengthy and tedious. It is best to use the key combination “CTRL” and “Enter”. This method can be used in any version of a text editor.
How to add a page in Word 2020 for Mac?
There is nothing complicated here either. All you need to do is follow these steps:
- First, place the cursor in the part of the document where you need to place a new blank page.
- Next, go to the “Insert” tab located on the toolbar.
- Then click on the “Blank Page” item.
- The result is that a blank new page automatically appears in the document.
If you want to expand the space, then just use a page break. It is important to understand that it does not add a blank page to the Word document, but simply moves the text to the previous page.
How to add a title page to a Word document?
This question is usually asked by students. After all, most often it turns out that they first create the text of a scientific work, and lastly design the title page. This is where the question arises of how to add a blank page placed in front of all the text. How to add a page in Word?
There is nothing complicated here either. There are two ways to add a blank cover page. The first method is to insert a title page template offered by the Word text editor.
To do this, you need to find the “Insert” section in the menu, and then select the “Cover Page” item. The user will be offered several options for prepared templates.
Here the author of the text can indicate the title of the document, city, last name and first name of the author, etc.
Second way. To add a blank cover page, you must place the cursor on the subsequent page. It is important to note that a blank sheet will appear in front of the cursor.
Then go to the “Insert” tab located on the toolbar. Then click on “Blank Page”. The title page will appear.
Next, the user must specify the required text, and then align it in width or place it in the center. This will make the text look neater.
In this article, we looked at several ways to add a page in Word, including a title page. As practice shows, even novice users of the Word text editor successfully cope with this. All that is required is to correctly and clearly follow the specified algorithm of actions. Only in this case the result will not disappoint you, and the work itself will not cause trouble.
Source: https://ru.solverbook.com/stati/kursovye-raboty/kak-dobavit-stranicu-v-vorde/
Added file and link - what's the difference?
If you decide to update the added file, you will have to click on the object several times to open and also edit it. Having edited the original document (outside of Word), the object within the document will remain unchanged. As for the link, the situation is the opposite. This will always display any changes made to the linked file.
Thank you for reading my article, and I wish you good luck mastering the secrets of the Word text editor. I will be glad to read in the comments that you were able to insert a document into the file you created.