vReveal
A good tradition that has become the norm: the developer develops, and we study and compare with previous products. Based on the results of this comparison, we use the new product or reject it. True, it is quite difficult to keep track of the emergence of all technical innovations in time: they multiply extremely actively, some do not even reach the beta testing stage, while others successfully conquer the market.
Only recently we examined one of the products based on CUDA technology, and suddenly it’s time to register another nominee from the same CUDA echelon. This time we take a look at one of the developments of MotionDSP, which offers “video enhancement software built on patented super technology.” It sounds familiar: cliched and stereotypical. This phrase is ideal only for announcing some suspicious program on the page of a cheap online store. Okay, let’s wait with the conclusions, maybe during the study we will radically change the first deceptive impression and come across a technology worthy of mention.
So, today we will talk about the vReveal program, running on CUDA technology. Let's remember what this fact means: CUDA is the name of the NVIDIA architecture created to implement parallel computing on a graphics processor. Transferring complex calculations from the central processor to the graphics processor, which is equipped with any modern Nvidia video card, can give a multiple increase in performance in procedures that require long and tedious calculations.
The installation module of the program offers several languages to choose from; Russian, alas, is missing.
The launch of the program is accompanied by an introductory splash screen that displays a warning about some limitations of the trial version. It turns out that, in addition to the standard 30-day limit, there is one more thing: a translucent “watermark” with the vReveal logo superimposed on top of the saved video.
At the beginning of work, vReveal will offer to scan the user’s folders for video files. It’s not clear why all this is... It feels as if the program was developed exclusively for a home user, who is sure that all his video files should be stored only in the Documents and Settings/Default User/My Videos folder, or even on the Desktop.
Here's how MotionDSP CEO Dr. Sean Varah explains it: “MotionDSP has a long history of focusing on video, and through years of research and development, we're bringing the most powerful video enhancement techniques to consumers in an accessible, simple app.” . From his words it becomes clear that vReveal was initially designed for users who are not professionals in the field of video processing. However, this does not mean that they are unprofessional in everything, because vReveal's patented technology is taken from applications that are used by justice agencies and intelligence agencies (Crime Scene Investigation).
Well, what do current services require if not quick and convenient transformation of low-quality video into a digestible and easily viewable form? The source material can be anything: a segment of footage obtained from a video surveillance system; video footage accidentally taken by a witness allegedly containing a portrait of the suspect; a video from a mobile phone posted on the Internet... At the same time, the employee working with such a video must only quickly provide the result of processing. This program is designed for such and such a specialist, not burdened with narrow knowledge of digital video processing. Including, of course, the home user.
Let's return to the program: its appearance greatly adds to the mood; an ordinary non-specialist will be especially happy with such a simple interface. Almost complete absence of incomprehensible icons, complex menus... Just three working tabs, and a viewing window with standard player control buttons.
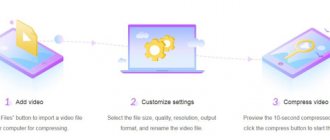
As usual, the first tab is used to import material into the program. There are two ways to do this: use the Import button to select a single video file, or use the Tools -> Folder Manager command to open a dialog box with a choice of the folder where the video that needs processing is stored.
The selected folder acts as a permanent source of material, and every time you start the program will scan this folder in search of a new video.
Here we need to thank everyone who contributed to the appearance of this article: in search of a video that needed restoration and improvement, the author came across in the depths of forgotten cabinets a tattered VHS tape from a personal video archive, long considered lost; Tears for this loss have long since dried up. It was all the more pleasant to once again find an expensive (and it should be noted - terribly low-quality, filmed without taking into account any rules) video. Of course, the entire tape was immediately captured and sent straight to vReveal.
A video file imported into the program (format support will be discussed below) can be viewed, simultaneously taking still images of the desired moments and saving them in one of the common graphic formats (.BMP, .JPG, .PNG). There is also a tool that allows you to determine the boundaries (beginning and end) of the video segment that needs processing - in case you want to save not the entire file, but only part of it, in an improved video.
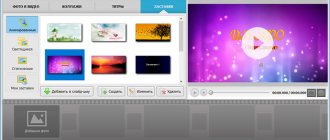
That, in fact, is all the preliminary operations. It's time to move on to the next stage of work - click on the Enhance tab. Here in the toolbar there are visual icons that are recessed buttons. Clicking each of them turns on the corresponding effect:
- Clean — cleaning video from debris (color noise, film defects: scratches, stains);
- 2x Resolution - doubles the resolution (only for video with a resolution of less than 288 pixels vertically or horizontally);
- Sharpen - increasing the clarity of blurry, “cloudy” video;
- Auto Contrast - automatically equalizes image contrast;
- Stabilize - stabilizes shaking, eliminates frame shake;
- Fill Light - adds light to dark areas.
In order to visually evaluate the changes made to the video, there is a special tool on the player panel - a button that allows you to divide the video window into two parts. On the left side the video is played in its unmodified form, and on the right side we can see the changes made on the fly. Thus, the operation and settings of each effect do not need to be predicted - the result is visible instantly.
The developer has taken care of one more convenience: the vertical border dividing the video frame, it turns out, can be dragged with the mouse left or right, thereby increasing or decreasing the display area of the original or processed video.
But still, the functionality of tools in the form of buttons alone is clearly not enough. Well, here too the developer has provided special settings that allow for a finer adjustment of all parameters. These settings are located on the Fine Tuning tab. As you can see, there are two more settings hidden here that are not visible in the Basic tab: Color , which allows you to change color saturation and white balance, and Deinterlace , which deinterlaces the frame (eliminating the notorious comb, or comb).
Now about the main thing: before we start experiments and measurements, we need to make sure that the program uses the graphics processor and not the central one. If the NVIDIA GPU On in the Tools is checked, then everything is in order, this video card supports CUDA technology and the program agrees to work with such a GPU (Nvidia GPUs that support CUDA will be discussed below).
If your video card does not support CUDA technology, then the item of the same name will simply be inactive and gray:
In general, there is nothing more to say about working in the vReveal program, with the exception of its last stage: saving the processed video. There's not much to brag about here: vReveal is able to create only two types of files: uncompressed AVI and video in the Windows Media Video (WMV) format. But there is also an item that is quite useful for the home user: sending videos directly to the YouTube website.
The video settings are also not very detailed. All that the user is allowed to do is decide on the frame size and select the folder in which the processed video will appear.
However, there is also a rather interesting opportunity to save a video file in both versions at once: both versions of the video, the original and processed with filters, will be located in one video frame (the picture shows one example of such work; shooting with a mobile phone was taken as the original video). Of course, miracles don’t happen; you can’t show missing details if they weren’t initially in the frame. But it turns out that it is quite possible to hide matrix noise, soften pixelation, and make contrasting objects clearer: compare the amount of noise in raw (left) and processed frames (right). And what’s interesting is that although noise removal occurs due to smoothing, despite this, we do not observe blurring of the picture: in the processed frame the name of the store is still clearly visible.
During the final calculation, vReveal displays information not only about the time remaining until the end of the work, but also calculates the number of minutes saved by the user by using CUDA technology.
Interesting statistics. Why not check it out? And it’s enough to feed the reader only pictures; it’s time to see the CUDA technology in action.
The GeForce GTX 285 video card produced by XFX, designed for gaming use, will help us with this. Well, it's time for her to move on from toys to CUDA work.
However, remembering our past experience, we already know that one video card will not be enough for us. You can, of course, compare video processing speed by turning on and off CUDA support, but what about owners of not so powerful graphics accelerators? What information will they glean from such a comparison? Of course, nothing, except for additional questions. Therefore, let's record the work of two video cards from the screen: the aforementioned powerful GeForce GTX 285 and the “old lady” GeForce 8600 GTS (a simple script that emulates mouse cursor movements will help us synchronize the work). The PC on which the measurements were carried out is an ordinary “home” configuration, consisting of a dual-core AMD Athlon 64 X2 4200+ processor with 4 GB of RAM and a 500W power supply (which was hastily purchased specifically to power the power-hungry GTX 285).
In the next video, you'll see that the 8600 GTS is about three times slower than its more modern and powerful sister. With each newly enabled filter, the gap in operating speed between these video cards increases more and more, reaching three times.
View the video in full resolution;
It’s not for nothing that we use an excerpt from an old film in our examples; such footage always suffers from the same type of shortcomings: a cloudy, unclear image, as if covered with a veil; an abundance of spots and scratches jumping across the screen due to defects in the old film; terrible shaking in the frame... By the way, have you noticed how carefully the shaky picture is stabilized here?
Yes, this video stabilization skill seems to be the most valuable. We have said a lot about stabilization, and we have broken many copies in search of the optimal tool. But none of these tools, be it a built-in module in After Effects or a special script for AviSynth, offers similar speed of operation with virtually the same result.
But viewing is one thing, but what will be the speed of saving the processed file? Yes, the same one as during playback! Theoretically, it may decrease slightly, because when saving, work is added to the central processor (not the graphics processor!) in the form of pumping information and recording the video stream into a newly created file. Of course, hard drives are also loaded, especially if saving occurs in uncompressed video with a high bitrate. However, these factors cannot play any serious role, because all modern PCs, even home ones, can easily cope with such loads.
Now let’s see at what speed the program will work if GPU support is turned off completely (this “test” is intended only for skeptical users who believe that if they have a sufficiently powerful CPU, they do not need any CUDA technologies).
Watch the video in full resolution,
Over the course of several tests, it turned out that the actual speedup that can be achieved when processing video in the vReveal program is approximately 7-10 times. Both when viewing and when saving.
It's time to move on to the lyrical part of our review. Let's see in which cases, when processing which video, the vReveal program and CUDA technology can give the greatest impact. Let's process a variety of video examples: filming with a mobile phone, an old household video captured from a VHS tape, footage from an Indian film (the so-called DVDRip), a black and white film about the first manned space flight and color newsreels of 1945 (the Victory Parade on Red Square).
The table shows screenshots of the working window of the vReveal program at one of the moments of playback with filters enabled. The result of these filters is visible on the right half of the frame, while the original video is displayed on the left.
| 1. Shooting with a mobile phone: MPEG-4 176x144 15 fps When processing this video, the following filters were used: Clean (noise removal), 2x Resolution (doubling the frame size), Auto Contrast (automatic adjustment of contrast and white balance), and Stabilize (elimination of hand shaking). The processing speed was 14-15 frames/sec (98%). The frame becomes lighter and more contrasting, the colors are saturated. Noise and shaking almost disappear, pixelation is reduced. |
| 2. Amateur video captured from a VHS tape via the AV input of a miniDV video camera: DV PAL 4:3 Used filters: Clean (noise removal), Auto Contrast (automatic adjustment of contrast and white balance), Stabilize (elimination of hand shaking), Deinterlace (deinterlacing). The processing speed was 8-9 frames/sec (37%). Colors become closer to natural, and shaking is almost completely eliminated (there was no trace of any stabilizer in that old video camera). But here I would like to say a poisonous thank you to the operator who forgot to turn off the date and time during shooting: when such a video is stabilized, the columns of numbers displayed in the corner of the screen begin to dance madly across the entire frame. |
| 3. DVDRip: MPEG-4 XviD 720×288 30 fps Used filters: Clean (noise removal), 2x Resolution (double the frame size), Sharpen (image clarity enhancement), Auto Contrast (automatic adjustment of contrast and white balance). Processing speed - 15 frames/sec (50%). Here, the Clean filter was used solely to hide the initial compression defects (pixelation that slipped here and there in dynamic scenes). The Sharpen filter neatly processes fine details that appear after doubling the frame size. And finally, auto contrast, which seems to erase a thick layer of dust from the screen and make the picture bright with rich colors. |
| 4. Black and white film: XviD 720×704 25 fps Filters involved: Clean (noise removal), Auto Contrast (automatic contrast adjustment). Processing speed - 10 frames/sec (40%). Due to the work of both filters, the frame becomes brighter and cleaner. |
| 5. Color film: MPEG-1 384×288 25 fps Used filters: Clean (noise removal), 2x Resolution (double the frame size), Sharpen (image clarity enhancement), Auto Contrast (automatic adjustment of contrast and white balance). The processing speed was 20 frames/sec (80%). Well, what can I say - the transformation of the picture, its second life, is visible to the naked eye. No stabilization was used due to logos present in the frame. |
Since we are talking about video, it is incorrect to limit ourselves to just static images. Let's watch the experiments described in the table live:
Now about the limitations: the program works with video with a frame size of no more than 576 pixels in height. Supported formats/containers: .AVI, .MPG, .ASF, and .WMV. However, if you have QuickTime installed on your system, the program also works with .MOV, MPEG 4 and .3GP. AMD (ATI) GPUs are not supported.
Despite the existing possibility of combining the computing power of several GPUs into one “cluster” (SLI technology), the program does not yet know how to use it. However, work on this issue is underway, so vReveal users are advised not to disable the Check for Updates at Launch option.
What video cards can work with the program? The answer is obvious: supporting CUDA technology. Namely, Nvidia GeForce 8 series and higher with driver version 178 or higher installed (you can view the list of CUDA-enabled video card models here). It is recommended that the video card have at least 128 megabytes of memory. At the time of writing this article, the program cannot work with some models of video cards: GeForce 8800 Ultra, 8800 GTX, 8800 GTS 640, 8800 GTS 320, Quadro 4600 and 5600 (intensive work is also underway to resolve this issue). Answers to all these and many other questions can be seen on a special page on the vReveal website.
[All articles in the “Digital Video” section]
vReveal Premium 3.2.0.13029
vReveal is a program designed to improve the quality of non-professional videos shot on mobile phones, digital cameras and other handheld devices. vReveal uses tools to stabilize, enhance video brightness and clarity. The program also increases the detail of low-resolution videos and eliminates noise.
Using Nvidia Cuda technology to harness the power of parallel computing on the GPU, vReveal quickly eliminates judder, darkness, noise and blur in consumer video. The program can remove noise, eliminate shaking, brighten, increase contrast, and increase saturation. There is also a 2xResolution function, which is designed to increase the resolution of the video, but only if the original does not exceed 288 vertical pixels.
The vReveal software product is designed specifically to relieve stress from the eyes of video lovers, which cannot always be viewed in the highest quality form. With vReveal you can achieve good quality even from “hopeless” videos downloaded from a noisy network, or DVDs with pirated recordings. The program does not require much experience or user skills. Poor quality video processing in vReveal occurs automatically according to preliminary user settings, which, by the way, the program itself recommends entering.
vReveal is a patented CSI (Crime Scene Investigation)-style high-definition video generation technology derived from applications used by justice and intelligence agencies. Using NVIDIA® CUDA™ technology to harness the power of parallel computing on the GPU, vReveal quickly eliminates judder, darkness, noise and blur in consumer video.
Features:
- Import and enhance HD video (up to 1080p)
- Stabilize, Brighten, Sharpen, and more with One Click Fix
- Save to high-definition (HD)
- Special effects: Black & White, Vivid Colors, Glow, and more
- Remove grainy video noise with Clean
- Import various popular video formats (MOV, MP4, AVI, MPG, MTS, WMV, 3GP, FLV, ASF, and more)
- Manage and organize your videos in a gallery
- Save to video formats including Windows Media (WMV), MJPEG AVI, Uncompressed AVI and MP4
- Built-in YouTube and Facebook uploader
- Create amazing panoramas
- Edit your videos with easy to use start and end titles
- Import videos directly from your memory card
- Quickly find what's in your clips using vReveal's lightning fast scrubbing
- Trim accurately with film strip
- Organize your clips into convenient and easy to find events
OS: Windows NT/2000/XP/Vista/7/8 (32 and 64 bit)
Download vReveal Premium 3.2.0.13029 (92.6 MB):