How to reinstall Windows on an Acer laptop?
On the Acer V3-571G laptop purchased in 1914, Windows 8 was never reinstalled. The system worked stably for 2 years, but over the last year frequent errors and random reboots have appeared. How can I return Windows to its original state now?
Answer (1)
There are two ways:
- Use built-in Acer eRecovery Management. This is a utility that restores the factory installation of Windows from a hidden partition on the hard drive.
- Take a clean Windows distribution and install it on a clean HDD.
The first option is launched using the ALT + F10 key combination during the initial boot of the laptop (when the Acer message appears). You will be prompted to completely return the system to factory settings or with the ability to save custom files.
If there were serious failures in the system or viruses, it is hardly advisable to transfer anything to a clean Windows. Files are transferred automatically and it is difficult to control what kind of garbage will be transferred from the old Windows. Therefore, complete deletion will be safer, and it is better to copy the necessary data to external media manually in advance.
By the way, the complete removal option also has a minus. Laptop manufacturers, in addition to Windows itself and the necessary drivers, shove a bunch of shareware software into them, because of which the OS is already immediately loaded. And when the user puts his own programs on top, the system barely moves. Even a large amount of RAM and a powerful processor will not bear such a burden. Working on such Windows will be very uncomfortable.
Therefore, it is better to reinstall the system using the second option - a clean installation from the original distribution. And then the drivers and the most necessary software are installed step by step. Then Windows will be much more responsive, without wasting its resources on programs that the user does not need.
You can download a licensed Windows distribution on the Microsoft website - https://www.microsoft.com/ru-ru/software-download/windows8. The link will download a tool for creating your own installation media for a DVD or USB flash drive.
The program will ask for the required version of Windows, its bit size (32 or 64 bit), and then download and write the installation distribution to the selected media. Next, you need to boot the laptop from this media and follow the installation instructions.
How I solved the problem with installing Windows on an Acer laptop.
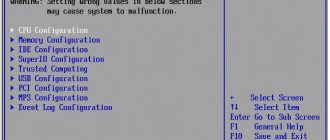
To install Windows on an Acer laptop, you need to go into the BIOS via the F2 button and make some settings.
After you and I have entered the BIOS, go to the MAIN item, opposite the F12 Boot Menu inscription there is the inscription Disabled, which means disabled, you need to enable this function by selecting the Enabled item.
Next, go to the Boot item, find the line BOOT Mode where opposite is the inscription (UEFI), it must be changed to
Legacy BIOS
It should all look like this; after which we save our changes by pressing the F10 button.
Then we reboot our laptop and go to the download menu, this is the F12 button. Select the name of our flash drive.
After which, the installation of the operating system continues as normal, but before installing Windows, I recommend that you reinstall the partitions on your hard drive with a new one.
More detailed video.
This is how you can reinstall Windows on an Acer laptop.
If you liked this article or found it useful, then share it with your friends through the social networking buttons.
Sooner or later in the life of every PC user, there comes a time when you have to reinstall Windows. There can be many reasons for this, for example, an outdated system, viruses that an antivirus cannot defeat, a large number of system errors that are easiest to fix by reinstalling the OS.
Today we will figure out step by step how to reinstall the Windows operating system and avoid data loss.
Important notes about installing and using Windows 10 on a laptop
In this new version of the operating system from Microsoft, you need to remember the following features.
- In Windows 10, the concept of applications and user data is separated even more clearly than in the G8. Never place your documents and photos on the system drive. If you ever need to do a full system reset, they can be removed. But the system is also completely restored even if system files and applications are damaged.
- Throughout the installation of Windows 10 on a laptop, an Internet connection is required to download important update files and device drivers.
- When installing “Ten” on an old laptop that was released more than five years ago, make sure that drivers for this version of the OS are available for all devices in the laptop. For example, support for some sound cards is currently limited.
- You can leave the installation disk or flash drive in case of system recovery after a serious failure. But such things happen extremely rarely. Therefore, most users do not save a recovery disk. You can always make a new one.
- It is not recommended to use pirated distributions for installation . Your laptop's operating system needs to be constantly updated, which is not guaranteed by a pirated installation kit.
- After installing Windows 10 on your laptop, it will not be superfluous to install an antivirus. Many free programs: AVG, Avast, for example, have already released their “top ten” versions.
Is it worth installing Windows 10 on a laptop ? The answer is yes. The laptop will run faster, and you will get new applications and an easier-to-manage OS. To be honest, there’s not much to configure. This is the first version of the OS that works great out of the box.
Preparing to reinstall Windows
The example in this article will be Windows 7. In principle, using the same scheme, you can install other versions, both old and new. Before you begin to reinstall Windows, you need to take a few preparatory steps. To begin with, you must clearly understand that your actions jeopardize the safety of your data, so if you are not confident in your actions, you should ask another person for help for these purposes.
First of all, copy important information for you to a flash drive, hard drive or any other medium. This could be photographs, music, documents - in general, everything that is very dear to you. Be sure to check the files in the Documents, Downloads folders on your Desktop. If your hard drive is divided into two partitions, or the system has two drives, make sure that all important information is saved on drive D: And when installing WIndows, you need to pay attention to the size of the drive on which the system is installed, so as not to accidentally erase the second drive.
Why you should install Windows 10 on your laptop
We will not talk about the merits of the new OS within the framework of this material. It is only important to mention the minimum requirements for the device itself on which this operating system will work correctly:
- Minimum screen resolution – 800*600 pixels;
- On a hard drive or SSD, you should leave approximately 20 GB of space for system files;
- In addition, the system disk must have space for any programs that the user will need;
- The minimum amount of RAM for a 64-bit system is 2 GB;
- A video card capable of supporting at least the ninth version of DirectX;
- Processor with a frequency of at least 1 GHz.
It is important to understand that mobile devices that were released 3 years ago are perfectly suitable for such parameters. When installed on older devices, normal operation is not guaranteed.
Considering that older versions of the OS, such as seven or even eight, are better, you are contradicting the most basic logic. The fact is that computers have long ceased to improve at the same pace as they did just a couple of years ago, but the operating systems have become even more beautiful and functional, but at the same time they have begun to use system resources more efficiently. Therefore, even if you have an old PC or laptop, then there is no problem installing the latest OS.
System installation process
Your computer will begin to boot and launch the system installer. Everything is relatively simple here. Follow the installer's instructions. The installation process is divided into several stages; after each stage, a checkmark will appear opposite.
Please note that during installation you will be offered a menu to select a disk for installing the operating system. You can either delete all existing partitions or format only partition C without deleting information from partition D:
When the first step is completed, the computer will restart. At this point, you need to start the BIOS again and put the hard drive bootable or remove the media with the image. Save the settings again and restart the computer. The installation will continue.
Upon completion of all stages, you will receive a clean, brand new system. All that remains is to perform basic system setup. Please note that all previously installed programs will be deleted permanently, and if you do not take care of saving important data, there is a risk of losing it forever.
If you installed a pirated version, then it is quite possible that it will already contain basic drivers and a minimum set of necessary (or even harmful) programs. If not, then you will have to look for it all yourself. It is best to download drivers from the official Microsoft websites, as well as from the websites of your PC component manufacturers.
>NexxDigital - computers and operating systems
The process of installing Windows 7 on a netbook
Installing Windows 7 will be a simple task even for a beginner. You will need the installation flash drive from step 1 and your precious netbook. Break the first one with your hands, smash the second one on your head. Connect the netbook to a power outlet, open the lid, admire this miracle of technology, close the lid, admire it some more, and get to work.
- Insert the flash drive into the netbook. Yes, yes, this is best done with the netbook turned off, so that when it starts, it will already be detected by the BIOS.
- Turn on your netbook. When starting, get ready to press F2 almost immediately to launch the BIOS setup utility. As soon as the message “Press F2 to enter setup” or similar appears in the lower left, press F2 and get the BIOS setup utility to launch.
- In the program that opens, go to the Boot tab, select USB ****** (the name of your flash drive should be indicated here) and use the F5 or F6 keys to move this item to the first place. Go to the last BIOS tab and select “Save an exit setup”.
- The computer will restart. This should launch Windows Setup immediately. If this does not happen, turn on your brain and return to point 1.
- Follow the onscreen instructions during the installation process. When choosing a section, I can give the following recommendation - delete all existing sections and create a breakdown yourself. The most convenient option would be to create two disks of 35 and 110GB, respectively. To delete and create disks, on the selection page, click on “Configure disk”, delete partitions, create two partitions sequentially (when creating the first, specify the size of 35000, when creating the second, agree with the proposed size), select the first created partition (most likely it will be second in the list after the section labeled “Reserved by the system”), click “Format”, and “Next”.
- Windows installation will take place automatically. Monitor the state of your computer before the first reboot. As soon as the first reboot begins, use the method described in steps 2 and 3 to return the Boot tab to its original state (that is, move USB *** from the first place to the end of the list), save the settings and continue the installation in automatic mode.
- The installation of Windows 7 will end with several questions from the system. Enter your username, computer name, select a password, configure updates and indicate your license key (it is located on the license sticker under the laptop).
At this point, the first stage of system installation is completed, Windows will turn on, configure itself and provide you with complete carte blanche - proceed further. You can now remove the flash drive and put it aside.
Acer factory settings. How to reinstall Windows on an Asus laptop? Step-by-step instruction
In fact, the method of reinstalling Windows on a laptop is not much different from reinstalling it on a desktop computer, but there are some points. There are two types of laptops:
- With Windows pre-installed
- Without her
In general, laptops are not sold without an OS, but often it can be the free Meego OS, which is installed instead of Windows to make the computer cheaper. After all, when purchasing a laptop, the price of a copy of Windows is included in the price, which raises the cost by 500-1000 rubles.
If you do not have a pre-installed licensed OS on your laptop in a hidden section, then use a universal one, which is also suitable for pirated copies.
But there are also advantages to pre-installed Windows - you can run system recovery to install a licensed OS from a hidden partition of your laptop’s hard drive. Owners of laptops without Microsoft OS are deprived of this opportunity. 3 options for how to restore Windows on a laptop:
- For laptops with Win of almost all models, in the Start menu there is software from the manufacturer for system recovery. They are called differently, you can distinguish them by their name - something about Recovery. You will be offered several ways to restore the OS, as well as reinstall Windows and bring the laptop to its original factory state.
- On almost all laptop models, immediately when you turn it on, you can see something like “Press F2 for Recovery”. If you don’t see anything like that, then look carefully at the moment when the manufacturer’s logo appears on the screen. This will allow you to start restoring the operating system instead of loading Windows.
- On laptops with Windows 8, you can go to “Computer Settings” - “General”, then find “Delete all data and reinstall Win”. The operating system will be reinstalled automatically, plus all the necessary drivers and other pre-installed software that was included in the system at the time of purchase will be installed.
How to activate the operating system on a laptop
When requesting a key, we tell the system that it does not exist. Or we just indicate it. Everything is clear with the license agreement - check the box and continue.
Installation type – custom. This way you can place a clean system and delete all files from the disk. Then you will need to specify the desired section. At this stage, space on the physical disk is redistributed. First we delete the section. Then we create a new one and format it for the new system. Then just click “Next” and wait for the process to complete.
If your device was released in recent years, and you initially purchased it with an operating system, then most likely the code is built into the BIOS and you will not have to do anything yourself. If you have an old PC, you will have to enter the code. You can find it on your PC. In the literal sense of the word - as a rule, the activation code is written on the bottom of the laptop, but it can be sewn in in another way. If you can't find it, but you definitely remember that you paid for the license along with the purchase of the PC, then you can contact the manufacturer.
As an alternative, you can use any activator, for example KMS Net or others. This is specialized software that will “hack the system” and as a result you will get a fully working system that will no longer ask for a key.
We hope that our instructions on how to install Windows 10 on a laptop answered your questions. At the same time, you also know how to activate the system. We only recommend not to lose your original key, if you actually have it. After all, most PCs have a real license if you bought it recently from the official store. But if it is not there, then you know a way to get around all the problems.
Restoring the laptop to its factory state
So, to reinstall Windows on a laptop using recovery, do the following. Let's consider performing an operation on an Acer laptop.
When the Acer logo appears, press Alt and F10. To avoid missing a moment, press them several times.
- The recovery program window will appear on the screen. A password may be required, if you did not set one, then use the factory passwords: 000000, 00000000 or AIM1R8.
- Select "Full recovery...". All data from drive C: will be deleted, save the necessary information from it in advance. If you need advice on how to do this correctly, then read the “Data Saving” section in our.
- Next, you should read what you are informed and warned about.
- Make sure the correct drive is selected.
- Agree to begin the operation.
- The process of restoring the OS on a laptop takes about 15-20 minutes.
This is several times less than the usual reinstallation of Windows on a laptop, especially considering the installation and settings of some utilities from the laptop manufacturer that come bundled with a pre-installed licensed OS.
- The operation was completed successfully. Click “Ok, the computer will reboot and you will be logged into the reinstalled OS.
In another model of mobile PC (HP, Asus, Lenovo, Samsung, etc.), the program for restoring and reinstalling Windows may differ, but the essence is the same. You will receive a fully working laptop in the same software condition as when you purchased it.
Good day, blog visitors.
Any computer, regardless of its hardware and software used, sooner or later needs a clean installation of the operating system. This is due to various reasons - a new version has appeared, the old one has broken down, there was a desire to remove errors and others. Of course, reinstalling Windows on a laptop from Asus or any other manufacturer will help with all these issues. But today I’ll just talk about the process associated specifically with equipment from this computer giant.
If the installed operating system still allows you to work, you first need to complete two fundamentally important steps:
- Prepare the necessary drivers (for video card, network). Having them, it will be possible to find the remaining elements in the future.
Copy documents from the system disk.
If your device no longer allows you to perform the above points, try to find another one that can still be used to do this.
Important drivers for the Eee PC model or any other are located on the official website.
But copying documents from the system drive if the laptop is not working will not be so easy. If the device allows this, we move it to a safe place. If not, open the laptop, take out the hard drive and try to connect it to other equipment. We extract the necessary data.
Creating bootable portable memory ( )
It’s worth saying right away that you can reinstall the OS in different ways. Previously, it was popular from a disk, since there was simply no USB memory. Immediately after their introduction, many motherboards did not support such devices. But over time, the ability to carry out the required procedure from a flash drive became available. And today this option often becomes the only one, since many models simply may not have a suitable drive.
We will consider the option without a disk, using only compact portable memory:
BIOS Setup ( )
Now we need to set the boot via BIOS and some other elements. To do this, we perform a number of actions:
Installation ( )
Well, now let's move on to directly placing Windows 8 or any other OS version on the device:
Using the spare area ( )
Also on some models, such as x54h, it is possible to use the recovery area. This is some space on the hard drive that makes it possible to restore the system without a removable disk.
Important! If, after purchasing a laptop, the operating system has already changed, most likely this will not be possible.
So, to use the tools from the reserve department, we perform a number of actions:
Well, as mentioned above, this solution will help solve many problems. Sometimes it even works when the FN button doesn't work. But again, not on all models.
I hope the article helps you. Subscribe and tell your friends about the blog.
Since OS Windows 8 has become firmly established in the lives of users, messages about all kinds of errors in its operation have begun to appear more and more often on computer forums. Some people with a smile attribute everything to the ubiquitous “viruses,” while others never stop making sarcastic remarks about Microsoft. However, this, unfortunately, does not solve the problem. As a result, you work on your Acer laptop and think about how to reinstall Windows 8 on it. Why think about it? There is a way, and it’s quite simple!
Installing Windows 10 on a laptop: step-by-step instructions
It’s best to start by visiting a special page dedicated to Windows 10, located on the official Microsoft website. Everything you need for installation is collected here.
Experts do not recommend using third-party utilities of dubious origin. Moreover, this time Microsoft specialists were really well prepared, and their utilities are reliable and easy to use.
What is the best way to install Windows 10 on a laptop?
Microsoft experts themselves recommend a so-called “clean” installation of Windows 10 from scratch, from a boot disk or flash drive. But judging by user reviews, from version 8.1 there is a much simpler option. Installing Windows 10 via Update. Just update the "eight" with the latest update packages and receive an invitation to download and install the tenth version. When everything is ready, Windows 10 will install itself on the laptop through the update center. The image size is 3.5 GB, so you need to ensure sufficient free space on the system disk.
How to install Windows 10 from a flash drive or DVD?
To install Windows 10 from a flash drive or disk, you need a system image, which can be downloaded from the official website support page indicated above . There you will also find a utility for writing an image to a flash drive. Click on the Download tool now button, after selecting the version: 32 or 64 bit.
The program is called Media Creation Tool.
- In Media Creation Tools, select the desired action: install Windows 10 on your laptop right now or create a bootable flash drive.
- In the next window, select the OS edition, language and bit depth. The choice of bit depth is related to the capabilities of the processor. But even if the central chip is capable of supporting 64-bit computing, but the memory is less than 4 GB, then you can opt for the 32-bit version. There won't be much point in switching to 64-bit.
- Specify the type of media for recording the image: a flash drive with a size of at least 4 GB or a DVD disc. Most portable laptops do not have a DVD drive, so there are few alternatives in this case.
- After burning the image, reboot your laptop. If booting from the flash drive does not start, then configure the order of devices to boot in the laptop BIOS. How to enter the BIOS, read our article .
Reinstalling from disk
When reinstalling from disk, remember that to restore the license you need to use a distribution kit with exactly the same OS as was installed previously. You can find out the version of the installed system on a sticker, which is usually located on the back of the laptop. By the way, the license key for your copy of Windows is also located there.
Remember that when you reinstall, a new operating system is deployed from the disk, and to avoid problems in the future, you should delete the data from the previous Windows.
This is accomplished by formatting the system partition, so take care in advance to transfer all the necessary data from the selected hard drive volume to install Windows. It is not advisable to transfer installed programs, since this will lose connection with the registry, and many of them may not start. Don't be lazy, install them again after replacing the OS.
The installation disk distribution does not include drivers for all laptops, so download the drivers for your device in advance from the manufacturer’s official resource. If this is not done, then after installation there is a high probability of the following problems occurring:
- The network card does not work;
- Wi-Fi does not work;
- Applications do not launch.
If you reinstalled the OS without this, then to troubleshoot network equipment you will have to download the driver distribution using another computer and transfer them using removable media, so before reinstalling, do not forget to play it safe and download drivers for the network card and Wi-Fi module.
To begin the installation process, insert the disc into the drive and restart your laptop. After your computer starts, open the boot menu and select boot from DVD.
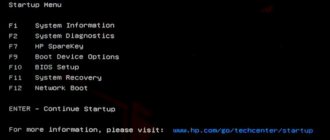
This dialog is called up on most laptops using the F12 key, and on HP devices the combination F9 + Esc is used.
Often on older computers this function is missing, so you will need to open the BIOS and edit the boot priority yourself. To go to the BIOS on laptops, manufacturers use the following keys:
- Acer, Asus, Samsung, Lenovo - F2;
- hp - F10 + Esc.
If the brand of your device is not in this list, then find out the actual key for it on the window that loads when you turn on the PC.
The BIOS interface from different manufacturers is not similar in appearance, but the sequence of actions for changing the boot priority is almost identical. Navigation through the windows of a running BIOS of all versions is carried out using the arrows on the keyboard and the Enter, Esc, +, - keys.
Sequence of actions for BIOS AMI:
- At the top of the screen, select the “Boot” tab.
- In the list that opens, select “Boot Device Priority”.
- Use the arrow keys on your keyboard to move "CDROM" to the first position in the download list.
- Click on F10 and save your changes by selecting "OK".
Sequence of action for BIOS Phoenix-Award:
- Select the "Advanced BIOS Features" entry and press Enter.
- In the “First Boot Device” field, select the following value - “CDROM”.
- Press F10 and confirm the changes.
Windows installation
After making a change to the BIOS and rebooting, a dialog will appear with the message: “Press any key to boot from CD or DVD.”
Further installation of Windows 7 is not difficult, do the following:
- Press any keyboard key.
- Wait until the file unpacker completes; a screen with the entry “Windows is loading files...” is displayed.
- In the “Install Windows” dialog, specify the language and click Next.
- In the window that appears, click on the large Install button.
- Select the version of the system to install that has a license code. You will need to enter it after reinstalling Windows 7.
- Agree to the licensing terms.
- Select the installation method - “Full installation”.
- Select the drive volume on which you are going to install the OS and prepare it by clicking on the “Disk setup” item.
There are situations when a reserved drive partition is present in the list; be sure to select another volume.
If you have disks with a capacity of more than 250 GB, it is worth splitting them into several. Typically, a separate partition of up to 100 GB in size is allocated for system installation.
- Format the selected drive partition. A warning will appear that all information on it will be deleted. Confirm your consent, because you have previously saved all the necessary data. Wait for the installation to complete and click Next.
- Wait for the installation process to complete; on average, it lasts from fifteen to twenty-five minutes, the duration depends on the configuration of the laptop.
- Fill in the fields provided with your username and PC name.
- Protect your account with a password, or you can skip this step.
- Enter the key copied from the sticker on your laptop.
- Select your security options.
- Set the date and time.
- If you have a network connection, specify the connection type.
Reinstalled Windows is ready to go. If you changed the boot priorities in the BIOS, return the hard drive to first place in the list, otherwise the computer will constantly try to start from the DVD.
Reinstallation from a flash drive
Many compact PCs, such as netbooks, do not have a DVD drive. Therefore, the question arises of how to properly reinstall Windows 7 on them. The answer is simple - use removable media.
To reinstall from a flash drive, you need to download the Windows 7 distribution image in ISO format and write it to this media using a special utility. Remember, in order to properly reinstall a licensed Windows system, you need to download a container with the same OS version. The flash drive itself must have a capacity of at least four gigabytes.
Burning Windows to media using the most popular UltraISO utility among its analogues is performed according to the following algorithm:
- Connect the flash drive.
- Launch the utility.
- From the File menu, select Open....
- Select the downloaded Windows 7 image.
- Open the “Boot” drop-down list and select the line “Burn Hard Disk Image...”.
- Click on the Burn button and wait for the process to complete.
The installation flash drive is ready, but to start the installation, you need to select “USB-HDD” in the BIOS as the priority device for starting the laptop. How to set up the BIOS is described above, all steps are similar, you just need to select another entry from the available list. Further installation is no different from installing Windows 7 from DVD.
Often after reinstalling Windows does not work. To solve this problem, take another OS distribution and repeat the installation process. In addition, many users ignore the need to format the partition and reinstall the seven on a disk that already has an installed copy of the system. Avoid this as it can also cause problems.
This article covered reinstalling Windows 7 in several ways. If there is no backup copy, then this procedure should be carried out from a disk on which exactly the same version of the OS is recorded. Some laptops do not have a CD-ROM, so reinstallation can only be done using external media, for example, a flash drive.
Video on the topic
Good publicity
Good afternoon dear friends! Today I want to tell you how to update Windows. The procedure is simple, but very important. Many of the programs we work with require additional libraries that can only be installed by updating Windows. For example, to get into a taxpayer’s personal account, you need an internet explorer browser, preferably the latest version. This is where Windows updates come in handy. Let's get started!
How often should you update Windows?
If you are unable to solve this problem yourself, then you can go to the HELP section and our specialists will help you.
A little off topic. Personally, I install Windows updates only when a specific program requires it. Most of the time, my updates are disabled. Since the update process consumes the resources of your computer and loads the network. If a program asks for some library or system component, then only in this case do I run updates. You may have updates installed automatically, it all depends on your Windows settings.
Let's assume that updates are not installed automatically for you or you do not know whether they are installed at all or not.
I’ll say right away that updates for all versions of Windows are installed the same way. That is, there is fundamentally no difference whether you have Windows 7 or 8, 8.1, 10. The procedure is the same everywhere.
How to check for Windows updates
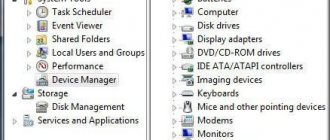
From words to deeds. Open the “Start” menu and select “Control Panel”.
Now select “Windows Update”.
Now we find ourselves in the “Windows Update” section. To check if there are available updates, click on the “Search for updates” button.
The search for updates will begin.
The search process is not fast, please be patient. Nothing froze, nothing broke, it just took a long time, this happens to everyone, wait. While the updates are loading, I’ll tell you just in case. All sorts of different sites offer to download an update package so as not to wait for Windows to find them. I would not trust such sites; the likelihood of catching a virus is extremely high. It's better to wait.
As a result of the download, we will see a window like this.
We see that there were 49 important updates and 99 optional ones (you may have a different number of updates).
How to choose the right Windows updates
Let's move on to the next stage. As we can see, there are mandatory updates and optional ones. It is important. Basically, you can click on the “Install updates” button. Then you will have all important updates installed immediately.
But I want to teach you how to install updates selectively. This will be very useful to us in further work with our programs. Especially with the following: Nature Management Module, Declarant-Alco, PU6 and others.
In order to install updates, we selectively go to each of the points. Let's start with the important updates. Click on the line “Important updates”.
We will see a window in which we are asked to choose which updates we will install. The updates you want to install must be checked. I selected 2 updates and marked them. After making your selection, be sure to click the “OK” button.
Now let's do the same with optional updates. Here I will select one update. Accordingly, I check the boxes next to the required updates. Then you need to press the “OK” button again.
As a result, we get the following message. We have selected 2 important updates and one optional one. This is exactly what the update window tells us. Click “Install updates”
The download and installation of updates will begin. Wait for this process to complete.
All! The update installation process is complete. For the final installation we will need to restart the computer.
During the reboot process, the computer will write to you that updates are being installed. Don't worry, this is how it should be. Just wait until the computer completes all the settings and turns on itself. Be patient!