07/03/2019 windows | security | virus treatment | programs
Windows Defender (or Windows Defender) is an antivirus from Microsoft built into the latest versions of the OS - Windows 10 and 8 (8.1). It works by default until you install any third-party antivirus (and during installation, modern antiviruses disable Windows Defender. However, not all recently) and provides, albeit not ideal, protection against viruses and malware (although recent tests indicate that he has become much better than he was). See also: How to enable Windows 10 Defender (if it says that this application is disabled by group policy).
This instruction contains a step-by-step description of how to disable Windows Defender in Windows 10 and Windows 8.1 in several ways, as well as how to turn it back on if necessary. This may be required in some cases when the built-in antivirus prevents you from installing a program or game, considering it malicious, and possibly in other situations. First, the method of shutdown is described in the latest versions of Windows 10 - 2004, 1909, 1903, 1809 and 1803, and then in previous versions of Windows 10, 8.1 and 8. Alternative methods of shutdown (not using system means) are also given at the end of the guide. Note: It might make more sense to add the file or folder to Windows 10 Defender exclusions. Also helpful: Best Free Antivirus.
- Temporarily disable Windows 10 Defender in Settings
- How to disable Windows 10 Defender in Local Group Policy Editor
- Disable Windows 10 Defender in Registry Editor
- Disable Windows Defender Antivirus service
- Video instruction
- Programs that allow you to disable the built-in antivirus
- How to disable Defender in previous versions of Windows 10 and 8.1
- Disable Defender using PowerShell (temporary)
How to disable Windows Defender 10
In the latest versions of Windows 10, disabling Windows Defender has changed slightly compared to previous versions. As before, disabling is possible using the settings (but in this case the built-in antivirus is only temporarily disabled), or using the Local Group Policy Editor (Windows 10 Pro and Enterprise only) or the Registry Editor.
Temporarily disable Windows 10's built-in antivirus by adjusting settings
If you do not need to completely disable the defender, but only need to temporarily disable it to install a program, you can do this in the following way:
- Go to Windows Defender Security Center. This can be done by double-clicking the Defender icon in the notification area at the bottom right and selecting “Open”, or in Settings - Updates and security - Windows Defender - Open Windows Defender Security Center button.
- In Security Center, select the Windows Defender settings page - Virus & threat protection (shield icon), and then click Manage settings under Virus & threat protection settings.
- Disable Real-time Protection and Cloud Protection.
In this case, Windows Defender will be disabled only for a while and then the system will use it again. Also, do not forget about the possibility of adding a program to defender exceptions. If you want to disable it completely, you will need to use the following methods.
Note: When you use the methods described below, the ability to customize Windows Defender in Settings will become inactive (until you return the values changed in the editor to their default values).
Disable Windows 10 Defender in Local Group Policy Editor
This method is only suitable for Windows 10 Professional and Enterprise editions; if you have Home, the next section of the instructions shows a method using the Registry Editor.
- Press Win+R keys on your keyboard and type gpedit.msc
- In the Local Group Policy Editor that opens, go to the section “Computer Configuration” - “Administrative Templates” - “Windows Components” - “Windows Defender Antivirus”.
- Double-click the “Turn off Windows Defender Antivirus” option and select “Enabled” (that’s right – “Enabled” will disable the antivirus).
- Similarly, disable the “Allow anti-malware service to start” and “Allow anti-malware service to run continuously” options (set to “Disabled”).
- Go to the “Real-time protection” subsection, double-click on the “Turn off real-time protection” option and set it to “Enabled”.
- Additionally, disable the “Scan all downloaded files and attachments” option (this should be set to “Disabled”).
- In the "MAPS" subsection, disable all options except "Send sample files."
- Set the “Send sample files if further analysis is required” option to “Enabled”, and at the bottom left (in the same policy settings window) set it to “Never send”.
However, in the latest versions of Windows 10 this is not enough; you additionally need to disable the Windows Defender service, and this simply cannot be done in services. How exactly it is turned off is in the corresponding section immediately after the next method.
How to completely disable Windows 10 Defender using Registry Editor
The settings configured in the Local Group Policy Editor can also be set in the Registry Editor, thereby disabling the built-in antivirus. Very important note: The latest version of Windows 10 does not allow you to change these registry settings unless you disable Windows 10 Defender in Settings, as described in the first section of the instructions. In this case, you must also disable the Anti-counterfeiting in the same settings section.
The procedure will be as follows (note: if any of the specified sections are missing, you can create them by right-clicking on the “folder” located one level higher and selecting the desired item in the context menu):
- Press Win+R, type regedit and press Enter.
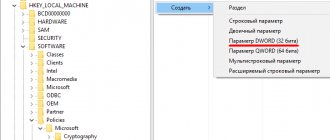
- In Registry Editor, navigate to HKEY_LOCAL_MACHINE\SOFTWARE\Policies\Microsoft\Windows Defender
- On the right side of the Registry Editor, right-click, select New - 32-bit DWORD Value (even if you have a 64-bit system) and name the value DisableAntiSpyware
- After creating the parameter, double-click on it and set the value to 1.
- There, create the AllowFastServiceStartup and ServiceKeepAlive parameters - their value should be 0 (zero, set by default).
- In the Windows Defender section, select the Real-Time Protection subkey (or create one), and in it create parameters named DisableIOAVProtection and DisableRealtimeMonitoring
- Double-click each of these parameters and set the value to 1.
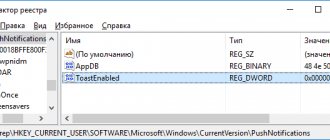
- In the Windows Defender section, create a Spynet subkey, in it create DWORD32 parameters with the names DisableBlockAtFirstSeen (value 1), LocalSettingOverrideSpynetReporting (value 0), SubmitSamplesConsent (value 2). This action disables cloud scanning and blocking of unknown programs.
We're done with this, but don't rush to close the Registry Editor: to completely disable the defender, you must also disable the service corresponding to it.
Disable Windows Defender Antivirus service
Finally, you need to disable the Windows Defender Antivirus service, and this cannot be done in services.msc. Disabling is possible using the following method:
- Go to the registry editor (Win + R keys, enter regedit) and go to the HKEY_LOCAL_MACHINE\SYSTEM\CurrentControlSet\Services\WinDefend section
- Double-click the Start parameter in the right pane of the Registry Editor and set its value to 4.
- Apply the settings, close Registry Editor, and restart your computer.
Done, now Windows 10 Defender will not work.
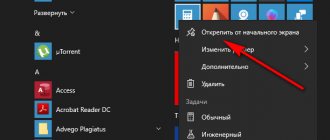
Additionally: In the latest Windows 10 updates, the Windows Defender icon appears in the taskbar notification area by default. You can disable it by going to the task manager (by right-clicking on the Start button), turning on detailed view and turning off the Windows Defender Notification icon item on the Startup tab.
The next time you reboot, the icon will not be displayed (however, the defender will continue to work if it is not disabled using the described methods). To get rid of the notification that virus protection is disabled, use the instructions: Protection against viruses and threats - how to disable the notification.
Disable Windows 10 Defender using free programs
There are many free programs that allow, among other things, to disable Windows 10 Defender, among them we can note a very simple free utility called Defender Control, as well as the following:
- Winaero Tweker is a free program for customizing Windows 10 settings. Disabling Defender is available in the Windows Defender section. About the program's capabilities and where to download it: Setting up and optimizing Windows 10 in Winaero Tweaker.
- O&O ShutUp 10 is another free utility for configuring OS behavior where such an option is available.
- Dism++ utility
- Win Updates Disabler. The program was created to disable automatic Windows 10 updates, but it can disable (and, importantly, enable it back) other functions, including Defender and Firewall. You can see the official website of the program in the screenshot below.
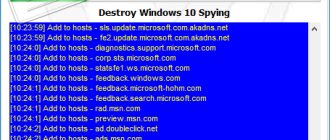
Another option is to use the Destroy Windows 10 Spying or DWS utility, the main purpose of which is to disable tracking functions in the OS, but in the program settings, if you enable the advanced mode, you can also disable Windows Defender (however, it is disabled in this program and default).
Disabling Windows Defender in previous versions and Windows 8.1
The steps required to turn off Windows Defender will be different in the two latest versions of the operating system from Microsoft. In general, it is enough to start by performing the following steps in both operating systems (but for Windows 10, the procedure for completely disabling the defender is somewhat more complicated; it will be described in detail below).
Go to the control panel: the easiest and fastest way to do this is to right-click on the “Start” button and select the appropriate menu item.
With Control Panel switched to Icons view (under View in the top right), select Windows Defender.
The main Windows Defender window will launch (if you see a message that “The application is disabled and is not monitoring your computer,” then most likely you simply have a different antivirus installed). Depending on what version of OS you have installed, follow these steps.
Windows 10
The standard method (which is not entirely functional) to disable Windows 10 Defender looks like this:
- Go to “Start” - “Settings” (gear icon) - “Update and Security” - “Windows Defender”
- Disable the “Real-time protection” option.
As a result, the protection will be disabled, but only for a while: after about 15 minutes it will turn on again.
If this option does not suit us, then there are ways to completely and permanently disable Windows 10 Defender in two ways - using the local group policy editor or the registry editor. The Local Group Policy Editor method is not suitable for Windows 10 Home.
To disable using the Local Group Policy Editor:
- Press Win+R and type gpedit.msc into the Run window.
- Go to Computer Configuration - Administrative Templates - Windows Components - Windows Defender Antivirus (in versions of Windows 10 before 1703 - Endpoint Protection).
- On the right side of the Local Group Policy editor, double-click Turn off Windows Defender Antivirus (formerly Turn off Endpoint Protection).
- Set this option to “Enabled”, if you want to disable the defender, click “Ok” and exit the editor (in the screenshot below the option is called Turn off Windows Defender, this was its name in earlier versions of Windows 10. Now - Turn off the antivirus program or turn off Endpoint Protection).
As a result, the Windows 10 Defender service will be stopped (i.e. it will be completely disabled) and you will see a message about this when you try to start Windows 10 Defender.
You can also perform the same steps using the Registry Editor:
- Go to the registry editor (Win+R keys, enter regedit)
- Navigate to the registry key HKEY_LOCAL_MACHINE\SOFTWARE\Policies\Microsoft\Windows Defender
- Create a DWORD value named DisableAntiSpyware (if it is not already in this section).
- Set this setting to 0 to keep Windows Defender enabled or 1 to keep Windows Defender disabled.
Done, now, if the built-in antivirus from Microsoft bothers you, it will only be with notifications that it is disabled. In this case, until the first reboot of the computer, you will see a defender icon in the notification area of the taskbar (after the reboot it will disappear). A notification will also appear indicating that virus protection is disabled. To remove these notifications, click on it, and then in the next window click “Don’t receive any more antivirus protection notifications”
If the built-in antivirus has not been disabled, then there is a description of how to disable Windows 10 Defender using free programs for these purposes.
Windows 8.1
Disabling Windows Defender 8.1 is much easier than in the previous version. All you need is:
- Go to Control Panel - Windows Defender.
- Open the Settings tab and then Administrator.
- Remove o
As a result, you will see a notification that the application is disabled and is not monitoring the computer - which is what we needed.
Method two. Permanent shutdown
To use this method, you will need to launch Registry Editor. In the latest versions of Windows, you must first use a temporary shutdown.
Open the Start menu, search for regedit and apply it.
Expand the HKEY_LOCAL_MACHINE branch. After that, go to the SOFTWARE directory. Once you open it, follow the path Policies\Microsoft. The final directory is Windows Defender. Here you need to create a DWORD value to disable Windows 10 Defender. Name it (or rename it after creation) DisableAntiSpyware. Set the parameter to 1.
In the previously opened directory, select the Real-Time Protection subdirectory. In it you need to create the DisableRealtimeMonitoring parameters with the value “1” and DisableIOAVProtection with the same value.
For the changes to take effect, you need to stop the service responsible for launching the system utility. More on this in the next section.
Disable Windows Defender using Command Prompt or PowerShell
Another way to disable Windows 10 Defender (though not permanently, but only temporarily - the same as when using settings) is to use the PowerShell command. Windows PowerShell should be run as an administrator, which can be done by using the taskbar search and then right-clicking the context menu.
In the PowerShell window, enter the command
Set-MpPreference -DisableRealtimeMonitoring $true
Immediately after it is completed, real-time protection will be disabled.
To use the same command in Command Prompt (also running as administrator), simply type powershell followed by a space before the command text.
Removal
Removing this antivirus manually is not that easy. You can't even open the task dumper because it disables these tools. You can manually remove the antivirus by downloading a lengthy instruction manual, but this is time-consuming and you must be at least somewhat tech-savvy in order to be successful.
However, the best antivirus software packages do an excellent job of automatically removing existing infections and protecting you from future threats. Since this software only costs between $30 and $60, you may find it worth your time to use top-notch antivirus software to clean your PC. Antispyware scans your PC for potential threats and ultimately removes identified spyware, malware, and other viruses. With its elegant real-time interface, the free software stands apart from the crowd in the list of anti-spyware apps.
Disable the "Enable virus protection" notification
If, after taking steps to disable Windows 10 Defender, the notification “Turning on virus protection. Virus protection is disabled", then in order to remove this notification, you can follow these steps:
- Using a search on the taskbar, go to Security and Maintenance Center (or find this item in the Control Panel).
- In the "Security" section, click "Don't receive any more messages about antivirus protection."
Done, in the future you should not see any messages indicating that Windows Defender is disabled.
Method one. Disabling for a while
We'll show you how to temporarily disable Windows 10 Defender - for example, to download a “suspicious” archive:
- In Windows Settings, select Update & Security. On the “Security” tab, find the “Open service” button on the right side of the screen and click on it.
- In the new window, click on the “Virus and Threat Protection” icon.
- Click on the “Protection Settings” heading. On the next page, disable all active settings to get rid of annoying system tracking.
Please note: after the settings are deactivated, you will not be able to configure Windows protection.
Disabling Windows Defender in this mode will last indefinitely; after the next restart or OS update, the program will be launched again. To completely deactivate the utility, try the following instructions.