Preliminary work
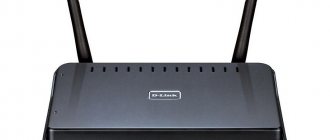
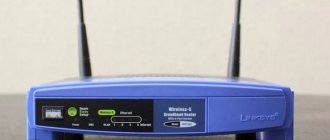
Unfortunately, the Dom.ru company does not have routers of its own production, and therefore they offer users to purchase devices from partners when connecting. Most often, one of the budget TP-Link models acts as a standard router, so we will consider it as an example. If you are using a different model, be guided by the menu names and sequence of actions, adapting them to the existing web interface. You need to start directly by connecting the router to the computer, because only after that you can open the Internet center. For detailed guidance on this topic, see the material at the link below.
Read more: Connecting a router to a computer
Once you are confident that the connection is correct and that the computer can see the network equipment, check the operating system setting that may affect network access in the future. To do this, you will need to open the properties of the network adapter and look at the type of obtaining IP addresses and DNS servers. This data should be obtained automatically.
Read more: Windows Network Settings
Advantages of digital TV over analogue
The quality of the image on the TV screen in a country house, as a rule, leaves much to be desired. This is because analog TV is connected, which is characterized by instability to interference. With analogue broadcasts, the signal is subject to delays and interruptions, especially in bad weather. Therefore, streaks, ripples, and sound noise may frequently appear on the screen.
Digital TV in a private home or country house will allow you to watch your favorite programs in good quality. This type of television has the following advantages:
- Allows you to switch between 200 channels and choose what is interesting;
- Maintains high resistance to interference;
- Provides high quality picture and sound on the screen;
- Makes it possible to record TV programs in the archive and watch them again;
- You can pause the broadcast and rewind advertisements.
Authorization in the Internet center
All subsequent actions will be performed in the router’s web interface, so you will need to log in through any browser. If this is your first time encountering authorization in the Internet center, read the topical guide at the link below.
Read more: Logging into the web interface of routers
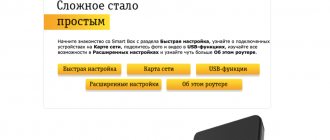
Setup for beginners
First of all, we suggest that you familiarize yourself with the Quick Configuration Wizard, which will allow beginners to carry out superficial configuration of the router without much difficulty and immediately after that go online. Not all router models have such a tool, but many developers are trying to implement it.
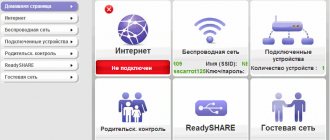
- Once authorization is completed, go to the “Quick setup” section through the panel on the left.
- The first window does not contain any useful information - it is only responsible for launching the Wizard, so immediately click “Next”.
- This network equipment for Dom.ru will operate in wireless router mode, so mark this item with a marker.
- Often during auto-configuration, the user is asked to select a country and provider so that all WAN parameters are set automatically. If you are able to do so, fill out the table and check the information with that provided by your Internet service provider. Otherwise, check the “I did not find suitable settings” option, select the PPPoE connection type and specify the authorization data received from the provider.
- When ready, proceed to the next step.
- MAC address cloning is not necessary for most users, so just skip this step and move on to the next one.
- The final stage will be the activation of the wireless network, since many users now connect to the Internet via Wi-Fi. In this block you only need to set the Wi-Fi name by which it can be found in the list, mark the recommended type of protection with a marker and write a password consisting of at least eight characters.
- In the “Confirm settings” window, make sure that everything is set correctly, and then click on “Save” for all changes to take effect.
Please note that immediately after configuration is completed, the router will reboot and it will take up to several minutes to turn it back on. Only after the router is in normal operating condition, check network access.
Setting up a connection to Dom.ru on an ASUS router
We connect the Internet to the router, connect our device and open the IP address in the browser: 192.168.1.1.
Immediately go to the “Internet” section and change the connection type to PPPoE. We register the username and password for Dom.ru. Save the settings with the “Apply” button at the bottom of the page.
Setting up a Wi-Fi network and password in the “Wireless Network” section.
Manual configuration
There are usually a huge number of editable settings added to network equipment, but they are not touched during quick configuration because novice users rarely need to change any of them. Let's look at all the settings in this section, and also show what to do if the previous instructions are not suitable due to the lack of the appropriate tool.
Step 1: Network
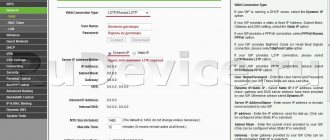
The first stage is setting up the protocol for receiving Internet from the provider, since the operation of the network depends on this. Almost always Dom.ru provides the PPPoE protocol, so you should know the login and password for connection in advance. To do this, open the documentation from the provider or contact technical support. Once the data is received, follow these steps:
- In the "Operating Mode" menu o.
- Next, go to the “Network” section and open the “WAN” category. For the connection type, enter “PPPoE” or another option depending on what information your provider provided, then fill out the remaining fields that appear and click “Save.”
- If suddenly Dom.ru has determined a dynamic IP address for you, you will need to specify it in the “Connection type”. Further, you do not need to perform any additional actions indicating the IP address or DNS servers, since they are provided automatically.
Step 2: LAN Settings
Local network settings include only three different sections that may be useful to the user. In most cases there is no need to touch them, but sometimes changes may be necessary.
- In the same “Network” section, open the “LAN” category, where the IP address of the router is changed and a new subnet mask is set, however, we do not recommend performing such a procedure unless necessary and completely confident in your actions.
- If you are going to connect the device to a TV to watch IPTV, go to the appropriate category and activate this function, remembering to save the changes.
- All that remains is to understand “MAC Address Cloning”. We already talked about this during quick setup and we will repeat now that cloning is carried out only by experienced users who know what it is intended for.
Do not forget that any changes must be saved immediately, otherwise they may be reset when moving to the next menu.
Step 3: Wireless Mode
The next step is to configure the wireless network. It makes sense to access it if you have not configured Wi-Fi through the built-in Wizard or want to change additional parameters that are not there.
- Open the “Wireless Mode” section and immediately go to “Basic Settings”, where the basic parameters are located. You only need to activate the network or completely disable it if it is not needed. The developers suggest changing the Wi-Fi name, selecting a channel and setting its width. The last steps need to be performed extremely rarely, for example, when setting up WDS mode.
- Next, move to “WPS”, where this technology is managed. By default, WPS is turned on, and in the menu itself you can create a new PIN code or manually add a device by pressing just one button.
- Don't forget about wireless protection. Mark the recommended item with a marker to indicate the security protocol, and then simply change the password to a more secure one. No further changes should be made to this category.
- You can restrict the access of certain devices to the Wi-Fi network by going to “MAC Address Filtering”, setting the appropriate rule type and adding targets to the table so that the rule applies to them.
- You can find out the MAC address of any equipment connected to the router via a wireless network in the “Wireless Mode Statistics”. Refresh the list as necessary to view new devices.
- Additionally, we note that most routers support a guest network, which is used for different purposes. Its settings correspond to the standard Wi-Fi settings that can be changed.
- Pay attention to the schedule table if it is present in the web interface. Thanks to it, you can configure the time at which the guest network will be active if there is no need for its operation on an ongoing basis.
All changes will be applied after rebooting the router, so we recommend that you immediately connect any device to it via Wi-Fi and check your Internet access. If the setup is done correctly, no problems should arise.
Step 4: DHCP Settings
To configure DHCP, which is responsible for automatically obtaining different IP addresses for all connected devices, many routers have a separate section. As a rule, you only need to make sure that the settings are correct, and you need to change them less often.
- Open the corresponding menu and make sure that the DHCP server is enabled. You can manually register DNS servers and change the IP range, making sure that it does not overlap with the standard router address (192.168.1.1 or 192.168.0.1).
- Next, go to the “DHCP Client List”. Here you can see which device was assigned a specific IP address - this will be useful later when editing access control settings.
- In “Address Reservation”, you manually assign an IP address to specific equipment, which will be assigned to it, which is also used for further configuration of access control.
Step 5: Security / Access Control / Parental Control
We suggest that you familiarize yourself with the security settings, access control and parental restrictions in one step, since in many web interfaces these parameters are combined or accessed by switching tabs.
- Let's look at the standard router protection options. By default, they are all enabled and do not require additional configuration, especially for novice users. Don't just change values if you're not sure what you're doing.
- Routers often have advanced protection that allows you to protect yourself from DoS attacks. It is also intended for experienced users who want to filter by the number of packets received per second.
- The router can be managed by everyone who is connected to it, but this can be easily fixed through the “Local Management” section. Here you can restrict access to the web interface to all devices except the current one or set MAC addresses for a white list.
- In conclusion, we note that sometimes manufacturers offer to connect Yandex.DNS for a safe online experience. Read the description of this technology directly in the Internet center and decide for yourself whether it is worth activating it.
- The parental controls feature allows you to create a list of restricted sites or select only those that you are allowed to visit. In a separate section, activate this tool and enter the MAC addresses of all objects to which the rules will be applied.
- After that, create a table with a schedule and add sites for the rule, which is done in just a few clicks and is not something complicated.
- To control access, go to a separate menu, where you first select the target node to which further rules will apply.
- Next, create a list of goals related to access control. To do this, add each of them to the table separately.
- In the table itself, only the IP address and port are filled in. You can add a description if needed for certain purposes.
- Finally, set a schedule according to which access control will work, using the same familiar table.
When you reset the router, all security rules will also be reset. It is better to create a backup copy in advance so that, if necessary, you can immediately restore all the parameters - this will be discussed in the final stage of the article.
Step 6: System Tools
Of the entire web interface, only the last section, called “System Tools,” remains to be examined, where there are basic options for managing the router. Let's look at each category separately.
- Make sure that the time in the corresponding menu is set correctly, including the date - they are necessary for the correct functioning of parental controls and other security rules.
- Go to “Firmware Update”: this section will come in handy when you need to reflash or update the router software.
- Resetting to factory settings is also carried out through “System Tools”. Please note that absolutely all user settings will be deleted.
- Through “Backup and Restore”, download the configuration file; to restore it, it can be loaded in the same menu.
- The developers allow you to reboot the router directly through a separate menu, as well as configure the automatic reboot time, for example, to reset the cache to normalize the functioning of the device.
- Change the administrator password if you do not want anyone to be able to log into the web interface and change settings.
Now the basic parameters of some routers can be changed via a smartphone, which becomes the best option if you don’t have access to a computer. If this method seems appropriate to you, use the general instructions in the article linked below.
Setting up a connection to Dom.ru on an ASUS router
We connect the Internet to the router, connect our device and open the IP address in the browser: 192.168.1.1.
Immediately go to the “Internet” section and change the connection type to PPPoE. We register the username and password for Dom.ru. Save the settings with the “Apply” button at the bottom of the page.
Setting up a Wi-Fi network and password in the “Wireless Network” section.