German products (programs, utilities and applications) have always been of good quality and reliability, but at the same time it is difficult to say that they are easy to use, so you cannot do without a detailed guide. The modern Avira antivirus is no exception. When a PC user needs to remove Avira brand antivirus software from their device, they face a lot of different difficulties. The Avira program can be erased either using standard operating system applications or in a completely different way.
How to completely remove Avira from Windows 7
How to completely remove Avira from Windows 7 using simple operating system tools:
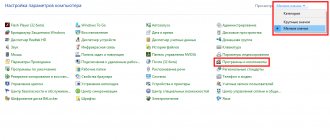
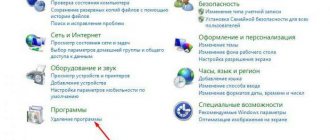
- First, open the “Control Panel”, for this we need to go to the “Start” menu.
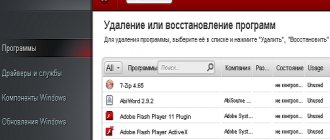
- In the window that opens, it is tedious to find the “Uninstall a program” item; if you cannot find this item in the menu, then look for “Programs and Features” or “Add or Remove Programs”. The names may vary depending on the operating system version.
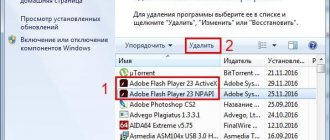
- Select a product from AVIRA from the resulting list and delete it by clicking on the button of the same name, which is located above the list of all programs. It is usually located on the right side of the window.
After this, the process of removing the antivirus will begin, as soon as it is completed, you should click “Finish”, after which it is advisable to restart the system for the changes to take effect.
Cleaning the registry from antivirus traces
It would seem that that’s all, the program has been successfully removed and you can begin installing other software to protect your computer from viruses. In principle, this is so, but after removing Avira using Windows, there are still traces of the program on the computer, which are garbage.
How to completely remove Avira remnants from your computer? Cleaning the registry will help get rid of them. To do this, you will need to open the Registry Editor. To get to it, select “Run” from the Start menu or press the hotkey combination Windows + R. Next, enter the command “regedit” in the line and press “ok”.
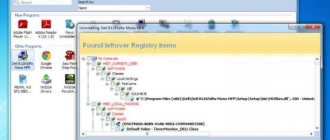
In the search window, enter the search word Avira and click “Find Next”
Thus, we find and delete all residual entries of the deleted Avira from the registry.
note
: To optimize the search process, there is a hotkey F3. After deleting the found entry and searching for the next one, simply click on it. We carry out these manipulations until the registry editor reports that no data was found.
An alternative removal method with automatic registry cleaning
How to remove Avira antivirus with automatic registry cleaning? To completely remove programs, there are specialized utilities and multifunctional software, for example, the Uninstall Tool. This program is easy to install and learn. It allows you not only to completely remove any installed software with automatic cleaning of the registry, but also to optimize computer resources, preventing unnecessary programs from running in the background.
Download and install the program. Next, open it. By default, the program opens the “Uninstaller” section we need. Find the Avira program, select it and click on “Remove selected program” or “Uninstall” if you right-click to bring up the context menu.
note
: There is a “Force deletion” item in the context menu. This function is useful when, for some reason, uninstallation does not start in the usual way.
After the Avira removal process is completed, a scan of the remaining files, folders and registry entries will begin.
Once the scan is complete, you will be prompted to delete everything found.
How to completely remove Avira from your computer Windows 10
How to completely remove Avira from Windows 10 and clean the registry. Follow the instructions below in the order shown:
- Download a special program from the official website of the antivirus developers using the link
- Unpack the downloaded archive to your computer.
- We run the program as administrator.
How to remove Avira antivirus from Windows OS?
If you need to install another version (product) of Avira or another antivirus, you must uninstall Avira, which is currently running in the OS. Read about how to do this correctly in this article. Several cleaning methods are presented to your attention using an uninstaller program, standard Windows tools and a special developer utility.
Solution #1: standard Avira removal
1. Click on the “windows” icon to enter the “Start” system menu.
2. In the list of options in the window that opens, select “Control Panel” (list on the right).
3. Set the section display mode to “Category” (drop-down menu in the “View” setting).
4. In the “Programs” block, go to the “Uninstall a program” section.
5. In the installed software directory, left-click on “Avira Antivirus”.
6. Click the “Delete” command in the function bar located at the top of the list.
7. Confirm the launch of the cleaning procedure: in the additional window “Do you want to completely remove ...” click on the “Yes” button.
8. Follow the instructions of the uninstaller.
The free version of security software - Avira Free - is installed along with additional applications (if you do not disable their unpacking in the installer!).
If they are present in the system and you need to get rid of them, perform the following operations:
1. In the same way as the antivirus program (via the control panel), first of all remove add-ons from your computer:
- System Speed (in the uninstaller window, check the boxes next to the “Delete backups...” and “... license information” settings);
- Browser Safety.
2. And only when you remove these applications, proceed to uninstall Launcher. (Otherwise it is not deleted: a message appears stating that it is being used by other Avira software.)
Solution #2: cleaning the system manually using the RegistryCleaner utility
When an antivirus cannot be sent to the recycle bin using its built-in uninstaller, you need to remove each of its elements (directories in the system partition, registry entries) from the laptop or PC separately.
Attention! Before following the instructions, make sure that Windows has the Microsoft Visual C++ 2010 component. You can find out about its presence in the list of installed programs: Start → Control Panel → Uninstall a program. This library is necessary for the correct operation of the RegistryCleaner utility (if it is not in the OS, an error appears upon startup - “The program cannot be started... mfc100.dll is missing...”). You can download Visual C++ 2010 on the Microsoft website (microsoft.com/ru-RU/download/details.aspx?id=5555).
Deleting files
1. Reboot the operating system in safe mode:
- hold down the “F8” key (see the description of your computer, this function can be launched by another key);
- In the menu, use the cursor keys (arrow keys) to select “Safe Mode” and press “Enter”.
2. Open the directory:
- on x32 OS - C:\Program Files (x86)\
- on x64 - C:\Program Files\
3. Rename the Avira folder. Give it an arbitrary name or add several characters to the name (for example, Aviradel1234):
- right-click on the folder;
- select “Rename” from the context menu;
- enter the characters, press "Enter".
4. Restart your computer again in safe mode (see point No. 1).
5. Delete the renamed antivirus folder through the system menu: right-click → Delete (or drag it to the Trash).
6. Press "Win+E". In the window that opens, press the “ALT” key. In the menu, open: Tools → Folder Options → “View” tab. In the “Advanced options” block, check the box next to the “Show hidden files...” function.
7. Go to the “ProgramData” directory on drive C. And in the same way (via the menu) get rid of the Avira folder.
8. Restart your PC normally.
Cleaning the registry
1. Download the registry cleaning utility from the official website of the antivirus company (dlpro.antivir.com/package/regcleaner/win32/en/avira_registry_cleaner_en.zip).
2. Unpack the downloaded archive:
- right-click on it;
- select "Extract all...".
Advice! Move the archive to a separate folder so that after unpacking the elements do not get lost among other files and programs.
3. Run the RegCleaner executable file as administrator.
4. Activate the “Scan Partitions” command, turn on the “Select All” option, and then click “Delete”.
Removing a test key
To get rid of a 30-day test license (a key registered in the registry), you must perform the following procedure:
1. Press "Win+R".
2. In the Run window, type regedit. Click "OK".
3. Go to the directory:
HKEY_LOCAL_MACHINE → Software → Classes
4. In “Classes” delete the folder along with all entries:
{80b8c23c-16e0-4cd8-bbc3-cecec9a78b79}
Right-click on the name, and then click “Delete”.
Solution #3: Using the Revo Uninstaller program
1. Open in your browser - revouninstaller.com/revo_uninstaller_free_download.html (offsite web page for downloading the free version of the utility).
2. Click the “Free Download” button (located under the distribution image).
3. Install and run Revo Uninstaller.
4. In the program window, click the mouse to select the antivirus icon.
5. In the top panel, click “Delete”.
6. Perform the standard uninstallation procedure (follow the instructions of the built-in antivirus software uninstaller).
7. Go to the program window again. Select the Advanced scan mode and run system analysis.
8. Delete all files, folders and entries in the antivirus registry remaining after cleaning: Select all → Delete.
Once the removal is complete, clean up the operating system using the CCleaner utility: eliminate errors in the registry, clear the disk partition directories of temporary files. If necessary, remove Avira addons (Browser Safety, Safesearch Plus) from your browsers. And then proceed to install new antivirus software.
Let your computer always be inaccessible to hacker attacks!
izbavsa.ru
Uninstalling using Revo Uninstaller
Instructions for using the uninstaller program:
- Open the web page in your browser - revouninstaller.com/revo_uninstaller_free_download.html.
- Next, click on download and download the file.
- Install it on your computer.
- Find the antivirus in the list that opens and click “Delete”.
- We start the system analysis by selecting the “Advanced” mode.
- After completing the cleaning process, remove all remaining debris.
You might also be interested in
How to completely remove Avast from Windows 7/10?
How to completely remove McAfee from Windows 10
USB Disk Security - protecting flash cards from viruses
Removing Avira antivirus - manually and using special software
Avira Free Antivirus is well known for providing its customers with reliable and comprehensive protection services against malicious utilities. It comes with a list of advanced features as well as ultra-powerful utilities that have been awarded by professionally trained PC experts to help users of all levels maintain the common anti-virus program. Unfortunately, the antivirus is also notorious in the market because it turned out to be the least intrusive version of the tool developed by the software laboratory. A damaged utility causes problems that are unpredictable for a vulnerable computer system.
How to completely remove Avira from Windows 7 and other versions - we’ll figure it out further. There is a list of reasons why users can get rid of the software:
- incorrect modification of some system documents or settings;
- another recently installed anti-virus utility;
- other third-party utilities loaded on the system;
- critical OS settings sometimes do not allow the software to be fully activated;
- After installing the antivirus, unexplained errors keep attacking the PC screen.
- the system speed suddenly becomes lower for no reason;
- regular third-party applications are not installed completely;
- previously installed third-party utilities, as well as system services, are not included;
- unexpected pop-up attacks created by incorrectly installed software do not allow the system to operate stably and smoothly;
- Many malicious utilities break into the system and cause irreparable damage to system files.
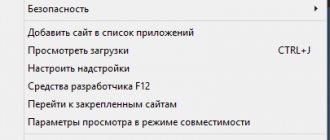
Method recommended by Avira antivirus technical support:
To completely remove Avira antivirus from a computer that technical support recommends to us, you need to boot the computer in safe mode and run the Avira RegistryCleaner removal utility.
To do this, restart the computer in safe mode. When loading, press and hold F8 when the system boots and select “Safe mode” or “Safe Mode” and then press “Enter”
As you know, it is possible to delete files in Safe Mode that you could not delete in normal mode. Now we need to find them.
Click the “Start” button, go to “Computer”, go to drive C and look for the Program Files folder there. We find a folder in it called Avira and delete it.
Next we take this step. We go to drive C, go to the Program Data folder (if you are still using the XP operating system, then C → Documents and Settings → All Users → Application Data) and delete the folders that contain Avira.
Now all that remains is to clean up everything that remains using the downloaded utility.
Download Avira RegistryCleaner and select “Scan partitions” with the “Select all” options. We delete the found files and restart the computer.
So we have completely removed Avira antivirus from the computer !
Friends, share the link to this article with your family and friends. They may need to completely remove Avira antivirus from their computer!