In this article I will talk about how to create an IP camera on Android. As a result, you can turn your smartphone or tablet into a device that will record on video everything that gets into the camera lens and transmit it via the Internet or a local network.
An IP camera can be useful for many useful things:
- Let's say you can install it near the stove in the kitchen and move to another room. Through the camera you can observe the preparation of the dish and make sure that nothing burns or boils over.
- An Android IP camera is useful as a video nanny. You can install it by pointing it at the baby and watch the child from another room, going about your business.
- This thing can be used as a video peephole at the front door.
- And, of course, you can use it as a hidden camera and watch via video streaming.
You can very profitably use as an IP camera any old (which can no longer work normally with modern programs and games) or broken (for example, with a damaged screen or case) Android device, which can no longer be fully used, but which is a pity get rid of. This way you will give a second life to your smartphone or tablet. And, of course, modern devices also easily cope with the IP camera function.
What you need to make an IP camera on Android
So, in order to create an IP camera, you will need the following:
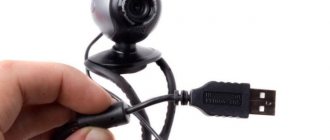
- An Android device with a working camera and microphone. The better the camera, the higher quality the video will be.
- A device that will be used as a receiver. A browser must be installed on it. The operating system doesn't matter. This could be a computer, laptop, or even another smartphone or tablet.
- It is necessary that the IP camera on Android and the receiver device be connected by a local network (they must be on the same Wi-Fi network), or both have Internet access with good speed.
- On the device that will serve as an IP camera, you will need to install one small program, which I will discuss below.
The program we will talk about is called IP Webcam. Before we start working with it, I’ll tell you about its advantages:
- It is free and in Russian (there is a Pro version, but you don’t have to buy it).
- You can transmit and record both video and sound.
- It does not require the installation of additional programs on the receiving device, which allows you to use any device with a browser as this role.
- This program has a whole set of extensions that improve its functions.
- You can adjust the video and audio quality.
- You can superimpose the date and time on the video you are shooting.
- There are night video functions.
- The receiver can connect to the IP camera locally via Wi-Fi or via the Internet.
- You can turn on the flash if necessary, including remotely.
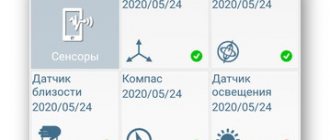
- You can configure motion sensors.
- And much more.
In general, IP Webcam is one of the best and most functional programs that can be used to create an IP camera on Android.
IP camera form factor
IP cameras are produced in dome, cylindrical, standard design (box), cube, and spherical form factors.
IP dome cameras are the most popular. Horizontal (ceiling) installation is provided, but special brackets open up the possibility of installation on a vertical plane.
IP Dome Camera
Cylindrical IP cameras are mounted on a rotating bracket. The adjustment sets the viewing direction. IP bullet cameras are often made in a dust-proof, water-proof and vandal-proof case, with a visor that protects from direct jets of water and sun rays, with a wide range of operating temperatures. Usually mounted on a vertical surface: wall, pole, fence.
Bullet IP Camera
Box cameras or cameras of standard design are mainly produced without a lens and mounting bracket, leaving the installer with a wide choice of installation and equipment of the device, which increases configuration flexibility and expands the scope of application of the model. Integration into a thermal casing adapts the camera to outdoor operating conditions.
IP cameras of the Cube form factor are designed for indoor use and are equipped with a bracket for mounting on the ceiling, wall, or table (desktop mounting is the most popular).
Cube IP Camera
The sphere is a form factor that determines the adjustment of the video surveillance direction of IP cameras: the ball is simply turned in the desired direction - there is no dome, it does not need to be removed. A special screen is provided to protect the lens.
IP camera "Sphere"
A separate group of IP cameras are PTZ cameras. They support PTZ technology, use special software and drives to rotate and tilt the body for the maximum level of control and cover a larger video surveillance area. PTZ IP cameras with auto-tracking and motion detection independently accompany the surveillance object throughout the monitored area.
There are also highly specialized models that do not fit into any standard form factor, for example, with an external lens (for retail).
IP camera on Android using IP Webcam
I won’t talk about all the settings of the IP Webcam program; the article is already too long. Moreover, everything is in Russian, you can figure it out yourself. I’ll get straight to the point - how to create an IP camera on Android. Do everything step by step.
Download and install the IP Webcam program on your Android. This can be done using the links below.
IP Webcam
Download the .apk file from Yandex Disk (version 1.12.5).
1194 Downloads
IP Webcam
Download file from Google Play
432 Downloads
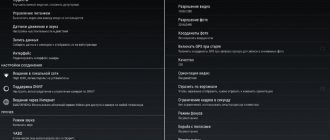
Launch the program on Android and you will be taken to the settings page. We won’t change anything and go straight to the “Connection Settings” section.
As mentioned above, an Android IP camera can broadcast video over two channels: over a local network via Wi-Fi or over the Internet. I will consider both connection options.
Broadcasting via Wi-Fi
In the “Connection Settings” section, click on “Local Network Broadcasting”. On the next page, click on “Login/password” and create a login and password to connect the receiver in the future. After that, click the “Ok” button. Next, scroll down the IP Webcam settings page and click on “Start” to start broadcasting.
Then you will see that the Android IP camera has started recording. Click on “How do I connect?”, then on “Connect directly” and I “Use Wi-Fi” (if the local network is organized by this method). You will see a message with the IP address. Leave it open for now.
Go to your receiver, launch a browser and write down the IP you received above in the address bar. You will be asked to enter your username and password - enter the data you came up with earlier. And then you will see an interface like this where you need to select “View Mode” and “Listening Mode”.
For example, I'll select "Built-in Browser" for viewing and "HTML5 Wav" for listening, and it will immediately start streaming video directly to the browser.
The interface has many useful settings and options. Study them yourself.
Broadcasting via the Internet
For the IP camera on Android to start broadcasting via the Internet, in the “Connection Settings” section, click on “Broadcast via the Internet”. Then check the “Enable Internet broadcasting” checkbox and click on “Create an account.” Create an account for yourself. To do this, enter your email, create and remember a password, and click on “Create an account.” The Android IP camera will create your account and then automatically log into it on your device. After that, you will see a message about improving the video quality - you can click “Yes or No”, it doesn’t really matter. Now go back to the IP Webcam settings and click on “Start” at the bottom to start broadcasting over the Internet.
The broadcast will begin. Click “How do I connect?”, then “Via Invedon” and in the message that opens, click “OK”.
To see what the IP camera broadcasts on Android, go to the website ru.ivideon.com on the receiver and click “Login”. Enter the email and password you created earlier and click “Login.”
You will see the devices currently connected to your account and will be able to watch video from their cameras.
Your personal account has many features and options. I recommend you see for yourself what's what.
Similar articles:
- How to record video from Android screen using a free program In this article, I will tell you about a small free application that allows you to record video from…
- Remote access in Android from anywhere in the world In this article I will tell you about an excellent free service that allows you to organize remote access...
- 100% free and reliable anti-theft for Android Anti-theft for Android is a program for a smartphone or tablet that allows you to secure and find…
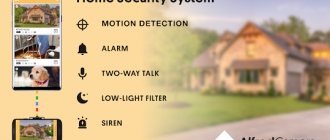
We organize video surveillance using a video surveillance program on Android
A video surveillance program for Android is a specially designed application that helps you monitor online everything that the camera is currently recording.
A similar developed technology has been practiced by users of cameras connected to a smartphone for quite some time. This is a simple and fairly affordable way to know anywhere what is happening or happened in your office (or other secure place), even if for some reason you are absent from your workplace.
Today we want to pay a little more attention to this topic so that you can monitor the territory from a distance without any questions. Attention! This article concerns video surveillance on an Android smartphone, so we cannot guarantee that other platforms of your device will work exactly the same with the applications that we will talk about later.
XProtect Go
Program interface
Quite an interesting development by Danish experts in video surveillance systems. In addition to having a wide range of recording storage capabilities, it has a very convenient free license for home use. It includes all the functions of the program, the only limitation concerns the number of connected devices - no more than 8, which is quite enough for the average person.
The developers were not pleased with the platform diversity - the program for the IP camera is presented only in Windows, but there is a streaming broadcast, which allows you to watch transmitted data via computer networks or the Internet from any devices and operating systems.
There are also specialized clients that allow you to control camera switching, recording and other functions via a WEB interface, Smart client or application for mobile devices.
In addition, the list of program features includes:
- a large number of cameras supported simultaneously - more than 8,500 models;
- zonal division of camera angles for motion detection;
- integration with the developer server with the subsequent ability to store video data on it;
- convenient archive management;
- setting up all functions including the sensitivity of the motion sensor;
- differentiation of access rights;
ONVIF
If the corporate option does not suit either the spirit, the meaning, or the amount of available cash savings, then it’s time to pay attention to the ONVIF application, a service designed to help both beginners and professionals in organizing a video surveillance branch using IP cameras and even standard web cameras.
You may be interested in: The best Android apps that will help you recover any lost files
Before you start interacting, you will have to thoroughly prepare - register an account, read the instructions given, organize your workplace (in essence, the developers propose combining equipment together, choosing a source for recording and storing the archive - either hard drives or cloud storage, and then – prepare a quick access panel for interacting with cameras: buttons for zoom, frame changing, sound recording). And then all you have to do is watch, without advertising, paid subscriptions and a bunch of imposed services.