Good day, dear friends! Fedor Lykov is in touch. Today I want to talk about how to set up a webcam on a computer and how to use it? I think nowadays a lot of users use cameras for video calls, both personal and work related. And they all use two types of cameras:
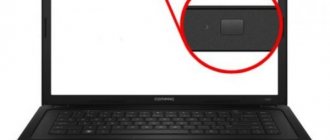
- Built-in - immediately present in the laptop, they can be found on the external top panel.
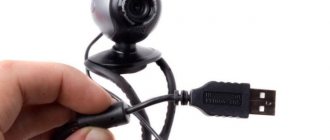
- External – they can be purchased separately and installed on your computer.
How to connect an external webcam?
- First, we need to secure the cameras to the monitor with special grips. If the camera has stands or legs, then it is enough to place it in a convenient place on the desktop.
- Then we connect the camera to the laptop using the USB cable that comes with the kit. Sometimes you need to connect the camera to the mains via an outlet.
- For the camera to work, you also need to install drivers. They are often located on the disk that comes with the webcam. The disc must be inserted into the drive, and the program will automatically open. If this does not happen, then the program should be opened through Explorer and find the “Setup” installation file. If the included disk does not fail, you can find drivers on the Internet by entering the model and manufacturer of the device.
- After installing the driver, the system asks to restart the computer. We are not shy and agree to reboot it.
Connecting a webcam to a computer
And so, the camera cable is connected to the computer. The next step is to install the program from the disk that was included in the kit. Without this disk, the webcam will not work. This is due to the fact that the computer simply does not “understand” what to do with the connected device. In the program menu that opens, find the “Install” button. If there are none, open the drive files and there you need to find the “Install”, “autorun” file or the name of the web camera manufacturer and run it. Then specify the folder where the driver will be installed. The program interface is designed for users with minimal PC knowledge, so understanding the installation of the software will not be difficult. Details for setting up the camera can be found in the instruction manual, which should be included in the box with the camera. If all steps are completed without errors, the webcam icon will appear in the section with local drives and on the desktop.
You can check the camera’s readiness for operation by opening “my computer”, as well as using special applications that are already installed along with the drivers. When you start the web camera in the next session, you will not need to re-install anything from the disk; the file system installed and remembered them.
How to get started with the camera on Windows 7?
You have already installed the drivers, but to use the camera you need to activate it. What steps should you take?
- Go to the “Control Panel”, as indicated in the photo.
- Click on the “System and Security” item.
- In this section, look for the “Device Manager” item and open it.
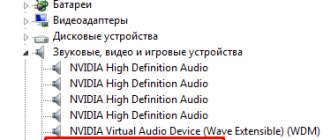
- Go to the “Sound, video and gaming devices” section.
- In the window that opens, select the name of the camera you installed and right-click. Next, you will be given several actions to choose from, from which you need to select one - “Engage”.
- After completing the action, the system may prompt you to restart your computer. Again, don’t be shy, but feel free to click “Yes.”
What to do if the device is not detected
Quite often a situation arises when everything seems to be done correctly, the drivers are installed, but the equipment still does not work. In this case, reinstalling or updating them will come to your aid.
Reinstalling drivers will require the following procedures:
- First you need to remove the old driver. To do this, right-click (RMB) on Start and select Device Manager.
- Look for imaging devices. Right-click on it and select “Delete”.
- The next step is installing a new driver. To do this, you will need a software disc directly for your laptop or PC, which must be included with it upon purchase. After inserting the disc, we find a folder called “Webcam”, which contains the drivers. We install them. If there is no driver disk, you can download it from the website of the laptop and computer manufacturer. For example, for a Lenovo laptop you can download and install the driver from https://pcsupport.lenovo.com.
Setting up a webcam on a computer via Skype
- Skype is currently one of the most popular video calling applications. To configure the camera, go to the Skype program and open the “Tools” section. Then click on the “Settings” item.
- Next, go to “Video Settings”.
- You will see your image in the window that appears. For more detailed camera settings, click “Web camera settings” under the image.
- In the next window, you can adjust the brightness, saturation, contrast, hue, sharpness, gamma, white balance, backlight, gain, and color of your in-camera image. To save the changes you have made, click the “Ok” or “Apply” button.
- For all changed parameters to take effect, click on the “Save” button.
After all the manipulations with the camera, you can enjoy video calls and stay in touch even with the most distant relatives!
Setting up the camera in the program
You can also set up a webcam using Skype or another program that offers users to make video calls within itself. The presented procedure takes a minimum of time and is by far the most popular and effective.
If you already have this program installed, then you need to follow these steps:
- Run the program.
- Go to the toolbar and click on the window that opens - Settings.
- Select Video Settings.
- In the window that appears, in the Instructions for installing a web camera item, you need to click on it and wait until the browser with the official program page is automatically opened on the laptop.
On the website you can quickly find the answer to the correct procedure for setting up the camera.
Webcam Applications
Below I will present you a list of camera programs. After all, not only Skype is limited to working with this device. If anyone is interested, you can experiment.
- WebcamMax. With this program you can add images, videos and various effects to your camera and broadcast to others.
- LiveWebCam. This program allows you to receive snapshots from your webcam.
- ManyCam. With it you can edit the image and sound during a live broadcast on YouTube, Facebook, or when communicating on Skype.
- Movavi Video Suite. It will not only record video from a webcam, but will also help you edit it.
- IP Camera Viewer. The function of this program is to create surveillance via IP and USB devices.
Setting up your webcam microphone
It is possible that the video from the webcam is transmitted, but the sound is not. In this case, you may need to configure the webcam microphone in your operating system.
Step 1: Right-click the Volume icon in the clock area and left-click Playback Devices.
Click on “Volume” and select “Playback devices” with the left mouse button
Step 2: Go to the Recording tab and right-click on the Microphone icon, selecting Properties.
Go to the “Recording” tab and right-click on the “Microphone” icon, selecting “Properties”
Step 3. In the “General” tab, in the “Controller” column, make sure that the required audio source (web camera) is selected. In the “Use of device” item, you also need to set the value “Use this device (on)”.
Set the value to “Use this device (on)”
Step 4. Go to the “Levels” tab, where you make sure that the microphone is not muted (the crossed out circle next to the speaker icon) and set the microphone volume in Desktop Microphone to 95-100%. You can also adjust the Microphone Boost level - it is usually set to 0 dB.
Setting microphone volume in Desktop Microphone
Step 5. To adjust the sound of the microphone after hearing your voice in the computer speakers, you need to go to the “Listen” tab and check the “Listen from this device” checkbox. After making all the settings, click “Apply”, then “OK”.
Step by step adjustment of microphone sound
For normal operation of the video camera, it is also necessary to monitor whether it is currently being used by other programs in the OS. In addition, when setting it up, you should read the “Operation Manual” to find out specific recommendations for working with the camera.
Connection without driver
The camera is not always purchased in a package. In this case, you will have to configure the webcam without a driver.
- We need to go to the official website of the developer and find the necessary software.
- If for some reason this fails, you need to use a search engine to find alternative sites that provide drivers.
- And the third option is to find the driver by hardware ID. In this case, you need to go to the “device manager” section and find the webcam icon, which will be highlighted with an exclamation mark. Right-click on the icon and select “properties”. We find the equipment ID and copy it for searching on the Internet. You can also use the automatic driver search, in which case the system will do everything for you.
You can find a set of drivers on the Internet. This driver pack has drivers for all occasions in its arsenal. If none of the options above help solve the problem, you can try to find the required driver here. Some editions of operating systems contain standard drivers for video equipment in their installation package. Then all you have to do is connect the webcam to your computer. If the camera does not have instructions, then on the Internet you can also find information specifically for your model on how to properly connect the web camera to your computer.