The article describes the process of installing Android on a laptop. No emulators for testing smartphone programs: a clean system on your computer and laptop. Live Android system on a machine or with a full installation. The issue of installing VirtualBox .
So. Android is not for laptops and definitely not for desktops (mobile Wi-FI, unpretentiousness to hardware make it a mobile operating system after all). However, will this stop inquisitive users and those who like to experiment? If you want to find out what you can gain as a result of such an experience as installing Android on your computer as one of the full-fledged OSs, this is the place for you. And even more so, this option is for those who have an old Pentium lying around with an insufficient HDD, which has served honorably for many years, but it would be a pity to throw it away.
Do you want to test the bootable USB flash drive and the OS itself in a virtual machine first?
inexpensive USB testers
What do we need?
- an empty flash drive for boot files (who wants, can use the good old DVD drive)
- actual boot files of the Android project x64-x86
- portable (including) and free utility Rufus (article with a link and operating procedure) for creating a bootable flash drive. If you have your own favorite utility, use it
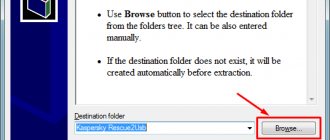
- EasyBCD program - if your computer is so old that it does not accept booting from a flash drive (how to force an old computer to boot from a flash drive, read the article Install USB boot from a BIOS that does not have USB support)
- VirtualBox program (if you want to install Android on a virtual machine). Then you won’t need any flash drives, just leave the image downloaded above on your computer. Refer to this section of the article if you are going to install Android on your laptop as the main one.
The process of writing a bootable ISO image to a USB flash drive on Android
Several free applications are available in the Play Store that allow you to extract and burn an ISO image to a USB flash drive or memory card:
- ISO 2 USB is a simple free application that works without root. The description does not clearly indicate which images are supported. Reviews speak of successful work with Ubuntu and other Linux distributions; in my experiment (more about this later), I recorded Windows 10 and booted from it in EFI mode (booting does not occur in Legacy). Doesn't seem to support recording to a memory card.
- EtchDroid is another free application that works without root, allowing you to burn both ISO and DMG images. The description states support for Linux-based images; the application also accepts Windows images.
- Bootable SDCard - in free and paid versions, requires root. Among the features: you can download images of various Linux distributions directly in the application. Declared support for Windows images.
As far as I can tell, the applications are very similar to each other and work almost the same. In my experiment I used ISO 2 USB, the application can be downloaded from the Play Store here: https://play.google.com/store/apps/details?id=com.mixapplications.iso2usb
The steps to burn a bootable USB will be as follows:
- Connect the USB flash drive to your Android device, launch the ISO 2 USB application.
- In the application, opposite the Pick USB Pen Drive item, click the “Pick” button and select the flash drive. To do this, open the menu with a list of devices, click on the desired drive, and then click “Select”.
- In the Pick ISO File item, click the button and specify the path to the ISO image that will be written to the drive. I used the original Windows 10 x64 image.
- Leave the “Format USB Pen Drive” option enabled.
- Click the “Start” button and wait until the bootable USB drive is created.
Some nuances that I encountered when creating a bootable USB flash drive in this application:
- After pressing “Start” for the first time, the application froze on unpacking the first file. A subsequent click (without closing the application) started the process and it completed successfully.
- If you connect a USB drive recorded in ISO 2 to a running Windows system, it will report that there is something wrong with the drive and offer to fix it. Don't fix it. In fact, the flash drive is working and loading/installing from it is successful, it’s just that Android formats it “unusually” for Windows, although it uses the supported FAT file system. The same situation can arise when using other similar applications.
How will we install?
- Download the image and write it to a flash drive
- Installing Android or running a live disk
- Installing Android on a virtual machine
Installing Android on a laptop. Preparing for work.
Download Android. I provided the link above. The latest two versions for systems with both types of bit depth are available for downloading from us, so choose. I think that 32-bit is enough for the eyes. View link on the page , and the redirect will redirect you to a page with automatic loading. The volume of downloaded data is about 600 MB, and the server speed seemed very low to me. File format is ISO. Attention! Despite the suitable architecture of the processor built into the laptop, by default the installation of ONLY the 32-bit version of the Android boot ISO worked. So download it right away. Installing the 64-bit version will require us to know the commands for editing tables in GRUB, so we’ll look at it later.
Flash drive - into the USB port. We temporarily remove unnecessary drives. Let's launch Rufus. I have a portable version taking part in the recording. First I format the flash drive, then I burn the image, indicating the path to the just downloaded files:
We agree with the recording parameters used and that the data from the flash drive will be erased. In less than five minutes everything was ready.
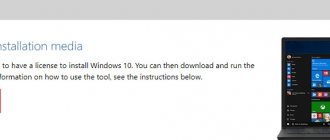
Creating installation media
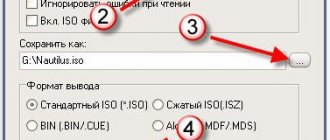
To burn the distribution to a flash drive, use the Rufus program. Connect the drive to your computer and set the settings in Rufus as shown in the screenshot. Choose to create an ISO image and click on the drive icon to provide the path to the downloaded Android file.
When asked about the recording type, select ISO. During the creation of bootable media, all data will be deleted from the flash drive.
What should you pay attention to?
All settings are visible in the figure. The utility does a lot for the user, and therefore I am writing after the creation of the flash drive with Android is completed. However, before you begin installing Android on your computer, note the following:
- The file system type is correctly specified (FAT32 by default)
- the correct letter is assigned to the disk (it should not be duplicated with other volumes of the system)
At the time of editing the article, the Rufus when recording a bootable USB flash drive for Android looks like this (pay attention to the cluster size):
To avoid boot errors, carefully read the contents of the window (so check your BIOS settings):
so as not to see this window when loading:
Launch without installation
The Android-x86 distribution has the function of starting the system without installation. In this mode, you can use all Android features, but the changes you make are not saved. Essentially, this is a demo mode that helps you understand whether it will be convenient to work with Android on a computer.
Restart your computer and boot from the flash drive - the same as with . In the menu, select the first item Run Android without installation.
After a short boot, the language selection screen and other initial settings will appear. At this point, your keyboard, mouse, and touchpad should work if you're running Android on a laptop. You don’t have to configure anything - anyway, the configuration is not saved in this mode.
Click “Next” until you get to the main system screen. Check how this version of Android works on your computer. Wi-Fi, local network connection, video playback - everything should work by default, without additional configuration.
Installing Android on a laptop from a recorded flash drive.
There are several options for booting from a flash drive: through the BIOS from the settings or using the F12 key to select a boot device. As a result, we have a launch selection window:
The first entry is about loading Android from a flash drive, bypassing the hard drive as a Live CD, the last on the list is installing the system on the hard drive of your computer or laptop. Next are the usual settings, in which it is better to refuse sending personal data and georeferencing for now.
The operating system menu is familiar to many (I had it like this):
Installed Android version:
You can meet. It takes a little getting used to using the mouse. Turn it off using the laptop power button.
We use Android x86 to run on a computer
Android x86 is a well-known open source project for porting the Android OS to computers, laptops and tablets with x86 and x64 processors. At the time of writing this article, the current version available for download is Android 5.1.1.
Android bootable flash drive
You can download Android x86 on the official website
https://www.android-x86.org/download
where iso and img images are available for download, both customized specifically for certain models of netbooks and tablets, and universal ones (located at the top of the list), the distribution itself weighs 350 MB.
To use the image, after downloading, write it to a disk or USB drive. I made a bootable USB flash drive with Android from an iso image using the Rufus utility using the following settings (judging by the resulting structure on the flash drive, it should boot successfully not only in CSM mode, but also in UEFI). When asked for the recording mode in Rufus (ISO or DD), select the first option.
To record an img image (which is posted specifically for EFI boot), you can use the free Win32 Disk Imager program.
Running Android x86 on a computer without installation
After booting from the previously created bootable USB flash drive with Android (how to enable booting from a flash drive in the BIOS), you will see a menu in which you will be asked to either install Android x86 on your computer, or start the OS without affecting the data on the computer. We select the first option - launch in Live CD mode (Run Android without installation).
After a short boot process, you will see a language selection window, and then the initial Android setup windows, I had the keyboard, mouse and touchpad working here on a laptop. You can not configure anything, but click “Next” (the settings will not be saved after a reboot anyway).
As a result, we get to the main screen of Android 5.1.1 (I used this version). In my test, on a relatively old laptop (Ivy Bridge x64), the following immediately worked: Wi-Fi, local network (and this is not displayed by any icons, judging only by opening pages in the browser with Wi-Fi turned off, sound, input devices), were installed video driver (this is not shown in the screenshot, it was taken from the virtual machine).
If you don’t have a network, just skip it in the wizard.
Here is the interface itself.
In general, everything works fine, although I was not very diligent in testing the functionality of Android on a computer. During the test, I encountered one freeze when opening the site in the built-in browser, which I could only “cure” by rebooting. I also note that Google Play services in Android x86 are not installed by default.
Installing Android x86
By selecting the last menu item when booting from a flash drive (Install Android x86 to hard disk), you can install Android on your computer as the main OS or an additional system.
Below I present only the installation process for a computer with two MBR (Legacy boot, not UEFI) disks in NTFS. Depending on your installation, these options may vary (and additional installation steps may appear). I also recommend not leaving the Android partition in NTFS.
On the first screen you will be asked to select a partition to install. Choose the one that you have prepared in advance for this. I have a whole separate disk (albeit a virtual one).
At the second stage, you will be asked to format the partition (or not to do so). If you are serious about using Android on your device, I recommend ext4 (in this case, you will have all the disk space available for use, like internal memory). If you do not format it (for example, leave NTFS), then at the end of the installation you will be asked to allocate space for user data (it is better to use the maximum value of 2047 MB).
The next step is the proposal to install the Grub4Dos bootloader. Answer “Yes” if you will use more than just Android on your computer (for example, you already have Windows installed)
If the installer finds other OSes on your computer, you will be prompted to add them to the boot menu. Do it.
In case you are using UEFI boot, confirm the entry of the EFI bootloader Grub4Dos, otherwise click “Skip”.
The installation of Android x86 will begin, and after it you can either immediately launch the installed system, or restart the computer and select the desired OS from the boot menu.
That's it, you've got Android on your computer—even if it's a controversial OS for such use, it's at least interesting.
conclusions
As you have seen, installing Android x86 on a PC is not so different from other operating systems. If you are lucky and the system fully supports your hardware, then you can very easily get a full-fledged Android system on your computer. If you have any questions, write in the comments!
To complete the video with the Android installation process from an American video blogger:
We continue to introduce the reader to the installation of the Android mobile operating system on computers and laptops running Windows and OS X. In the first part of the instructions, we showed how to install using the BlueStacks emulator. This material provides for a more complex installation of Android on a computer as a separate operating system without the use of virtual machines.
By installing Android as a second operating system, we can achieve a significant increase in the performance of the mobile OS without loading the RAM and processor with third-party applications or emulators.
Preparation
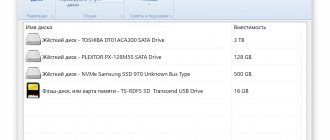
To install, we will need a USB drive of at least 1 GB in size and a separate disk partition of at least 8 GB in size. A disk partition for installing Android can be created using standard operating system tools (context menu of the Start button - Disk Management for Windows), but to save time, you can use a second USB drive on which the operating system will be installed.
Installation
Before starting the installation, download the ported image of the Android operating system from the Android-x86 website. In the Downloads section, find the OS version you are interested in (it is recommended to install the latest current version “android-x86-5.1-rc1.iso” or “android-x86_64-5.1-rc1.img”, depending on the bit depth).
2. To write the downloaded Android image to a flash drive, you will need the UltraISO utility. The trial version of the program can be downloaded from here. Install UltraISO and wait for the Android installation image to finish downloading.
3. Connect the USB drive to your computer. Attention: during the installation process, all data located on the flash drive will be deleted!
4. Launch UltraISO. Click “File” - “Open” and select the newly downloaded image in *.img or *.iso format.
5. The image will open in the UltraISO application. Go to the menu: “Boot” - “Burn Hard Disk Image”.
6. Make sure that the installed flash drive is selected as the target disk to be written to (Disk Drive item), and the downloaded .iso/.img file with the Android system is selected as the “Image file”.
7. Click on the “Record” item. The utility will warn you that all data on the flash drive has been destroyed and will begin recording the installation image.
Wait until copying finishes.
8. Restart your computer.
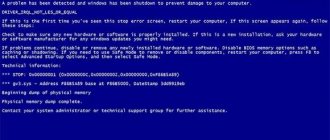
In the BIOS/UEFI settings, make sure that USB is selected in the Boot Device Priority - First Boot Device item (depending on the motherboard model, boot drive priority items may have different names).
If you have an Apple computer:
When rebooting, when a white screen appears, hold down the “Alt” key until the menu for selecting boot disks appears. Select the created drive.
9. After loading, the Live CD menu will appear on the screen, with which you can immediately launch the Android OS without preliminary installation, go into one of the debugging modes, or perform a full installation.
Select Installation and press Enter.
10. In the menu that appears, select the partition on your hard drive created for installing Android. Be careful - installing on top of Windows or OS X will completely erase the system.
Note: In some cases, especially when trying to install Android on a laptop, you may need to connect a USB keyboard. The built-in keyboard may stop responding until installation is complete.
The installer window will warn you about the loss of all data located on the selected partition. Click Yes.
12. Agree to install the GRUB boot loader and the EFI GRUB2 subkey.
13. To be able to overwrite data in the Android system and work with files, in the Do you want to install/system directory as read-write? dialog box. select Yes.
14. The Android OS installation will begin.
At the end of the process, the installer will offer to create a user partition within the system. By default, 512 MB is allocated for data. Click Yes and specify a recommended size of 2000 MB.
15. At this point, the installation of the Android operating system can be considered complete. In the window that appears, select Run Android-x86 - “Run Android”.
Further setup of the system completely repeats the first turn on of a new smartphone running Android, and consists of the following steps: selecting the system language, connecting to a Wi-Fi wireless network, authorization using a Google account and, directly, downloading applications and games from the Google store Play, or installing APK files.
Possible problems
When formatting a hard drive partition (step 11), it is preferable to choose FAT32 and NTFS systems. This is due to the optimal compatibility of the flash drives used with installation APK files copied using Windows OS (differences in the file systems of the drive and partition can lead to a conflict - the system simply will not see the flash drive). If there is no need for this method of installing games and applications, you can choose any type of formatting.
Recently, smartphones and tablets running on the Android operating system have become very popular. And this is obvious: high system performance, the ability to synchronize various devices, many games and applications.
This is why more and more computer users are interested in the question of how to install the Android operating system on a computer.
If you want to use only the Android operating system on your laptop or computer, format the hard drive on which the old operating system is installed and install Android on this partition. If you want to use Android along with the operating system installed on your computer, you need to create a new hard drive partition and install Android on this partition.
I have the Windows 7 operating system installed on my laptop, so in this article I will describe in detail what needs to be done to install Android next to the main operating system.
To download the Android operating system for your computer, you need to go to the official website of the Android-x86 project developers:
https://www.android-x86.org/download
Here, select the version of Android you want to install and click on the “View” button. After this, the image download will begin.
Firmware via TWRP Recovery
To move between menu items in this recovery, press the screen as in normal sentences, and to confirm the operation, you need to slide your finger along the strip at the bottom of the window.
- Start the device in recovery mode. This usually happens by holding down both the volume buttons and the power button. If this combination does not work, try pressing the volume up or down keys separately.
- Select Cleaning - Advanced, then check the boxes next to all the items except the memory card.
- Confirm the actions, but after cleaning, do not reboot the device, since the operating system is removed and you simply will not see anything except the manufacturer’s logo.
- Return to the main recovery menu, select “Install” to select your firmware.
- To display the memory card, tap on the “Select Memory” button.
- Find the file with the firmware, select it, then swipe your finger along the bar at the bottom of the screen to confirm the start of the firmware.
- After a few minutes, the system will prompt you to reboot.
Please note that the system may take about 10 minutes to turn on for the first time.
Preparing the image
You won’t be able to just grab and immediately connect an iso image of the Windows installer, since I already said that the program works with Linux images by default. Therefore, when you go through the DriveDroid initialization process, give the program root access and the program will check if your device is supported, click the “+” at the top of the screen and select create blank image to create a blank image:
the Partition table (MBR) item and select the file system None :
Creating the image will take quite a lot of time, when everything is ready, connect the newly created flash drive to the computer, tap the Writable USB to have write access:
Now let's move on to actions on the computer. Run:
cfdisk /dev/sdb
Here /dev/sdb is the newly connected memory of the Android device, with which you are going to install windows from the phone. Select the dos partition table, press new, then enter, then write and yes. Then format the disk to ntfs:
mkfs -t ntfs /dev/sdb1
And finally, let's write down the image:
winusb --install windows7.iso /dev/sdb1
Where windows7.iso is the Windows installation image, and /dev/sdb1 is the address of the connected flash drive. You can find out the address by looking at what new devices appeared after connecting the flash drive in the Dev directory:
ls /dev | grep sd
After the recording is completed, all that remains is to restart the computer, go into the BIOS settings by pressing F2 or F10, and in the Boot section set the highest priority for our flash drive. Now all that remains is to install windows from the phone: