Via Control Panel
Open the Control Panel by clicking on the Start button - Windows System Tools - Control Panel
.
How to disable autorun of a flash drive in Windows 10
Go to Control Panel - Hardware and Sound - AutoPlay
.
Disabling autorun of a Windows 10 flash drive.
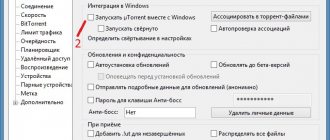
A window will open in which at the very top, check the box next to Use autorun for all media and devices.
.
Then, in the Removable media item, select Do not perform any actions
and click the Save button. Now the Control Panel can be closed, and autorun of the Windows 10 flash drive will be disabled.
Turning the AutoPlay feature on and off
For Windows 7, 8
Before you enable autorun of the flash drive, you need to open the control panel in the “Start” menu and select “Autorun”. Check the box next to the “Use for all media and devices” entry.
Next to the entry “Use for all media and devices” you need to check the box
Then save the settings. And in order to disable autorun of the flash drive, you need to remove the pointer from this tab.
For Windows XP
The process of enabling and disabling this feature in OS XP is a little more complicated. To do this, you need to go to “Group Policy”. In the Start menu, find the Run tab, enter the gredit.msc command and press enter. In the window that opens, select “Computer Configuration”, “Administrative Templates” and “System”. On the right side, find the line “Disable startup”.
Click on Disable autorun
To enable the function o (not set) and confirm “OK”. And to disable it, select the line “Enabled” and “For all disks with selection confirmation.”
After you have autostarted the flash drive, you should insert the removable drive into the PC and check the operation of the system.
Through the Local Group Policy Editor
First, launch the Local Group Policy Editor, and to do this you need to press two WIN + R
.
A window will open in which you need to enter the command Gpedit.msc
and click OK.
How to disable autorun on Windows 10
On the left side of the editor, expand the path Computer Configuration - Administrative Templates - Windows Components - Autorun Policy
Disabling Autorun
.
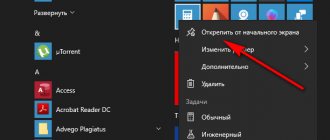
You need to change the state of this item, and to do this, double-click on it with the left mouse button. How to remove autorun on Windows 10
A window will open in which you place a dot next to the Enabled item and click OK. After this, the editor can be closed, and autorun of the Windows 10 flash drive will be disabled.
How to disable autorun in Windows XP.
I will give two options on how to disable autorun in Windows XP. 1. Through the gpedit program; 2. Through the system registry;
First option.
Start Menu – Run – gpedit
Computer Configuration – Administrative Templates – System – Disable Autorun
“Parameter” tab, select the “Enable” radio button. Select "Disable autorun: on all drives." There is no need to restart the computer; autorun is disabled immediately.
Second option.
Next, to disable autorun on all removable media, follow the branch:
You need to change in the parameter: NoDriveTypeAutoRun the value that you have set to ff .
To disable autorun of CDs, follow the branch:
And change the value of the “AutoRun” parameter to “0”. After this, restart the computer. All autostart of removable media is disabled.
Via Registry Editor
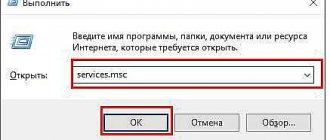
First, launch the Registry Editor. Press two WIN+R
.
A window will open in which you need to enter the regedit
and click OK.
How to disable autorun in Windows 10
The Registry Editor will open in which you need to open HKEY_CURRENT_USER - Software - Microsoft - Windows - CurrentVersion - Policies - Explorer
.
Click on the last item, and then on the right side find the item NoDriveTypeAutoRun
.
You need to change the value of this parameter, and to do this, move the cursor over it and press the right mouse button. A menu will open in which you need to select Edit. Disabling autorun in Windows 10
A window will open in which, in the value field, delete the old value, and then enter the new value 000000FF
and click OK. After this, close the Registry Editor and restart the computer. After the reboot, the changes made in the editor will take effect and autostart of the Windows 10 flash drive will be disabled.
Such a convenient and at the same time controversial feature of the Windows OS as “Autorun” is heard by many users. However, not everyone knows about its purpose and benefits in work. In this article we will tell you how to enable autorun of a flash drive and what advantages and disadvantages it has. We will look at all the ways to activate it on Windows 7 and 10.
The Autorun option was introduced by Microsoft developers on the outdated operating systems Win 95 and XP. This allowed the computer to be used as a full-fledged media player. A person only had to insert a CD, floppy disk, or USB drive into the drive tray or port - its contents would be played automatically. Even then, the PC became a kind of music center or video player.
The negative side of this functionality is the strong vulnerability of the system to malware and viruses. The dangerous software replaces the standard file of the root folder of the flash drive “Autorun.inf” with its infected copy containing a link or executable program. So the system itself launches a virus within itself and the user practically cannot stop this process.
In subsequent versions of the OS, developers disabled “autorun” by default, but left the option to choose. If you are aware of the risks and you have a powerful antivirus installed, you can enable autorun on your PC yourself using our tips.
AutoPlay Basics
- You should know that Autorun for a flash drive itself does not contain malicious code, but only has a link to an existing file with a virus from the Internet.
- Also, malicious utilities are written to the Autorun folder when copied with the extension .inf, .bat, .exe, .pif, .ini, .cmd, etc.
- You cannot immediately launch a file or group of autorun files. You need to open them using viewing software (for example, Notepad) and check for viruses.
- If, when copying data, in addition to the necessary information, autorun is detected, then it should be deleted. And if it is not deleted or disappears and is created again a minute later, it means that the computer is infected.
- You can also use various optimization programs (tweakers) to disable the function. But it is better to do this manually, for greater security.
Enable via “Control Panel” or “Settings”
The easiest way to activate the “autorun” function in Windows 7 is to use the “Control Panel” system menu. We do it as described below.
- Go to “Start/Control Panel/Hardware and Sound”
and click on the
“AutoPlay” section.
- Check the box next to “Use autorun for all media and devices
.
You can also specify individual launch parameters for any device paired with a PC. At the bottom of the window, click “Save”
.
Autostart of a flash drive on Windows 10 is even easier to activate.
- Open “Start/Settings”
and select the submenu
“Devices”
.
- Click on “Autorun” and switch the top checkbox to the position as in the screenshot.
Here the user has access to separate profiles for various types of devices: smartphones, tablets, removable Flash media, video cameras, SD memory cards and other gadgets. The parameters for connected devices differ. Thus, you can disable autorun for USB drives, but allow it for a DVD drive, or vice versa.
It is worth noting that enabling this mode on the “ten” is also possible through the control panel. This is done in the same way as described above for Windows 7.
Enabling via the Policy Management Console
This method is quite accessible to the average user and can help if, for various reasons, autostart of a flash drive in Windows 7 does not work. Everything is simple here:
- Open the Start menu,
then enter
“gpedit.msc”
. Click on the console file that appears.
- In the console interface that appears, follow the path “Administrative Templates/ Windows Components/Autorun Policies”
.
We are interested in the “Disable autorun” item -
double-click on it.
- In the pop-up window, check the box next to “Disable”
in the upper left corner and confirm with the
“OK” button.
In case you have any confusion, let us explain: this service was created to disable the “autorun”. We deactivated it through our actions and removed the blocking. The above method also applies to Windows 10 systems.
Activating automatic startup through the registry editor
If, after all the autostart measures, there is still no flash drive in Windows 10 and 7, then the third method will help - setting it up through the registry. It is similar to the previous option, but requires special care. "Avtorun" can be activated manually with or without the use of a third-party utility. First, let's look at the standard Windows method without downloading software.
To do this you need:
- Open the Start
, enter the word
“regedit”
and click on the console editor file “
exe”.
- Prepare a safety copy of the entire register. This is highly recommended to return the system to its previous state in the event of a failure. In the toolbar we find “File/Export”
. We give the file a name and save it in any visible place or just on the desktop.
- The left half of the window is reserved for the database manager.
It requires you to go to this path: “HKEY_LOCAL_MACHINE\Software\Microsoft\Windows\CurrentVersion\Policies\Explorer”.
Take a close look at the options on the right side of the window. The screenshot above is a sample system with autorun enabled. This is how it should be for you too. If, in addition to these objects, there are others with the name “
NoAutorun”
or
“ DisableAutorun”
, or similar in name, delete them.
- Go to: "HKEY_CURRENT_USER\Software\Microsoft\Windows\CurrentVersion\Policies\Explorer".
Perform similar actions to remove blocking parameters. The window should look like this:
- Go to:
"HKEY_CURRENT_USER\Software\Microsoft\Windows\CurrentVersion\Explorer\AutoplayHandlers"
.
For the “DisableAutoplay”
The value should be REG_DWORD:00000000 as in the screenshot below.
- After this, you need to restart the computer and check the functionality of the function on the flash drive.
Setting up the startup registry using the Reg Organizer utility
Now we will consider these same steps using a convenient program for servicing domestically developed PCs - “Reg Organizer”.
- Launch the program and select the top panel item: “Tools/Registry Editor”.
- Copy the desired path into the search bar, click “Go”
and make changes according to the plan described above.
If you notice strange behavior of the system after changes and reboots, for example, crashes or freezing of the screen, then you can always roll back all actions. Double-click on the file of the previously prepared copy of the registry and click “OK”.
Then restart your computer.
Eventually
Our article described three main ways to enable USB autorun in Windows 7 and 10. The first two are available to everyone. Setup will not cause any inconvenience and will not take much time.
The third option, with changing registry values, is the most complex and is aimed at advanced users. We advise beginners not to experiment with it, since the registry contains data about the parameters and settings of Windows system files. Damage to it can lead to serious problems with your PC.
To save personal time, it is better to use the free program “Reg Organizer” or another similar one. Its main advantage is fast navigation through sections and a more understandable graphical shell.
Remember that enabling media autorun reduces your computer's protection from viruses and puts your confidential data at risk!
Undoubtedly, autorun of a flash drive or any other removable storage media is very convenient for users. You just need to insert the device into the USB output on your computer or laptop and voila, you will immediately see its contents with files and folders. Thus, you save yourself from unnecessary clicks.
But autorunning a flash drive will be safe and harmless only if you have a high-quality antivirus installed on your computer. Otherwise, you risk infecting your system with malicious files and losing a lot of data from your hard drive.
Also, if there are a lot of files on your flash drive, then during autostart there is a chance that the computer will slow down and glitch. This flaw only applies to owners of old and weak computers or laptops.
To avoid problems with viruses and glitches, I recommend that you disable autorun of flash drives. This is done very easily, and with the help of these instructions you will generally cope with the task in a matter of minutes. Let's look at several methods that will help you disable autorun of USB storage media.
Method one
This method of disabling autorun of a flash drive is suitable for users of both Windows 7 and Windows 8.
So, open the Start menu. Then enter the following phrase into the search bar: “ Change Group Policy
"
Your system will find the corresponding section in the Control Panel. Click on it. For users of the Windows 8 operating system, I advise you to install the same Start menu as on my computer.
You can read how to do this. The Local Group Policy Editor dialog box opens
"
On the left you will see a tree-shaped menu. Click on the Administrative Templates
, then
Autorun Policy
.
On the right side of the window you will see 4 states. You need to open the first one, which is called “ Turning off autorun
”.
This will open a new “Turn off autorun” dialog box. In the top left corner you have 3 states of this option “ Not Configured
”, “
Enabled
” and “
Disabled
”.
You probably already guessed that you need to check the box next to “ Disabled
”.
To save the settings, click the “ Apply
” button.
Second method
This method will help you not just disable autorun of the flash drive, but configure it for a specific type of device. Well, of course, you can also disable everything at once.
To get started, go to " Control Panel"
"
Then set the view to "small icons". Now look for the AutoPlay
.
Let's open it. And now you get a lot of space to customize your preferences.
Here you can configure autorun of disks, software, memory cards and, of course, removable media. For those who want to simply disable autorun of flash drives and other devices, I recommend simply unchecking the “ Use autorun for all media and devices”
", which is located at the very top.
Then click the " Save
" button.
The third method is
a very useful tool that can block viruses from accessing your computer through autorun of removable media. And most importantly, this utility is absolutely free.
There is also a similar free program called Antirun. I won’t mention paid ones, since you can find them anyway.
Fourth method
Most antiviruses have a function to disable autorun of flash drives. This is usually set by default, but I advise you to play it safe and go through the settings of your antivirus.
So we looked at 4 of the simplest and very easy ways to disable such an option as autorun of a flash drive or any other removable storage device. I hope this instruction helped you.
Autorun (not to be confused with autostart) is a good and useful feature of Windows operating systems. It takes on some tasks and automates certain processes that the user would otherwise have to do himself. You just need to connect the removable device to your computer and Windows will automatically perform some tasks. For example, it will open a photo application, launch a media player, or open Explorer. In this article we will talk about how to enable autorun for a flash drive, external drive or any other device, as well as how to disable it and why to do it.
How to enable autorun of a flash drive on Windows 7
» windows 7 » How to enable autorun of a flash drive on windows 7
Why disable autorun from a flash drive at all? The fact is that if the flash drive is infected with a virus, then when you connect it to the computer, autorun starts and offers you the choice of an option to view the contents, and through it your computer is infected with a virus. Therefore, it is better to disable it, especially since it is not particularly needed. You can simply insert the flash drive into the USB port and open “My Computer”, where you can view its contents without any autorun.
Attention! This method is only suitable for the Windows 7 operating system, so if you have another system installed, this option will not work.
The first thing we do is press the “START” button and go to the Control Panel
Going to the control panel, in the search bar (upper right corner) we type the phrase “Change group policy”. The computer will find and display the “Administration” item. Here we click on “Change Group Policy”
How to enable automatic startup in Windows 10 Settings
The section for automatically starting connected devices has a separate section in Windows 10 Settings. Go to it to enable autostart or repair the system in case of malfunctions. For example, if autostart disappeared.
Press Win
+ I
(this is the fastest way to open Settings) and go to the section
Devices - Startup
.
There is a single switch here that is responsible for enabling or disabling autorun.
A little lower, the system will prompt you to set default actions for certain devices. This could be a removable storage device (USB flash drive or disk), a memory card, or, for example, your smartphone, as in the screenshot.
You can select one of the proposed actions from the drop-down menu. By default, the system asks the user for the required action every time. If you want to change your preferred action or have the system constantly ask you, you need to change these parameters.
When you set the Ask every time
Windows will prompt you for a specific action with the connected device. The selection menu will appear as a standard notification.
From here you can disable autostart for a specific type of device. This is useful if you need autostart for certain devices, but do not want to allow other types of devices to autostart. For example, you can prohibit the startup of removable media, but allow your phone to autostart. In this case, for an individual device, you must select Do not perform any actions
.
How to enable or disable autorun of a flash drive - PC Consultant
Good afternoon, dear readers, new and old???? , today I want to consider the issue of autorun of a flash drive and how to disable it. We will consider Windows operating systems, in my case this is version 8.1, but the steps taken will also be suitable for Windows 10 and 7, for now it’s all the same, unless small software messes up in the future.
Of course, autorun is a very useful function that helps the user quickly gain access to the connected device, but it also carries the other side of the coin in terms of reducing security, since your flash drive may have a virus or a malicious Trojan that starts launching as soon as The usb device opens, below we will look at how to defeat it.
How to disable autorun from a flash drive in Windows 10
In the modern world of cloud storage and fast Internet connections, flash drives are gradually losing their relevance, but are still widely used. This means that the risk of running into some kind of malicious infection through someone else’s USB drive is still high. To reduce it, it is recommended to disable autorun of removable media in Windows 10. This can be done using several methods of varying degrees of complexity.
Note
: Disabling autorun does not protect you from viruses and malware. Always use standard Windows antivirus or solutions from third-party developers. In this case, disabling autorun will only be an additional preventive protection.
Disabling AutoPlay via Windows 10 Settings
How to disable autorun via Windows 10 Control Panel
Disabling automatic startup via Registry Editor
Like all other settings, you can disable autorun with a simple tweak to the operating system registry.
note
: Editing the registry requires your account to have Administrator rights. If there are none, you will need a password for the Administrator profile.
Warning
: Editing the registry always carries certain risks of damaging your computer software. Use other methods to disable autorun of a flash drive if you are not sure that you can return the registry to its previous state.
How to disable autorun through Group Policy Editor
note
: Like Registry Editor, Group Policy Editor requires proper permissions from the user account. You will need either an Administrator profile or a password for one.
Thus, autorun can be either enabled or disabled on your Windows 10 computer.
Flash drive – USB drive for storing data. By default, when you connect it to a computer or laptop, autorun is triggered. The system reads data from the media and offers options on how or how to open the flash drive. But what if autorun is not needed for security or privacy reasons?
Disabling autorun is especially important now. In the Internet era, flash drives are actively used to transfer information, viruses, Trojans and other troubles. Disabling autorun will help avoid consequences; to do this, open the control panel by clicking the corresponding icon. Click on Hardware and Sound, then select AutoPlay. In the window that opens, uncheck the Use autorun for all media and devices option. Save your changes before exiting. This item will disable autorun for absolutely all devices. The method described above is not the only one. Go to the Control Panel, in the top right Quick Search box, enter Group Policy Change into it. Select the line under Administration. The same editor can be opened with a quick command; to do this, press the combination Win + R (Win button on the keyboard with the Windows logo) - the Run window will open. Enter Gpedit.msc in it. Click OK. If you did everything correctly, the Local Group Policy Editor will open. Next, to configure policy settings, in the left part of the window, navigate through the folders in the following sequence:
- computer configuration;
- administrative templates;
- autostart policy.
Double-click to open Turn off autorun.
Initially, the dot is marked Not specified. It should be noted Enable, there is a little confusion here, this is how you turn off autorun. In the drop-down list of options, select – CD and removable media drives. Click OK. Close the Editor. You can also disable automatic startup of the flash drive through the registry. To do this, repeat the combination Win+R. Enter the REGEDIT command to open the Windows Registry Editor. The editor will open. Go to the address in the registry, double-click on the AutoRun parameter and in the window change the value of the parameter from one to zero. Launch Registry Editor, go to . Right-click to create a partition and give it the name Explorer. Create a string parameter here, NoDriveTypeAutoRun, and set it to 0x4. Save. If you want to disable autorun on all devices, set the value to 0xFF. Setting up the registry is recommended only for experienced users. Carelessly changing settings can lead to freezes or the inability to load the operating system.
How to disable or enable autorun of disks and flash drives in Windows 7, 8, 10
Many users are annoyed by the automatic launch of each storage device inserted into the device with information. In this case, audio and video players may automatically launch, or notification windows may simply pop up. But much worse things can happen, such as the installation and spread of viruses.
To begin with, it’s worth saying that there are two types of automatic launch. The first is AutoPlay , it searches for a certain type of information on the drive and offers to run it through the default utility. The second type is Autorun , it came from older versions of Windows.
In this case, Windows looks for the Autorun.ini file on the disk, and then reads and runs the actions recorded in it. This could be as simple as changing the media icon to something non-standard custom, or writing a virus into the system. This article will talk about how to disable autorun on the system.
Universal methods
This section will talk about several methods for disabling autorun, which are suitable for all systems, starting with Windows 7.
Disable Autorun and Autoplay in the Local Group Policy Editor
There are several ways to select the application you need. You can go to Start, then go to Control Panel , then select Administration and here select Group Policy Editor.
However, you can simply press win+r and enter gpedit.msc . Next, the user will need to go to the computer configuration, then in Administrative Templates , then click on windows components .
In this directory you should select the autorun policy.
Next, you need to double-click the left mouse button on the “ Turn off autorun ” option. In the window that opens, you will need to change the checkbox to Enabled, and at the bottom of the window you should make sure that the parameter will be applied to all devices.
Choosing the best program for repairing and restoring your hard drive
Using the registry editor
The user may not have access to the previous item due to the system version or other restrictions. In this case, you should use a utility to edit the registry; you can open it by pressing win+r and typing regedit .
After that, on the left side of the menu you will need to go through the path consisting of the directories HKEY_LOCAL_MACHINE\Software\Microsoft\Windows\CurrentVersion\Policies\Explorer\ , the user will also need a second section with the same path, only it will start with HKEY_CURRENT_USER .
In these two directories, the user will need to right-click on an empty space and create dword parameter for 3 bits. It will need to be called NoDriveTypeAutorun , and its value will have to be set to 000000FF. Then you can close the editor and restart the computer. After this, automatic startup of all drives will be prohibited.
Shutdown via control panel
You can also turn it off through the control panel. First, the user will need to launch it, then Hardware and Sound and here click on Autorun.
Here you can uncheck the use of autorun and in this case it will not be used for any devices. However, if the user is afraid of viruses or he simply does not like certain actions, then everything can be configured here. There is an option to choose what the system will do with each file type. You can configure everything so that video files will be played immediately, or the computer will not respond to them at all.
The user can configure all the items for himself; here you can select actions for audio and video, images and programs, DVD discs, and so on. However, for programs it is better to disable automatic launch or at least leave a request to the user.
Autorun in Windows 8 and 8.1
For the eight, everything is set up a little differently. First, go to settings , then to Change computer settings, then to Computer and devices, and then go to Autorun .
Connecting the motherboard to the system unit
Here you can turn the autoplay lever off or configure actions for each media type.
Disable in Windows 10
In the top ten, to configure go to settings , then go to the devices section.
Next, select autorun in the left menu. Here you can turn the switch to the off position, or configure actions for each media.
Enabling autorun in Windows 7, 8, 10
Some users encounter the opposite problem. They want a menu to pop up or files to play when they insert a drive, but nothing happens. In this case, you should check the parameters described in the article.
It’s best to start with the settings section or control panel; this is the easiest and most likely way to disable the automatic start of drives. If everything is configured correctly there, then you should go to group policies and disable the specified parameter there.