Some users want to know how to remove tiles in Windows 10 because they do not like this version of the operating system interface. The so-called “live tiles” first appeared as part of the Windows 8 operating system.
Many users had mixed reactions to this Microsoft innovation, which fits the touch screen of the device. The Start menu was removed from the system, which Microsoft returned in a stripped-down version to the Windows 8.1 operating system.
It has become inconvenient to work on desktop PCs and laptops using a keyboard and mouse due to the lack of quick access to various menu elements. In the Windows 10 operating system, a full-fledged Start menu has been returned.
There are still a number of “live tiles” left in the Start menu that show notifications and alerts. The user has options to customize the display of tiles: they can be grouped, resized, removed or disabled.
How to remove tiles from the Windows 10 Start menu in the operating system? To solve the problem, the user can use several options: you can disable live tiles or immediately remove all tiles in Windows.
In this guide, you will get the following instructions: one way to remove tiles in Windows and three ways to disable tiles. Note that disabled tiles remain in their original location in the Start menu.
How to remove pinned tiles in Windows 10
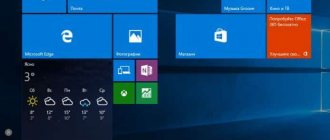
Now we will look at how to disable tiles in the Windows 10 start. We will remove the tiles that are on the Start screen.
It is necessary to perform the following algorithm of actions:
- Right-click the tile.
- From the context menu, select Unpin from Start.
- Continue unpinning the remaining live tiles.
As a result, there will be no more tiles left in the Start menu.
Creating Tiles Using Tile Iconifier
Let's first look at the Tile Iconifier utility, it is completely free, has a Russian interface, which is important, and can make your own home screen tiles.
you can from the official website
The Tile Iconifier utility is available for both 32 and 64 bit systems. If you don’t know which one you have, then read how to find out the bitness of your Windows system
After unpacking the archive, you will see that the program is portable, that is, it does not require installation. Let's launch it. The program will show you in the Shortcut Name window all the shortcuts that it could detect in your operating system. Below you will see the path to the shortcut of your programs and the path to the executable file.
To change the image on the label, select the one you want and double-click on the black icon. At the same time, for the tile image you can specify not only files from icon libraries, but also your own images in PNG, BMP, JPG. Moreover, transparency is supported and works for PNG.
Set the switch to Use custom image and click the Browse button to select an image.
As you can see, the image I selected is now displayed in the Medium icon field; to apply it, click Tile Iconify!.
You can also edit it a little here, for example, by selecting Background Color, I set it to silver as an example.
Now, in order to see a new tile with a new design, you need to pin it to the home screen.
If you think that Tile Iconifier can change images on existing labels, then you are mistaken. At the top, click Utilities > Custom Shortcut Manager.
In the window that opens, you can create a new shortcut, which you can then place in the tiles.
Click Create New Shortcut. A wizard will open where you will have to go through a couple of steps.
- Explorer - to create shortcuts to simple and special Explorer folders, including control panel items, devices, and various settings.
- Steam - for creating shortcuts and tiles for Steam games.
- Chrome Apps - shortcuts and tile designs for Google Chrome applications.
- Windows Store - for Windows Store apps
- Other - manually create any shortcut and launch it with parameters.
I'll create a shortcut to the folder
Below in the Shortcut Name field we set the required display name and you can immediately set the icon for the shortcut on the left. We all click Generate Shortcut to create it.
After that, the newly created shortcut will appear in the All apps - TileIconify section (from where you can pin it to the Start screen), as well as in the list in the main Tile Iconifier window, where you can customize the tile for this shortcut - image for medium and small tiles, caption , background color (as was described at the beginning of the program review).
Add a folder or document to the Start screen
You can add a folder or document to the Start screen without additional software. To do this, open the explorer along this path
C:\ProgramData\Microsoft\Windows\Start Menu\Programs
Move any document or shortcut to it here, after which it will appear in the Start menu > All applications, right-click on it > Pin to Start screen.
How to disable tiles in Windows 10
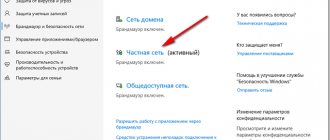
In some cases, users do not need to remove tiles from the Start menu; they only need to disable messages and notifications from live tiles.
To disable tile updates, follow these steps:
- Right-click on a specific live tile.
- Select "Advanced" and then "Disable Live Tiles" from the context menu.
- If necessary, do a similar operation with other tiles.
How to disable Live Tiles in Windows 10
You can disable Live Tiles in Windows using the Local Group Policy Editor. This tool is not available to users of the Home version of Windows (Home); it only works in older versions of Professional (Professional) and Enterprise (Enterprise). For the Windows 10 Home version, the option using the Registry Editor is suitable.
You may also be interested in:
- How to remove screen blur in Windows 10 - 3 ways
- How to remove Windows activation message - 3 ways
The user will need to go through the following steps:
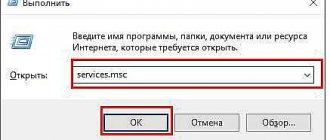
- Press the "Win" + "R" keys.
- In the Run dialog box, in the Open field, enter the command “gpedit.msc” (without quotes).
- Click on the "OK" button.
- In the Local Group Policy Editor window, follow the path:
User Configuration → Administrative Templates → Start Menu and Taskbar → Notifications
- Double-click on the "Disable Tile Notifications" option.
- In the “Disable Tile Notifications” window, activate the “Enabled” option, click on the “OK” button.
- In the Local Group Policy Editor window, follow the path:
User Configuration → Administrative Templates → Start Menu and Taskbar
- Double-click on “Clear notifications on login tile.”
- In the “Clear notifications at login” window, set the option to “Enabled”, click on the “OK” button.
- Restart your computer.
If necessary, this setting can be changed. To return to the previous state, you will need to switch the parameter state to the “Not set” option.
Returning the Start Menu
For many years, the Start menu remained the same in all versions of software released by Microsoft. However, in 2012, the developers decided to replace it with a Metro-style desktop. This update received many negative reviews and criticism, which became the reason for the return of the beloved Start to the system, but with significant improvements and modifications.
During the work on the new Windows 10, there was a lot of controversy about the usefulness and necessity of Start. The majority of users were in favor of this menu. Now it’s difficult to say whether it was returned due to reviews and complaints, or whether Microsoft themselves decided so, but the significantly improved menu has returned.
The main feature of the innovation is the combined buttons of the classic menu and “live” tiles. The arsenal of possibilities has also expanded, for example, you can customize the Start menu at your discretion.
Disabling tiles in the Windows Registry
Now we will disable tiles in the Windows 10 Start menu by making changes to the operating system registry. To do this, we will create several sections with the necessary parameters.
Follow these steps:
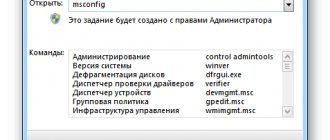
- Press the "Win" + "R" keyboard keys.
- In the “Run” window, enter the command “regedit” (without quotes), press the “Enter” key.
- In the Registry Editor window, follow the path:
HKEY_CURRENT_USER\Software\Policies\Microsoft\Windows\CurrentVersion
- Right-click on “CurrentVersion”, in the context menu select first “Create” and then “Partition”.
- Name the section “PushNotifications” (without quotes).
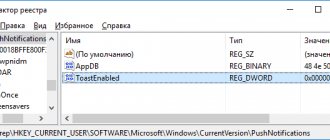
- In the “PushNotifications” section, right-click on the free space, and in the context menu that opens, select sequentially: first “Create” and then “32-bit DWORD Value”.
- Give the parameter a name: "NoTileApplicationNotification" (without quotes).
- Right-click on the created parameter and select “Edit...”.
- In the Edit 32-Bit DWORD Value window, set the value to 1, and then click OK.
To clear the live tile cache, you need to make changes to another section of the Windows registry.
Make the following changes to the registry settings:
- In the Registry Editor, follow the path:
HKEY_CURRENT_USER\Software\Policies\Microsoft\Windows
- Right-click on the "Windows" folder.
- In the context menu, select “New” → “Section”.
- Name the section "Explorer" (without quotes).
- Open the Explorer section and then click on an empty space within the section.
- In the context menu, select New → 32-bit DWORD Value.
- Give the new parameter a name: "ClearTilesOnExit" (without quotes).
- Double-click on the parameter with the left mouse button.
- In the “Change 32-bit DWORD Value” window, in the “Value:” field, enter “1”, click on the “OK” button.
- Restart your computer.
If you need to revert to your previous settings, follow these steps:
- In the Registry Editor window, follow the path:
HKEY_CURRENT_USER\Software\Policies\Microsoft\Windows\CurrentVersion\PushNotifications
- From the "CurrentVersion" folder, remove the "NoTileApplicationNotification" parameter.
- Next, follow the path:
HKEY_CURRENT_USER\Software\Policies\Microsoft\Windows\Explorer
- From the Explorer folder, remove the ClearTilesOnExit setting.
- Restart your PC.
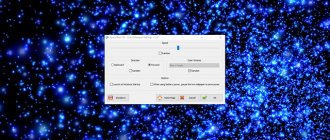
Hiding taskbar elements
Sometimes you need to hide the taskbar not completely, but only disable the display of its individual elements, mainly the various tools shown on the right side of the bar. The Group Policy Editor will help you quickly configure them.
The instructions below will not be suitable for owners of Windows 7 Home Basic/Advanced and Starter, since there is no Group Policy Editor. Instead, we recommend changing one setting in the Registry Editor that is responsible for disabling ALL system tray items. It is configured as follows:
- Launch the Run command by holding down the Win + R hotkey, type regedit, and then click OK.
- Navigate to the path below to get to the Explorer folder.
- In an empty space, right-click and select “New” - “DWORD Value (32 bits).”
- Name it NoTrayItemsDisplay.
- Double-click on the line with the left mouse button to open the settings window. In the “Value” line, enter the number 1.
- Restart your computer and the changes will take effect.
HKEY_CURRENT_USER/SOFTWARE/Microsoft/Windows/CurrentVersion/Policies/Explorer
Now all system tray items will not be displayed. You will need to delete the created parameter if you want to return their state.
Now let’s move on directly to working with group policies, where you can edit each parameter in more detail:
- The transition to the editor is carried out through the “Run” utility. Launch it by pressing the Win + R key combination. Type gpedit.msc, and then click on “OK”.
- Go to the User Configuration - Administrative Templates directory and select the Start Menu and Taskbar state.
- First of all, let's look at the "Do not display toolbars in the taskbar" setting. Double-click on a line to edit the parameter.
- Check the “Enable” checkbox if you want to disable the display of custom elements, for example, “Address”, “Desktop”, “Quick Launch”. In addition, other users will not be able to manually add them without first changing the value of this tool.