Where do you store passwords for online accounts? On a text file on your computer? In the browser? In your head? According to statistics from the NordPass company, in 2020, about 500 million passwords were leaked online due to the fact that people do not care about storing them.
In the article What is a login and password, we talked in detail about “bad” passwords, as well as the consequences that their use can lead to, namely attacks from hackers.
There I also mentioned one of the simplest and most reliable ways to store passwords - special programs. In this article I want to talk about one of these free programs called KeePass.
You will learn what KeePass is, why it is needed, how to download and install it. I will teach you how to use this program and tell you how you can strengthen your protection. We will mainly talk about KeePass for the Windows operating system, but towards the end of the article I will also talk about versions for other systems, including mobile ones.
If you have been looking for a reliable way to store passwords or have at least once thought about your online security, you have come to the right place!
KeePass - what is this program?
KeePass is a free program for computers and mobile phones designed to store passwords and logins from various websites and services. In addition to logins and passwords, you can also store additional information in it, for example, links to websites, bank card numbers, passport details, or just secret notes.
The program is open source and takes up little space on your computer. You don’t have to install it on your computer at all and use the portable version. The program has been translated into Russian, which makes working with it easier.
KeePassDX
KeePassDX is a multi-format KeePass password manager, the app allows you to securely store and use passwords, keys and digital identities by integrating Android design standards.
Characteristics:
- Creating a database of files/records and groups.
- Support for .kdb and .kdbx files (versions 1-4) with AES - Twofish - ChaCha20 - Argon2 algorithm.
- Compatible with most alternative programs (KeePass, KeePassX, KeePassXC,...).
- Allows you to quickly open and copy URI/URL fields.
- Biometric recognition for quick unlocking (fingerprint/face unlock/…).
- One-time password (HOTP/TOTP) management for two-factor authentication (2FA).
- Material design with themes.
- Autofill and integration.
- Keyboard fill field.
- History of each entry.
- Precise control of settings.
- The code is written in native languages (Kotlin/Java/JNI/C).
KeePassDX is open source and ad-free.
To install on your phone, follow the link.
How KeePass works
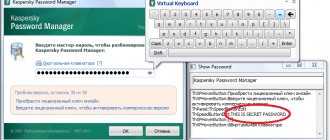
In KeePass, passwords are stored in a database (you can create any number of them), which is a .kdbx file and contains . Each entry is tied to a specific service or event; it may contain a link to the site, login, password, as well as space for additional notes. When entering the program, the user enters a special password, which is called a master password , and then gains access to the entire database. In other words, if you have saved your email password in the program, then to access this password you need to enter the master password. This increases the security of data storage.
Note: the master password is not stored anywhere and if a person loses it, he will not be able to access the database. By the way, this should be stored on a piece of paper or in a notebook so as not to forget! But I don't recommend you do this. The best thing to do is come up with a master password that you will never forget, and write down hints in a notepad that will help you remember the master password.
Databases are stored in encrypted form. KeePass uses strong encryption algorithms AES and Twofish (these ciphers are the most secure, even banks use them), and the program code is publicly available. That is, smart programmers would have long ago caught its creators committing fraud, because they can freely study this code and make sure whether the encryption algorithms are executed correctly.
How to use KeePassX?
Creating a Password Vault
Setting up KeePass begins with creating a storage location where all passwords will be stored. To do this, in the main program window, go to the “Storage” and select the “New storage” .
Next, a window will appear in front of us in which we need to set a master password that will be used to access the saved database. Remember that the security of your data depends on its complexity, so when creating it, be sure to choose an option with mixed case letters, numbers and, preferably, that they are not combined with significant dates in your life and do not have name abbreviations.
To enhance protection, you can also connect a key file. You can choose your own text document or generate a new one. When you have completed operations with passwords, click the “OK” .
Our next step is to save the storage to a file so that you can save it and transfer it to another device at any time. Go to the “Storage” and select “Save storage” , then specify the path where the file will be stored and give it a name.
Saving your KeePassX password
To add a new password to the database, you must click on the corresponding icon in the main program window or go to the “Records” and select “Add a new record” .
In the window that appears, set the name of the entry and enter all the necessary data, such as login, password and link to the site. Here you can change the recording icon, as well as set the duration during which the entered data can be used.
Using passwords
So, we've learned how to create notes, but now it's time to learn how to use them. There are a lot of options here, among which the user can choose the most convenient one.
Open the site where you want to log in. This can be done directly from KeePassX using the keyboard shortcut Ctrl + U or through the context menu - the “Open URL” . You can simply enter the link in your browser.
Next, copy the username using the keyboard shortcut Ctrl + B or select the corresponding item in the context menu. Paste the copied data into the login field on the site. Repeat the same operation with the password, only here the combination Ctrl + C is used.
Another option is to use auto-input. To do this, open the required site in a browser or via Ctrl + U , then in the KeePassX context menu select “Produce auto-input” or, after selecting the desired entry, press the combination Ctrl + V.
After this operation, all data will be automatically entered into a special form on the website, and the user will only have to confirm the correctness of the login and password.
Password grouping
When the number of sites used is difficult to count on fingers, it is advisable to group entries in advance according to certain criteria. To do this, go to the “Groups” and select “Add group” , then enter the name of the category and confirm all actions with the “Ok” .
You can also add a group to KeePassX through the context menu right in the main program window. It is worth noting that when you delete a category, all folders will automatically move to the trash, which will be created automatically.
Restore and export storage
KeePassX users can export any storage to a CSV file, which is supported by many other programs as well as mobile devices. To do this, go to the "Storage" and select "Export to CSV file" . Importing a previously saved recording is done through the same menu, but you need to select the appropriate item. KeePass is synchronized with the database either manually or automatically. In the latter case, you need to go to the program settings and choose the most convenient option for yourself.
Where and how to download KeePass
I recommend downloading the program only from the official website keepass.info! Make sure that this address is in the address bar, and that the page itself looks like this:
Important: for some time there was a fraudulent site online, keepass.de, which sold this free program and was in no way connected with its creator. Please note that only the site’s domain zone (.de suffix) was changed.
To download the password manager, go to the “Downloads” section and select the latest current version of the program.
At the time of writing, this is version 2.44. Click on the green “Download Now” button:
Why do we download KeePass 2.XX (where XX is the version number, at the time of writing the latest is 44), and not Portable or KeePass 1.XX? The program has several versions.
KeePass is mainly divided into versions 2.xx and 1.xx, which differ in functionality:
- 1.xx (Classic, Classic lite version) - works on all Windows, without software requirements. It is portable, but has fewer features than 2.xx.
- 2.xx (Professional, Full version) - works on all Windows, but you will need Microsoft. NET Framework 2.0, has expanded functionality.
That is, version 2.xx has more functions, for example:
- Entry history;
- Availability of a basket;
- Import your own icons;
- Ability to group and sort search results;
- Full Unicode support;
- Auto-entry TCATO with two-channel obfuscation;
- Ability to use custom scripts and so on.
Portable is a portable version of the program that does not need to be installed. It can be launched directly from the downloaded archive. It is usually intended to be stored on removable media, such as a flash drive. That is, the user only needs to download the portable version and move it to a flash drive, after which he can insert it into any computer and launch KeePass without any problems. This is why it is loved by system administrators who move between different user computers in enterprises and configure them.
On the download page below you will also find unofficial versions of KeePass created by other programmers based on open source. They will come in handy if you want to download the manager to a phone or tablet based on Android, iOS, or less popular computer operating systems. The links here lead to application pages in special stores (Play Store or App Store), but since these versions are unofficial, it would be biased if we singled out just one.
Let's go back to downloading KeePass for your computer. After selecting the version and clicking on the green “Download Now” button, we will be redirected to the download page, where we just need to wait for the timer to expire:
Select the location where we will save the program installer:
How to download KeePass
In this chapter, we will look at how to download KeePass from the official website in Russian. I recommend downloading all programs related to the security of your computer or the data stored on it exclusively from the official developer sites . By using torrents or third-party storage, you risk not only getting a virus on your PC, but even worse, leaking all your passwords to attackers.
So, download the program from their website keepass.info absolutely free. Just copy the address and paste it into the search bar in your browser.
In the window that opens, click on Downloads in the menu on the left, the following window appears:
In it we select a more recent version, in this case 2.38. On the left there are shortcuts for installing the program, on the right - for downloading the portable version . Let's consider the second download option. Click on the download icon.
Save the archive file:
Unpack it to a suitable location on your computer or flash drive. Now you can launch the program and use it, if, of course, you speak excellent English. If not, you need to Russify KeePass .
How to install KeePass
KeePass is installed like any other program. Double-click on the downloaded installer with the left mouse button, after which the installation itself will begin. First you will be asked to select the installation language:
We accept the terms of the agreement:
Select the location where the program will be installed. By default this is the system drive C:
Select the full installation:
Select additional tasks:
In the final window we make sure that everything is selected correctly:
KeePass will install in literally a second and upon completion you will see the following window:
The program is installed and its icon can be found on the desktop (if the appropriate option is selected):
Russification of KeePass
When you first launch the password manager, you will find that it is in English. It’s possible to work, but personally I’m not very comfortable doing it, and even more so for those who don’t know a word of English. Therefore, it is better to Russify it, that is, translate it into Russian.
You can do this in a couple of minutes! The program has been officially translated into more than 40 languages, including Russian. We return to the KeePass website and go to the Translations section:
We look for Russian in the list of languages and click on the floppy disk icon (save) next to the specified version of KiPas (I remind you that this is 2.44):
We are waiting for the file to download:
We look for it on the computer:
And we unpack the archive into the folder with the installed program, namely into the Languages folder:
Next, run the program and select “View” – “Change Language”:
In the window that appears, select the language Russian (Russian). If it doesn’t appear for you, it means you unpacked the archive incorrectly.
We reboot the program and see that KeePass is now completely translated into Russian:
At the moment the program is an empty gray window. As passwords are saved, it will fill out and will look something like this:
How to install the crack?
The Russification algorithm is very simple.
- First, download the cracker to your computer;
- Unpack the archive by right-clicking on it - “Extract all” - “Extract”;
- Copy the Russian.lngx file to the folder where the program was installed;
- View – Change language – select “Russian”;
- Click on the “Yes” button to reboot and the changes to take effect.
There is no need to do anything else!
Setting up KeePass. Interface overview
In this section we will understand the program interface, and I will also show you how to configure it.
After launching KeePass, the user will see the following:
Basic settings include:
- File. Here you can create a database, save it, open an existing one, change the master key to it, print it, import or export the database to another format;
- Group. Allows you to create a group of passwords. For example, social networks, forums, and so on;
- Record. Section for working with database records. That is, it allows you to copy passwords and logins, add and change entries, and so on. In KeePass, a record contains information about the login and password for a specific site;
- Search. To search for passwords;
- View. Here you can customize the program interface. For example, remove the toolbar (marked as a quick access toolbar in the picture above), set the location of passwords, and so on;
- Service. Here you can use the built-in password generator and download plugins (add-ons) for the program created by other users;
- Reference. Information about the password manager and its creator.
Since we do not yet have a single database, many functions are not active. First you need to configure the program. To do this, go to “Service” - “Options”:
In Security , check the boxes next to the following settings:
This will significantly improve security, especially if your device is hacked.
In the Policy , you will see many permissions. The good news is, of course, you need to disable them all, but I only removed “Export-without a key” and “Print-without a key”. The user can change all the settings here at will.
In the Interface you can play with the appearance of the program, fonts, buttons and other elements. These settings do not affect functionality, so set them at your discretion.
In Integration , hotkeys are configured. You can also enable the “Run KeePass with Windows” option and enable KDBX file association so that password sheets can be opened from a computer without first launching KeePass.
In Advanced I set the settings like this:.
We've sorted out the installation, Russification and settings! Now let's start creating a password sheet and work with it.
Setting up KeePass
To configure KeePass in the menu, go to “ Tools ” → “ Options ”:
On the “ Security ” tab, it is recommended to enable database locking during prolonged inactivity and when the computer goes into sleep mode.
On the “ Interface ” tab you can very finely customize the appearance of the program to suit your taste:
How to use the program
In this section we will take a closer look at how to use KeePass. Let's create the first database, add login and password entries to it, and use the program's capabilities to facilitate authorization on the site.
Database
A database (DB) is a place in which many logins and passwords for various sites can be stored simultaneously. You can create any number of databases and give them different names. I only have one database. But for some it will be more convenient to store data in different databases. In this case, passwords and logins can be grouped in one database, for example:
- Social Networks Group;
- Electronic Wallets Group;
- etc.
To create a database, click on the white sheet on the quick access panel (“Create”) or on the same button in the “File” menu:
In the window that appears, click “OK” and select the location on the computer where the database will be stored.
We come up with a master password for the database. Let me remind you again: a master password is needed to access the database being created. It is not stored anywhere, so it must be remembered. The master password can contain both English and Russian letters, and you can also use symbols, numbers, spaces, dots and any combinations with them. The program will tell you whether it is reliable (depending on the number of characters):
Next, let's start creating the database. In the General , you can come up with a name, description, and optionally choose a color:
In the Security , Compression and Recycle Bin , I recommend leaving everything as it is:
In the Advanced , you can set the master password settings, namely its change over time, to enhance security. For example, I have to change my master password every 90 days and the program regularly reminds me of this. It doesn’t even just remind you, it simply won’t let you work with the database until you change your old password.
Click on “Ok”! Next, KeePass will prompt you to print an emergency sheet on a printer, which will indicate the master password. Above, I already recommended saving somewhere, for example, in your phone in notes, tips like:
- Your mother's maiden name;
- My nickname at school;
- My first car;
- A verse from a favorite song from the 90s.
These tips can also be printed out and attached with magnets to the refrigerator or any other visible place.
As a result of creating a database in KeePass, you will see the following:
Note: don't forget to click save! If you have disabled automatic saving in the settings, you will have to do it manually. I have automatic saving when exiting the database. This is very convenient, since at the beginning of using the program I had to manually save and there were times when I forgot to do this and the passwords were not saved, which caused a lot of inconvenience.
Now you can create groups and add entries with logins and passwords from various sites.
Groups
A group is a “folder” in our database in which you can combine records according to various criteria. They are needed solely for order, so that the user does not get confused. In the newly created database you will see the following groups:
- Are common;
- OS (operating system);
- Net;
- Internet;
- Mail;
- Accounts.
You can delete all of them and start from scratch. Let's do this (you need to right-click and click "Delete group"), and also create three "folders": social networks, email and forums.
Note: After deleting groups and entries, they are placed in the trash. If desired, they can be restored or deleted permanently.
To create, right-click on “Database” and select “Add Group”. In the new window we indicate the name, and you can additionally change the icon:
In other sections (Notes, Behavior, Autotyping, Plugin Data) nothing needs to be changed (if the user does not want it).
As a result, a new group will appear in the database:
Let's create others in the same way, but change the icons:
If you want to change a group (name, icon), right-click on it and select “Change group”:
Now let's try to create a data record!
How to use KeePass?
We decided to write a small guide that will help you take your first steps and avoid the most common mistakes. Repeat after us and you will quickly understand the basic subtleties and nuances.
- First, let's create our database. Click on “File” - “Create” - “Ok”;
- Select a location, enter a name and click on “Save”;
- Create a master password, you will need it to open the application;
- You can leave everything as it is in the database parameters;
- You can print out the emergency sheet if you wish. But remember that the master password will be visible in it;
- Now on the left you will be able to see the categories. Create a new one, for example “Social networks”. To do this you need to: right mouse button – create a new group;
- Then, in the right field, press the right button again and “Add entry” (or Ctrl+i);
- 8. Specify the name (for example VKontakte), login and password;
Now repeat this operation every time you need to save a password for a site or service.
Other KeePass Features
We've covered all the main features of KeePass, but that's not all! It also has other features that may be useful to you.
Password generator
KeePass has a built-in password generator. It will help you generate a strong, long password. Go to “Service” - “Create password”:
And select settings. You can create them yourself or choose a ready-made profile.
Next, select the password length and what characters should be used when generating it:
After clicking the “Ok” button, an entry with only a password will appear in the database:
By editing the recording, you can see what the program has come up with for us. Examples of other passwords, according to the settings, can be viewed in “Tools” - “Create a password” - “View” tab:
Checking password strength
KeePass can check the strength of your passwords and display this information in an easy-to-read format. To do this, go to “Search” - “Password Quality”:
And we see the following table:
I have a weak password for the earning site ForumOk (brown), and a medium password for non-essential email (yellow). Those passwords that the program itself created are strong (green).
Working with the database
After creating the database, you will see many empty groups. You can delete them manually, or use built-in functions designed to bring the database in order. For example, remove empty groups, duplicate entries, and so on.
To do this, go to “Service” - “Database” and select the desired option:
In “Base Maintenance...” you can configure automatic deletion of history, as well as view information on deleted records.
What is this program?
KeePass Password Safe solves several problems: the program not only stores already created passwords, but also helps to generate a unique complex password for each account. The main advantage of the utility is that the user no longer needs to think about where and how to store passwords in order not to lose data and prevent their transfer to third parties.
KeePass Password Safe stores materials in an encrypted database, which is locked with one master key or a special file.
KeePass for other operating systems
What does KeePass look like for other operating systems? Will this instruction work for them? Now we'll find out!
Linux, Mac OS, Ubuntu and others
For other operating systems, KeePass is no different - the programs have identical interfaces and functionality. But installation may vary.
For Linux and Mac OS, just like for Windows, you need to download the .exe file from the Download page and perform the usual installation. For Linux Ubuntu builds, this installation is done using the terminal and commands.
Let's look at an example for Ubuntu. On the Download page we look for this version:
Afterwards you will be taken to the forum where there are commands for installation:
By entering these commands sequentially into the terminal, you will install KeePass and to start you will need to enter sudo open keepass2. Result:
As you can see, KeePass for Ubuntu has the same interface! I hope you won't have any difficulties installing for other operating systems. Thanks to the fact that we moved the database to cloud storage, you just need to access it from this system and that’s it!
KeepPass2Android
Keepass2Android is an open source password manager for Android. It allows you to read and edit .kdbx files, the database format of the popular KeePass 2.x program for Windows and other computer operating systems.
The user interface is based on Keepassdroid (by Brian Pellin), ported from Java to Mono for Android. Internal algorithms use original KeePass libraries to access files to ensure maximum compatibility with the original file format.
Main features of the application
- read/write .kdbx files (KeePass 2.x)
- integration with almost any Android browser
- Quick Unlock: Unlock the database by entering the entire password, open it again by entering just a few characters
- Access to files in cloud storage (Dropbox, Google Drive, SkyDrive, FTP, WebDAV). Use "Keepass2Android Offline" if you don't need this feature.
- Built-in software keyboard: Switch to this keyboard to enter data for torization. This will protect you from clipboard password sniffers
- Support for editing records, including additional string fields, attachments, tags, etc.
- search dialog with all the features present in KeePass 2.x.
To install on your phone, follow the link.
Advantages and disadvantages of the program
Summarizing all of the above, I will highlight the main advantages of the program and its disadvantages in a short list. Pros:
- Reliable data protection due to the use of encryption and caching algorithms, multi-factor authentication;
- Cross-platform, that is, support for all current computer and mobile platforms;
- Open source code, which allows you to verify the security of the program. Based on it, third-party developers create plugins for the program that expand its capabilities;
- Availability – KeePass is distributed absolutely free of charge;
- There is a browser extension;
- The presence of a portable version, which allows you not to store the program on your computer at all;
- There is a full translation into Russian;
- Password generator;
- There is protection against keylogging, that is, against tracking keystrokes;
There are some disadvantages, but they are not significant:
- There is no automatic password capture feature . By this we mean the password manager's ability to automatically record login information in the Username and Password fields. In KeePass, this is highlighted as a function that needs to be activated using hot keys;
- You have to do more actions compared to competitors, for example, LastPass. However, this disadvantage is offset by a high level of security, since passwords in LastPass are stored on the company’s servers, and in KeePass passwords are written in an encrypted file that can be stored on your computer, flash drive or cloud.
In my opinion, the program has many more advantages than disadvantages, and the latter can be solved using third-party plugins.
Key features and functionality of KeePass
- Using AES and Twofish algorithms to encrypt password databases;
- Encrypt the entire database (not just the password fields), including usernames, notes, etc.;
- The SHA-256 algorithm is used to hash the master key;
- Process memory protection – your passwords are encrypted while KeePass is running;
- Secure in-memory streams – when loading the internal XML format, passwords are encrypted using the session key;
- Protection against keyloggers;
- Export a list of passwords to various formats such as TXT, HTML, XML and CSV;
- Import data from CSV files (all): RoboForm, KeePassX, etc.;
- Database protection using a master password or file key (can be used simultaneously);
- Availability of a portable version – KeePass Portable;
- The password database consists of a single file that can be easily transferred from one computer to another;
- Powerful internal viewer/editor for text files, images and documents;
- Automatically clears the Windows clipboard some time after you have copied one of your passwords;
- Password generator;
- Support for plugins that expand the capabilities of the program;
- Multilingual localization – Russian, Ukrainian, Belarusian and other languages are supported.
Similar programs for storing passwords
If you still don’t like KeePass, then pay attention to similar programs for storing passwords, the best of which we have listed here.
- LastPass is one of the most popular competitors, which is convenient primarily in conjunction with browsers. When registering on new sites, the password manager offers to save registration data to its database. There is a password generator, as well as autofill. I use both KeePass and LastPass. In the first one I store the most important information, for example, bank logins and passwords. In the second I store access to different sites and forums.
- RoboForm is a popular password manager with a modern interface, with built-in Russian language. Paid, but there is a free version. Built-in protection against phishing attacks that recognizes unsafe links (and even those that have been faked as original) and warns the user about it.
- 1Password is another excellent program, translated into Russian and has a user-friendly interface. Capable of identifying unsafe sites and weak passwords. There is support for two-factor authentication. The program is paid, but there is a free trial period.
- Dashlane is a password manager from foreign developers, which also has its own features. Firstly, the program can store receipts from online purchases, as well as other personal information (card numbers, account numbers, and so on). Secondly, it identifies weak passwords and prompts the user to change them. Thirdly, if an account on the site is hacked, Dashlane will notify the owner.
- SafeInCloud is an excellent analogue with a password generator, built-in cloud synchronization, biometric authentication, and automatic filling of data in browsers and applications. Developed by Russian programmers.
How to use?
Let's figure out how to start using KeePass Password Safe.
- First, let's create a common key file.
- We create a master key. It is needed to access the password database and must be reliable.
- Select the category for which you are creating a password. For example, the Internet or mail. Click on the “add entry” icon located at the top.
- Enter the name or address of the site, login and password for it, click OK.
- Open the desired website, go to KeePass, select the desired file and click on autodial. The program automatically enters the saved password and the user logs into the site/forum/email under his/her name.
Since the KeePass Password Safe utility is designed to ensure the security of user passwords and keys , it should be handled with care, keeping in mind some rules:
- To access the KeePass Password Safe database, the most complex password must be used.
- The master password cannot be stored in a common database.
- It is recommended to create two copies of KeePass with password files. This is necessary so that if the flash drive is lost or the computer breaks down, the data is not irretrievably lost.
- The KeePass file itself should not be kept on your desktop; on the contrary, it should be kept as far away from prying eyes as possible.
By following these simple rules, you can not worry about the security of your data and use the manager comfortably.
Answers to readers' questions
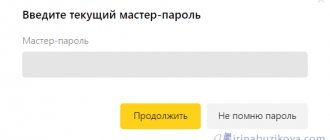
How to change the master password for a database
To do this, you need to open this database, having first entered its password and in the “File” section select “Change master key”, and then enter a new key:
How many databases can you create?
As many as you want! As I said, a database is a file, and a computer can have many files. The only limit is space on your hard drive or in the cloud (but the weight of one database is only a few kilobytes).
How to delete a database
You need to find the database file and delete it like any other file on your computer.
How to update keepass portable
KeePass Portable is the same program, but you can launch it directly from the archive. In terms of functionality, it is no different, so the update is carried out in exactly the same way (see picture below).
What to do if you lost your database, how to find it
If you reinstalled the system, or unintentionally permanently deleted the database, you will not be able to restore it; KeePass does not provide such a function. Therefore, you will have to create a new one.
Likewise, if you forget the master password, you will also not be able to access the database.
How does the KeePass password manager work?
The manager has many functions for more precise settings and personalization, but most of them are optional.
IT Expo 2020
October 8, Online, Free
tproger.ru
Events and courses on tproger.ru
The principle of operation is simple: you have one master password, which is needed to access the database with your other passwords. You can record passwords you create in the manager, or generate them automatically - then they will be a random sequence of characters, for example YF2JOekNoozosT8Zl8W1. The second option is usually safer.
Don't worry, you won't have to rewrite them manually - the saved passwords are copied from the program and pasted into the required field.