What is AutoCorrect
See also: “How to make an amount in words with kopecks in Excel: add-on, formula”
Excel keeps in its memory a list of common mistakes that can be made. When the user enters an error from this list, the program will automatically replace it with the correct value. This is exactly what AutoCorrect is for, and this is the principle of its operation.
Using this tool, the following main types of errors are corrected:
- two consecutive capital letters in a word
- starting a new sentence with a lowercase letter
- errors due to Caps Lock enabled
- other typical typos and errors
How to enable autocorrect on Android
If you change your mind later, you can turn AutoCorrect back on at any time.
Just follow the same instructions as above, setting up the last step:
- Open the Settings app and go to System > Languages & input > Virtual keyboard > Gboard. Or open your keyboard, hold the comma key and tap the gear icon.
Again, if you're using a different Android keyboard, you may find that the instructions may be different. Any installed keyboard should appear under the Virtual Keyboard section settings . Open it from there, then you will need to find the appropriate settings.
SwiftKey, for example, has AutoCorrect under Typing > Typing and AutoCorrect > AutoCorrect .
Enable and disable autocorrect
This function is initially enabled in the program, but in some cases it needs to be disabled (permanently or temporarily). Let’s say we need to intentionally make mistakes in some words or use symbols that the program recognizes as erroneous and replaces them, although we don’t want this. If we change the character that was corrected by autocorrect to the one we need, the function will not perform the replacement again. This method is certainly suitable for isolated cases. Otherwise, to save time and effort, the best solution would be to disable the AutoCorrect function.
- Go to the “File” menu.
- In the side menu on the left, go to “Options”.
- In the settings window that opens, click on the “Spelling” subsection. On the right side of the window, click the “AutoCorrect Options” button.
- A window with the function settings will appear on the screen. Uncheck the box next to the “Replace as you type” option, and then click OK.
- The program will return us back to the main window with parameters, where we press the OK button again.
Note: to reactivate the function, return the checkbox to its place, and then also save the changes by pressing the OK button.
How to disable automatic language switching in Windows 10
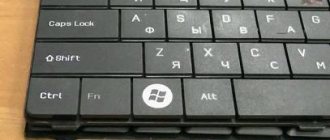
The first thing a person remembers when becoming a PC user is the key combination Alt + Shift or Ctrl + Shift. It is responsible for changing the keyboard layout, or rather, changing the input language. Sometimes, having forgotten about the current setting, the user writes and writes something, and then, looking at the monitor, falls into despair. The entire text resembles a set of letters that must be deleted and retyped. To prevent this kind of misunderstanding from preventing the user of Windows 10 (and earlier builds of Windows) from working with text editors, the developers of some software have provided the ability to automatically switch the language to the one that was already in use. Sometimes such concern for convenience causes confusion and the user does not know how to disable automatic language switching in Windows 10 and simultaneously type in both Russian and English.
Disable auto-switching in Windows 10 programs and settings
Windows 10 developers have given the user the opportunity to choose how the system behaves with the text input language in a particular application. Unfortunately, not all text editors support automatic language switching. However, in the input method settings of the operating system itself, you can specify the need to remember the desired language for each application. To do this, you should perform the following manipulations:
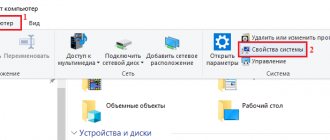
- Right-click on the Start icon and select Control Panel.
- A new window will appear. Select the “Language” section.
- A window with language settings will appear. Click on the “Advanced options” link. Here we put o if you want to enable automatic language switching or uncheck the box to deactivate the function.
After making changes in this section of the Control Panel, automatic language switching can be turned off or on in a specific program. Let's look at an example using the Word program, as it is the program most used by owners of PCs with Windows 10.
- Open Microsoft Word. Click “File”, “Options”.
- A small window will appear. In the menu on the left, select “Advanced” and check or uncheck (depending on the purpose) the item “Automatically switch keyboard layout according to the language of the surrounding text.”
- Save the changes. Now, auto-switching will not work and you will be able to change the input language yourself (or vice versa).
It is important to note that only in editors that allow you to create text documents, you can enable or disable language autosave. This cannot be done in other programs.
A programmatic way to disable auto-switching of the input language
You can enable or disable automatic language switching when entering text using the Punto Switcher program. This program will monitor your typing and, if necessary, change the input language. At the same time, it is important to note that the program switches the language not only in text editors, but also in games, programs and Windows itself. You can configure it as follows.
Install the program. We launch it on our PC. Call up the settings. Select “General” and indicate when and how to change the keyboard layout.
By going to the “Hot Keys” section, you can configure language switching control. It is enough to double-click to select a parameter and set a key combination for it.
If you do not want automatic language switching to work in some program, you should select the “Exception Programs” section and add software in which automatic layout switching will be disabled.
Thus, using such a lightweight program, automatic language switching in Windows 10 and installed programs can be turned on or off. The main thing is to set the necessary parameters correctly.
Automatic date replacement and possible problems
Sometimes it happens that while entering a number with dots, the program corrects it to the date. Let's say we entered the number 3.19 into an empty cell.
After we press the Enter key, we will receive data in the form of month and year.
We need to save the original data that we entered in the cell. In such situations, there is no need to deactivate autocorrect. Here's what we do:
- First, select the range of cells in which we want to add the necessary information in the form of numbers with dots. Then, being in the “Home” tab, go to the “Number” tools section, where we click on the current cell format option.
- In the list that opens, select the “Text” item.
- Now we can safely enter data into cells in the form of numbers with dots.
Note: you need to remember that numbers in cells with a text format cannot participate in calculations, since they are perceived by the program differently and the final result will be distorted.
Editing the autocorrect dictionary
As we mentioned earlier, the purpose of autocorrect is to help correct mistakes or typos. The program initially provides a standard list of correspondences between words and symbols for performing replacements, however, the user has the opportunity to add his own options.
- Again, go to the window with the AutoCorrect parameters, following the steps described above (the “File” menu – the “Options” section – the “Spelling” subsection – the “AutoCorrect Options” button).
- In the “Replace” field we write a symbol (word), which will later be identified by the program as an error. In the “To” field, indicate the value that will be used as a replacement. When ready, click the “Add” button.
- As a result, we can add to this dictionary all the most common typos and mistakes that we make (if they are not in the original list), so as not to waste time on further correction.
Atomase replacement with mathematical symbols
Go to the tab of the same name in the AutoCorrect options. Here we will find a list of values that will be replaced by the program with mathematical symbols. This option is extremely useful when you need to enter a character that is not on the keyboard. For example, to enter the character “α” (alpha), it will be enough to type “\alpha”, after which the program will substitute the required character in place of this value. Other characters are entered in a similar manner.
You can also add your own options to this list.
Removing a combination from AutoCorrect
To remove an unnecessary combination of words or symbols from the autocorrect list, simply select it with a mouse click and then click the “Delete” button.
Also, by highlighting a specific match, instead of deleting it, you can simply adjust one of its fields.
Instructions
When working on a computer, the need to switch input languages arises quite often - for example, while searching on the Internet. Therefore, it is not recommended to disable this option. In addition, it does not interfere with comfortable work in any selected layout.
If you still decide to disable language selection, open “Start” - “Control Panel” - “Regional and Language Options”. Select the "Languages" tab, click the "More details" button. In the new window, click the “Keyboard Options” button, then “Change keyboard shortcuts” and uncheck the “Switch input languages” and “Switch keyboard layouts” checkboxes. Save your changes by clicking OK.
If you want to remove the layout indicator from the system tray, open the Task Manager (Ctrl + Alt + Del) and stop the ctfmon.exe process. Then delete the entry for this file from your startup folder. The most convenient way to do this is using the Aida64 (Everest) program. Open “Programs” - “Startup”, select ctfmon.exe in the list and click the “Delete” button at the top of the window.
You can also use CCleaner to disable or remove ctfmon.exe. Launch it, open “Tools” - “Startup”. Select the line with ctfmon.exe and click the “Disable” (recommended) or “Delete” button.
If you do not like the standard appearance of the keyboard layout switcher, replace it (after removing ctfmon.exe from startup) with the Punto Switcher utility. You can set it to display the layout by showing the Russian or US flag, which is very convenient - to determine the layout, just glance at the tray. In the program settings, select the items “Make the icon in the form of country flags” and “Always show the icon at full brightness.” You can download Punto Switcher for Windows XP and Windows 7 from the link: https://download.yandex.ru/punto/PuntoSwitcherSetup.exe.
Attention, TODAY only!
Everything interesting
You can switch the keyboard layout on your computer in various ways. However, for novice users, simply switching the keyboard to Russian may cause some difficulties. To solve this problem, you can try using...
Each PC user has the opportunity to personalize the keyboard layout. This can be done using the appropriate interface. Also today there are specialized programs that automatically...
To change the keyboard layout in the operating system, there are “hot keys”. Most often they are used for this operation, although you can switch the input language using the mouse. In Windows OS there is also the ability to change...
If there are failures in the Windows operating system, the icon for switching keyboard layouts may disappear from the tray. To avoid inconvenience when working with texts, you need to restore the language bar settings. Instructions 1Failures in the operating room...
Working on a computer is most comfortable and productive when it is configured correctly, including many different parameters. In the event that the user has to deal with texts, it is very important to configure the work correctly...
The language bar in operating systems of the Windows family is used to switch layouts by pressing the Ctrl + Shift or Alt + Shift key combination. But sometimes this panel disappears due to accidental deletion or system failures. ...
A keyboard layout is a table of correspondence between keys and letters of the alphabet. Switching from one correspondence table to another is most often used to change the input language, but this is not necessary - even for the Russian language there are several...
It is very inconvenient when you work on several computers and all of them have different keyboard shortcuts for switching the keyboard layout and input language. However, it won't take much time to set them up equally. Instructions 1In order to...
Automatic language change is a fairly convenient function: the user does not need to be distracted by switching layouts manually. But sometimes it does not allow you to enter text correctly. To disable automatic language change, you must perform...
Probably, many users have encountered the situation of being unable to change the input language in safe mode. The standard methods do not work, and there is no language bar icon either. You can try using almost all possible combinations...
Automatically switching languages when typing on a computer is possible using the Punto Switcher utility. On the one hand, this is convenient - you don’t need to manually switch to the desired language every time, but sometimes, when you have to type text with a large...
How to switch language on keyboard
Let's go to “Start” -> “Control Panel” -> “Regional and Language Options”. In the window that appears at the top, select the “Languages and Keyboards” tab and click the “Change Keyboard” button there. On the “General” tab of the window that appears, you have the opportunity to select additional languages, if, of course, you are going to use them. To do this, click the “Add” button. Most users use only English and Russian. Also on this tab you can set which language will be the default when Windows boots.
In order to configure the method of switching between languages, you need to go to the “Keyboard Switching” tab. Then click the “Change keyboard shortcut” button. Another window appears in which you can change the keyboard shortcut to change the input language, which is what we actually need. We select a key combination that is convenient for us, for example, ALT on the left + SHIFT, click OK, and in the previous window click “Apply” to save the new settings for switching between languages.
Now let's try to switch the language on the keyboard. Let's open a text editor, for example, notepad. Let's type some word in Russian. Then press ALT+SHIFT (it’s convenient to first hold SHIFT and then press ALT while holding SHIFT) and try to type a word in the switched language.
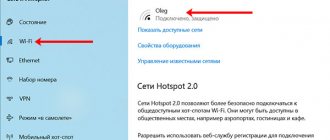
Switching using the keys on your keyboard is the most convenient and fastest way to switch between languages, but there is another way. If you look at the panel at the bottom where the “Start” button is located, on the opposite side of this button, that is, on the right, you can see what language you currently have enabled, for example RU. If you click on this RU, a small window will open where you can switch to another language. If you do not see an indicator of the language being used on the right, then you probably do not have the language bar turned on. In order to enable it, you need to right-click on the bottom panel where the “Start” button is located, no matter where it is, then select “Panel” in the menu that opens, and in the window that appears, check the box next to “Language bar” . As a result, the language bar should appear.
If your input language automatically switches, it's most likely Punto Switcher. In the program settings, you can assign hotkeys to “enable/disable” auto-switching and cancel layout conversion.
Setting up the main parameters of autoreplacement
The main parameters include all the settings that can be made in the “AutoCorrect” tab. The following options are initially activated in the program:
- correction of two capital letters at the beginning of a word;
- correcting the first letter of a sentence to capitalize;
- indicating the days of the week with a capital letter;
- eliminating errors caused by accidentally pressing the Caps Look key.
To deactivate these options, simply uncheck the box next to them, and then click OK to save the changes.
Working with Exceptions
The program provides a special dictionary that stores words and symbols for which autocorrect will not work, even if this function is enabled and there is a necessary match in the main parameters.
To get into this dictionary, click on the “Exceptions” button.
The window that appears has two tabs:
First letter
- Here is a list of words after which the “dot” symbol (“.”) should not be perceived by the program as the end of a sentence, which means that the next word will begin with a lowercase letter. Basically, this applies to all kinds of abbreviations, for example, kg., g., rub., kop. etc.
- In the top field we can enter our value, which will be added to the list of exceptions after clicking the corresponding button.
- Also, by selecting a specific value from the list, you can edit or delete it.
TWO Capital letters
Values from the list in this tab, similar to the list in the “First Letter” tab, will not be affected by autocorrect. Here we can also add, change or delete new elements.
Problems with spell checking
Now we will look at several cases when the check does not work as expected or does not turn on at all.
What to do if everything is highlighted in red
If a text editor underlines all words in a row with a red wavy line, then there are 2 possible reasons:
- You are writing text on the wrong keyboard layout, for example, typing Russian words on the Ukrainian layout.
- The language specified for spell checking is not the correct one.
To change the language, click on the current value at the bottom of the screen and select the desired option.
Why errors are not highlighted and what to do
If Word does not react in any way to obvious problems, then you need to work with the settings and turn on spell checking. To do this, click on the “File” menu item.
In the list that appears on the left, we find the “Options” or “Word Options” section. Usually it is at the very bottom.
Now go to the “Spelling” subsection. If you want the editor to help you and correct errors, you must check the boxes:
- check spelling while typing;
- mark grammatical errors;
- When checking spelling, also check your grammar.
I also always add the item “Complex words”.
Check that the file you are working on is not included in the exceptions.